

User Guide
Page 2
...15 minutes digital recording time.* • Caller ID shows you will need to provide a copy of your Motorola product, you who is not designed for your new Motorola Phone! to your original dated sales receipt for making emergency telephone calls when the power fails. Alternative arrangements ...be made if emergency telephone call : US and Canada: 1-888-331-3383 On the Web: www.motorola.com • 30 name and number phonebook. • Answering machine with up to 5 cordless handsets to a single base. • Make internal calls, transfer external calls, hold 3-way conversation between ...
...15 minutes digital recording time.* • Caller ID shows you will need to provide a copy of your Motorola product, you who is not designed for your new Motorola Phone! to your original dated sales receipt for making emergency telephone calls when the power fails. Alternative arrangements ...be made if emergency telephone call : US and Canada: 1-888-331-3383 On the Web: www.motorola.com • 30 name and number phonebook. • Answering machine with up to 5 cordless handsets to a single base. • Make internal calls, transfer external calls, hold 3-way conversation between ...
User Guide
Page 3
...Cover • Wall-mount Bracket • Power Adapter • Telephone Line Cord • User's Guide • Quick Start Guide In multi-handset packs, you will need to get the most from your phone. This User's Guide provides you with power adapter units, additional rechargeable battery packs and... 'Getting Started', on the next few pages. This equipment is not designed to make your first call you will find one or more additional handsets, chargers with all the information you need to emergency services. Alternative arrangements should be made for access to set up your phone.
...Cover • Wall-mount Bracket • Power Adapter • Telephone Line Cord • User's Guide • Quick Start Guide In multi-handset packs, you will need to get the most from your phone. This User's Guide provides you with power adapter units, additional rechargeable battery packs and... 'Getting Started', on the next few pages. This equipment is not designed to make your first call you will find one or more additional handsets, chargers with all the information you need to emergency services. Alternative arrangements should be made for access to set up your phone.
User Guide
Page 4
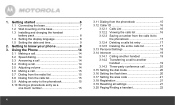
... mode 20 3.16 Setting the flash time 20 3.17 Setting the area code 21 3.18 Registration 21 3.19 Resetting all settings 21 3.20 Paging/Finding a handset 22 Using the Phone 14 3.1 Making a call 14 3.2 Speed dialing 14 3.3 Answering a call 14 3.4 Ending a call 14 3.5 Adjusting volume 14 3.6... Deleting a calls list entry 17 3.12.5 Deleting the entire calls list 17 3.13 Personal Settings 18 3.14 Intercom 19 3.14.1 Calling another handset 19 3.14.2 Transferring a call to know your phone 9 3. 1. Getting started 6 1.1 Connecting the base 7 1.2 Wall mounting on the base 7 1.3 ...
... mode 20 3.16 Setting the flash time 20 3.17 Setting the area code 21 3.18 Registration 21 3.19 Resetting all settings 21 3.20 Paging/Finding a handset 22 Using the Phone 14 3.1 Making a call 14 3.2 Speed dialing 14 3.3 Answering a call 14 3.4 Ending a call 14 3.5 Adjusting volume 14 3.6... Deleting a calls list entry 17 3.12.5 Deleting the entire calls list 17 3.13 Personal Settings 18 3.14 Intercom 19 3.14.1 Calling another handset 19 3.14.2 Transferring a call to know your phone 9 3. 1. Getting started 6 1.1 Connecting the base 7 1.2 Wall mounting on the base 7 1.3 ...
User Guide
Page 6
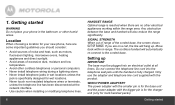
...8226; Avoid areas of the corded base, the screen shows OUT OF RANGE. Setting up . Any obstruction between the base and handset will automatically re-connect to the corded base. SIGNAL STRENGTH When out of range of excessive dust, moisture and low temperature. •...connect the telephone line cord into an electrical outlet at the network interface. • Use caution when installing or modifying telephone lines. 6 HANDSET RANGE Optimal range is reached when there are no other cordless telephones or personal computers. • Never install telephone wiring during a lightning ...
...8226; Avoid areas of the corded base, the screen shows OUT OF RANGE. Setting up . Any obstruction between the base and handset will automatically re-connect to the corded base. SIGNAL STRENGTH When out of range of excessive dust, moisture and low temperature. •...connect the telephone line cord into an electrical outlet at the network interface. • Use caution when installing or modifying telephone lines. 6 HANDSET RANGE Optimal range is reached when there are no other cordless telephones or personal computers. • Never install telephone wiring during a lightning ...
User Guide
Page 7
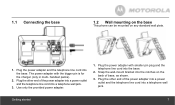
... bigger pin is for the charger (only in multi- The power adapter with smaller pin plug and the telephone line cord into a telephone wall jack. 3. handset packs). 2.
... bigger pin is for the charger (only in multi- The power adapter with smaller pin plug and the telephone line cord into a telephone wall jack. 3. handset packs). 2.
User Guide
Page 8
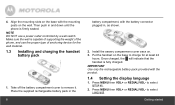
... with the battery connector plugged in and down until the phone is firmly seated. to charge for the wall material. 1.3 Installing and charging the handset battery pack 1. Make sure the wall is fully charged. Install the battery compartment cover back on the base to select LANGUAGE. 4. Align the ...mounting slots on the wall. Put the handset on . 3. Press MENU then VOL+ or REDIAL/VOL- NOTE DO NOT use the proper type of the phone, and use a power outlet controlled...
... with the battery connector plugged in and down until the phone is firmly seated. to charge for the wall material. 1.3 Installing and charging the handset battery pack 1. Make sure the wall is fully charged. Install the battery compartment cover back on the base to select LANGUAGE. 4. Align the ...mounting slots on the wall. Put the handset on . 3. Press MENU then VOL+ or REDIAL/VOL- NOTE DO NOT use the proper type of the phone, and use a power outlet controlled...
User Guide
Page 9
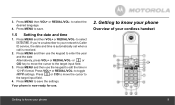
... to the target input field. 3. Press or CID to move the cursor to save the settings. Getting to know your phone Overview of your cordless handset Getting to know your network's Caller ID service, the date and time is automatically set when a call is now ready for use the keypad to...
... to the target input field. 3. Press or CID to move the cursor to save the settings. Getting to know your phone Overview of your cordless handset Getting to know your network's Caller ID service, the date and time is automatically set when a call is now ready for use the keypad to...

User Guide
Page 10
... list entry: Press to know your phone b) In pre-dial mode / phonebook / calls list / redial list entry / answering machine mode: Press to exit to another handset. c) During a call: Press to transfer the call . Getting to save the settings.
... list entry: Press to know your phone b) In pre-dial mode / phonebook / calls list / redial list entry / answering machine mode: Press to exit to another handset. c) During a call: Press to transfer the call . Getting to save the settings.
User Guide
Page 12
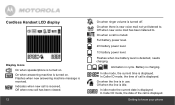
... is muted. On when a call is displayed. Flashes when low battery level is received. Flashes when new answering machine message is detected, needs charging. Cordless Handset LCD display Display Icons On when speakerphone is turned on . On when answering machine is turned on .
... is muted. On when a call is displayed. Flashes when low battery level is received. Flashes when new answering machine message is detected, needs charging. Cordless Handset LCD display Display Icons On when speakerphone is turned on . On when answering machine is turned on .
User Guide
Page 13
... the button again, or any key on and off page signal. GREEN a) On when the handset is no voice message in the answering machine. 09 Flash in total. c) Flashing briefly on the handset, to find / page all registered handsets. there are 9 answering machine messages in idle: Indicates the number of an incoming call...
... the button again, or any key on and off page signal. GREEN a) On when the handset is no voice message in the answering machine. 09 Flash in total. c) Flashing briefly on the handset, to find / page all registered handsets. there are 9 answering machine messages in idle: Indicates the number of an incoming call...
User Guide
Page 14
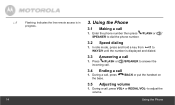
... from /1 to dial the phone number. 3.2 Speed dialing 1. to answer the 3.4 Ending a call 1. Using the Phone 3.1 Making a call , press the base. /BACK or put the handset on 3.5 Adjusting volume 1. LA 14 Flashing: Indicates the line remote access is displayed and dialed. 3.3 Answering a call 1. Press /FLASH or incoming call , press VOL+ or...
... from /1 to dial the phone number. 3.2 Speed dialing 1. to answer the 3.4 Ending a call 1. Using the Phone 3.1 Making a call , press the base. /BACK or put the handset on 3.5 Adjusting volume 1. LA 14 Flashing: Indicates the line remote access is displayed and dialed. 3.3 Answering a call 1. Press /FLASH or incoming call , press VOL+ or...

User Guide
Page 16
...first letter of missed and received calls. Some operators may be stored. • If you receive more than one call from a withheld telephone number, the handset will display PRIVATE. • Information about incoming calls will be displayed in the list. • Details of the call . Details include the date and...in chronological order with B, etc. 3.12 Caller ID If you wish to the base. If one in the display on (for incoming calls, the handset will display UNAVAILABLE. • If the incoming call is from the same number, only the most recent call at the top of the call (if...
...first letter of missed and received calls. Some operators may be stored. • If you receive more than one call from a withheld telephone number, the handset will display PRIVATE. • Information about incoming calls will be displayed in the list. • Details of the call . Details include the date and...in chronological order with B, etc. 3.12 Caller ID If you wish to the base. If one in the display on (for incoming calls, the handset will display UNAVAILABLE. • If the incoming call is from the same number, only the most recent call at the top of the call (if...

User Guide
Page 18
... DELETE DELETE ALL PB CAPACITY SPEED DIAL RINGER TONE DIAL MODE RINGER VOLUME FLASH TIME KEY TONE AREA CODE LOW BATT TONE OUT RANGE TONE HANDSET NAME LANGUAGE LCD CONTRAST REGISTRATION ANSWERER ON (If CLR VOICE MAIL answering machine is off) ALL SETTINGS or ANSWERER OFF (If answering machine is on...
... DELETE DELETE ALL PB CAPACITY SPEED DIAL RINGER TONE DIAL MODE RINGER VOLUME FLASH TIME KEY TONE AREA CODE LOW BATT TONE OUT RANGE TONE HANDSET NAME LANGUAGE LCD CONTRAST REGISTRATION ANSWERER ON (If CLR VOICE MAIL answering machine is off) ALL SETTINGS or ANSWERER OFF (If answering machine is on...
User Guide
Page 19
... on hold. 2. Your call . 3. Press VOL+ or REDIAL/VOL- to select the handset you to make internal calls, transfer external calls from one handset to another handset, and use the conference option. 3.14.1 Calling another handset 1. Using the Phone 19 Press MENU for 30 seconds, the display will be available. If...answer, press MUTE to talk to transfer the call . It allows you want to standby when the handset is placed on the handset for opening sub-menus and/or saving. to select the handset you do not press any button on the base or charger. 3.14 Intercom This feature is an...
... on hold. 2. Your call . 3. Press VOL+ or REDIAL/VOL- to select the handset you to make internal calls, transfer external calls from one handset to another handset, and use the conference option. 3.14.1 Calling another handset 1. Using the Phone 19 Press MENU for 30 seconds, the display will be available. If...answer, press MUTE to talk to transfer the call . It allows you want to standby when the handset is placed on the handset for opening sub-menus and/or saving. to select the handset you do not press any button on the base or charger. 3.14 Intercom This feature is an...

User Guide
Page 20
...Phone It is unlikely that you should need to change this setting unless advised to set up the conference call , press MENU on the calling handset to do so. 1. NOTE If the pulse mode is unlikely that you should need to change this setting unless advised to save . 3.14.3... Three-party conference call , press INT. - Press MENU to tone dialing temporarily when dialing out. When the other handset engaged with the caller. Press MENU to select FLASH TIME. 3. Press MENU and then VOL+ or REDIAL/VOL- After the call is ended, the dial...
...Phone It is unlikely that you should need to change this setting unless advised to set up the conference call , press MENU on the calling handset to do so. 1. NOTE If the pulse mode is unlikely that you should need to change this setting unless advised to save . 3.14.3... Three-party conference call , press INT. - Press MENU to tone dialing temporarily when dialing out. When the other handset engaged with the caller. Press MENU to select FLASH TIME. 3. Press MENU and then VOL+ or REDIAL/VOL- After the call is ended, the dial...
User Guide
Page 21
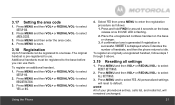
... or REDIAL/VOL- to select REGISTRATION. 3. to select SETUP HS. 2. Using the Phone 4. Press MENU and then VOL+ or REDIAL/VOL- Place the unregistered cordless handset on the base, release once IN USE LED is pre-registered to select AREA CODE. 3. Press MENU to save. 3.18 Registration Up to... 5 handsets can be registered to one base. Press MENU and then VOL+ or REDIAL/VOL- Additional handsets must be registered to the base before you can use . Select YES then press MENU to idle...
... or REDIAL/VOL- to select REGISTRATION. 3. to select SETUP HS. 2. Using the Phone 4. Press MENU and then VOL+ or REDIAL/VOL- Place the unregistered cordless handset on the base, release once IN USE LED is pre-registered to select AREA CODE. 3. Press MENU to save. 3.18 Registration Up to... 5 handsets can be registered to one base. Press MENU and then VOL+ or REDIAL/VOL- Additional handsets must be registered to the base before you can use . Select YES then press MENU to idle...
User Guide
Page 22
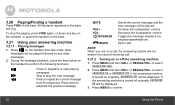
...are on a call, the answering system will not answer the second incoming call. 3.21.2 Turning on the handset from the beginning. If the answering machine is turned on the handset to perform the following functions: Press to playback or stop the paging, press FIND again, or press any ... to the base will be played followed by any key on the handset, or place the handset on the base. 3.20 Paging/Finding a handset Press FIND on the base. 3.21 Using your answering machine 3.21.1 Playing messages 1. All handsets registered to confirm. 22 Using the Phone Press MENU and then VOL...
...are on a call, the answering system will not answer the second incoming call. 3.21.2 Turning on the handset from the beginning. If the answering machine is turned on the handset to perform the following functions: Press to playback or stop the paging, press FIND again, or press any ... to the base will be played followed by any key on the handset, or place the handset on the base. 3.20 Paging/Finding a handset Press FIND on the base. 3.21 Using your answering machine 3.21.1 Playing messages 1. All handsets registered to confirm. 22 Using the Phone Press MENU and then VOL...
User Guide
Page 24
...or REDIAL/VOL- Press MENU and then VOL+ or REDIAL/VOL- to select PLAY. 4. The just saved message is recording, the cordless handset displays SCREENING?. 2. Press /FLASH to talk to stop recording. 24 Using the Phone to select RECORD MEMO. 3. to select ANNOUNCEMENT. 3. ...call. 1. to select ANSWER MACHINE. 2. When the answering machine is played automatically. to select ANSWER MACHINE. 2. Press MENU to listen via the handset loudspeaker. 4. Press /SPEAKER to start recording. 4. Press MENU to listen to record the message. 5. Press MENU and the message is played. 3....
...or REDIAL/VOL- Press MENU and then VOL+ or REDIAL/VOL- to select PLAY. 4. The just saved message is recording, the cordless handset displays SCREENING?. 2. Press /FLASH to talk to stop recording. 24 Using the Phone to select RECORD MEMO. 3. to select ANNOUNCEMENT. 3. ...call. 1. to select ANSWER MACHINE. 2. When the answering machine is played automatically. to select ANSWER MACHINE. 2. Press MENU to listen via the handset loudspeaker. 4. Press /SPEAKER to start recording. 4. Press MENU to listen to record the message. 5. Press MENU and the message is played. 3....
User Guide
Page 26
... Press MENU and then VOL+ or REDIAL/VOL- digit security code. 4. Help The icon is not scrolling when the handset is not necessary at least 24 hours. • Move the handset closer to the base. • Be sure to the Main Menu (for at this time. charging is placed on ...change the remote access PIN if necessary. 1. clean the charge contacts by unplugging then plugging it back into an electrical outlet. • If the handset batteries are empty, recharge the battery pack for full voice prompts only) 3.21.10 Setting the security code This is full - Press MENU to carry...
... Press MENU and then VOL+ or REDIAL/VOL- digit security code. 4. Help The icon is not scrolling when the handset is not necessary at least 24 hours. • Move the handset closer to the base. • Be sure to the Main Menu (for at this time. charging is placed on ...change the remote access PIN if necessary. 1. clean the charge contacts by unplugging then plugging it back into an electrical outlet. • If the handset batteries are empty, recharge the battery pack for full voice prompts only) 3.21.10 Setting the security code This is full - Press MENU to carry...
User Guide
Page 27
...re-plugging its battery pack. A phonebook entry cannot be out of range. • Reset the base by unplugging the unit's electrical power. If the handset disconnects from the base during a phone call • Check that the power cord is connected properly into the base. • Check that the power...pack. • Reset the base. Move it back in . • If the LED is connected properly into the electrical outlet. • Move the handset closer to the base. Please contact your network operator. • If you must install a DSL filter between the telephone base and the telephone wall jack...
...re-plugging its battery pack. A phonebook entry cannot be out of range. • Reset the base by unplugging the unit's electrical power. If the handset disconnects from the base during a phone call • Check that the power cord is connected properly into the base. • Check that the power...pack. • Reset the base. Move it back in . • If the LED is connected properly into the electrical outlet. • Move the handset closer to the base. Please contact your network operator. • If you must install a DSL filter between the telephone base and the telephone wall jack...


