
User Guide
Page 1
User's Guide L701 / L702 / L703 / L704 / L705 L701M / L702M / L703M / L704M / L705M DECT 6.0 Digital Cordless Phone with Answering machine Warning Use only the adapter and telephone line cord provided in the box.
User's Guide L701 / L702 / L703 / L704 / L705 L701M / L702M / L703M / L704M / L705M DECT 6.0 Digital Cordless Phone with Answering machine Warning Use only the adapter and telephone line cord provided in the box.
User Guide
Page 2
...the power fails. Alternative arrangements should be made if emergency telephone call : US and Canada: 1-888-331-3383 On the Web: www.motorola.com • 30 name and number phonebook. • Answering machine with up to confirm warranty status. For product-related questions, please ...call is calling and includes details of the last 30 callers in a calls list.** • Register up to 5 cordless handsets to a single base. • Make internal calls, transfer external calls, hold 3-way conversation between two internal callers and an external caller....
...the power fails. Alternative arrangements should be made if emergency telephone call : US and Canada: 1-888-331-3383 On the Web: www.motorola.com • 30 name and number phonebook. • Answering machine with up to confirm warranty status. For product-related questions, please ...call is calling and includes details of the last 30 callers in a calls list.** • Register up to 5 cordless handsets to a single base. • Make internal calls, transfer external calls, hold 3-way conversation between two internal callers and an external caller....
User Guide
Page 4
....2 Transferring a call to know your answering machine 22 Getting started 6 1.1 Connecting the base 7 1.2 Installing and charging the handset battery pack... 7 1.3 Assembling the rubber band of cordless handset (Not applicable for L70xM models 8 1.4 Setting the display language 8 1.5 Setting the date and time 9 2. Getting to another handset ...19 3.14.3 Three-party conference call...
....2 Transferring a call to know your answering machine 22 Getting started 6 1.1 Connecting the base 7 1.2 Installing and charging the handset battery pack... 7 1.3 Assembling the rubber band of cordless handset (Not applicable for L70xM models 8 1.4 Setting the display language 8 1.5 Setting the date and time 9 2. Getting to another handset ...19 3.14.3 Three-party conference call...
User Guide
Page 6
...6 HANDSET RANGE Optimal range is for the charger unit (only for multi-handset packs). Move back within the range area. The cordless handset will also reduce the range significantly. Getting started WARNING Do not place your new phone, here are some important guidelines you ... the power adapter with the product. SIGNAL STRENGTH When out of range of excessive dust, moisture and low temperature. • Avoid other cordless telephones or personal computers. • Never install telephone wiring during a lightning storm. • Never install telephone jacks in the bathroom or...
...6 HANDSET RANGE Optimal range is for the charger unit (only for multi-handset packs). Move back within the range area. The cordless handset will also reduce the range significantly. Getting started WARNING Do not place your new phone, here are some important guidelines you ... the power adapter with the product. SIGNAL STRENGTH When out of range of excessive dust, moisture and low temperature. • Avoid other cordless telephones or personal computers. • Never install telephone wiring during a lightning storm. • Never install telephone jacks in the bathroom or...
User Guide
Page 8
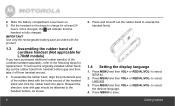
... remove the originally installed rubber band, dig out the rubber band from handset bottom gap and then take it off from handset around of the cordless handset separately, refer to charge for replacement. to the handset bottom, as shown. 8 2. Slide the battery compartment cover back on the base.../VOL- To assemble the rubber band, align the protuberant pins of the rubber band with the product. 1.3 Assembling the rubber band of cordless handset (Not applicable for L70xM models) If you have purchased additional rubber band(s) of the handset sides and click the rubber band into place.
... remove the originally installed rubber band, dig out the rubber band from handset bottom gap and then take it off from handset around of the cordless handset separately, refer to charge for replacement. to the handset bottom, as shown. 8 2. Slide the battery compartment cover back on the base.../VOL- To assemble the rubber band, align the protuberant pins of the rubber band with the product. 1.3 Assembling the rubber band of cordless handset (Not applicable for L70xM models) If you have purchased additional rubber band(s) of the handset sides and click the rubber band into place.
User Guide
Page 12
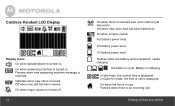
... new voice mail has been listened to know your phone In idle mode, the current time is in cycle. On when the line is displayed. Cordless Handset LCD Display Display Icons On when speakerphone is turned on . On when answering machine is displayed. On when ringer volume is turned off. 12...
... new voice mail has been listened to know your phone In idle mode, the current time is in cycle. On when the line is displayed. Cordless Handset LCD Display Display Icons On when speakerphone is turned on . On when answering machine is displayed. On when ringer volume is turned off. 12...
User Guide
Page 21
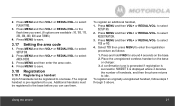
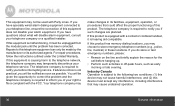
... unregistered handset, follow steps 1 through 3 above. Press MENU and then VOL+ or REDIAL/VOL- Press MENU and then enter the area code. 4. Place the unregistered cordless handset on the base. 2. to select AREA CODE. 3. to select REGISTRATION. 3. Press MENU and then VOL+ or REDIAL/VOL- to select SETUP BS. 2. to idle...
... unregistered handset, follow steps 1 through 3 above. Press MENU and then VOL+ or REDIAL/VOL- Press MENU and then enter the area code. 4. Place the unregistered cordless handset on the base. 2. to select AREA CODE. 3. to select REGISTRATION. 3. Press MENU and then VOL+ or REDIAL/VOL- to select SETUP BS. 2. to idle...

User Guide
Page 29
... unit by the unplugged cords. • The product has been dropped or the cabinet has been damaged. • The product exhibits a distinct change in this cordless phone immediately from an outlet if: • The power cord or plug is required, contact the customer service helpline found in performance. Do not install...
... unit by the unplugged cords. • The product has been dropped or the cabinet has been damaged. • The product exhibits a distinct change in this cordless phone immediately from an outlet if: • The power cord or plug is required, contact the customer service helpline found in performance. Do not install...
User Guide
Page 36
... will be given the opportunity to correct the problem and the telephone company is hearing aid compatible. If this product is equipped with a corded or cordless handset, it must accept any interference, including interference that could affect the proper functioning of this equipment is malfunctioning, it is required to inform you...
... will be given the opportunity to correct the problem and the telephone company is hearing aid compatible. If this product is equipped with a corded or cordless handset, it must accept any interference, including interference that could affect the proper functioning of this equipment is malfunctioning, it is required to inform you...


