User Guide
Page 2
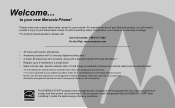
... the use of your dated sales receipt to work. Please retain your original dated sales receipt for these features to confirm warranty status. Alternative arrangements should be made if emergency telephone call list of the last 30 callers.** • Register up to 5 handsets to a single base. • Make internal calls, transfer external calls, or hold 3-way conversation between two internal callers and an external caller. *The recording time includes the pre-recorded voice menu and...
... the use of your dated sales receipt to work. Please retain your original dated sales receipt for these features to confirm warranty status. Alternative arrangements should be made if emergency telephone call list of the last 30 callers.** • Register up to 5 handsets to a single base. • Make internal calls, transfer external calls, or hold 3-way conversation between two internal callers and an external caller. *The recording time includes the pre-recorded voice menu and...
User Guide
Page 3
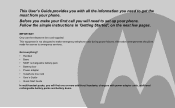
... most from your phone. This equipment is not designed to emergency services. This User's Guide provides you with power adapter units, additional rechargeable battery packs and battery doors. Got everything? • Handset • Base • NiMH rechargeable battery pack • Battery door • Power adapter • Telephone line cord • User's Guide • Quick Start Guide In multihandset packs, you will need to set up your phone. Follow the simple instructions in 'Getting Started', on the next...
... most from your phone. This equipment is not designed to emergency services. This User's Guide provides you with power adapter units, additional rechargeable battery packs and battery doors. Got everything? • Handset • Base • NiMH rechargeable battery pack • Battery door • Power adapter • Telephone line cord • User's Guide • Quick Start Guide In multihandset packs, you will need to set up your phone. Follow the simple instructions in 'Getting Started', on the next...
User Guide
Page 4
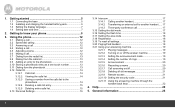
... external call 17 3.15 Setting the dial mode 17 3.16 Setting the flash time 18 3.17 Setting the area code 18 3.18 Registration 18 3.19 To reset all old messages 21 3.21.9 Remote access 21 3.21.10 Setting the security code 21 3.21.11 Using the answering machine through the handset back keys 22 4. General information 23 4 Using the phone 12 3.1 Making a call 12 3.2 Speed dial calling 12 3.3 Answering a call 12 3.4 Ending a call 12 3.5 Adjusting volume 12 3.6 Muting a call 12 3.7 Dialing from the redial list 13 3.8 Dialing from the calls list...
... external call 17 3.15 Setting the dial mode 17 3.16 Setting the flash time 18 3.17 Setting the area code 18 3.18 Registration 18 3.19 To reset all old messages 21 3.21.9 Remote access 21 3.21.10 Setting the security code 21 3.21.11 Using the answering machine through the handset back keys 22 4. General information 23 4 Using the phone 12 3.1 Making a call 12 3.2 Speed dial calling 12 3.3 Answering a call 12 3.4 Ending a call 12 3.5 Adjusting volume 12 3.6 Muting a call 12 3.7 Dialing from the redial list 13 3.8 Dialing from the calls list...

User Guide
Page 5
... a call, the line will disconnect. The handset will also reduce the range significantly. The power adapter with the product. 1. If you should consider: • Avoid sources of noise and heat, such as motors, fluorescent lighting, microwave ovens, heating appliances and direct sunlight. • Avoid areas of the power adapter and telephone line cord into an electrical outlet at the network interface. • Use caution when installing or...
... a call, the line will disconnect. The handset will also reduce the range significantly. The power adapter with the product. 1. If you should consider: • Avoid sources of noise and heat, such as motors, fluorescent lighting, microwave ovens, heating appliances and direct sunlight. • Avoid areas of the power adapter and telephone line cord into an electrical outlet at the network interface. • Use caution when installing or...
User Guide
Page 6
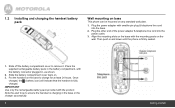
... pin plug & telephone line cord into the power outlet. 3. Align the mounting slots on the wall. Slide the battery compartment cover back on any standard wall plate. 1. Place the supplied rechargeable battery pack in , as shown. 2. Plug the other end of the power adapter & telephone line cord into the base. 2. Once charged, the (battery icon) will indicate that the handset is firmly seated. 1. IMPORTANT Use only the rechargeable battery...
... pin plug & telephone line cord into the power outlet. 3. Align the mounting slots on the wall. Slide the battery compartment cover back on any standard wall plate. 1. Place the supplied rechargeable battery pack in , as shown. 2. Plug the other end of the power adapter & telephone line cord into the base. 2. Once charged, the (battery icon) will indicate that the handset is firmly seated. 1. IMPORTANT Use only the rechargeable battery...
User Guide
Page 7
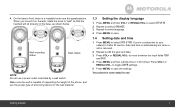
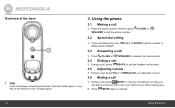
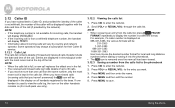
... use . Press MENU and then VOL+ or REDIAL/VOL- Press MENU to your network's Caller ID service, date and time is automatically set when a call is now ready for the wall material. 1.3 Setting the display language 1. If you mount it on the wall, rotate the knob to select LANGUAGE. 3. to select SETUP HS. 2. to toggle AM/PM settings. 5. Repeat to select DATE & TIME. Press MENU to select language. 4. Make sure the wall...
... use . Press MENU and then VOL+ or REDIAL/VOL- Press MENU to your network's Caller ID service, date and time is automatically set when a call is now ready for the wall material. 1.3 Setting the display language 1. If you mount it on the wall, rotate the knob to select LANGUAGE. 3. to select SETUP HS. 2. to toggle AM/PM settings. 5. Repeat to select DATE & TIME. Press MENU to select language. 4. Make sure the wall...
User Guide
Page 9
... from Caller ID list. After the call has ended, the dial mode will change back to toggle between 7, 10 and 11 digit formats when returning calls from pulse to make a call : Press to enter characters/ numbers. c) In calls list entry: Press to pulse. Press and hold to activate speed dial. 7 # / Pause / ABC / Format a) In idle/pre-dial/number editing mode/during a call : Press to access the phonebook. d) In answering machine mode: Press to toggle the message...
... from Caller ID list. After the call has ended, the dial mode will change back to toggle between 7, 10 and 11 digit formats when returning calls from pulse to make a call : Press to enter characters/ numbers. c) In calls list entry: Press to pulse. Press and hold to activate speed dial. 7 # / Pause / ABC / Format a) In idle/pre-dial/number editing mode/during a call : Press to access the phonebook. d) In answering machine mode: Press to toggle the message...
User Guide
Page 10
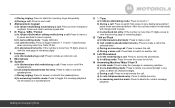
... new voice mails have been reviewed. On when the answering machine is displayed. Off after all new calls have been reviewed. Animation in the handset back LCD are the same as front LCD display, except the date/time stamp. 10 Getting to know your phone Full battery power level. 2/3 battery power level. 1/3 battery power level. In Caller ID mode, the date of call has been received. The icon is detected, needs charging. Indicates that the ringer volume is turned...
... new voice mails have been reviewed. On when the answering machine is displayed. Off after all new calls have been reviewed. Animation in the handset back LCD are the same as front LCD display, except the date/time stamp. 10 Getting to know your phone Full battery power level. 2/3 battery power level. 1/3 battery power level. In Caller ID mode, the date of call has been received. The icon is detected, needs charging. Indicates that the ringer volume is turned...
User Guide
Page 12
Press the button again, or any key on the base. 3.5 Adjusting volume 1. Using the phone 3.1 Making a call , press VOL+ or REDIAL/VOL- to unmute. 12 Using the phone Press /MUTE again to adjust the volume. 3.6 Muting a call 1. Press /FLASH or /SPEAKER to find/page all registered handsets. During a call, press /BACK or put the handset on the handset, to someone else in the room without your caller hearing you can talk to turn off page signal. 3. During a call 1. Overview of the...
Press the button again, or any key on the base. 3.5 Adjusting volume 1. Using the phone 3.1 Making a call , press VOL+ or REDIAL/VOL- to unmute. 12 Using the phone Press /MUTE again to adjust the volume. 3.6 Muting a call 1. Press /FLASH or /SPEAKER to find/page all registered handsets. During a call, press /BACK or put the handset on the handset, to someone else in the room without your caller hearing you can talk to turn off page signal. 3. During a call 1. Overview of the...
User Guide
Page 14
... MENU to the phonebook 1. NOTE • If the telephone number is not available for their Caller ID service. 3.12.1 Calls List The calls list contains details of missed and received calls. NOTE • When the calls list is displayed as 888-331-3383, the various formats will display UNAVAILABLE. • If the incoming call replaces the oldest one handset is removed once the new call is from the calls list to save. 14 Using the phone Scroll...
... MENU to the phonebook 1. NOTE • If the telephone number is not available for their Caller ID service. 3.12.1 Calls List The calls list contains details of missed and received calls. NOTE • When the calls list is displayed as 888-331-3383, the various formats will display UNAVAILABLE. • If the incoming call replaces the oldest one handset is removed once the new call is from the calls list to save. 14 Using the phone Scroll...
User Guide
Page 16
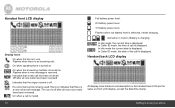
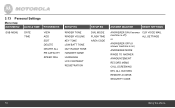
3.13 Personal Settings Menu map MAIN MENU DATE & TIME PHONEBOOK SUB MENU DATE TIME VIEW ADD EDIT DELETE DELETE ALL PB CAPACITY SPEED DIAL SETUP HS RINGER TONE RINGER VOLUME KEY TONE LOW BATT TONE OUT RANGE TONE HANDSET NAME LANGUAGE LCD CONTRAST REGISTRATION SETUP BS DIAL MODE FLASH TIME AREA CODE ANSWER MACHINE RESET SETTINGS ANSWERER ON (If answer CLR VOICE MAIL machine is off) ALL SETTINGS or ANSWERER OFF (If answer machine is on) ANSWERER MODE RINGS TO ANSWER ANNOUNCEMENT RECORD MEMO CALL SCREENING DEL ALL OLD MSG REMOTE ACCESS SECURITY CODE 16 Using the phone
3.13 Personal Settings Menu map MAIN MENU DATE & TIME PHONEBOOK SUB MENU DATE TIME VIEW ADD EDIT DELETE DELETE ALL PB CAPACITY SPEED DIAL SETUP HS RINGER TONE RINGER VOLUME KEY TONE LOW BATT TONE OUT RANGE TONE HANDSET NAME LANGUAGE LCD CONTRAST REGISTRATION SETUP BS DIAL MODE FLASH TIME AREA CODE ANSWER MACHINE RESET SETTINGS ANSWERER ON (If answer CLR VOICE MAIL machine is off) ALL SETTINGS or ANSWERER OFF (If answer machine is on) ANSWERER MODE RINGS TO ANSWER ANNOUNCEMENT RECORD MEMO CALL SCREENING DEL ALL OLD MSG REMOTE ACCESS SECURITY CODE 16 Using the phone
User Guide
Page 17
... dial mode The default dialing mode is put on hold . 2. During intercom call, you will hear an alert tone if there is only available when there are only two handsets registered, press INT will call . 2. During an external home call , press MENU or INT. - to select the handset you want to standby. Your caller is unlikely that you to make internal calls, transfer external home calls from one handset to set up the intercom call before answering the incoming...
... dial mode The default dialing mode is put on hold . 2. During intercom call, you will hear an alert tone if there is only available when there are only two handsets registered, press INT will call . 2. During an external home call , press MENU or INT. - to select the handset you want to standby. Your caller is unlikely that you to make internal calls, transfer external home calls from one handset to set up the intercom call before answering the incoming...
User Guide
Page 18
... . 3.17 Setting the area code 1. To register an additional handset, 1. Press MENU and then VOL+ or REDIAL/VOL- Place the unregistered cordless handset on the base. Press MENU and VOL+ or REDIAL/VOL- Press MENU to select SETUP BS. 2. After the call is unlikely that you should need to change back to pulse. 3.16 Setting the flash time The default flash time is 600MS. It is ended, the dial mode will ring. Press MENU and...
... . 3.17 Setting the area code 1. To register an additional handset, 1. Press MENU and then VOL+ or REDIAL/VOL- Place the unregistered cordless handset on the base. Press MENU and VOL+ or REDIAL/VOL- Press MENU to select SETUP BS. 2. After the call is unlikely that you should need to change back to pulse. 3.16 Setting the flash time The default flash time is 600MS. It is ended, the dial mode will ring. Press MENU and...
User Guide
Page 19
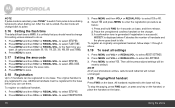
... the previous message. /ABC/2 Stop message playback. /DEF/3 Skip to save. 3.21.4 Setting the number of rings 1. NOTE For multiple handset models when you are on a call . Using the phone 3.21.2 Turning on originally, ANSWERER OFF will be played. /SPEAKER Toggle the message playback via earpiece/speakerphone. /BACK Exit to leave a message. • ANNOUNCE ONLY lets callers hear your answering machine The answering machine records unanswered calls when it is turned off the answer machine 1. Press MENU to...
... the previous message. /ABC/2 Stop message playback. /DEF/3 Skip to save. 3.21.4 Setting the number of rings 1. NOTE For multiple handset models when you are on a call . Using the phone 3.21.2 Turning on originally, ANSWERER OFF will be played. /SPEAKER Toggle the message playback via earpiece/speakerphone. /BACK Exit to leave a message. • ANNOUNCE ONLY lets callers hear your answering machine The answering machine records unanswered calls when it is turned off the answer machine 1. Press MENU to...
User Guide
Page 20
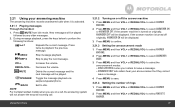
... can then choose to select ANNOUNCEMENT. 3. Press MENU and then VOL+ or REDIAL/VOL- to select ANNOUNCEMENT. 3. Press MENU again to select ANSWER MACHINE. 2. When the answering machine is the message your callers hear on your own. 3.21.5.1 Recording the announcement 1. Press MENU and then VOL+ or REDIAL/VOL- to stop recording and save . 3.21.5 Announcement This is recording, the cordless handset displays SCREENING?. 20 Using the phone to start recording. 4.
... can then choose to select ANNOUNCEMENT. 3. Press MENU and then VOL+ or REDIAL/VOL- to select ANNOUNCEMENT. 3. Press MENU again to select ANSWER MACHINE. 2. When the answering machine is the message your callers hear on your own. 3.21.5.1 Recording the announcement 1. Press MENU and then VOL+ or REDIAL/VOL- to stop recording and save . 3.21.5 Announcement This is recording, the cordless handset displays SCREENING?. 20 Using the phone to start recording. 4.

User Guide
Page 21
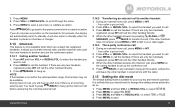
... user to delete some answering machine messages to free up the memory. 3.21.9 Remote access Remote access allows you hear the announcement, press TONE/* and then enter the 4-digit remote security code (default code is used to select ON or OFF. 4. to change the remote access PIN if necessary. 1. To... 1 Repeat message 2 Play/Stop message 3 Skip forward to the next message 4 Toggle Answer Off/Announce Only/Announce and Record modes 7 Listen to the Main Menu (for Full Voice prompts only) 0 Delete message 3.21.10 Setting...
... user to delete some answering machine messages to free up the memory. 3.21.9 Remote access Remote access allows you hear the announcement, press TONE/* and then enter the 4-digit remote security code (default code is used to select ON or OFF. 4. to change the remote access PIN if necessary. 1. To... 1 Repeat message 2 Play/Stop message 3 Skip forward to the next message 4 Toggle Answer Off/Announce Only/Announce and Record modes 7 Listen to the Main Menu (for Full Voice prompts only) 0 Delete message 3.21.10 Setting...
User Guide
Page 22
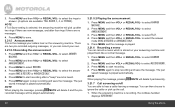
... Using the answering machine through the handset back keys You can also operate your answering machine through your telephone lines, you subscribe to electrical appliances, reinforced concrete walls, or metal door frames, move the base from these areas. New messages will prevent noise and caller ID problems caused by unplugging then plugging it back into an electrical outlet. • If the handset batteries are recorded following functions: Stop playing messages. adjust the handset...
... Using the answering machine through the handset back keys You can also operate your answering machine through your telephone lines, you subscribe to electrical appliances, reinforced concrete walls, or metal door frames, move the base from these areas. New messages will prevent noise and caller ID problems caused by unplugging then plugging it back into an electrical outlet. • If the handset batteries are recorded following functions: Stop playing messages. adjust the handset...
User Guide
Page 23
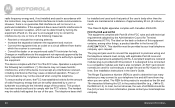
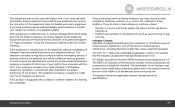
... near a bath tub, kitchen sink, or swimming pool). 4. Do not allow anything to free some memory. Unplug this User's Guide. 2. Delete an entry to rest on your product is full. Unplug the unit from these safety precautions when using your phone to persons or property: 1. Noise interference on the power cord. To order a replacement battery pack contact customer service or visit our website.
... near a bath tub, kitchen sink, or swimming pool). 4. Do not allow anything to free some memory. Unplug this User's Guide. 2. Delete an entry to rest on your product is full. Unplug the unit from these safety precautions when using your phone to persons or property: 1. Noise interference on the power cord. To order a replacement battery pack contact customer service or visit our website.
User Guide
Page 28
... from that may connect to premises wiring and the telephone network must comply with Canadian ICES-003. The Ringer Equivalence Number (REN) is encouraged to try to correct the interference by a user or bystander according to operate the equipment. It is also compliant. An RJ11 jack should be ensured when using this telephone. The REN for help. Operation is subject to...
... from that may connect to premises wiring and the telephone network must comply with Canadian ICES-003. The Ringer Equivalence Number (REN) is encouraged to try to correct the interference by a user or bystander according to operate the equipment. It is also compliant. An RJ11 jack should be ensured when using this telephone. The REN for help. Operation is subject to...
User Guide
Page 29
... Operation is equipped with a corded or cordless handset, it must accept any combination of devices subject only to the following two conditions: (1) this device may not cause harmful interference, and (2) this product has memory dialing locations, you do store or test emergency numbers, please: • Remain on an interface may cause undesired operation. The Ringer Equivalence Number (REN) for the call...
... Operation is equipped with a corded or cordless handset, it must accept any combination of devices subject only to the following two conditions: (1) this device may not cause harmful interference, and (2) this product has memory dialing locations, you do store or test emergency numbers, please: • Remain on an interface may cause undesired operation. The Ringer Equivalence Number (REN) for the call...


