Product Manual
Page 3
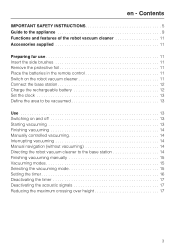
... side brushes 11 Remove the protective foil 11 Place the batteries in the remote control 11 Switch on the robot vacuum cleaner 11 Connect the base station 12 Charge the rechargeable battery 12 Set the clock 13 Define the area to be vacuumed 13 Use 13 Switching on and off 13 Starting vacuuming 13 Finishing vacuuming 14 Manually controlled vacuuming 14 Interrupting vacuuming 14 Manual navigation (without vacuuming 14 Directing the robot vacuum cleaner...
... side brushes 11 Remove the protective foil 11 Place the batteries in the remote control 11 Switch on the robot vacuum cleaner 11 Connect the base station 12 Charge the rechargeable battery 12 Set the clock 13 Define the area to be vacuumed 13 Use 13 Switching on and off 13 Starting vacuuming 13 Finishing vacuuming 14 Manually controlled vacuuming 14 Interrupting vacuuming 14 Manual navigation (without vacuuming 14 Directing the robot vacuum cleaner...
Product Manual
Page 4
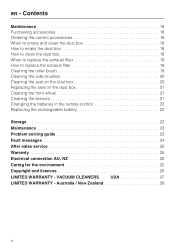
... filter 19 How to replace the exhaust filter 19 Cleaning the roller brush 19 Cleaning the side brushes 20 Cleaning the seal on the dust box 20 Replacing the seal on the dust box 21 Cleaning the front wheel 21 Cleaning the sensors 21 Changing the batteries in the remote control 22 Replacing the rechargeable battery 22 Storage 22 Maintenance 23 Problem solving guide 23 Fault messages 24 After sales service 25 Warranty 25 Electrical...
... filter 19 How to replace the exhaust filter 19 Cleaning the roller brush 19 Cleaning the side brushes 20 Cleaning the seal on the dust box 20 Replacing the seal on the dust box 21 Cleaning the front wheel 21 Cleaning the sensors 21 Changing the batteries in the remote control 22 Replacing the rechargeable battery 22 Storage 22 Maintenance 23 Problem solving guide 23 Fault messages 24 After sales service 25 Warranty 25 Electrical...
Product Manual
Page 5
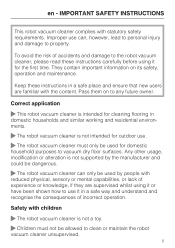
... supported by people with statutory safety requirements. Keep these instructions carefully before using it or have been shown how to use it for outdoor use can only be allowed to property. Any other usage, modification or alteration is not intended for the first time. Pass them on its safety, operation and maintenance. Improper use . ~ The robot vacuum cleaner must not be used for cleaning flooring...
... supported by people with statutory safety requirements. Keep these instructions carefully before using it or have been shown how to use it for outdoor use can only be allowed to property. Any other usage, modification or alteration is not intended for the first time. Pass them on its safety, operation and maintenance. Improper use . ~ The robot vacuum cleaner must not be used for cleaning flooring...
Product Manual
Page 6
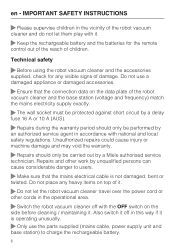
... rechargeable battery. 6 Also switch it . Repairs and other cords in this way if it is not damaged, bent or twisted. Unauthorized repairs could cause injury or machine damage and may void the warranty. ~ Repairs should only be carried out by an authorized service agent in accordance with the OFF switch on the data plate of children. Technical safety ~ Before using the robot vacuum cleaner...
... rechargeable battery. 6 Also switch it . Repairs and other cords in this way if it is not damaged, bent or twisted. Unauthorized repairs could cause injury or machine damage and may void the warranty. ~ Repairs should only be carried out by an authorized service agent in accordance with the OFF switch on the data plate of children. Technical safety ~ Before using the robot vacuum cleaner...
Product Manual
Page 7
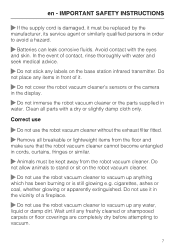
... not use the robot vacuum cleaner to vacuum up any freshly cleaned or shampooed carpets or floor coverings are completely dry before attempting to vacuum. 7 Do not allow animals to avoid a hazard. ~ Batteries can leak corrosive fluids. Clean all breakable or lightweight items from the robot vacuum cleaner. cigarettes, ashes or coal, whether glowing or apparently extinguished. Do not use the robot vacuum cleaner without the exhaust filter fitted. ~ Remove all parts with...
... not use the robot vacuum cleaner to vacuum up any freshly cleaned or shampooed carpets or floor coverings are completely dry before attempting to vacuum. 7 Do not allow animals to avoid a hazard. ~ Batteries can leak corrosive fluids. Clean all breakable or lightweight items from the robot vacuum cleaner. cigarettes, ashes or coal, whether glowing or apparently extinguished. Do not use the robot vacuum cleaner without the exhaust filter fitted. ~ Remove all parts with...
Product Manual
Page 8
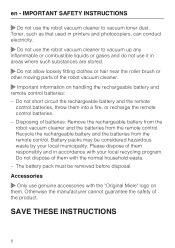
... "Original Miele" logo on handling the rechargeable battery and remote control batteries: - IMPORTANT SAFETY INSTRUCTIONS ~ Do not use it in areas where such substances are stored. ~ Do not allow loosely fitting clothes or hair near the roller brush or other moving parts of the robot vacuum cleaner. ~ Important information on them into a fire, or recharge the remote control batteries. - Battery packs may be removed before...
... "Original Miele" logo on handling the rechargeable battery and remote control batteries: - IMPORTANT SAFETY INSTRUCTIONS ~ Do not use it in areas where such substances are stored. ~ Do not allow loosely fitting clothes or hair near the roller brush or other moving parts of the robot vacuum cleaner. ~ Important information on them into a fire, or recharge the remote control batteries. - Battery packs may be removed before...
Product Manual
Page 9
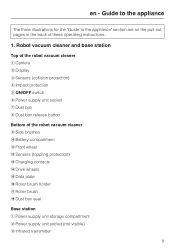
... robot vacuum cleaner a Camera b Display c Sensors (collision protection) d Impact protection e ON/OFF switch f Power supply unit socket g Dust box h Dust box release button Bottom of these operating instructions. 1. Guide to the appliance The three illustrations for the "Guide to the appliance" section are on the pull-out pages in the back of the robot vacuum cleaner i Side brushes j Battery compartment k Front wheel l Sensors (toppling protection) m Charging contacts n Drive wheels o Data plate p Roller brush holder q Roller brush r Dust...
... robot vacuum cleaner a Camera b Display c Sensors (collision protection) d Impact protection e ON/OFF switch f Power supply unit socket g Dust box h Dust box release button Bottom of these operating instructions. 1. Guide to the appliance The three illustrations for the "Guide to the appliance" section are on the pull-out pages in the back of the robot vacuum cleaner i Side brushes j Battery compartment k Front wheel l Sensors (toppling protection) m Charging contacts n Drive wheels o Data plate p Roller brush holder q Roller brush r Dust...
Product Manual
Page 11
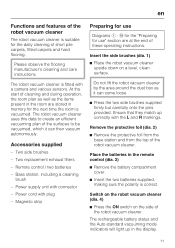
... carpets, fitted carpets and hard flooring. The rechargeable battery status and the Auto standard vacuuming mode indicators will light up correctly with a camera and various sensors. Base station, including a cleaning brush - Power cord with connector - Remote control / two batteries - Please observe the flooring manufacturer's cleaning and care instructions. Accessories supplied - Switch on the robot vacuum cleaner (dia. 4) ^ Press the ON switch on a level, clean surface. At the start of cleaning and during operation...
... carpets, fitted carpets and hard flooring. The rechargeable battery status and the Auto standard vacuuming mode indicators will light up correctly with a camera and various sensors. Base station, including a cleaning brush - Power cord with connector - Remote control / two batteries - Please observe the flooring manufacturer's cleaning and care instructions. Accessories supplied - Switch on the robot vacuum cleaner (dia. 4) ^ Press the ON switch on a level, clean surface. At the start of cleaning and during operation...
Product Manual
Page 12
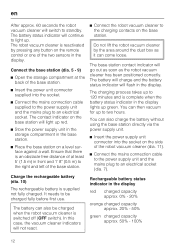
... the side of the base station. ^ Connect the robot vacuum cleaner to standby. The battery status indicator will continue to 120 minutes and is switched off (OFF switch). The contact indicator on the base station will light up to an electrical socket. You can then vacuum for up red. ^ Stow the power supply unit in the storage compartment in the display...
... the side of the base station. ^ Connect the robot vacuum cleaner to standby. The battery status indicator will continue to 120 minutes and is switched off (OFF switch). The contact indicator on the base station will light up to an electrical socket. You can then vacuum for up red. ^ Stow the power supply unit in the storage compartment in the display...
Product Manual
Page 13
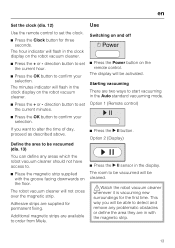
... above. en Set the clock (dia. 12) Use Use the remote control to confirm your selection. Option 1 (Remote control) ^ Press the OK button to set the current minutes. If you will be able to be cleaned. ,Watch the robot vacuum cleaner whenever it is vacuuming new surroundings for three seconds. Adhesive strips are in the clock display on the floor. The hour...
... above. en Set the clock (dia. 12) Use Use the remote control to confirm your selection. Option 1 (Remote control) ^ Press the OK button to set the current minutes. If you will be able to be cleaned. ,Watch the robot vacuum cleaner whenever it is vacuuming new surroundings for three seconds. Adhesive strips are in the clock display on the floor. The hour...
Product Manual
Page 14
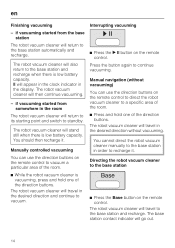
... vacuuming - Manually controlled vacuuming You can use the direction buttons on the remote control. The robot vacuum cleaner will travel in the room The robot vacuum cleaner will stand still when there is low battery capacity. The robot vacuum cleaner will return to the base station and recharge when there is low battery capacity. if vacuuming started from somewhere in the desired direction without vacuuming) You can use the direction buttons on the remote control. The robot vacuum cleaner...
... vacuuming - Manually controlled vacuuming You can use the direction buttons on the remote control. The robot vacuum cleaner will travel in the room The robot vacuum cleaner will stand still when there is low battery capacity. The robot vacuum cleaner will return to the base station and recharge when there is low battery capacity. if vacuuming started from somewhere in the desired direction without vacuuming) You can use the direction buttons on the remote control. The robot vacuum cleaner...
Product Manual
Page 18
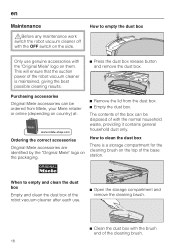
... ensure that the suction power of the base station. Ordering the correct accessories Original Miele accessories are identified by the "Original Miele" logo on the top of the robot vacuum cleaner is a storage compartment for the cleaning brush on the packaging. How to clean the dust box There is maintained, giving the best possible cleaning results. ^ Press the dust box release button and remove the dust box.
... ensure that the suction power of the base station. Ordering the correct accessories Original Miele accessories are identified by the "Original Miele" logo on the top of the robot vacuum cleaner is a storage compartment for the cleaning brush on the packaging. How to clean the dust box There is maintained, giving the best possible cleaning results. ^ Press the dust box release button and remove the dust box.
Product Manual
Page 19
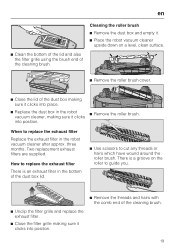
.... ^ Replace the dust box in the robot vacuum cleaner, making sure it clicks into position. 19 When to replace the exhaust filter Replace the exhaust filter in the bottom of the dust box lid. ^ Use scissors to replace the exhaust filter There is a groove on a level, clean surface. ^ Remove the roller brush cover. ^ Close the lid of the cleaning brush. There is an exhaust filter in the robot vacuum cleaner after approx. en ^ Clean...
.... ^ Replace the dust box in the robot vacuum cleaner, making sure it clicks into position. 19 When to replace the exhaust filter Replace the exhaust filter in the bottom of the dust box lid. ^ Use scissors to replace the exhaust filter There is a groove on a level, clean surface. ^ Remove the roller brush cover. ^ Close the lid of the cleaning brush. There is an exhaust filter in the robot vacuum cleaner after approx. en ^ Clean...
Product Manual
Page 20
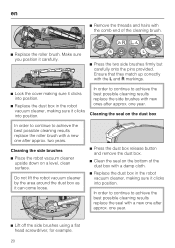
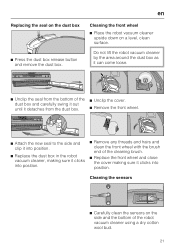
... it clicks into position. In order to continue to achieve the best possible cleaning results replace the side brushes with a damp cloth. ^ Replace the dust box in the robot vacuum cleaner, making sure it can come loose. ^ Press the dust box release button and remove the dust box. ^ Clean the seal on a level, clean surface. Ensure that they match up correctly with a new one after approx.
... it clicks into position. In order to continue to achieve the best possible cleaning results replace the side brushes with a damp cloth. ^ Replace the dust box in the robot vacuum cleaner, making sure it can come loose. ^ Press the dust box release button and remove the dust box. ^ Clean the seal on a level, clean surface. Ensure that they match up correctly with a new one after approx.
Product Manual
Page 21
... dust box as it clicks into position. ^ Remove any threads and hairs and clean the front wheel with the brush end of the cleaning brush. ^ Replace the front wheel and close the cover making sure it clicks into position. Replacing the seal on a level, clean surface. en Cleaning the front wheel ^ Place the robot vacuum cleaner upside down on the dust box ^ Press the dust box release button and remove the dust...
... dust box as it clicks into position. ^ Remove any threads and hairs and clean the front wheel with the brush end of the cleaning brush. ^ Replace the front wheel and close the cover making sure it clicks into position. Replacing the seal on a level, clean surface. en Cleaning the front wheel ^ Place the robot vacuum cleaner upside down on the dust box ^ Press the dust box release button and remove the dust...
Product Manual
Page 22
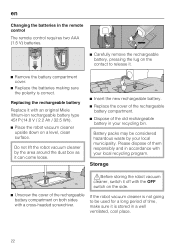
Replacing the rechargeable battery Replace it . ^ Remove the battery compartment cover. ^ Replace the batteries making sure the polarity is correct. Storage ,Before storing the robot vacuum cleaner, switch it off with the OFF switch on the side. ^ Unscrew the cover of the rechargeable battery compartment on both sides with an original Miele lithium-ion rechargeable battery type 4S1P (14.8 V / 2.2 Ah / 32.5 Wh). ^ Place the robot vacuum cleaner upside down on...
Replacing the rechargeable battery Replace it . ^ Remove the battery compartment cover. ^ Replace the batteries making sure the polarity is correct. Storage ,Before storing the robot vacuum cleaner, switch it off with the OFF switch on the side. ^ Unscrew the cover of the rechargeable battery compartment on both sides with an original Miele lithium-ion rechargeable battery type 4S1P (14.8 V / 2.2 Ah / 32.5 Wh). ^ Place the robot vacuum cleaner upside down on...
Product Manual
Page 23
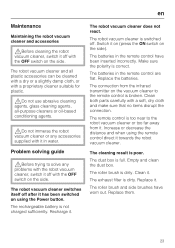
... roller brush is poor. en Maintenance Maintaining the robot vacuum cleaner and accessories ,Before cleaning the robot vacuum cleaner, switch it . Problem solving guide ,Before trying to solve any accessories supplied with the robot vacuum cleaner, switch it . Make sure the polarity is dirty. The remote control is full. Increase or decrease the distance and when using the Power button. The exhaust filter is correct. Replace it towards the robot vacuum cleaner. Switch it has been switched...
... roller brush is poor. en Maintenance Maintaining the robot vacuum cleaner and accessories ,Before cleaning the robot vacuum cleaner, switch it . Problem solving guide ,Before trying to solve any accessories supplied with the robot vacuum cleaner, switch it . Make sure the polarity is dirty. The remote control is full. Increase or decrease the distance and when using the Power button. The exhaust filter is correct. Replace it towards the robot vacuum cleaner. Switch it has been switched...
Product Manual
Page 24
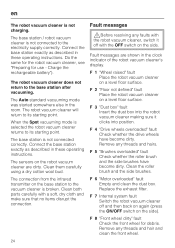
.... Clean both parts carefully with the robot vacuum cleaner, switch it clicks into position. F 6 "Motor overloaded" fault Empty and clean the dust box. Remove any threads and hairs. The base station is not charging. Connect the base station exactly as described in these operating instructions. Replace the exhaust filter. The Auto standard vacuuming mode was started somewhere else in the clock indicator of the robot vacuum cleaner's display. Clean the roller brush...
.... Clean both parts carefully with the robot vacuum cleaner, switch it clicks into position. F 6 "Motor overloaded" fault Empty and clean the dust box. Remove any threads and hairs. The base station is not charging. Connect the base station exactly as described in these operating instructions. Replace the exhaust filter. The Auto standard vacuuming mode was started somewhere else in the clock indicator of the robot vacuum cleaner's display. Clean the roller brush...
Product Manual
Page 30
... authorised Miele Service Agent; use for a purpose for use of household appliances and vacuum cleaners, commercial use or operation after a defect has occurred or been discovered vi. in order to be eligible to maintain, service or use or installation (where applicable) which is responsible); damage through exposure to you a warranty repair or service, call 1300 731 822 or e-mail: service@miele.com.au 30 use of the product i.e. It...
... authorised Miele Service Agent; use for a purpose for use of household appliances and vacuum cleaners, commercial use or operation after a defect has occurred or been discovered vi. in order to be eligible to maintain, service or use or installation (where applicable) which is responsible); damage through exposure to you a warranty repair or service, call 1300 731 822 or e-mail: service@miele.com.au 30 use of the product i.e. It...

Product Manual
Page 57
... Warranty shall cover the replacement or repair of all parts of purchase, this product, including all original compressors, condensers, evaporators, driers, the original refrigerant and the original connecting tubing. - Parts and labour. One (1) year. RemoteVision® Modules: Please refer to you (including parts & labour). - Upon request, such labour shall be defective in normal, non-commercial, household use : - One (1) year, upright and canister vacuums. Parts...
... Warranty shall cover the replacement or repair of all parts of purchase, this product, including all original compressors, condensers, evaporators, driers, the original refrigerant and the original connecting tubing. - Parts and labour. One (1) year. RemoteVision® Modules: Please refer to you (including parts & labour). - Upon request, such labour shall be defective in normal, non-commercial, household use : - One (1) year, upright and canister vacuums. Parts...


