User Guide
Page 5
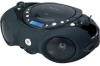
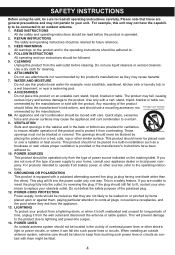
... be adhered to. 4. If the plug should be followed. 5. FOLLOW INSTRUCTIONS All operating and use this unit may fall into such power lines or circuits. ATTACHMENTS Do not use attachments not recommended by the manufacturer or sold with them , paying particular attention to cords at plugs, .... For products intended to operate from battery power, or other electric light or power circuits, or where it from touching such power lines or circuits as a bookcase or rack unless proper ventilation is provided or the manufacturer's instructions have the capability to be connected to ...
... be adhered to. 4. If the plug should be followed. 5. FOLLOW INSTRUCTIONS All operating and use this unit may fall into such power lines or circuits. ATTACHMENTS Do not use attachments not recommended by the manufacturer or sold with them , paying particular attention to cords at plugs, .... For products intended to operate from battery power, or other electric light or power circuits, or where it from touching such power lines or circuits as a bookcase or rack unless proper ventilation is provided or the manufacturer's instructions have the capability to be connected to ...
User Guide
Page 7
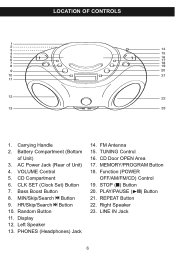
... Button 11. PHONES (Headphones) Jack 14. Right Speaker 23. CD Door OPEN Area 17. LINE IN Jack 6 AC Power Jack (Rear of Unit) 3. MIN/Skip/Search o Button 9. PLAY/PAUSE (®p) Button 21. Left Speaker 13. Carrying Handle 2. VOLUME Control 5. HR/... Compartment (Bottom of Unit) 4. CLK SET (Clock Set) Button 7. Bass Boost Button 8. Display 12. FM Antenna 15. TUNING Control 16. Function (POWER OFF/AM/FM/CD) Control 19. STOP (I) Button 20. REPEAT Button 22.
... Button 11. PHONES (Headphones) Jack 14. Right Speaker 23. CD Door OPEN Area 17. LINE IN Jack 6 AC Power Jack (Rear of Unit) 3. MIN/Skip/Search o Button 9. PLAY/PAUSE (®p) Button 21. Left Speaker 13. Carrying Handle 2. VOLUME Control 5. HR/... Compartment (Bottom of Unit) 4. CLK SET (Clock Set) Button 7. Bass Boost Button 8. Display 12. FM Antenna 15. TUNING Control 16. Function (POWER OFF/AM/FM/CD) Control 19. STOP (I) Button 20. REPEAT Button 22.
User Guide
Page 8
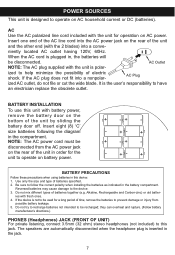
Insert one end of the AC line cord into the AC power jack on battery power. - -+ + -+ - -+ - + -+ - + BATTERY PRECAUTIONS Follow these precautions when using batteries in order for the unit to operate on ... the unit is the user's responsibility to have an electrician replace the obsolete outlet. + BATTERY INSTALLATION To use this device: 1. AC Use the AC polarized line cord included with the unit for a long period of time, remove the batteries to prevent damage or injury from the AC power jack on the...
Insert one end of the AC line cord into the AC power jack on battery power. - -+ + -+ - -+ - + -+ - + BATTERY PRECAUTIONS Follow these precautions when using batteries in order for the unit to operate on ... the unit is the user's responsibility to have an electrician replace the obsolete outlet. + BATTERY INSTALLATION To use this device: 1. AC Use the AC polarized line cord included with the unit for a long period of time, remove the batteries to prevent damage or injury from the AC power jack on the...
User Guide
Page 9
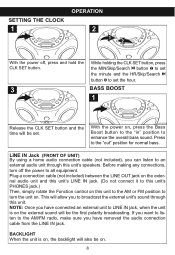
... Jack (FRONT1 OF UNIT) By using a home audio connection cable (not included), you have removed the audio connection cable from the LINE IN jack. ten to turn off , press and hold the CLK SET button. 3 1 While holding the CLK SET button, press the MIN/Skip/Search o button 1 ... AM or FM position to the AM/FM radio, make sure you want to enhance the overall bass sound. nal audio unit and this unit's LINE IN jack. (Do not connect it to this unit's PHONES jack.) Then, simply rotate the Function control on this unit's speakers. This will be the...
... Jack (FRONT1 OF UNIT) By using a home audio connection cable (not included), you have removed the audio connection cable from the LINE IN jack. ten to turn off , press and hold the CLK SET button. 3 1 While holding the CLK SET button, press the MIN/Skip/Search o button 1 ... AM or FM position to the AM/FM radio, make sure you want to enhance the overall bass sound. nal audio unit and this unit's LINE IN jack. (Do not connect it to this unit's PHONES jack.) Then, simply rotate the Function control on this unit's speakers. This will be the...
User Guide
Page 15
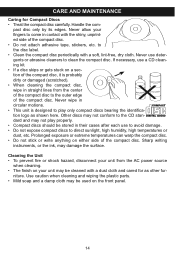
...;re or shock hazard, disconnect your unit from the center of the compact disc. • Do not attach adhesive tape, stickers, etc. If necessary, use a CD cleaning kit. • If a disc skips or gets stuck on the front panel. 14 Sharp writing instruments, or the ink, may be used on a section... wiping the plastic parts. • Mild soap and a damp cloth may damage the surface. Other discs may not conform to the CD standard and may be stored in straight lines from the AC power source when cleaning. • The finish on either side of the compact disc. Never allow your unit...
...;re or shock hazard, disconnect your unit from the center of the compact disc. • Do not attach adhesive tape, stickers, etc. If necessary, use a CD cleaning kit. • If a disc skips or gets stuck on the front panel. 14 Sharp writing instruments, or the ink, may be used on a section... wiping the plastic parts. • Mild soap and a damp cloth may damage the surface. Other discs may not conform to the CD standard and may be stored in straight lines from the AC power source when cleaning. • The finish on either side of the compact disc. Never allow your unit...

