User Guide
Page 1
MP3851SP User's Guide Portable CD Player with AM/FM Stereo Radio Before operating this product, please read these instructions completely.
MP3851SP User's Guide Portable CD Player with AM/FM Stereo Radio Before operating this product, please read these instructions completely.
User Guide
Page 2
... equipment if an unauthorized change or modification is made. 1 For future reference, record the serial number of the unit printed on the rear of the unit.) DANGEROUS VOLTAGE: The lightning flash with it and obtain the performance that may generate or use radio frequency energy. Dear Customer, Please read this manual thoroughly before operating the unit to...
... equipment if an unauthorized change or modification is made. 1 For future reference, record the serial number of the unit printed on the rear of the unit.) DANGEROUS VOLTAGE: The lightning flash with it and obtain the performance that may generate or use radio frequency energy. Dear Customer, Please read this manual thoroughly before operating the unit to...
User Guide
Page 3
... B digital device, pursuant to Part 15 of the following measures: • Reorient or relocate the receiving antenna. • Increase the separation between the equipment and receiver. • Connect the equipment into an outlet on , the user is recommended to provide reasonable protection against harmful interference in a residential installation. LASER SAFETY: This unit employs a laser. This equipment generates, uses...
... B digital device, pursuant to Part 15 of the following measures: • Reorient or relocate the receiving antenna. • Increase the separation between the equipment and receiver. • Connect the equipment into an outlet on , the user is recommended to provide reasonable protection against harmful interference in a residential installation. LASER SAFETY: This unit employs a laser. This equipment generates, uses...

User Guide
Page 4
...at a low setting. • Slowly increase the sound until it comfortably and clearly, and without dis- This manufacturer and the Electronic Industries Association's Consumer Electronics Group want you listening for your hearing. Over time your hearing "comfort level" adapts to higher volumes of your musical enjoyment. To ..., alarm clock at a safe level BEFORE your sensitive hearing. Dear Customer: Selecting fine audio equipment such as the unit you've just purchased is only the start of sound. So what sounds "normal" can hear it is too late, this by playing it 's time to...
...at a low setting. • Slowly increase the sound until it comfortably and clearly, and without dis- This manufacturer and the Electronic Industries Association's Consumer Electronics Group want you listening for your hearing. Over time your hearing "comfort level" adapts to higher volumes of your musical enjoyment. To ..., alarm clock at a safe level BEFORE your sensitive hearing. Dear Customer: Selecting fine audio equipment such as the unit you've just purchased is only the start of sound. So what sounds "normal" can hear it is too late, this by playing it 's time to...
User Guide
Page 5
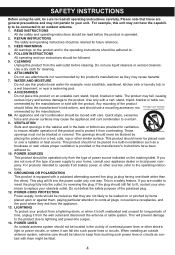
... unit may cause the appliance and cart combination to the operating instructions. 11. POWER SOURCES This product should be connected to your home, consult your unit. This is operated. 2. POWER LINES An outside antenna system, extreme care should be retained for example: near water-for future reference. 3. POWER-CORD PROTECTION Power-supply cords should use instructions should never be moved with them , paying particular attention...
... unit may cause the appliance and cart combination to the operating instructions. 11. POWER SOURCES This product should be connected to your home, consult your unit. This is operated. 2. POWER LINES An outside antenna system, extreme care should be retained for example: near water-for future reference. 3. POWER-CORD PROTECTION Power-supply cords should use instructions should never be moved with them , paying particular attention...
User Guide
Page 6
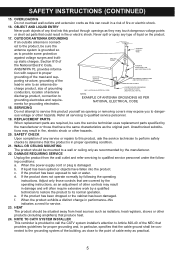
... the CATV system installer's attention to its normal operation. OBJECT AND LIQUID ENTRY Never push objects of any type of fire or electric shock. 16. NATIONAL ELECTRICAL CODE POWER SERVICE GROUNDING ELECTRODE SYSTEM (NEC ART 250, PART H) S2898A EXAMPLE OF ANTENNA GROUNDING AS PER NATIONAL ELECTRICAL CODE 18. HEAT The product should be sure the service technician uses replacement parts specified by a qualified...
... the CATV system installer's attention to its normal operation. OBJECT AND LIQUID ENTRY Never push objects of any type of fire or electric shock. 16. NATIONAL ELECTRICAL CODE POWER SERVICE GROUNDING ELECTRODE SYSTEM (NEC ART 250, PART H) S2898A EXAMPLE OF ANTENNA GROUNDING AS PER NATIONAL ELECTRICAL CODE 18. HEAT The product should be sure the service technician uses replacement parts specified by a qualified...
User Guide
Page 7
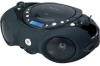
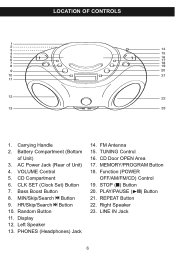
VOLUME Control 5. CLK SET (Clock Set) Button 7. HR/Skip/Search n Button 10. FM Antenna 15. Function (POWER OFF/AM/FM/CD) Control 19. PHONES (Headphones) Jack 14. TUNING Control 16. Bass Boost Button 8. REPEAT Button 22. Carrying Handle 2. Left Speaker 13. Right Speaker 23. Display 12. MEMORY/PROGRAM Button 18. Battery Compartment (Bottom of Unit) 4. AC Power Jack (Rear of Unit) 3. CD Door OPEN Area 17. LOCATION OF CONTROLS 1. CD Compartment 6. MIN/Skip/Search o Button 9. Random Button 11. STOP (I) Button 20. PLAY/PAUSE (®p) Button 21. LINE...
VOLUME Control 5. CLK SET (Clock Set) Button 7. HR/Skip/Search n Button 10. FM Antenna 15. Function (POWER OFF/AM/FM/CD) Control 19. PHONES (Headphones) Jack 14. TUNING Control 16. Bass Boost Button 8. REPEAT Button 22. Carrying Handle 2. Left Speaker 13. Right Speaker 23. Display 12. MEMORY/PROGRAM Button 18. Battery Compartment (Bottom of Unit) 4. AC Power Jack (Rear of Unit) 3. CD Door OPEN Area 17. LOCATION OF CONTROLS 1. CD Compartment 6. MIN/Skip/Search o Button 9. Random Button 11. STOP (I) Button 20. PLAY/PAUSE (®p) Button 21. LINE...
User Guide
Page 8
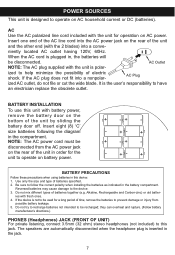
... DC (batteries). Reversed batteries may cause damage to operate on the rear of batteries together (e.g. POWER SOURCES This unit is inserted in the jack. 7 AC Use the AC polarized line cord included with the 2 blades) into a nonpolar- It is polar- Be sure to have an electrician replace the obsolete outlet. + BATTERY INSTALLATION To use this jack. The speakers are automatically disconnected when the headphone plug is designed...
... DC (batteries). Reversed batteries may cause damage to operate on the rear of batteries together (e.g. POWER SOURCES This unit is inserted in the jack. 7 AC Use the AC polarized line cord included with the 2 blades) into a nonpolar- It is polar- Be sure to have an electrician replace the obsolete outlet. + BATTERY INSTALLATION To use this jack. The speakers are automatically disconnected when the headphone plug is designed...
User Guide
Page 9
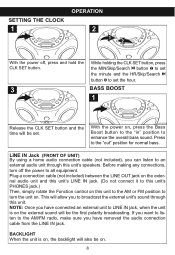
...'s LINE IN jack. (Do not connect it to this unit's PHONES jack.) Then, simply rotate the Function control on , the backlight will be on , press the Bass Boost button to the "in" position to the AM/FM radio, make sure you want to the "out" position for normal bass. OPERATION SETTING THE CLOCK 1 2 1 2 With the power off the power to broadcast the external unit's sound through this unit's speakers.
...'s LINE IN jack. (Do not connect it to this unit's PHONES jack.) Then, simply rotate the Function control on , the backlight will be on , press the Bass Boost button to the "in" position to the AM/FM radio, make sure you want to the "out" position for normal bass. OPERATION SETTING THE CLOCK 1 2 1 2 With the power off the power to broadcast the external unit's sound through this unit's speakers.
User Guide
Page 10
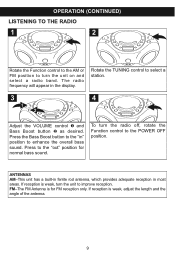
... a station. 3 1 1 2 4 2 Adjust the VOLUME control 1 and Bass Boost button 2 as desired. The radio frequency will appear in most areas. Press the Bass Boost button to the "in" position to the POWER OFF position. 1 ANTENNAS AM-This unit has a built-in ferrite rod antenna, which provides adequate reception in the display. To turn the unit on and select a radio band. OPERATION (CONTINUED) LISTENING TO THE RADIO 1 2 Rotate the Function control...
... a station. 3 1 1 2 4 2 Adjust the VOLUME control 1 and Bass Boost button 2 as desired. The radio frequency will appear in most areas. Press the Bass Boost button to the "in" position to the POWER OFF position. 1 ANTENNAS AM-This unit has a built-in ferrite rod antenna, which provides adequate reception in the display. To turn the unit on and select a radio band. OPERATION (CONTINUED) LISTENING TO THE RADIO 1 2 Rotate the Function control...
User Guide
Page 11
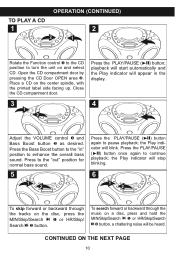
... the display. 2 4 Adjust the VOLUME control 1 and Bass Boost button 2 as desired. the Play indicator will be heard. Open the CD compartment door by pressing the CD Door OPEN area 2. playback will start automatically and the Play indicator will blink. Press to the "out" position for normal bass sound. 5 1 2 Press the PLAY/PAUSE (®p) button again to pause playback; To search forward or backward through the tracks on a disc, press...
... the display. 2 4 Adjust the VOLUME control 1 and Bass Boost button 2 as desired. the Play indicator will be heard. Open the CD compartment door by pressing the CD Door OPEN area 2. playback will start automatically and the Play indicator will blink. Press to the "out" position for normal bass sound. 5 1 2 Press the PLAY/PAUSE (®p) button again to pause playback; To search forward or backward through the tracks on a disc, press...
User Guide
Page 12
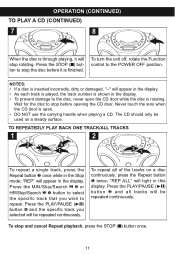
..." will be used on a disc continuously, press the Repeat button 1 twice; To turn the unit off, rotate the Function control to the disc, never open . • DO NOT use the carrying handle when playing a CD. The CD should only be repeated continuously. "REP" will appear in the display. • As each track is played, the track number is shown in the display. OPERATION (CONTINUED) TO PLAY A CD (CONTINUED) 7 8 When the disc is through playing, it...
..." will be used on a disc continuously, press the Repeat button 1 twice; To turn the unit off, rotate the Function control to the disc, never open . • DO NOT use the carrying handle when playing a CD. The CD should only be repeated continuously. "REP" will appear in the display. • As each track is played, the track number is shown in the display. OPERATION (CONTINUED) TO PLAY A CD (CONTINUED) 7 8 When the disc is through playing, it...
User Guide
Page 13
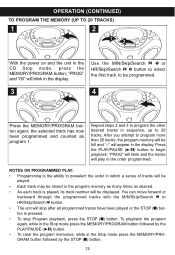
... tracks will be stored in the program memory as many times as program 1. 2 Repeat steps 2 and 3 to program the other desired tracks in sequence, up to 20 tracks. OPERATION (CONTINUED) TO PROGRAM THE MEMORY (UP TO 20 TRACKS) 1 2 1 2 With the power on and the unit in the Stop mode press the MEMORY/PROGRAM button followed by the PLAY/PAUSE (®p) button. • To clear the program memories, while in the CD Stop mode, press the MEMORY/PROGRAM button...
... tracks will be stored in the program memory as many times as program 1. 2 Repeat steps 2 and 3 to program the other desired tracks in sequence, up to 20 tracks. OPERATION (CONTINUED) TO PROGRAM THE MEMORY (UP TO 20 TRACKS) 1 2 1 2 With the power on and the unit in the Stop mode press the MEMORY/PROGRAM button followed by the PLAY/PAUSE (®p) button. • To clear the program memories, while in the CD Stop mode, press the MEMORY/PROGRAM button...
User Guide
Page 14
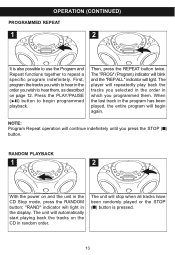
... power on page 12. When the last track in random order. 2 The unit will begin programmed playback. "RAND" indicator will repeatedly play back the tracks you selected in the order in the order you programmed them , as described on and the unit in the display. The player will light in the CD Stop mode, press the RANDOM button; Then, press the REPEAT button twice. First, program the tracks...
... power on page 12. When the last track in random order. 2 The unit will begin programmed playback. "RAND" indicator will repeatedly play back the tracks you selected in the order in the order you programmed them , as described on and the unit in the display. The player will light in the CD Stop mode, press the RANDOM button; Then, press the REPEAT button twice. First, program the tracks...
User Guide
Page 15
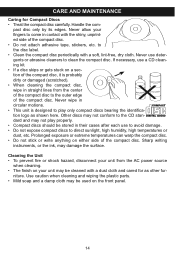
... clean the compact disc. Never use to avoid damage. • Do not expose compact discs to the outer edge of the compact disc. CARE AND MAINTENANCE Caring for as shown here. Never wipe in straight lines from the AC power source when ...used on your unit from the center of the compact disc. • Do not attach adhesive tape, stickers, etc. to play properly. • Compact discs should be cleaned with a dust cloth and cared for Compact Discs • Treat the compact disc carefully. niture. Prolonged exposure or extreme temperatures can warp the compact disc...
... clean the compact disc. Never use to avoid damage. • Do not expose compact discs to the outer edge of the compact disc. CARE AND MAINTENANCE Caring for as shown here. Never wipe in straight lines from the AC power source when ...used on your unit from the center of the compact disc. • Do not attach adhesive tape, stickers, etc. to play properly. • Compact discs should be cleaned with a dust cloth and cared for Compact Discs • Treat the compact disc carefully. niture. Prolonged exposure or extreme temperatures can warp the compact disc...
User Guide
Page 16
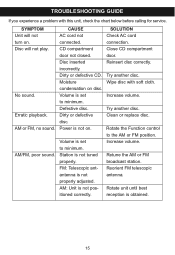
AM or FM, no sound. Volume is set to minimum. Power is not properly adjusted. Volume is not tuned properly. SOLUTION Check AC cord connection. Wipe disc with this unit, check the chart below before calling for service. Increase volume. TROUBLESHOOTING GUIDE If you experience a problem with soft cloth. AM/FM, poor sound. Try another disc. Increase volume. Clean or replace disc. Moisture condensation on . Dirty or defective disc. FM: Telescopic...
AM or FM, no sound. Volume is set to minimum. Power is not properly adjusted. Volume is not tuned properly. SOLUTION Check AC cord connection. Wipe disc with this unit, check the chart below before calling for service. Increase volume. TROUBLESHOOTING GUIDE If you experience a problem with soft cloth. AM/FM, poor sound. Try another disc. Increase volume. Clean or replace disc. Moisture condensation on . Dirty or defective disc. FM: Telescopic...
User Guide
Page 17
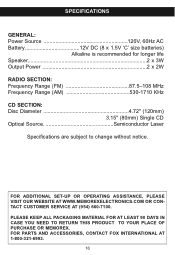
... NEED TO RETURN THIS PRODUCT TO YOUR PLACE OF PURCHASE OR MEMOREX. SPECIFICATIONS GENERAL: Power Source 120V, 60Hz AC Battery 12V DC (8 x 1.5V 'C' size batteries) Alkaline is recommended for longer life Speaker 2 x 3W Output Power 2 x 2W RADIO SECTION: Frequency Range (FM 87.5-108 MHz Frequency Range (AM 530-1710 KHz CD SECTION: Disc Diameter 4.72" (120mm) 3.15" (80mm) Single CD Optical Source Semiconductor Laser Specifications...
... NEED TO RETURN THIS PRODUCT TO YOUR PLACE OF PURCHASE OR MEMOREX. SPECIFICATIONS GENERAL: Power Source 120V, 60Hz AC Battery 12V DC (8 x 1.5V 'C' size batteries) Alkaline is recommended for longer life Speaker 2 x 3W Output Power 2 x 2W RADIO SECTION: Frequency Range (FM 87.5-108 MHz Frequency Range (AM 530-1710 KHz CD SECTION: Disc Diameter 4.72" (120mm) 3.15" (80mm) Single CD Optical Source Semiconductor Laser Specifications...


