Manual
Page 2
...4 Location of Controls 6 Charging the Battery 7 Using the Strap 8 Installing the Software 8 • Installing Windows Media Player 10..........9 • Installing Windows Media Player 11........12 • Installing MediaCoder 14 Downloading and Transferring Files 16 Using MediaCoder 19 Safely Remove Hardware 20 General Operation 21 • Turning the Power On/Off 21 • Menu Button 21 • Inserting/Removing an External Memory Card (Micro SD 21 • Headphones Jack 22 • Volume Buttons 22 • Lock Function 22 Main Menu 23 Operation-Music Playback Mode 24...
...4 Location of Controls 6 Charging the Battery 7 Using the Strap 8 Installing the Software 8 • Installing Windows Media Player 10..........9 • Installing Windows Media Player 11........12 • Installing MediaCoder 14 Downloading and Transferring Files 16 Using MediaCoder 19 Safely Remove Hardware 20 General Operation 21 • Turning the Power On/Off 21 • Menu Button 21 • Inserting/Removing an External Memory Card (Micro SD 21 • Headphones Jack 22 • Volume Buttons 22 • Lock Function 22 Main Menu 23 Operation-Music Playback Mode 24...
Manual
Page 3
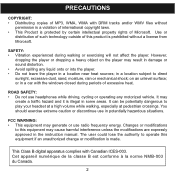
... driving, cycling or operating any liquid onto or into the player. • Do not leave the player in potentially hazardous situations. You should exercise extreme caution or discontinue use radio frequency energy. This Class B digital apparatus complies with the windows closed during walking or exercising will not affect the player. It can be potentially dangerous to this equipment may generate...
... driving, cycling or operating any liquid onto or into the player. • Do not leave the player in potentially hazardous situations. You should exercise extreme caution or discontinue use radio frequency energy. This Class B digital apparatus complies with the windows closed during walking or exercising will not affect the player. It can be potentially dangerous to this equipment may generate...
Manual
Page 8
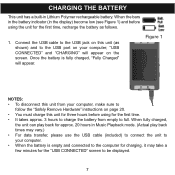
... in Music Playback mode. (Actual play back times may take a few minutes for the first time. • It takes approx. 3 hours to charge the battery from your computer; Once the battery is empty and connected to the computer for charging, it may vary.) • For data transfer, please use the USB cable (included) to connect the unit to your computer. • When the battery is fully charged, "Fully Charged" will...
... in Music Playback mode. (Actual play back times may take a few minutes for the first time. • It takes approx. 3 hours to charge the battery from your computer; Once the battery is empty and connected to the computer for charging, it may vary.) • For data transfer, please use the USB cable (included) to connect the unit to your computer. • When the battery is fully charged, "Fully Charged" will...
Manual
Page 9
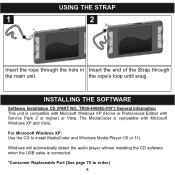
... Professional Edition with Microsoft Windows XP and Vista. For Microsoft Windows XP: Use the CD to order.) 8 Windows will automatically detect the audio player without installing the CD software when the USB cable is compatible with Service Pack 2 or higher) or Vista. INSTALLING THE SOFTWARE Software Installation CD (PART NO. The MediaCoder is connected. *Consumer Replaceable Part (See page 70 to install MediaCoder and Windows Media Player (10 or 11). USING THE STRAP 1 2 Insert the...
... Professional Edition with Microsoft Windows XP and Vista. For Microsoft Windows XP: Use the CD to order.) 8 Windows will automatically detect the audio player without installing the CD software when the USB cable is compatible with Service Pack 2 or higher) or Vista. INSTALLING THE SOFTWARE Software Installation CD (PART NO. The MediaCoder is connected. *Consumer Replaceable Part (See page 70 to install MediaCoder and Windows Media Player (10 or 11). USING THE STRAP 1 2 Insert the...

Manual
Page 10
... installed Windows Media Player 10, you can transfer MP3 files, WMA files, WMA files with Windows XP only. If the installation screen doesn't automatically appear, double-click My Computer, then double-click on the CD drive; Click "Download & Install Windows Media Player 10 or 11". 2. Then, click "Download Now". Click "Run" again. Read the License Agreement, then click I ACCEPT. 9 WINDOWS MEDIA PLAYER 10 INSTALLATION Windows Media Player 10 is for how to install Windows Media Player 11. (Windows Vista users must use...
... installed Windows Media Player 10, you can transfer MP3 files, WMA files, WMA files with Windows XP only. If the installation screen doesn't automatically appear, double-click My Computer, then double-click on the CD drive; Click "Download & Install Windows Media Player 10 or 11". 2. Then, click "Download Now". Click "Run" again. Read the License Agreement, then click I ACCEPT. 9 WINDOWS MEDIA PLAYER 10 INSTALLATION Windows Media Player 10 is for how to install Windows Media Player 11. (Windows Vista users must use...
Manual
Page 13
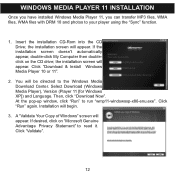
... CD drive; You will appear. Select Download (Windows Media Player), Version (Player 11 [for Windows XP]) and Language. At the pop-up window, click "Run" to your player using the "Sync" function. 1. If the installation screen doesn't automatically appear, double-click My Computer then doubleclick on "Microsoft Genuine Advantage Privacy Statement" to the Windows Media Download Center. Click "Download & Install Windows Media Player 10 or 11". 2. A "Validate Your Copy of Windows" screen will be directed to...
... CD drive; You will appear. Select Download (Windows Media Player), Version (Player 11 [for Windows XP]) and Language. At the pop-up window, click "Run" to your player using the "Sync" function. 1. If the installation screen doesn't automatically appear, double-click My Computer then doubleclick on "Microsoft Genuine Advantage Privacy Statement" to the Windows Media Download Center. Click "Download & Install Windows Media Player 10 or 11". 2. A "Validate Your Copy of Windows" screen will be directed to...
Manual
Page 17
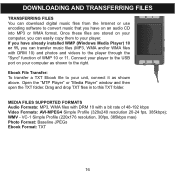
... 11. WMV - Connect your player to the USB port on an audio CD into MP3 or WMA format. Drag and drop TXT files in to this TXT folder. If you have on your player. Open the "MTP Player" or "Media Player" window and then open the TXT folder. DOWNLOADING AND TRANSFERRING FILES TRANSFERRING FILES You can download digital music files from the Internet or use encoding software to convert music that you have already installed WMP (Windows Media Player) 10 or 11...
... 11. WMV - Connect your player to the USB port on an audio CD into MP3 or WMA format. Drag and drop TXT files in to this TXT folder. If you have on your player. Open the "MTP Player" or "Media Player" window and then open the TXT folder. DOWNLOADING AND TRANSFERRING FILES TRANSFERRING FILES You can download digital music files from the Internet or use encoding software to convert music that you have already installed WMP (Windows Media Player) 10 or 11...
Manual
Page 18
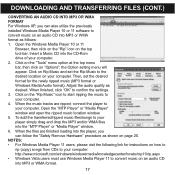
... "Rip Music" icon to start ripping the music to your computer. connect the player to your computer. Open the "MTP Player" or "Media Player" window and open the ripped music location window. 5. NOTES: • For Windows Media Player 11 users, please visit the following link for the newly ripped music (MP3 format or Windows Media Audio format). the Option setting menu will appear. To add the transferred/ripped music files/songs to convert music on an audio CD into the "MTP Player" or "Media Player" window. 6. DOWNLOADING AND TRANSFERRING FILES (CONT...
... "Rip Music" icon to start ripping the music to your computer. connect the player to your computer. Open the "MTP Player" or "Media Player" window and open the ripped music location window. 5. NOTES: • For Windows Media Player 11 users, please visit the following link for the newly ripped music (MP3 format or Windows Media Audio format). the Option setting menu will appear. To add the transferred/ripped music files/songs to convert music on an audio CD into the "MTP Player" or "Media Player" window. 6. DOWNLOADING AND TRANSFERRING FILES (CONT...

Manual
Page 19
...'s memory. You must use Windows Media Player 11 to locate the music files you transfer the files into MP3 or WMA format. 18 Click on "Sync". 2. Open the "Windows Media Player Browser 10" and click on the "Sync List" pull-down menu. DOWNLOADING AND TRANSFERRING FILES (CONT.) TRANSFERRING MP3/WMA/VIDEO/PHOTO FILES AND WMA FILES WITH DRM 10 USING WINDOWS MEDIA PLAYER 10 (FOR WINDOWS XP ONLY) To transfer MP3/WMA/PHOTO/VIDEO/WMA files with DRM 10 to the player. 4. Select the Portable Device ("MTP Player" or "Media Player") that...
...'s memory. You must use Windows Media Player 11 to locate the music files you transfer the files into MP3 or WMA format. 18 Click on "Sync". 2. Open the "Windows Media Player Browser 10" and click on the "Sync List" pull-down menu. DOWNLOADING AND TRANSFERRING FILES (CONT.) TRANSFERRING MP3/WMA/VIDEO/PHOTO FILES AND WMA FILES WITH DRM 10 USING WINDOWS MEDIA PLAYER 10 (FOR WINDOWS XP ONLY) To transfer MP3/WMA/PHOTO/VIDEO/WMA files with DRM 10 to the player. 4. Select the Portable Device ("MTP Player" or "Media Player") that...
Manual
Page 20
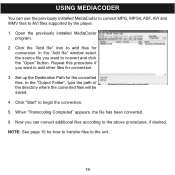
... for how to transfer files to add files for the converted files. In the "Add file" window select the source file you want to convert and click the "Open" button. Click "Start" to AVI files supported by the player. 1. USING MEDIACODER You can convert additional files according to the above procedures, if desired. Set up the Destination Path for conversion. Now you can use the previously installed MediaCoder to convert...
... for how to transfer files to add files for the converted files. In the "Add file" window select the source file you want to convert and click the "Open" button. Click "Start" to AVI files supported by the player. 1. USING MEDIACODER You can convert additional files according to the above procedures, if desired. Set up the Destination Path for conversion. Now you can use the previously installed MediaCoder to convert...

Manual
Page 23
... Down ▼ 2 button during playback. NOTE: The volume level will be shown on the side of the screen. Slide the Power/Lock switch to the Unlock position (middle) to cancel the Lock function; the Lock icon will disappear from the screen. 22 This is useful, for example, when you do not want the file changed by a bar and a number (0 to lock the buttons; To control the volume, simply press...
... Down ▼ 2 button during playback. NOTE: The volume level will be shown on the side of the screen. Slide the Power/Lock switch to the Unlock position (middle) to cancel the Lock function; the Lock icon will disappear from the screen. 22 This is useful, for example, when you do not want the file changed by a bar and a number (0 to lock the buttons; To control the volume, simply press...
Manual
Page 25
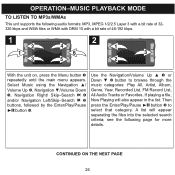
... WMA files or WMA with DRM 10 with a bit rate of 48-192 kbps. 1 2 2 4 1 1 6 3 3 5 2 With the unit on, press the Menu button 1 repeatedly until the main menu appears. Then press the Enter/Play/Pause ®p button 3 to browse through the music categories: Play All, Artist, Album, Genre, Year, Recorded List, FM Record List, All Audio Tracks or Favorites. CONTINUED ON THE NEXT PAGE 24 OPERATION-MUSIC PLAYBACK MODE...
... WMA files or WMA with DRM 10 with a bit rate of 48-192 kbps. 1 2 2 4 1 1 6 3 3 5 2 With the unit on, press the Menu button 1 repeatedly until the main menu appears. Then press the Enter/Play/Pause ®p button 3 to browse through the music categories: Play All, Artist, Album, Genre, Year, Recorded List, FM Record List, All Audio Tracks or Favorites. CONTINUED ON THE NEXT PAGE 24 OPERATION-MUSIC PLAYBACK MODE...

Manual
Page 26
... or the desired song using the Navigation/Volume Up ▲ 1 or Down ▼ 2 button then press the Enter/Play/Pause ®p button 3 to show the currently playing file. Now Playing: Select to start playback. All Audio Tracks: All audio files on the unit will not appear if no file is playing. 25 This option will be shown in the display. FM Record List: All recorded files that were recorded off of the audio files.
... or the desired song using the Navigation/Volume Up ▲ 1 or Down ▼ 2 button then press the Enter/Play/Pause ®p button 3 to show the currently playing file. Now Playing: Select to start playback. All Audio Tracks: All audio files on the unit will not appear if no file is playing. 25 This option will be shown in the display. FM Record List: All recorded files that were recorded off of the audio files.

Manual
Page 27
... turn the unit off or changing mode. The player will move the player forward or backward within a file to locate a specific musical passage. HIGH-SPEED MUSIC SEARCH 1 1 2 During playback, press and hold the Navigation Right/Skip-Search n 1 or Left/o 2 button to move forward or backward at the beginning of the last track which was playing before turning the power off , when the unit is held. OPERATION-MUSIC PLAYBACK MODE...
... turn the unit off or changing mode. The player will move the player forward or backward within a file to locate a specific musical passage. HIGH-SPEED MUSIC SEARCH 1 1 2 During playback, press and hold the Navigation Right/Skip-Search n 1 or Left/o 2 button to move forward or backward at the beginning of the last track which was playing before turning the power off , when the unit is held. OPERATION-MUSIC PLAYBACK MODE...

Manual
Page 31
... Enter/Play/Pause ®p button 3. 3 1 3 2 Select a desired Play mode (Normal, Repeat One [to repeat the selected song continuously], Repeat All [to repeat all selected songs continuously] or Random [to randomly play all of the selected songs]) using the Navigation/ Volume Up ▲ 1 or Down ▼ 2 button, then press the Enter/Play/Pause ®p button 3 to play back in Music Playback mode (Now Playing screen), press and hold the Menu button until the Contextual menu appears. OPERATION-MUSIC PLAYBACK MODE (CONTINUED) MUSIC CONTEXTUAL MENU-PLAY MODE...
... Enter/Play/Pause ®p button 3. 3 1 3 2 Select a desired Play mode (Normal, Repeat One [to repeat the selected song continuously], Repeat All [to repeat all selected songs continuously] or Random [to randomly play all of the selected songs]) using the Navigation/ Volume Up ▲ 1 or Down ▼ 2 button, then press the Enter/Play/Pause ®p button 3 to play back in Music Playback mode (Now Playing screen), press and hold the Menu button until the Contextual menu appears. OPERATION-MUSIC PLAYBACK MODE (CONTINUED) MUSIC CONTEXTUAL MENU-PLAY MODE...
Manual
Page 34
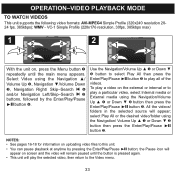
... Menu button 1 repeatedly until the button is pressed again. • This unit will appear; select Play All or the desired video/folder using the Navigation ▲/ Volume Up 2, Navigation ▼/Volume Down 3, Navigation Right/ Skip-Search n 4 and/or Navigation Left/Skip-Search o 5 buttons, followed by pressing the Enter/Play/Pause ®p button; WMV - To play all of the videos. OPERATION-VIDEO PLAYBACK MODE TO WATCH VIDEOS This unit supports the following video formats...
... Menu button 1 repeatedly until the button is pressed again. • This unit will appear; select Play All or the desired video/folder using the Navigation ▲/ Volume Up 2, Navigation ▼/Volume Down 3, Navigation Right/ Skip-Search n 4 and/or Navigation Left/Skip-Search o 5 buttons, followed by pressing the Enter/Play/Pause ®p button; WMV - To play all of the videos. OPERATION-VIDEO PLAYBACK MODE TO WATCH VIDEOS This unit supports the following video formats...

Manual
Page 36
... photo mode. 35 Use the Navigation/Volume Up ▲ 1 or Down ▼ 2 button to select Play All, then press the Enter/Play/ Pause ®p button 3 to music or the radio while viewing the photos, if desired. OPERATION-PHOTO PLAYBACK MODE TO VIEW PHOTOS-This unit supports baseline JPEGs. 1 2 1 3 4 6 2 1 5 2 3 With the unit on uploading photo files to this unit. • You can listen to view the photos. Select Photos using the Navigation ▲/ Volume...
... photo mode. 35 Use the Navigation/Volume Up ▲ 1 or Down ▼ 2 button to select Play All, then press the Enter/Play/ Pause ®p button 3 to music or the radio while viewing the photos, if desired. OPERATION-PHOTO PLAYBACK MODE TO VIEW PHOTOS-This unit supports baseline JPEGs. 1 2 1 3 4 6 2 1 5 2 3 With the unit on uploading photo files to this unit. • You can listen to view the photos. Select Photos using the Navigation ▲/ Volume...

Manual
Page 46
... and exit Recorder mode. 45 Select Record using the Navigation ▲/ Volume Up 2, Navigation ▼/Volume Down 3, Navigation Right/Skip-Search n 4 and/or Navigation Left/Skip-Search o 5 buttons, followed by the Enter/Play/Pause ®p button 6. Press the Menu button to exit the FM mode before create a voice recording. Press the Enter/Play/Pause ®p button to pause recording; OPERATION-RECORDER MODE TO CREATE A VOICE RECORDING 1 2 1 3 4 2 6 5 With the unit on, press the Menu button 1 repeatedly until the...
... and exit Recorder mode. 45 Select Record using the Navigation ▲/ Volume Up 2, Navigation ▼/Volume Down 3, Navigation Right/Skip-Search n 4 and/or Navigation Left/Skip-Search o 5 buttons, followed by the Enter/Play/Pause ®p button 6. Press the Menu button to exit the FM mode before create a voice recording. Press the Enter/Play/Pause ®p button to pause recording; OPERATION-RECORDER MODE TO CREATE A VOICE RECORDING 1 2 1 3 4 2 6 5 With the unit on, press the Menu button 1 repeatedly until the...

Manual
Page 49
OPERATION-RECORDER MODE (CONTINUED) RECORDER CONTEXTUAL MENU-RECORD SETTINGS (For Voice Recording only) 1 2 1 3 2 2 1 3 While in (MS ADPCM or PCM). the Settings screen will be set the desired setting: Encoder: select the type of format the recording will be stored (Internal or External) Rate: Select the desired sample rate of recording (8000 to 48000). the setting will be recorded in Record mode, press and hold the Menu button 1 until the Contextual menu appears. Scroll to set . 48...
OPERATION-RECORDER MODE (CONTINUED) RECORDER CONTEXTUAL MENU-RECORD SETTINGS (For Voice Recording only) 1 2 1 3 2 2 1 3 While in (MS ADPCM or PCM). the Settings screen will be set the desired setting: Encoder: select the type of format the recording will be stored (Internal or External) Rate: Select the desired sample rate of recording (8000 to 48000). the setting will be recorded in Record mode, press and hold the Menu button 1 until the Contextual menu appears. Scroll to set . 48...
Manual
Page 66
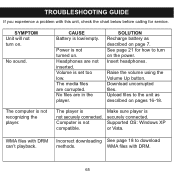
... the volume using the Volume Up button. Download uncorrupted files. Upload files to turn on. No sound. Supported OS: Windows XP or Vista. Power is not turned on the power. Headphones are corrupted. Computer is securely connected. See page 21 for service. methods. No files are in the player. Make sure player is not compatible. WMA files with DRM. 65 Volume is not securely connected. The player is set too low. SYMPTOM Unit will not turn on . TROUBLESHOOTING GUIDE...
... the volume using the Volume Up button. Download uncorrupted files. Upload files to turn on. No sound. Supported OS: Windows XP or Vista. Power is not turned on the power. Headphones are corrupted. Computer is securely connected. See page 21 for service. methods. No files are in the player. Make sure player is not compatible. WMA files with DRM. 65 Volume is not securely connected. The player is set too low. SYMPTOM Unit will not turn on . TROUBLESHOOTING GUIDE...


