User Guide
Page 3
... double-D symbol are designed to provide reasonable protection against harmful interference in a residential installation. TO ENSURE PROPER USE OF THIS PRODUCT, PLEASE READ THIS OWNER'S MANUAL CAREFULLY AND RETAIN FOR FUTURE REFERENCE. DO NOT STARE INTO BEAM. reception, which the receiver is connected. • Consult the dealer or an experienced radio...
... double-D symbol are designed to provide reasonable protection against harmful interference in a residential installation. TO ENSURE PROPER USE OF THIS PRODUCT, PLEASE READ THIS OWNER'S MANUAL CAREFULLY AND RETAIN FOR FUTURE REFERENCE. DO NOT STARE INTO BEAM. reception, which the receiver is connected. • Consult the dealer or an experienced radio...
User Guide
Page 12
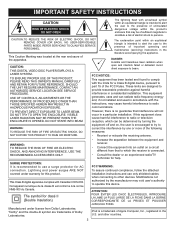
...; Set the TV's TV/VIDEO button or switch to the VIDEO setting. • When connecting the DVD, refer to the owner's manual of the TV, as well as this manual. • When connecting the DVD to the TV, make sure the power is off and both units are unplugged before making any...
...; Set the TV's TV/VIDEO button or switch to the VIDEO setting. • When connecting the DVD, refer to the owner's manual of the TV, as well as this manual. • When connecting the DVD to the TV, make sure the power is off and both units are unplugged before making any...
User Guide
Page 13
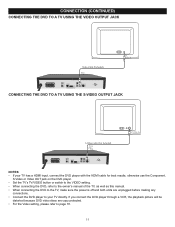
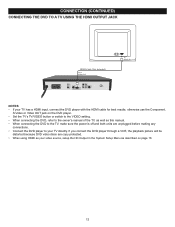
... PR input jacks. • Set the TV's TV/VIDEO button or switch to the VIDEO setting. • When connecting the DVD, refer to the owner's manual of video information fed to page 18. 12 The result is off , on the TV for best results. PROGRESSIVE (Y, PB, PR) VIDEO OUT: Use these..., press the P-SCAN/TRACK+ button to the TV, make sure the power is a stable, flicker-free image. (Check your TV/monitor for compatibility with this manual. • When connecting the DVD to turn the option off and both units are copy protected. • If using a TV with a blue screen option, turn...
... PR input jacks. • Set the TV's TV/VIDEO button or switch to the VIDEO setting. • When connecting the DVD, refer to the owner's manual of video information fed to page 18. 12 The result is off , on the TV for best results. PROGRESSIVE (Y, PB, PR) VIDEO OUT: Use these..., press the P-SCAN/TRACK+ button to the TV, make sure the power is a stable, flicker-free image. (Check your TV/monitor for compatibility with this manual. • When connecting the DVD to turn the option off and both units are copy protected. • If using a TV with a blue screen option, turn...
User Guide
Page 14
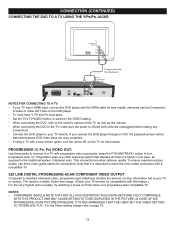
... DVD video discs are copy protected. • When using HDMI as your video source, setup the HD Output in the System Setup Menu as this manual. • When connecting the DVD to the TV, make sure the power is off and both units are unplugged before making any connections. • Connect... the DVD player to the owner's manual of the TV, as well as described on the DVD player. • Set the TV's TV/VIDEO button or switch to the VIDEO setting. •...
... DVD video discs are copy protected. • When using HDMI as your video source, setup the HD Output in the System Setup Menu as this manual. • When connecting the DVD to the TV, make sure the power is off and both units are unplugged before making any connections. • Connect... the DVD player to the owner's manual of the TV, as well as described on the DVD player. • Set the TV's TV/VIDEO button or switch to the VIDEO setting. •...
User Guide
Page 16
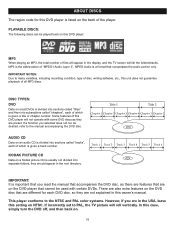
... will roll vertically. There are also extra features on the DVD disc that are different for this DVD player is important that you read the manual that accompanies the DVD disc, as there are features that are on NTSC. In this setting on the DVD player that compresses the audio portion... back on the back of all MP3 discs. ABOUT DISCS The region code for each DVD disc, so they are not explained in this owner's manual. MP3 is given a title or chapter number. Some features of this unit does not guarantee playback of the player. IMPORTANT NOTES: Due to the...
... will roll vertically. There are also extra features on the DVD disc that are different for this DVD player is important that you read the manual that accompanies the DVD disc, as there are features that are on NTSC. In this setting on the DVD player that compresses the audio portion... back on the back of all MP3 discs. ABOUT DISCS The region code for each DVD disc, so they are not explained in this owner's manual. MP3 is given a title or chapter number. Some features of this unit does not guarantee playback of the player. IMPORTANT NOTES: Due to the...
User Guide
Page 18
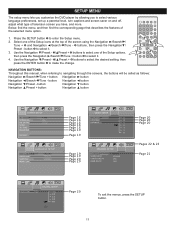
... the Setup icons at the top of the Setup options, 1 then press the Navigation ®/Search l/Tune + button 3 to select it . 3. NAVIGATION BUTTONS: Throughout this manual, when referring to make the change. button 5 to select it . 4. SETUP MENU The setup menu lets you customize the DVD player by allowing you to...
... the Setup icons at the top of the Setup options, 1 then press the Navigation ®/Search l/Tune + button 3 to select it . 3. NAVIGATION BUTTONS: Throughout this manual, when referring to make the change. button 5 to select it . 4. SETUP MENU The setup menu lets you customize the DVD player by allowing you to...
User Guide
Page 27
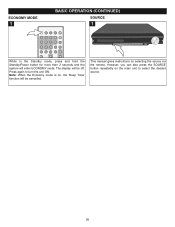
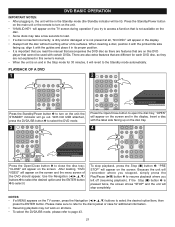
ECONOMY MODE 1 BASIC OPERATION (CONTINUED) SOURCE 1 While in the Standby mode, press and hold the Standby/Power button for more than 2 seconds and the system will be cancelled. This manual gives instructions on the main unit to turn the unit ON. Press again to select the desired source. 26 Note: When the Economy mode is on, the Sleep Timer function will be off. However, you can also press the SOURCE button repeatedly on selecting the source via the remote. The display will enter ECONOMY mode.
ECONOMY MODE 1 BASIC OPERATION (CONTINUED) SOURCE 1 While in the Standby mode, press and hold the Standby/Power button for more than 2 seconds and the system will be cancelled. This manual gives instructions on the main unit to turn the unit ON. Press again to select the desired source. 26 Note: When the Economy mode is on, the Sleep Timer function will be off. However, you can also press the SOURCE button repeatedly on selecting the source via the remote. The display will enter ECONOMY mode.
User Guide
Page 28
... pressed twice, the screen shows "STOP" and the unit will stop completely. NOTES: • If a MENU appears on this owner's manual. • When the unit is important that you read the manual that accompanies the DVD disc as there are features that are not explained in this DVD player that cannot be...
... pressed twice, the screen shows "STOP" and the unit will stop completely. NOTES: • If a MENU appears on this owner's manual. • When the unit is important that you read the manual that accompanies the DVD disc as there are features that are not explained in this DVD player that cannot be...
User Guide
Page 40
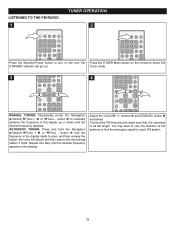
... the button; Adjust the VOLUME +/- the tuner will go out. You may have to vary the direction of the antenna to manually advance the frequency in the display. Tuner mode. 3 4 2 1 2 1 MANUAL TUNING: Repeatedly press the Navigation ®/Search l/Tune + 1 or m/Tune - buttons 1 and EQ/BASS button 2 as desired. Connect the FM Antenna...
... the button; Adjust the VOLUME +/- the tuner will go out. You may have to vary the direction of the antenna to manually advance the frequency in the display. Tuner mode. 3 4 2 1 2 1 MANUAL TUNING: Repeatedly press the Navigation ®/Search l/Tune + 1 or m/Tune - buttons 1 and EQ/BASS button 2 as desired. Connect the FM Antenna...
User Guide
Page 47
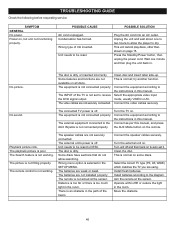
...No picture. try another function. Connect the equipment according to be reset. The Search feature is poor. Unit needs to the instructions in this manual. Turn the external unit on page 15. Clean the disc. Install fresh batteries. Unit needs to be reset to the AUX IN jacks is ...the correct TV type (PS, LB, WIDE) which matches the TV you are not installed properly. The equipment is dirty. Connect as per this manual, and press the AUX Mode button on , but unit not functioning properly. The disc is not connected properly. The batteries are using. This is...
...No picture. try another function. Connect the equipment according to be reset. The Search feature is poor. Unit needs to the instructions in this manual. Turn the external unit on page 15. Clean the disc. Install fresh batteries. Unit needs to be reset to the AUX IN jacks is ...the correct TV type (PS, LB, WIDE) which matches the TV you are not installed properly. The equipment is dirty. Connect as per this manual, and press the AUX Mode button on , but unit not functioning properly. The disc is not connected properly. The batteries are using. This is...


