User Guide
Page 3
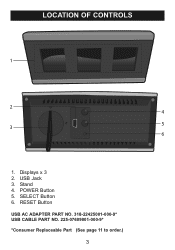
POWER Button 5. USB Jack 3. Stand 4. Displays x 3 2. SELECT Button 6. RESET Button USB AC ADAPTER PART NO. 318-22425001-000-9* USB CABLE PART NO. 225-07609001-000-9* *Consumer Replaceable Part (See page 11 to order.) 3 LOCATION OF CONTROLS 1 2 4 5 3 6 1.
POWER Button 5. USB Jack 3. Stand 4. Displays x 3 2. SELECT Button 6. RESET Button USB AC ADAPTER PART NO. 318-22425001-000-9* USB CABLE PART NO. 225-07609001-000-9* *Consumer Replaceable Part (See page 11 to order.) 3 LOCATION OF CONTROLS 1 2 4 5 3 6 1.
User Guide
Page 4
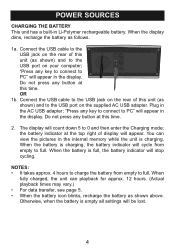
...; When the battery icon blinks, recharge the battery as follows. 1a. When the display dims, recharge the battery as shown above. Connect the USB cable to the USB jack on your computer; Do not press any button at this unit (as shown) and to full. Otherwise, when the battery is full, the... at the top right of display will count down 5 to full. NOTES: • It takes approx. 4 hours to charge the battery from empty to the USB port on the rear of this time. 2. When fully charged, the unit can view the pictures in Li-Polymer rechargeable battery. Plug in the display...
...; When the battery icon blinks, recharge the battery as follows. 1a. When the display dims, recharge the battery as shown above. Connect the USB cable to the USB jack on your computer; Do not press any button at this unit (as shown) and to full. Otherwise, when the battery is full, the... at the top right of display will count down 5 to full. NOTES: • It takes approx. 4 hours to charge the battery from empty to the USB port on the rear of this time. 2. When fully charged, the unit can view the pictures in Li-Polymer rechargeable battery. Plug in the display...
User Guide
Page 5
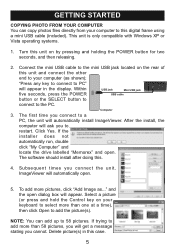
If the installer does not automatically run, double click "My Computer" and locate the drive labelled "Memorex" and open . 5. To add more than one at a time), then click Open to add more pictures, click "Add Image as shown); Select a picture (or ...button to connect to restart. Click Yes. Turn this unit on the rear of this digital frame using a mini USB cable (included). Delete picture(s) in the display. After the install, the computer will appear in this . 4. GETTING STARTED COPYING PHOTO FROM YOUR COMPUTER You can add up to a PC, the unit will get a message...
If the installer does not automatically run, double click "My Computer" and locate the drive labelled "Memorex" and open . 5. To add more than one at a time), then click Open to add more pictures, click "Add Image as shown); Select a picture (or ...button to connect to restart. Click Yes. Turn this unit on the rear of this digital frame using a mini USB cable (included). Delete picture(s) in the display. After the install, the computer will appear in this . 4. GETTING STARTED COPYING PHOTO FROM YOUR COMPUTER You can add up to a PC, the unit will get a message...
User Guide
Page 7
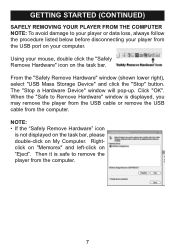
Click "OK". Rightclick on "Memorex" and left-click on the task bar. From the "Safely Remove Hardware" window (shown lower right), select "USB Mass Storage Device" and click the "Stop" button. When the "Safe to remove the player from the computer. 7 The "Stop a Hardware Device" window ...-click on your computer. NOTE: • If the "Safely Remove Hardware" icon is displayed, you may remove the player from the USB cable or remove the USB cable from the computer. GETTING STARTED (CONTINUED) SAFELY REMOVING YOUR PLAYER FROM THE COMPUTER NOTE: To avoid damage to your player or data...
Click "OK". Rightclick on "Memorex" and left-click on the task bar. From the "Safely Remove Hardware" window (shown lower right), select "USB Mass Storage Device" and click the "Stop" button. When the "Safe to remove the player from the computer. 7 The "Stop a Hardware Device" window ...-click on your computer. NOTE: • If the "Safely Remove Hardware" icon is displayed, you may remove the player from the USB cable or remove the USB cable from the computer. GETTING STARTED (CONTINUED) SAFELY REMOVING YOUR PLAYER FROM THE COMPUTER NOTE: To avoid damage to your player or data...
User Guide
Page 8
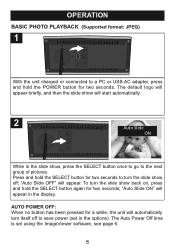
The default logo will appear briefly, and then the slide show off to a PC or USB AC adapter, press and hold the POWER button for two seconds; To turn the slide show will appear in the slide show back on, press .... Press and hold the SELECT button again for two seconds. "Auto Slide ON" will start automatically. 2 Auto Slide ON While in the display. OPERATION BASIC PHOTO PLAYBACK (Supported format: JPEG) 1 With the unit charged or connected to save power (set using the ImageViewer software, see page 6. 8 The Auto Power Off time...
The default logo will appear briefly, and then the slide show off to a PC or USB AC adapter, press and hold the POWER button for two seconds; To turn the slide show will appear in the slide show back on, press .... Press and hold the SELECT button again for two seconds. "Auto Slide ON" will start automatically. 2 Auto Slide ON While in the display. OPERATION BASIC PHOTO PLAYBACK (Supported format: JPEG) 1 With the unit charged or connected to save power (set using the ImageViewer software, see page 6. 8 The Auto Power Off time...
User Guide
Page 10
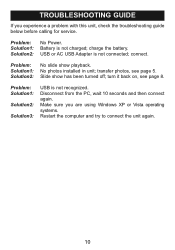
connect. USB or AC USB Adapter is not charged; No photos installed in unit; transfer photos, see page 8. turn it back on, see page 5. Make sure you experience a problem with this unit, check the troubleshooting guide below before calling for service. ... again. 10 charge the battery. Disconnect from the PC, wait 10 seconds and then connect again. Problem: Solution1: Solution2: No Power. Problem: Solution1: Solution2: Solution3: USB is not recognized.
connect. USB or AC USB Adapter is not charged; No photos installed in unit; transfer photos, see page 8. turn it back on, see page 5. Make sure you experience a problem with this unit, check the troubleshooting guide below before calling for service. ... again. 10 charge the battery. Disconnect from the PC, wait 10 seconds and then connect again. Problem: Solution1: Solution2: No Power. Problem: Solution1: Solution2: Solution3: USB is not recognized.
User Guide
Page 11
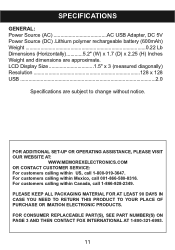
...REPLACEABLE PART(S), SEE PART NUMBER(S) ON PAGE 3 AND THEN CONTACT FOX INTERNATIONAL AT 1-800-321-6993. 11 SPECIFICATIONS GENERAL: Power Source (AC AC USB Adapter, DC 5V Power Source (DC) .Lithium polymer rechargeable battery (600mAh) Weight 0.22 Lb Dimensions (Horizontally 5.2" (W) x 1.7 (D) x 2.... TO YOUR PLACE OF PURCHASE OR IMATION ELECTRONIC PRODUCTS. LCD Display Size 1.5" x 3 (measured diagonally) Resolution 128 x 128 USB 2.0 Specifications are approximate. FOR ADDITIONAL SET-UP OR OPERATING ASSISTANCE, PLEASE VISIT OUR WEBSITE AT: WWW.MEMOREXELECTRONICS.COM OR CONTACT ...
...REPLACEABLE PART(S), SEE PART NUMBER(S) ON PAGE 3 AND THEN CONTACT FOX INTERNATIONAL AT 1-800-321-6993. 11 SPECIFICATIONS GENERAL: Power Source (AC AC USB Adapter, DC 5V Power Source (DC) .Lithium polymer rechargeable battery (600mAh) Weight 0.22 Lb Dimensions (Horizontally 5.2" (W) x 1.7 (D) x 2.... TO YOUR PLACE OF PURCHASE OR IMATION ELECTRONIC PRODUCTS. LCD Display Size 1.5" x 3 (measured diagonally) Resolution 128 x 128 USB 2.0 Specifications are approximate. FOR ADDITIONAL SET-UP OR OPERATING ASSISTANCE, PLEASE VISIT OUR WEBSITE AT: WWW.MEMOREXELECTRONICS.COM OR CONTACT ...