User Guide
Page 2
... presence of the unit. The user could lose the authority to use radio frequency energy. Avoid direct exposure to this equipment may generate or use a surge protector for this equipment if an unauthorized change or modification is recommended to operate this product. 1 Lightning and power surges ARE NOT covered under warranty for AC connection. Changes or modifications to...
... presence of the unit. The user could lose the authority to use radio frequency energy. Avoid direct exposure to this equipment may generate or use a surge protector for this equipment if an unauthorized change or modification is recommended to operate this product. 1 Lightning and power surges ARE NOT covered under warranty for AC connection. Changes or modifications to...
User Guide
Page 3
...Connect the equipment into an outlet on a stable surface. • Avoid installing the unit in locations described below: • Places exposed to direct sunlight or close to heat radiating appliances such as electric heaters. • On top of the FCC Rules. These limits are designed to Part 15 of other stereo... with the limits for help. • Do not open the CD compartment while the CD is no guarantee that to which can radiate radio frequency energy and, if not installed and used in accordance with the instructions, may cause harmful interference to constant vibration. •...
...Connect the equipment into an outlet on a stable surface. • Avoid installing the unit in locations described below: • Places exposed to direct sunlight or close to heat radiating appliances such as electric heaters. • On top of the FCC Rules. These limits are designed to Part 15 of other stereo... with the limits for help. • Do not open the CD compartment while the CD is no guarantee that to which can radiate radio frequency energy and, if not installed and used in accordance with the instructions, may cause harmful interference to constant vibration. •...
User Guide
Page 4
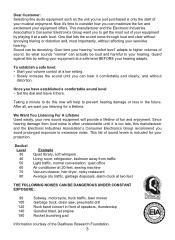
...adapts to higher volumes of your musical enjoyment. Taking a minute to do this now will provide a lifetime of sound levels is too late, this by playing it comfortably and clearly, and without distortion. Once you have established a comfortable sound level: • Set the dial and leave it 's time... You Listening For A Lifetime Used wisely, your new sound equipment will help to prevent hearing damage or loss in front of speakers, thunderclap 140 Gunshot blast, jet engine 180 Rocket launching pad Information courtesy of your equipment by setting your equipment at a safe ...
...adapts to higher volumes of your musical enjoyment. Taking a minute to do this now will provide a lifetime of sound levels is too late, this by playing it comfortably and clearly, and without distortion. Once you have established a comfortable sound level: • Set the dial and leave it 's time... You Listening For A Lifetime Used wisely, your new sound equipment will help to prevent hearing damage or loss in front of speakers, thunderclap 140 Gunshot blast, jet engine 180 Rocket launching pad Information courtesy of your equipment by setting your equipment at a safe ...
User Guide
Page 5
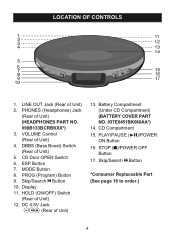
...STOP (I)/POWER OFF Button 17. Display 11. Skip/Search n Button *Consumer Replaceable Part (See page 16 to order.) 4 Skip/Search o Button 10. Battery Compartment (Under CD Compartment) (BATTERY COVER PART NO. 037E6451BK080AA*) 14. VOLUME Control (Rear of Unit) 5. DBBS (Bass Boost) Switch (Rear of Unit) 4. HOLD (ON/OFF) Switch (Rear of Unit) (HEADPHONES PART NO. 098B133BCRBKXX*) 3. ESP Button 7. PROG (Program) Button 9. PLAY/PAUSE (®p)/POWER ON Button 16. MODE Button 8. LOCATION OF CONTROLS 1. PHONES (Headphones) Jack (Rear of Unit) 12. DC 4.5V Jack z (Rear...
...STOP (I)/POWER OFF Button 17. Display 11. Skip/Search n Button *Consumer Replaceable Part (See page 16 to order.) 4 Skip/Search o Button 10. Battery Compartment (Under CD Compartment) (BATTERY COVER PART NO. 037E6451BK080AA*) 14. VOLUME Control (Rear of Unit) 5. DBBS (Bass Boost) Switch (Rear of Unit) 4. HOLD (ON/OFF) Switch (Rear of Unit) (HEADPHONES PART NO. 098B133BCRBKXX*) 3. ESP Button 7. PROG (Program) Button 9. PLAY/PAUSE (®p)/POWER ON Button 16. MODE Button 8. LOCATION OF CONTROLS 1. PHONES (Headphones) Jack (Rear of Unit) 12. DC 4.5V Jack z (Rear...
User Guide
Page 6
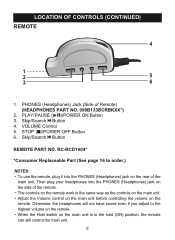
... before controlling the volume on the remote. Otherwise, the headphones will not have sound even if you adjust to order.) NOTES: • To use the remote, plug it into the PHONES (Headphones) jack on the remote work in the hold (ON) position, the remote can still control the main unit. 5 PLAY/PAUSE (®p)/POWER ON Button 3. VOLUME Control 5. Then plug your headphones into the PHONES (Headphones) jack on the rear of the remote. • The controls...
... before controlling the volume on the remote. Otherwise, the headphones will not have sound even if you adjust to order.) NOTES: • To use the remote, plug it into the PHONES (Headphones) jack on the remote work in the hold (ON) position, the remote can still control the main unit. 5 PLAY/PAUSE (®p)/POWER ON Button 3. VOLUME Control 5. Then plug your headphones into the PHONES (Headphones) jack on the rear of the remote. • The controls...
User Guide
Page 7
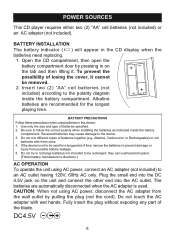
... type of the blade. Plug the small end into the AC outlet. POWER SOURCES This CD player requires either two (2) "AA" cell batteries (not included) or an AC adapter (not included). Open the CD compartment, then open the battery compartment door by pulling the plug (not the cord). BATTERY INSTALLATION The battery indicator ( ) will appear in on the unit and connect the other end into the...
... type of the blade. Plug the small end into the AC outlet. POWER SOURCES This CD player requires either two (2) "AA" cell batteries (not included) or an AC adapter (not included). Open the CD compartment, then open the battery compartment door by pulling the plug (not the cord). BATTERY INSTALLATION The battery indicator ( ) will appear in on the unit and connect the other end into the...
User Guide
Page 8
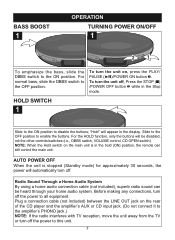
... turn off . Plug a connection cable (not included) between the LINE OUT jack on the rear of the CD player and the amplifier's AUX or CD input jack. (Do not connect it to this unit. 7 For the HOLD function, only the buttons will be heard through your home audio system. HOLD SWITCH 1 Slide to the ON position to enable the buttons. Before making any connections, turn off , Press the STOP (I) /POWER OFF button ƒ while in the display. AUTO POWER...
... turn off . Plug a connection cable (not included) between the LINE OUT jack on the rear of the CD player and the amplifier's AUX or CD input jack. (Do not connect it to this unit. 7 For the HOLD function, only the buttons will be heard through your home audio system. HOLD SWITCH 1 Slide to the ON position to enable the buttons. Before making any connections, turn off , Press the STOP (I) /POWER OFF button ƒ while in the display. AUTO POWER...
User Guide
Page 9
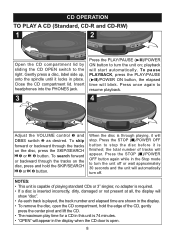
... unit is open the CD compartment, hold the SKIP/SEARCH o 3 or n 4 button. playback will appear. To search forward or backward through the tracks on the disc, press the SKIP/SEARCH o 3 or n 4 button. Press the STOP (I )/POWER OFF button again while in place. Press the STOP (I )/POWER OFF button to turn off. Insert headphones into the PHONES jack. 3 1 2 Press the PLAY/PAUSE (®p)/POWER ON button to stop . the total number of tracks will...
... unit is open the CD compartment, hold the SKIP/SEARCH o 3 or n 4 button. playback will appear. To search forward or backward through the tracks on the disc, press the SKIP/SEARCH o 3 or n 4 button. Press the STOP (I )/POWER OFF button again while in place. Press the STOP (I )/POWER OFF button to turn off. Insert headphones into the PHONES jack. 3 1 2 Press the PLAY/PAUSE (®p)/POWER ON button to stop . the total number of tracks will...
User Guide
Page 10
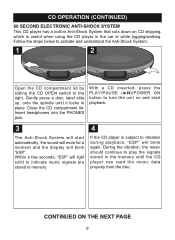
... PHONES jack. With a CD inserted, press the PLAY/PAUSE (®p)/POWER ON button to turn the unit on CD skipping, which is subject to vibration during playback, "ESP" will blink again. CD OPERATION (CONTINUED) 60 SECOND ELECTRONIC ANTI-SHOCK SYSTEM This CD player has a built-in Anti-Shock System that cuts down on and start playback. 3 The Anti-Shock System will start automatically, the sound...
... PHONES jack. With a CD inserted, press the PLAY/PAUSE (®p)/POWER ON button to turn the unit on CD skipping, which is subject to vibration during playback, "ESP" will blink again. CD OPERATION (CONTINUED) 60 SECOND ELECTRONIC ANTI-SHOCK SYSTEM This CD player has a built-in Anti-Shock System that cuts down on and start playback. 3 The Anti-Shock System will start automatically, the sound...
User Guide
Page 11
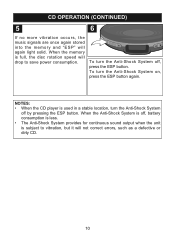
... sound output when the unit is subject to save power consumption. To turn the Anti-Shock System off by pressing the ESP button. To turn the Anti-Shock System off , press the ESP button. When the memory is used in a stable location, turn the Anti-Shock System on, press the ESP button again. CD OPERATION (CONTINUED) 5 6 If no more vibration occurs, the music...
... sound output when the unit is subject to save power consumption. To turn the Anti-Shock System off by pressing the ESP button. To turn the Anti-Shock System off , press the ESP button. When the memory is used in a stable location, turn the Anti-Shock System on, press the ESP button again. CD OPERATION (CONTINUED) 5 6 If no more vibration occurs, the music...
User Guide
Page 12
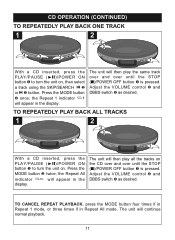
... on. CD OPERATION (CONTINUED) TO REPEATEDLY PLAY BACK ONE TRACK 1 2 2 3 4 2 3 1 1 With a CD inserted, press the PLAY/PAUSE (®p)/POWER ON button ‚ to turn the unit on, then select a track using the SKIP/SEARCH o 2 or n 3 button. the Repeat 1 indicator 1 will then play all the tracks on the CD over and over until the STOP (I )/POWER OFF button ‚ is pressed. TO CANCEL REPEAT PLAYBACK, press the MODE button four times if in Repeat 1 mode, or three times if...
... on. CD OPERATION (CONTINUED) TO REPEATEDLY PLAY BACK ONE TRACK 1 2 2 3 4 2 3 1 1 With a CD inserted, press the PLAY/PAUSE (®p)/POWER ON button ‚ to turn the unit on, then select a track using the SKIP/SEARCH o 2 or n 3 button. the Repeat 1 indicator 1 will then play all the tracks on the CD over and over until the STOP (I )/POWER OFF button ‚ is pressed. TO CANCEL REPEAT PLAYBACK, press the MODE button four times if in Repeat 1 mode, or three times if...
User Guide
Page 13
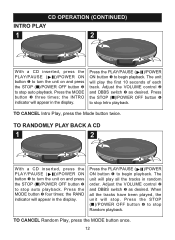
... in the display. Press the STOP (I )/POWER OFF button ƒ to stop auto playback. Adjust the VOLUME control ƒ and DBBS switch „ as desired. TO RANDOMLY PLAY BACK A CD 1 2 2 3 3 21 41 With a CD inserted, press the PLAY/PAUSE ( )/POWER ON button ‚ to turn the unit on and press the STOP (I )/POWER OFF button … to stop Intro playback. Press the PLAY/PAUSE ( )/POWER ON button ‚ to stop . Press the MODE button „ three times; Adjust the VOLUME control ƒ and...
... in the display. Press the STOP (I )/POWER OFF button ƒ to stop auto playback. Adjust the VOLUME control ƒ and DBBS switch „ as desired. TO RANDOMLY PLAY BACK A CD 1 2 2 3 3 21 41 With a CD inserted, press the PLAY/PAUSE ( )/POWER ON button ‚ to turn the unit on and press the STOP (I )/POWER OFF button … to stop Intro playback. Press the PLAY/PAUSE ( )/POWER ON button ‚ to stop . Press the MODE button „ three times; Adjust the VOLUME control ƒ and...
User Guide
Page 14
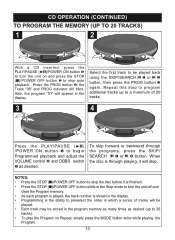
... times as desired. NOTES: • Press the STOP (I )/POWER OFF button 2 to stop the disc before it will blink. To skip forward or backward through playing, it is finished. • Press the STOP (I)/POWER OFF button while in the Stop mode to turn the unit on Repeat, simply press the MODE button twice while playing the Program. 13 CD OPERATION (CONTINUED) TO PROGRAM THE MEMORY (UP TO 20 TRACKS) 1 2 3 21 3 1 2 With a CD...
... times as desired. NOTES: • Press the STOP (I )/POWER OFF button 2 to stop the disc before it will blink. To skip forward or backward through playing, it is finished. • Press the STOP (I)/POWER OFF button while in the Stop mode to turn the unit on Repeat, simply press the MODE button twice while playing the Program. 13 CD OPERATION (CONTINUED) TO PROGRAM THE MEMORY (UP TO 20 TRACKS) 1 2 3 21 3 1 2 With a CD...
User Guide
Page 15
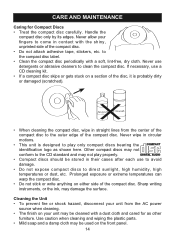
... not expose compact discs to the compact disc label. • Clean the compact disc periodically with the shiny, unprinted side of the compact disc. If necessary, use detergents or abrasive cleaners to come in straight lines from the AC power source when cleaning. • The finish on either side of the compact disc. • Do not attach adhesive tape, stickers, etc. Handle the compact disc only by its...
... not expose compact discs to the compact disc label. • Clean the compact disc periodically with the shiny, unprinted side of the compact disc. If necessary, use detergents or abrasive cleaners to come in straight lines from the AC power source when cleaning. • The finish on either side of the compact disc. • Do not attach adhesive tape, stickers, etc. Handle the compact disc only by its...
User Guide
Page 16
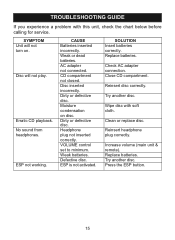
... before calling for service. Replace batteries. Press the ESP button. 15 CAUSE Batteries inserted incorrectly. Headphone plug not inserted correctly. Close CD compartment. Try another disc. Increase volume (main unit & remote). Disc will not turn on disc. CD compartment not closed. Weak batteries. Try another disc. SYMPTOM Unit will not play. Erratic CD playback. ESP not working. Weak or dead batteries. Disc inserted incorrectly. Dirty or defective disc. Dirty or defective disc. VOLUME control set to minimum...
... before calling for service. Replace batteries. Press the ESP button. 15 CAUSE Batteries inserted incorrectly. Headphone plug not inserted correctly. Close CD compartment. Try another disc. Increase volume (main unit & remote). Disc will not turn on disc. CD compartment not closed. Weak batteries. Try another disc. SYMPTOM Unit will not play. Erratic CD playback. ESP not working. Weak or dead batteries. Disc inserted incorrectly. Dirty or defective disc. Dirty or defective disc. VOLUME control set to minimum...
User Guide
Page 17
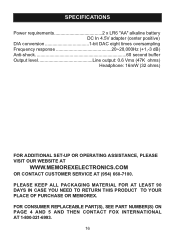
SPECIFICATIONS Power requirements 2 x LR6 "AA" alkaline battery DC In 4.5V adapter (center positive) D/A conversion 1-bit DAC eight times oversampling Frequency response 20~20,000Hz (+1,-3 dB) Anti-shock 60 second buffer Output level Line output: 0.6 Vms (47K ohms) Headphone: 16mW (32 ohms) FOR ADDITIONAL SET-UP OR OPERATING ASSISTANCE, PLEASE VISIT OUR WEBSITE AT WWW.MEMOREXELECTRONICS.COM OR CONTACT CUSTOMER SERVICE AT (954) 660...
SPECIFICATIONS Power requirements 2 x LR6 "AA" alkaline battery DC In 4.5V adapter (center positive) D/A conversion 1-bit DAC eight times oversampling Frequency response 20~20,000Hz (+1,-3 dB) Anti-shock 60 second buffer Output level Line output: 0.6 Vms (47K ohms) Headphone: 16mW (32 ohms) FOR ADDITIONAL SET-UP OR OPERATING ASSISTANCE, PLEASE VISIT OUR WEBSITE AT WWW.MEMOREXELECTRONICS.COM OR CONTACT CUSTOMER SERVICE AT (954) 660...


