User Guide
Page 3
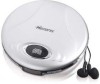
...and found to comply with the limits for help. • Do not open the CD compartment while the CD is rotating. • Always keep the CD compartment closed when not in use. • Keep all foreign objects out of the CD compartment. • Place the unit on a circuit different from that interference will ... numérique de la classe B est conforme à la norme NMB-003 du Canada. 2 This equipment generates, uses and can be determined by turning the equipment off and on, the user is no guarantee that to heat radiating appliances such as electric heaters. • On top of the FCC...
...and found to comply with the limits for help. • Do not open the CD compartment while the CD is rotating. • Always keep the CD compartment closed when not in use. • Keep all foreign objects out of the CD compartment. • Place the unit on a circuit different from that interference will ... numérique de la classe B est conforme à la norme NMB-003 du Canada. 2 This equipment generates, uses and can be determined by turning the equipment off and on, the user is no guarantee that to heat radiating appliances such as electric heaters. • On top of the FCC...
User Guide
Page 8
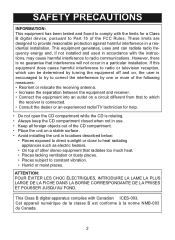
... unit on the main unit is stopped (Standby mode) for approximately 30 seconds, the power will appear in the Stop mode. To turn off , Press the STOP (I) /POWER OFF button ƒ while in the display. HOLD SWITCH 1 Slide to the ON position to the OFF position. Slide to ... be heard through your home audio system. Plug a connection cable (not included) between the LINE OUT jack on the rear of the CD player and the amplifier's AUX or CD input jack. (Do not connect it to the amplifier's PHONO jack.) NOTE: If the radio interferes with TV reception...
... unit on the main unit is stopped (Standby mode) for approximately 30 seconds, the power will appear in the Stop mode. To turn off , Press the STOP (I) /POWER OFF button ƒ while in the display. HOLD SWITCH 1 Slide to the ON position to the OFF position. Slide to ... be heard through your home audio system. Plug a connection cable (not included) between the LINE OUT jack on the rear of the CD player and the amplifier's AUX or CD input jack. (Do not connect it to the amplifier's PHONO jack.) NOTE: If the radio interferes with TV reception...
User Guide
Page 9
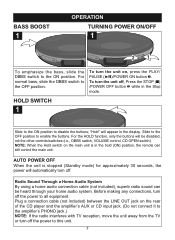
... tracks will start automatically. playback will appear. Press the STOP (I )/POWER OFF button to the right. Press once again to turn the unit on; NOTES: • This unit is open the CD compartment, hold the SKIP/SEARCH o 3 or n 4 button. To pause PLAYBACK, press the PLAY/PAUSE (®p)/POWER ON ... before it will appear in the display. • To remove the disc, open . 8 Close the CD compartment lid. Press the STOP (I )/POWER OFF button again while in the Stop mode to turn off or wait approximately 30 seconds and the unit will blink. Gently press a disc, label side up,...
... tracks will start automatically. playback will appear. Press the STOP (I )/POWER OFF button to the right. Press once again to turn the unit on; NOTES: • This unit is open the CD compartment, hold the SKIP/SEARCH o 3 or n 4 button. To pause PLAYBACK, press the PLAY/PAUSE (®p)/POWER ON ... before it will appear in the display. • To remove the disc, open . 8 Close the CD compartment lid. Press the STOP (I )/POWER OFF button again while in the Stop mode to turn off or wait approximately 30 seconds and the unit will blink. Gently press a disc, label side up,...
User Guide
Page 10
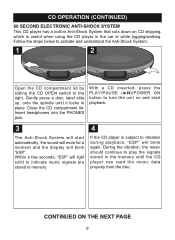
...and understand the Anti-Shock System: 1 2 Open the CD compartment lid by sliding the CD OPEN switch to play the signals stored in memory. 4 If the CD player is subject to turn the unit on CD skipping, which is useful when using the CD player in place. Gently press a disc, label side up,... onto the spindle until the CD player can read the music data properly from the disc. Close the CD compartment lid. During the ...
...and understand the Anti-Shock System: 1 2 Open the CD compartment lid by sliding the CD OPEN switch to play the signals stored in memory. 4 If the CD player is subject to turn the unit on CD skipping, which is useful when using the CD player in place. Gently press a disc, label side up,... onto the spindle until the CD player can read the music data properly from the disc. Close the CD compartment lid. During the ...
User Guide
Page 11
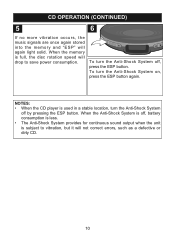
... disc rotation speed will drop to vibration, but it will again light solid. To turn the Anti-Shock System on, press the ESP button again. To turn the Anti-Shock System off by pressing the ESP button. CD OPERATION (CONTINUED) 5 6 If no more vibration occurs, the music signals are once... or dirty CD. 10 When the Anti-Shock System is off, battery consumption is less. • The Anti-Shock System provides for continuous sound output when the unit is used in a stable location, turn the Anti-Shock System off , press the ESP button. NOTES: • When the CD player is subject ...
... disc rotation speed will drop to vibration, but it will again light solid. To turn the Anti-Shock System on, press the ESP button again. To turn the Anti-Shock System off by pressing the ESP button. CD OPERATION (CONTINUED) 5 6 If no more vibration occurs, the music signals are once... or dirty CD. 10 When the Anti-Shock System is off, battery consumption is less. • The Anti-Shock System provides for continuous sound output when the unit is used in a stable location, turn the Anti-Shock System off , press the ESP button. NOTES: • When the CD player is subject ...
User Guide
Page 12
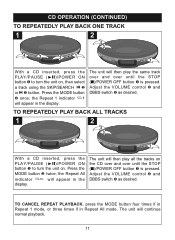
...in the display. ALL TO REPEATEDLY PLAY BACK ALL TRACKS 1 2 2 3 2 1 1 With a CD inserted, press the PLAY/PAUSE (®p)/POWER ON button ‚ to turn the unit on the CD over and over until the STOP (I )/POWER OFF button ‚ is pressed. the Repeat All indicator ALL... will then play all the tracks on . CD OPERATION (CONTINUED) TO REPEATEDLY PLAY BACK ONE TRACK 1 2 2 3 4 2 3 1 1 With a CD inserted, press the PLAY/PAUSE (®p)/POWER ON button ‚ to turn the unit on, then select a track using the SKIP/SEARCH o 2 or ...
...in the display. ALL TO REPEATEDLY PLAY BACK ALL TRACKS 1 2 2 3 2 1 1 With a CD inserted, press the PLAY/PAUSE (®p)/POWER ON button ‚ to turn the unit on the CD over and over until the STOP (I )/POWER OFF button ‚ is pressed. the Repeat All indicator ALL... will then play all the tracks on . CD OPERATION (CONTINUED) TO REPEATEDLY PLAY BACK ONE TRACK 1 2 2 3 4 2 3 1 1 With a CD inserted, press the PLAY/PAUSE (®p)/POWER ON button ‚ to turn the unit on, then select a track using the SKIP/SEARCH o 2 or ...
User Guide
Page 13
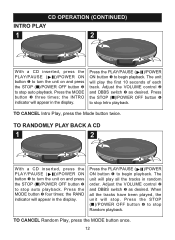
...MODE button „ four times; TO CANCEL Random Play, press the MODE button once. 12 CD OPERATION (CONTINUED) INTRO PLAY 1 2 2 3 3 21 41 With a CD inserted, press the PLAY/PAUSE ( )/POWER ON button ‚ to turn the unit on and press the STOP (I )/POWER OFF button … to stop auto ...to stop Random playback. TO CANCEL Intro Play, press the Mode button twice. TO RANDOMLY PLAY BACK A CD 1 2 2 3 3 21 41 With a CD inserted, press the PLAY/PAUSE ( )/POWER ON button ‚ to turn the unit on and press the STOP (I)/POWER OFF button ƒ to stop auto playback. The unit...
...MODE button „ four times; TO CANCEL Random Play, press the MODE button once. 12 CD OPERATION (CONTINUED) INTRO PLAY 1 2 2 3 3 21 41 With a CD inserted, press the PLAY/PAUSE ( )/POWER ON button ‚ to turn the unit on and press the STOP (I )/POWER OFF button … to stop auto ...to stop Random playback. TO CANCEL Intro Play, press the Mode button twice. TO RANDOMLY PLAY BACK A CD 1 2 2 3 3 21 41 With a CD inserted, press the PLAY/PAUSE ( )/POWER ON button ‚ to turn the unit on and press the STOP (I)/POWER OFF button ƒ to stop auto playback. The unit...
User Guide
Page 14
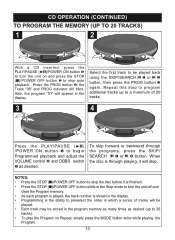
... first track to 20 tracks). • To play the Program on and press the STOP (I )/POWER OFF button while in the Stop mode to turn the unit on Repeat, simply press the MODE button twice while playing the Program. 13 NOTES: • Press the STOP (I)/POWER OFF button to... SKIP/SEARCH o 1 or n ƒ button, then press the PROG button „ again. CD OPERATION (CONTINUED) TO PROGRAM THE MEMORY (UP TO 20 TRACKS) 1 2 3 21 3 1 2 With a CD inserted, press the PLAY/PAUSE (®p)/POWER ON button 1 to turn the unit off and clear the Program memory. • As each program is played...
... first track to 20 tracks). • To play the Program on and press the STOP (I )/POWER OFF button while in the Stop mode to turn the unit on Repeat, simply press the MODE button twice while playing the Program. 13 NOTES: • Press the STOP (I)/POWER OFF button to... SKIP/SEARCH o 1 or n ƒ button, then press the PROG button „ again. CD OPERATION (CONTINUED) TO PROGRAM THE MEMORY (UP TO 20 TRACKS) 1 2 3 21 3 1 2 With a CD inserted, press the PLAY/PAUSE (®p)/POWER ON button 1 to turn the unit off and clear the Program memory. • As each program is played...
User Guide
Page 16
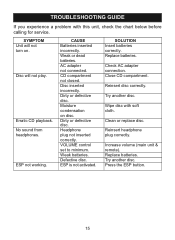
Disc will not turn on disc. AC adapter not connected. Moisture condensation on . Weak batteries. Replace batteries. Close CD compartment. Clean or replace disc. Increase volume (main unit & remote). Erratic CD playback. Weak or dead batteries. Dirty or defective disc. VOLUME control set to minimum. SOLUTION Insert ... not activated. TROUBLESHOOTING GUIDE If you experience a problem with soft cloth. SYMPTOM Unit will not play. ESP not working. CD compartment not closed. Check AC adapter connection. Reinsert headphone plug correctly. Replace batteries.
Disc will not turn on disc. AC adapter not connected. Moisture condensation on . Weak batteries. Replace batteries. Close CD compartment. Clean or replace disc. Increase volume (main unit & remote). Erratic CD playback. Weak or dead batteries. Dirty or defective disc. VOLUME control set to minimum. SOLUTION Insert ... not activated. TROUBLESHOOTING GUIDE If you experience a problem with soft cloth. SYMPTOM Unit will not play. ESP not working. CD compartment not closed. Check AC adapter connection. Reinsert headphone plug correctly. Replace batteries.


