

User Guide
Page 2
... a risk of electric shock to persons. ATTENTION: The exclamation point within an equilateral triangle is made. iPod and iPhone are expressly approved in the instruction manual. REFER SERVICING TO QUALIFIED SERVICE PERSONNEL. FCC WARNING: This equipment may cause harmful interference unless the modifications are trademarks of important operating and...
... a risk of electric shock to persons. ATTENTION: The exclamation point within an equilateral triangle is made. iPod and iPhone are expressly approved in the instruction manual. REFER SERVICING TO QUALIFIED SERVICE PERSONNEL. FCC WARNING: This equipment may cause harmful interference unless the modifications are trademarks of important operating and...
User Guide
Page 8
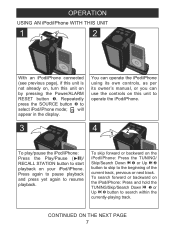
... current track, previous or next track. will appear in the display. You can operate the iPod/iPhone using its own controls, as per its owner's manual, or you can use the controls on this unit on by pressing the Power/ALARM RESET button 1. CONTINUED ON THE NEXT PAGE 7 Repeatedly press the...
... current track, previous or next track. will appear in the display. You can operate the iPod/iPhone using its own controls, as per its owner's manual, or you can use the controls on this unit on by pressing the Power/ALARM RESET button 1. CONTINUED ON THE NEXT PAGE 7 Repeatedly press the...
User Guide
Page 10
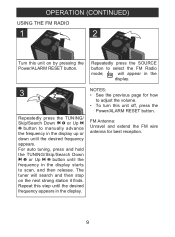
.... • To turn this unit on the next strong station it finds. Repeat this step until the desired frequency appears in the display starts to manually advance the frequency in the display up or down until the frequency in the display. will search and then stop on by pressing the Power...
.... • To turn this unit on the next strong station it finds. Repeat this step until the desired frequency appears in the display starts to manually advance the frequency in the display up or down until the frequency in the display. will search and then stop on by pressing the Power...
User Guide
Page 13
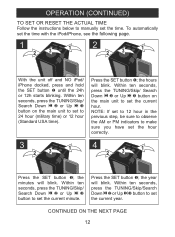
... to set the current hour. NOTE: If set to 12 hour in the previous step, be sure to observe the AM or PM indicators to manually set the current minute. Press the SET button 1; Press the SET button 1; the minutes will blink. Within ten seconds, press the TUNING/Skip/Search Down...
... to set the current hour. NOTE: If set to 12 hour in the previous step, be sure to observe the AM or PM indicators to manually set the current minute. Press the SET button 1; Press the SET button 1; the minutes will blink. Within ten seconds, press the TUNING/Skip/Search Down...


