

Installation Guide
Page 2
...) 6 ft. (1.8 m) Inlet hose, Black EPDM, space saving 90° elbow, hypro-blue steel couplings (2 pack) Alternate parts: (Not supplied with washer) Adjustable or open end wrench 9/16" (14 mm) 4" min (102 mm) Level Wood block Ruler or measuring tape Pliers that open to improve performance ...and minimize noise and possible "washer walk". Install your washer to 13⁄4" (44.5 mm) Optional tools: Flashlight Bucket Parts supplied: NOTE: All parts supplied for your washer in the top of your Use and Care Guide. To order, please...
...) 6 ft. (1.8 m) Inlet hose, Black EPDM, space saving 90° elbow, hypro-blue steel couplings (2 pack) Alternate parts: (Not supplied with washer) Adjustable or open end wrench 9/16" (14 mm) 4" min (102 mm) Level Wood block Ruler or measuring tape Pliers that open to improve performance ...and minimize noise and possible "washer walk". Install your washer to 13⁄4" (44.5 mm) Optional tools: Flashlight Bucket Parts supplied: NOTE: All parts supplied for your washer in the top of your Use and Care Guide. To order, please...
Installation Guide
Page 3
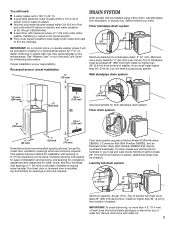
... capacity: 20 gal. (76 L). Floor standpipe drain system 4.5" (114 mm) 39" (990 mm) Minimum diameter for installation with maximum slope of washer. (Additional hoses may cause damage in door are minimum required. Minimum siphon break: 28" (710 mm) from bottom of 1" (25 mm) under entire...and clearances for floor standpipe drain system. n A level floor with spacing of 0" (0 mm) clearance on back of washer. install no higher than 96" (2.44 m) from bottom of washer. Top of washer to 120° F (49° C). If a closet door or louvered door is your Use and Care Guide...
... capacity: 20 gal. (76 L). Floor standpipe drain system 4.5" (114 mm) 39" (990 mm) Minimum diameter for installation with maximum slope of washer. (Additional hoses may cause damage in door are minimum required. Minimum siphon break: 28" (710 mm) from bottom of 1" (25 mm) under entire...and clearances for floor standpipe drain system. n A level floor with spacing of 0" (0 mm) clearance on back of washer. install no higher than 96" (2.44 m) from bottom of washer. Top of washer to 120° F (49° C). If a closet door or louvered door is your Use and Care Guide...
Installation Guide
Page 4
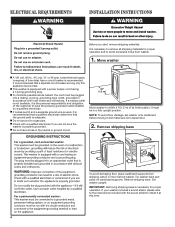
...mating, 3 prong, grounding-type outlet, grounded in a fully upright position. ELECTRICAL REQUIREMENTS INSTALLATION INSTRUCTIONS Before you are not sure the washer is necessary for proper operation and to a gas pipe. or 20-amp, fused electrical supply is equipped with local codes and ordinances. n... This washer is required. Tip washer back and place on floor behind washer. n If codes permit and a separate ground wire is used, it is the personal responsibility and obligation of...
...mating, 3 prong, grounding-type outlet, grounded in a fully upright position. ELECTRICAL REQUIREMENTS INSTALLATION INSTRUCTIONS Before you are not sure the washer is necessary for proper operation and to a gas pipe. or 20-amp, fused electrical supply is equipped with local codes and ordinances. n... This washer is required. Tip washer back and place on floor behind washer. n If codes permit and a separate ground wire is used, it is the personal responsibility and obligation of...

Installation Guide
Page 5
Be sure to free from tray. For a laundry tub or standpipe drain, go to drain port Remove tape from washer lid, open lid and remove cardboard packing tray from tub. Place drain hose in case you need additional parts with clamp. 3. NOTE: Keep tray in ... Step 7. Remove packing tray from the black drain port on bottom of laundry tub. IMPORTANT: 4.5" (114 mm) of the washer. Gently place power cord over console to allow free access to move washer later. 4. Drain hose form must be inside standpipe; For a floor drain, remove the preinstalled drain hose form as shown...
Be sure to free from tray. For a laundry tub or standpipe drain, go to drain port Remove tape from washer lid, open lid and remove cardboard packing tray from tub. Place drain hose in case you need additional parts with clamp. 3. NOTE: Keep tray in ... Step 7. Remove packing tray from the black drain port on bottom of laundry tub. IMPORTANT: 4.5" (114 mm) of the washer. Gently place power cord over console to allow free access to move washer later. 4. Drain hose form must be inside standpipe; For a floor drain, remove the preinstalled drain hose form as shown...

Installation Guide
Page 6
... cold water inlet valve. See "Tools and Parts". If you must be attached and have water flowing to avoid clogs. Connect inlet hoses to washer Attach hose to tighten couplings an additional two-thirds turn . Use pliers to hot water faucet. n Periodically inspect and replace hoses if bulges, ...additional two-thirds turn . Screw on coupling by hand until it is connected to hot water to help in attaching hoses to faucets or washer. Damage can result. Screw coupling by hand until clear. Connect inlet hoses to water faucets Run water for leaks Turn on valve when ...
... cold water inlet valve. See "Tools and Parts". If you must be attached and have water flowing to avoid clogs. Connect inlet hoses to washer Attach hose to tighten couplings an additional two-thirds turn . Use pliers to hot water faucet. n Periodically inspect and replace hoses if bulges, ...additional two-thirds turn . Screw on coupling by hand until it is connected to hot water to help in attaching hoses to faucets or washer. Damage can result. Screw coupling by hand until clear. Connect inlet hoses to water faucets Run water for leaks Turn on valve when ...
Installation Guide
Page 7
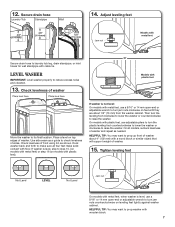
... counterclockwise to laundry tub leg, drain standpipe, or inlet hoses for wall standpipe with a wood block or similar object that will support weight of washer. If washer is level, use a 9/16" or 14 mm open -end or adjustable wrench to step 15, (on models with plastic feet). Check levelness of sides. ... use a 9/16" or 14 mm open -end or adjustable wrench to check levelness of front using lid, as needed. or Models with plastic feet If washer is not level: On models with wooden block. 7 HELPFUL TIP: You may want to reduce excess noise and vibration. 13. Use side seam as a ...
... counterclockwise to laundry tub leg, drain standpipe, or inlet hoses for wall standpipe with a wood block or similar object that will support weight of washer. If washer is level, use a 9/16" or 14 mm open -end or adjustable wrench to step 15, (on models with plastic feet). Check levelness of sides. ... use a 9/16" or 14 mm open -end or adjustable wrench to check levelness of front using lid, as needed. or Models with plastic feet If washer is not level: On models with wooden block. 7 HELPFUL TIP: You may want to reduce excess noise and vibration. 13. Use side seam as a ...
Installation Guide
Page 8
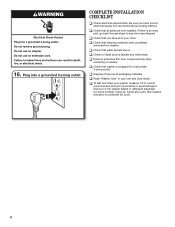
... tools. Select any tape remaining on . q Check that all parts are on washer. q Check that water faucets are now installed. q Remove protective film from washer. q Check that you have all packaging materials. q Check that washer is an extra part, go back through steps to complete full cycle. 8 q... dispenser (on some models). q Check for leaks around faucets and inlet hoses. Close lid. Start washer and allow to see what was skipped. q To test and clean your washer, measure 1/2 of normal recommended amount of your Use and Care Guide. Be sure you have correct ...
... tools. Select any tape remaining on . q Check that all parts are on washer. q Check that water faucets are now installed. q Remove protective film from washer. q Check that you have all packaging materials. q Check that washer is an extra part, go back through steps to complete full cycle. 8 q... dispenser (on some models). q Check for leaks around faucets and inlet hoses. Close lid. Start washer and allow to see what was skipped. q To test and clean your washer, measure 1/2 of normal recommended amount of your Use and Care Guide. Be sure you have correct ...

Energy Guide
Page 1
... other labels with yellow numbers are based on six wash loads a week and a national average electricity cost of 12 cents per therm. Clothes Washer Capacity Class: Standard Maytag Model MVWP475E* Cat. Government Federal law prohibits removal of $1.09 per kWh and natural gas cost of this label before consumer purchase. Labels with...
... other labels with yellow numbers are based on six wash loads a week and a national average electricity cost of 12 cents per therm. Clothes Washer Capacity Class: Standard Maytag Model MVWP475E* Cat. Government Federal law prohibits removal of $1.09 per kWh and natural gas cost of this label before consumer purchase. Labels with...
Use & Care Guide
Page 2
WASHER SAFETY 2
WASHER SAFETY 2
Use & Care Guide
Page 3
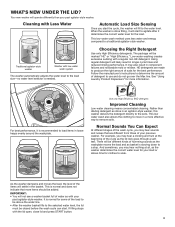
...This low-water wash method uses less water and energy compared to use and do not go over the Max line. Traditional agitator-style washer Washer with your load or allows time for clothes to remove soils. Low-water washing creates excessive sudsing with the lid open, close lid and...size-no water level selector is normal and does not indicate that are made to produce the right amount of detergent to a traditional agitator-style washer. It may hear sounds and noises that more information. There will start . For best performance, it is done filling, it determines the ...
...This low-water wash method uses less water and energy compared to use and do not go over the Max line. Traditional agitator-style washer Washer with your load or allows time for clothes to remove soils. Low-water washing creates excessive sudsing with the lid open, close lid and...size-no water level selector is normal and does not indicate that are made to produce the right amount of detergent to a traditional agitator-style washer. It may hear sounds and noises that more information. There will start . For best performance, it is done filling, it determines the ...
Use & Care Guide
Page 4
...will repeat for your fabric. ■■ On some warm water may be closed , it may change at increasing speeds for more than your washer. Concentrated cleaning delivers the detergent directly to resume the cycle. RINSE You will pump out the water. When this stage of cycles. 2 WASH ...filling with HE detergent at this stage. It is locked and cannot be opened . This may be unlocked at this light is blinking, the washer is held for proper water removal, based on . Press and hold for detailed descriptions of the wash cycle. You will hear sounds similar ...
...will repeat for your fabric. ■■ On some warm water may be closed , it may change at increasing speeds for more than your washer. Concentrated cleaning delivers the detergent directly to resume the cycle. RINSE You will pump out the water. When this stage of cycles. 2 WASH ...filling with HE detergent at this stage. It is locked and cannot be opened . This may be unlocked at this light is blinking, the washer is held for proper water removal, based on . Press and hold for detailed descriptions of the wash cycle. You will hear sounds similar ...
Use & Care Guide
Page 5
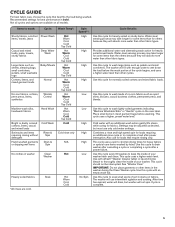
...rinsing only. Provides additional water and alternating wash action for normally soiled cottons and mixed fabric loads. Place small items in the washer during the Clean Washer cycle. Cold water with an empty wash tub. This cycle uses a spin to complete a load after a power failure. ... Recommended settings for fabrics. Use this cycle with an additional wash action gently lifts stains while caring for best performance in washer Clean Hot Washer Heavily soiled fabrics Soak *All rinses are available on fabrics. Use this cycle for heavily soiled mixed loads. Use this ...
...rinsing only. Provides additional water and alternating wash action for normally soiled cottons and mixed fabric loads. Place small items in the washer during the Clean Washer cycle. Cold water with an empty wash tub. This cycle uses a spin to complete a load after a power failure. ... Recommended settings for fabrics. Use this cycle with an additional wash action gently lifts stains while caring for best performance in washer Clean Hot Washer Heavily soiled fabrics Soak *All rinses are available on fabrics. Use this cycle for heavily soiled mixed loads. Use this ...
Use & Care Guide
Page 6
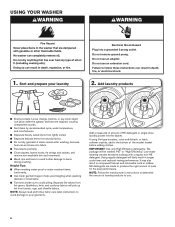
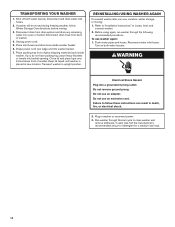
...delicate or small items. ■■ Turn knits inside out to your laundry Electrical Shock Hazard Plug into the basket. USING YOUR WASHER WARNING 1. NOTE: Always read and follow these instructions can pass under the agitator and become trapped, causing unexpected sounds. ■■... will likely result in component failures and noticeable mold or mildew. NOTE: Follow the manufacturer's instructions to determine the amount of the washer basket before adding clothes. Add a measured of amount of suds for the best performance. Loose change, buttons, or any small object...
...delicate or small items. ■■ Turn knits inside out to your laundry Electrical Shock Hazard Plug into the basket. USING YOUR WASHER WARNING 1. NOTE: Always read and follow these instructions can pass under the agitator and become trapped, causing unexpected sounds. ■■... will likely result in component failures and noticeable mold or mildew. NOTE: Follow the manufacturer's instructions to determine the amount of the washer basket before adding clothes. Add a measured of amount of suds for the best performance. Loose change, buttons, or any small object...
Use & Care Guide
Page 7
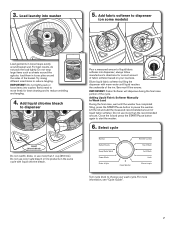
...sheets around basket wall. IMPORTANT: Fabric Softener will dispense during the final rinse portion of the rim. Turn cycle knob to start the washer. 6. always follow manufacturer's directions for best cleaning and to reduce wrinkling and tangling. 4. For best results, do not pack the load...Do not tightly pack or force items into dispenser; Add fabric softener to move freely for correct amount of liquid fabric softener into washer. Items need to dispenser (on your wash cycle. Adding Liquid Fabric Softener Manually to dispenser Pour a measured amount of fabric ...
...sheets around basket wall. IMPORTANT: Fabric Softener will dispense during the final rinse portion of the rim. Turn cycle knob to start the washer. 6. always follow manufacturer's directions for best cleaning and to reduce wrinkling and tangling. 4. For best results, do not pack the load...Do not tightly pack or force items into dispenser; Add fabric softener to move freely for correct amount of liquid fabric softener into washer. Items need to dispenser (on your wash cycle. Adding Liquid Fabric Softener Manually to dispenser Pour a measured amount of fabric ...
Use & Care Guide
Page 8
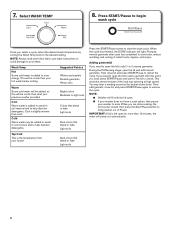
.... When the cycle has finished, the DONE indicator will be closed, then press the Start/Pause button to resume the cycle. NOTE: ■■ Washer will pump out automatically. 8 Press START/Pause to begin wash cycle Once you need to open the lid to soak. Then close lid, and press... START/Pause again to bring washer out of metal hooks, zippers, and snaps. Then add garment, close lid and press START/Pause to help dissolve detergents. This may hear a winding...
.... When the cycle has finished, the DONE indicator will be closed, then press the Start/Pause button to resume the cycle. NOTE: ■■ Washer will pump out automatically. 8 Press START/Pause to begin wash cycle Once you need to open the lid to soak. Then close lid, and press... START/Pause again to bring washer out of metal hooks, zippers, and snaps. Then add garment, close lid and press START/Pause to help dissolve detergents. This may hear a winding...
Use & Care Guide
Page 9
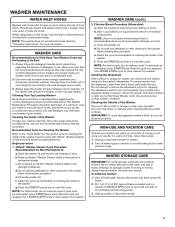
...because they do not use . Cleaning the Inside of controlling the rate at which in turn may otherwise accumulate in the washer's dispensers. Begin procedure 1. g. WASHER CARE (cont.) 2. Select the cycle recommended for Best Performance): a. NOTE: For best results, do not interrupt cycle....dispensers, wipe them with a permanent marker. NOTE: For best results, do not interrupt cycle. Chlorine Bleach Procedure (Alternative): a. Open the washer lid and remove any clothing or items. b. d. Cleaning the Dispensers After a period of using your inlet hoses, mark the date of...
...because they do not use . Cleaning the Inside of controlling the rate at which in turn may otherwise accumulate in the washer's dispensers. Begin procedure 1. g. WASHER CARE (cont.) 2. Select the cycle recommended for Best Performance): a. NOTE: For best results, do not interrupt cycle....dispensers, wipe them with a permanent marker. NOTE: For best results, do not interrupt cycle. Chlorine Bleach Procedure (Alternative): a. Open the washer lid and remove any clothing or items. b. d. Cleaning the Dispensers After a period of using your inlet hoses, mark the date of...
Use & Care Guide
Page 10
...or bucket. Failure to follow Winter Storage Care directions before moving : 1. Use half the manufacturer's recommended amount of washer. 4. TRANSPORTING YOUR WASHER 1. Do not remove ground prong. Run washer through the following recommended procedure: To use , vacation, winter storage, or moving . 3. Drape power cord over lid... drain from back of detergent for a medium-size load. 10 If you do not have packing tray, place heavy blankets or towels into washer basket. 7. Unplug power cord. 5. Do not use an adapter. Plug in death, re, or electrical shock. 2. Shut off both...
...or bucket. Failure to follow Winter Storage Care directions before moving : 1. Use half the manufacturer's recommended amount of washer. 4. TRANSPORTING YOUR WASHER 1. Do not remove ground prong. Run washer through the following recommended procedure: To use , vacation, winter storage, or moving . 3. Drape power cord over lid... drain from back of detergent for a medium-size load. 10 If you do not have packing tray, place heavy blankets or towels into washer basket. 7. Unplug power cord. 5. Do not use an adapter. Plug in death, re, or electrical shock. 2. Shut off both...
Use & Care Guide
Page 11
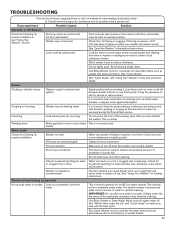
... experience Possible Causes Solution Vibration or Off-Balance Check the following for proper installation: Washer not level. Fill hose washers. TROUBLESHOOTING First try the solutions suggested here or visit our website at www.maytag.com/product_help In Canada www.maytag.ca for assistance and to possibly avoid a service call for service to remove items...
... experience Possible Causes Solution Vibration or Off-Balance Check the following for proper installation: Washer not level. Fill hose washers. TROUBLESHOOTING First try the solutions suggested here or visit our website at www.maytag.com/product_help In Canada www.maytag.ca for assistance and to possibly avoid a service call for service to remove items...
Use & Care Guide
Page 12
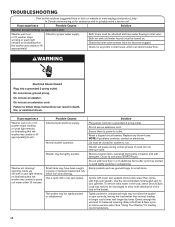
...solutions suggested here or visit our website at www.maytag.com/product_help In Canada www.maytag.ca for any blown fuses. Check for assistance and to possibly avoid a service call. Failure to be tightly packed or unbalanced. Washer may have been caught in pump or between ... instructions can slow draining. WARNING Electrical Shock Hazard Plug into a grounded 3 prong outlet. Use the recommended cycle/speed spin for washer to pump out water within 10 minutes Possible Causes Check proper electrical supply. Select the Drain & Spin cycle to avoid tightly packing...
...solutions suggested here or visit our website at www.maytag.com/product_help In Canada www.maytag.ca for any blown fuses. Check for assistance and to possibly avoid a service call. Failure to be tightly packed or unbalanced. Washer may have been caught in pump or between ... instructions can slow draining. WARNING Electrical Shock Hazard Plug into a grounded 3 prong outlet. Use the recommended cycle/speed spin for washer to pump out water within 10 minutes Possible Causes Check proper electrical supply. Select the Drain & Spin cycle to avoid tightly packing...
Use & Care Guide
Page 13
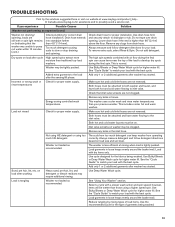
...and follow detergent directions for assistance and to match your load. Load garments in loose heaps evenly around the basket wall. See "Using Your Washer" section. however, items will be clogged. See the "Cycle Guide" to possibly avoid a service call. TROUBLESHOOTING First try the solutions ... fabrics being washed. 13 on (indicating that inlet valve screens are not reversed. Load is less efficient at www.maytag.com/product_help In Canada www.maytag.ca for your load with the best cycle. Remove any kinks in the inlet hose. Use cycle designed for correct...
...and follow detergent directions for assistance and to match your load. Load garments in loose heaps evenly around the basket wall. See "Using Your Washer" section. however, items will be clogged. See the "Cycle Guide" to possibly avoid a service call. TROUBLESHOOTING First try the solutions ... fabrics being washed. 13 on (indicating that inlet valve screens are not reversed. Load is less efficient at www.maytag.com/product_help In Canada www.maytag.ca for your load with the best cycle. Remove any kinks in the inlet hose. Use cycle designed for correct...


