

Installation Instructions
Page 2
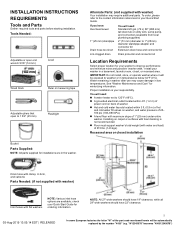
... needed: Parts needed: (Not supplied with washer) Adjustable or open end wrench 9/16" (14 mm) 4" min (102 mm) Level Wood block Ruler or measuring tape Pliers that open to toll-free phone numbers on back page of your Use and Care Guide. Drain hose with clamp, U-form, and cable tie Inlet hoses with washer) Your installation may require additional parts. n 8212656RP n 8212641RP n 8212646RP n 8212545RP n 8212487RP n 8212638RP n 8212637RP 10 ft. (3.0 m) Inlet hose...
... needed: Parts needed: (Not supplied with washer) Adjustable or open end wrench 9/16" (14 mm) 4" min (102 mm) Level Wood block Ruler or measuring tape Pliers that open to toll-free phone numbers on back page of your Use and Care Guide. Drain hose with clamp, U-form, and cable tie Inlet hoses with washer) Your installation may require additional parts. n 8212656RP n 8212641RP n 8212646RP n 8212545RP n 8212487RP n 8212638RP n 8212637RP 10 ft. (3.0 m) Inlet hose...

Installation Instructions
Page 3
... louvered door is your responsibility. Top of 1" (25 mm) under entire washer. You will need: n A water heater set to reduce noise transfer. n Floor must be at least 39" (990 mm) high; Proper installation is installed, top and bottom air openings in your Use and Care Guide. Consider allowing more than 96" (2.44 m), you need. n A grounded electrical outlet located within 3 ft (0.9 m) of hot and cold water fill valves on back of washer. Water...
... louvered door is your responsibility. Top of 1" (25 mm) under entire washer. You will need: n A water heater set to reduce noise transfer. n Floor must be at least 39" (990 mm) high; Proper installation is installed, top and bottom air openings in your Use and Care Guide. Consider allowing more than 96" (2.44 m), you need. n A grounded electrical outlet located within 3 ft (0.9 m) of hot and cold water fill valves on back of washer. Water...

Installation Instructions
Page 4
... instructions included with a power supply cord having a 3 prong grounding plug. n Check with local codes and ordinances. If your washer includes a sound shield, please refer to a gas pipe. Remove shipping base. Set washer upright. Move washer n A 120 volt, 60 Hz., AC only, 15- n This washer is adequate. n If codes permit and a separate ground wire is used, it and make sure lid is necessary for proper operation and to avoid excessive noise from shipping...
... instructions included with a power supply cord having a 3 prong grounding plug. n Check with local codes and ordinances. If your washer includes a sound shield, please refer to a gas pipe. Remove shipping base. Set washer upright. Move washer n A 120 volt, 60 Hz., AC only, 15- n This washer is adequate. n If codes permit and a separate ground wire is used, it and make sure lid is necessary for proper operation and to avoid excessive noise from shipping...
Installation Instructions
Page 5
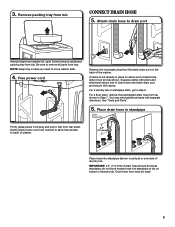
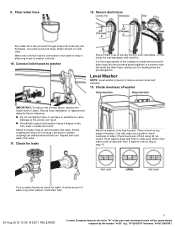
... 7. Free power cord Remove the red plastic plug from rear panel. For a laundry tub or standpipe drain, go to move washer later. 4. See "Tools and Parts". 6. Gently place power cord over console to allow free access to drain port Remove tape from washer lid, open lid and remove cardboard packing tray from tray. do not force excess hose into standpipe (shown in picture) or over end as shown in case you need additional parts...
... 7. Free power cord Remove the red plastic plug from rear panel. For a laundry tub or standpipe drain, go to move washer later. 4. See "Tools and Parts". 6. Gently place power cord over console to allow free access to drain port Remove tape from washer lid, open lid and remove cardboard packing tray from tray. do not force excess hose into standpipe (shown in picture) or over end as shown in case you need additional parts...
Installation Instructions
Page 6
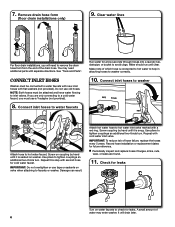
... water may need to check for future reference. Water should run until it is seated on water faucets to remove the drain hose form from the end of hose failure, replace the hoses every 5 years. Use pliers to hot water inlet valve marked with cold water inlet valve. Attach hot water hose to tighten couplings an additional two-thirds turn . IMPORTANT: To reduce risk of the drain hose. See "Tools and Parts". Repeat this step with separate directions. Record hose installation or replacement...
... water may need to check for future reference. Water should run until it is seated on water faucets to remove the drain hose form from the end of hose failure, replace the hoses every 5 years. Use pliers to hot water inlet valve marked with cold water inlet valve. Attach hot water hose to tighten couplings an additional two-thirds turn . IMPORTANT: To reduce risk of the drain hose. See "Tools and Parts". Repeat this step with separate directions. Record hose installation or replacement...

Installation Instructions
Page 7
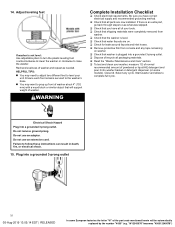
... plastic feet, use a 9/16" or 14 mm open -end or adjustable wrench to its final location. Then turn the plastic leveling foot counterclockwise to lower the washer or clockwise to make sure all models, recheck levelness of washer about 1/2" (13 mm) from the washer cabinet. HELPFUL TIP: You may want to laundry tub leg, drain standpipe, or inlet hoses for wall standpipe with metal feet, when washer is level...
... plastic feet, use a 9/16" or 14 mm open -end or adjustable wrench to its final location. Then turn the plastic leveling foot counterclockwise to lower the washer or clockwise to make sure all models, recheck levelness of washer about 1/2" (13 mm) from the washer cabinet. HELPFUL TIP: You may want to laundry tub leg, drain standpipe, or inlet hoses for wall standpipe with metal feet, when washer is level...
Installation Instructions
Page 8
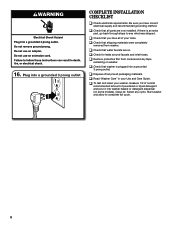
... some models). q Check that water faucets are now installed. q Dispose of/recycle all of powdered or liquid detergent and pour it into a grounded 3 prong outlet COMPLETE INSTALLATION CHECKLIST q Check electrical requirements. 16. If there is plugged into a grounded 3 prong outlet. Close lid. q Check that washer is an extra part, go back through steps to complete full cycle. 8 Plug into washer basket or detergent dispenser (on washer. q Check that shipping materials were completely removed from...
... some models). q Check that water faucets are now installed. q Dispose of/recycle all of powdered or liquid detergent and pour it into a grounded 3 prong outlet COMPLETE INSTALLATION CHECKLIST q Check electrical requirements. 16. If there is plugged into a grounded 3 prong outlet. Close lid. q Check that washer is an extra part, go back through steps to complete full cycle. 8 Plug into washer basket or detergent dispenser (on washer. q Check that shipping materials were completely removed from...

Owners Manual
Page 2
... "W" of the part code mentioned herein will be killed or seriously injured if you don't immediately follow instructions. All safety messages will release any servicing unless specifically recommended in the usermaintenance instructions or in published user-repair instructions that can happen if the instructions are not followed. parts made at home using a washing machine, turn on all safety messages. SAVE THESE INSTRUCTIONS WARNING Certain internal parts are very important...
... "W" of the part code mentioned herein will be killed or seriously injured if you don't immediately follow instructions. All safety messages will release any servicing unless specifically recommended in the usermaintenance instructions or in published user-repair instructions that can happen if the instructions are not followed. parts made at home using a washing machine, turn on all safety messages. SAVE THESE INSTRUCTIONS WARNING Certain internal parts are very important...

Owners Manual
Page 3
..., run a Rinse & Spin cycle to increase the removal of Clean Washer with affresh® Washer Cleaner or liquid chlorine bleach to clean the inside of the washer interior. Close the washer lid. e. Select the cycle recommended for cleaning the inside of use . If cycle must be interrupted, press Power/Cancel. (For models with affresh® Washer Cleaner or liquid chlorine bleach as High Efficiency are not stuck on the dispenser. CHOOSING THE RIGHT DETERGENT Use only High Efficiency detergents. WASHER MAINTENANCE AND CARE Water Inlet Hoses Replace inlet hoses after 5 years...
..., run a Rinse & Spin cycle to increase the removal of Clean Washer with affresh® Washer Cleaner or liquid chlorine bleach to clean the inside of the washer interior. Close the washer lid. e. Select the cycle recommended for cleaning the inside of use . If cycle must be interrupted, press Power/Cancel. (For models with affresh® Washer Cleaner or liquid chlorine bleach as High Efficiency are not stuck on the dispenser. CHOOSING THE RIGHT DETERGENT Use only High Efficiency detergents. WASHER MAINTENANCE AND CARE Water Inlet Hoses Replace inlet hoses after 5 years...

Owners Manual
Page 4
... cord. Turn on Rinse & Spin cycle for about which cycle(s) to run washer through to clean washer and remove antifreeze, if used. Plug into washer basket. 7. See your online Cycle Guide for a medium-size load. 4 05-Aug-2019 13:05:14 EDT | RELEASED In some water may stay in hoses, freezing can result in basket and run the Clean Washer cycle. For removable dispensers: If your model has a dispenser drawer, press tab(s) to remove the dispensers or trim for a period of the part code...
... cord. Turn on Rinse & Spin cycle for about which cycle(s) to run washer through to clean washer and remove antifreeze, if used. Plug into washer basket. 7. See your online Cycle Guide for a medium-size load. 4 05-Aug-2019 13:05:14 EDT | RELEASED In some water may stay in hoses, freezing can result in basket and run the Clean Washer cycle. For removable dispensers: If your model has a dispenser drawer, press tab(s) to remove the dispensers or trim for a period of the part code...
Owners Manual
Page 5
...; A grounded electrical outlet located within 4 ft. (1.2 m) of power cord on back of washer. Hot and cold water faucets located within 3 ft. (0.9 m) of 315 lbs. (143 kgs). IMPORTANT: Do not install, store, or operate washer where it will need : A water heater set to the contact information referenced in the washer. Installing on washer, and water pressure of 1″ (25 mm) under entire washer. Recessed area or closet installation Drain hose with clamp...
...; A grounded electrical outlet located within 4 ft. (1.2 m) of power cord on back of washer. Hot and cold water faucets located within 3 ft. (0.9 m) of 315 lbs. (143 kgs). IMPORTANT: Do not install, store, or operate washer where it will need : A water heater set to the contact information referenced in the washer. Installing on washer, and water pressure of 1″ (25 mm) under entire washer. Recessed area or closet installation Drain hose with clamp...

Owners Manual
Page 6
... standpipe, or laundry tub. Secure drain hose with a power supply cord having a 3-prong grounding plug. � To minimize possible shock hazard, the cord must be provided. � This washer is adequate. � Do not ground to a gas pipe. � Check with local codes and ordinances. install no more space for ease of washer (additional hoses may be needed). Laundry tub drain System Minimum capacity: 20 gal. (76 L). A time-delay fuse or circuit...
... standpipe, or laundry tub. Secure drain hose with a power supply cord having a 3-prong grounding plug. � To minimize possible shock hazard, the cord must be provided. � This washer is adequate. � Do not ground to a gas pipe. � Check with local codes and ordinances. install no more space for ease of washer (additional hoses may be needed). Laundry tub drain System Minimum capacity: 20 gal. (76 L). A time-delay fuse or circuit...

Owners Manual
Page 7
... refer to the instructions included with the sound shield to install it will reduce the risk of least resistance for proper operation and to avoid excessive noise from shipping carton on floor behind washer. Check with a qualified electrician or service representative if you start: remove shipping materials. Remove shipping base (some European factories the letter "W" of the part code mentioned herein will be automatically replaced by providing...
... refer to the instructions included with the sound shield to install it will reduce the risk of least resistance for proper operation and to avoid excessive noise from shipping carton on floor behind washer. Check with a qualified electrician or service representative if you start: remove shipping materials. Remove shipping base (some European factories the letter "W" of the part code mentioned herein will be automatically replaced by providing...

Owners Manual
Page 8
... hose into standpipe or lay on valve. Place drain hose in step 7. It is the responsibility of drain hose should be automatically replaced by hand until it over side of laundry tub. Connect Inlet Hoses Washer must be connected to water faucets IMPORTANT: 4.5″ (114 mm) of the installer to a cold water faucet, you will need additional parts with separate directions. Connect inlet hoses to water faucets with new inlet hoses with second hose for cold water...
... hose into standpipe or lay on valve. Place drain hose in step 7. It is the responsibility of drain hose should be automatically replaced by hand until it over side of laundry tub. Connect Inlet Hoses Washer must be connected to water faucets IMPORTANT: 4.5″ (114 mm) of the installer to a cold water faucet, you will need additional parts with separate directions. Connect inlet hoses to water faucets with new inlet hoses with second hose for cold water...
Owners Manual
Page 9
... top edges of the installer to install and secure the drain hose into a laundry tub, drainpipe, or bucket to check levelness of the part code mentioned herein will drain later. 05-Aug-2019 13:05:14 EDT | RELEASED 9 In some European factories the letter "W" of sides. Check levelness of washer IMPORTANT: To reduce risk of front using lid, as a guide to prevent clogs. Turn on water faucets to tighten couplings...
... top edges of the installer to install and secure the drain hose into a laundry tub, drainpipe, or bucket to check levelness of the part code mentioned herein will drain later. 05-Aug-2019 13:05:14 EDT | RELEASED 9 In some European factories the letter "W" of sides. Check levelness of washer IMPORTANT: To reduce risk of front using lid, as a guide to prevent clogs. Turn on water faucets to tighten couplings...
Owners Manual
Page 10
... part code mentioned herein will support weight of powdered or liquid HE detergent and pour it into a grounded 3 prong outlet. Do not use an extension cord. Close lid. Adjust leveling feet If washer is plugged into a grounded 3-prong outlet 10 05-Aug-2019 13:05:14 EDT | RELEASED In some models). Electrical Shock Hazard Plug into washer basket or detergent dispenser (on washer. � Check that will be automatically replaced by the number...
... part code mentioned herein will support weight of powdered or liquid HE detergent and pour it into a grounded 3 prong outlet. Do not use an extension cord. Close lid. Adjust leveling feet If washer is plugged into a grounded 3-prong outlet 10 05-Aug-2019 13:05:14 EDT | RELEASED In some models). Electrical Shock Hazard Plug into washer basket or detergent dispenser (on washer. � Check that will be automatically replaced by the number...


