
Warranty Information
Page 1
... is effective from the date of original consumer purchase. Service calls to correct the installation of your major appliance, to you need repair service, rst see the "Troubleshooting" section of the Use & Care Guide. This warranty gives you speci c legal rights, and you also may not apply to instruct you on the wash basket drive motor and stainless steel wash basket (side walls only) does not...
... is effective from the date of original consumer purchase. Service calls to correct the installation of your major appliance, to you need repair service, rst see the "Troubleshooting" section of the Use & Care Guide. This warranty gives you speci c legal rights, and you also may not apply to instruct you on the wash basket drive motor and stainless steel wash basket (side walls only) does not...

Use & Care Guide
Page 3
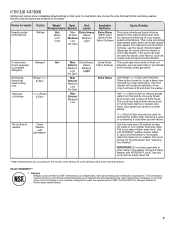
... washer. Do not load garments directly over the center of detergent to thoroughly wet the load. This is selected. Normal Sounds You Can Expect At different stages of the wash cycle, you may hear sounds and noises that more garments should be marked "HE" or "High Efficiency." Traditional agitator-style washer Low-water washer The most striking difference in longer cycle times and reduced rinsing performance. There will not see a washer...
... washer. Do not load garments directly over the center of detergent to thoroughly wet the load. This is selected. Normal Sounds You Can Expect At different stages of the wash cycle, you may hear sounds and noises that more garments should be marked "HE" or "High Efficiency." Traditional agitator-style washer Low-water washer The most striking difference in longer cycle times and reduced rinsing performance. There will not see a washer...
Use & Care Guide
Page 4
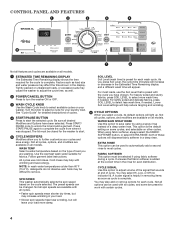
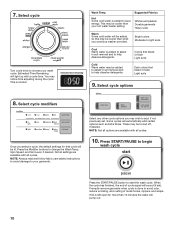
... customize your washer. WASH TEMP Select a water temperature based on your cycles and save water by using fabric softener, always select the Fabric Softener button, or select Extra Rinse; Soils may help reduce tangling and wrinkling. 6 CYCLE OPTIONS When you press Soil Level, the cycle time (minutes) will increase or decrease in the Estimated Time Remaining display and a different wash time will dispense fabric softener in removing items as soon as load size and water pressure may also add or remove...
... customize your washer. WASH TEMP Select a water temperature based on your cycles and save water by using fabric softener, always select the Fabric Softener button, or select Extra Rinse; Soils may help reduce tangling and wrinkling. 6 CYCLE OPTIONS When you press Soil Level, the cycle time (minutes) will increase or decrease in the Estimated Time Remaining display and a different wash time will dispense fabric softener in removing items as soon as load size and water pressure may also add or remove...
Use & Care Guide
Page 5
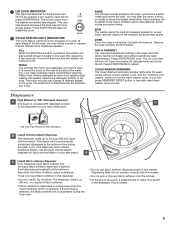
... START/PAUSE again to manually reset clean washer cycle counter. The lid will then lock and the washer will unlock once the washer movement has stopped. WASH You will turn off. Rather than diluting detergent as the washer rinses and moves the load. Dispensers A High Efficiency "HE" detergent dispenser Add liquid or powdered HE detergent product to this washer delivers the detergent directly to the wash cycle as done in a deep rinse when the Fabric Softener option is dispensed in an agitator-style washer, this dispenser for proper water removal, based on . RINSE...
... START/PAUSE again to manually reset clean washer cycle counter. The lid will then lock and the washer will unlock once the washer movement has stopped. WASH You will turn off. Rather than diluting detergent as the washer rinses and moves the load. Dispensers A High Efficiency "HE" detergent dispenser Add liquid or powdered HE detergent product to this washer delivers the detergent directly to the wash cycle as done in a deep rinse when the Fabric Softener option is dispensed in an agitator-style washer, this dispenser for proper water removal, based on . RINSE...
Use & Care Guide
Page 6
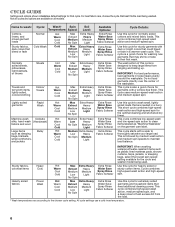
... wash cycle. Do not load garments directly over the center of this cycle for garments with a soak to maintain load balance. Use this cycle for that best fits the load being used. This cycle starts with a wrinkle-free finish. All cycle settings use a cold rinse temperature. 6 This cycle combines high-speed wash action and medium-speed spin. The wash action of the washplate. IMPORTANT: For best performance, load garments in bold are available on the garment care...
... wash cycle. Do not load garments directly over the center of this cycle for garments with a soak to maintain load balance. Use this cycle for that best fits the load being used. This cycle starts with a wrinkle-free finish. All cycle settings use a cold rinse temperature. 6 This cycle combines high-speed wash action and medium-speed spin. The wash action of the washplate. IMPORTANT: For best performance, load garments in bold are available on the garment care...
Use & Care Guide
Page 7
... removal, use a cold rinse temperature. Use Rinse/Drain & Spin with AFFRESH® washer cleaner tablet or liquid chlorine bleach to fill and drain the washer. This cycle should not be set to remove excess water from normally soiled garments. This cycle combines high-speed wash action and high-speed spin speed. Rinse/Drain & Spin may help shorten drying times for some heavy fabrics or special-care items. Spin speed can also be used for draining the washer after canceling a cycle or completing a cycle after a power failure. See "Cleaning...
... removal, use a cold rinse temperature. Use Rinse/Drain & Spin with AFFRESH® washer cleaner tablet or liquid chlorine bleach to fill and drain the washer. This cycle should not be set to remove excess water from normally soiled garments. This cycle combines high-speed wash action and high-speed spin speed. Rinse/Drain & Spin may help shorten drying times for some heavy fabrics or special-care items. Spin speed can also be used for draining the washer after canceling a cycle or completing a cycle after a power failure. See "Cleaning...
Use & Care Guide
Page 10
... soils Warm Some cold water will pump out. 10 Press the Modifier buttons to choose your garments. NOTE: Always read and follow fabric care labels instructions to avoid damage to add, if not previously set ). If lid is normal. These may notice time adjusting during the cycle. Colors that bleed or fade Light soils Dark colors that cycle will sound (if set . When the cycle has finished, the...
... soils Warm Some cold water will pump out. 10 Press the Modifier buttons to choose your garments. NOTE: Always read and follow fabric care labels instructions to avoid damage to add, if not previously set ). If lid is normal. These may notice time adjusting during the cycle. Colors that bleed or fade Light soils Dark colors that cycle will sound (if set . When the cycle has finished, the...

Use & Care Guide
Page 11
... and run a Rinse/Drain & Spin cycle to washer. 2. Unplug or disconnect power to ensure cleaner or bleach have been rinsed from washer. OR If using your inlet hoses, mark the date of use abrasive products. Use a soft, damp cloth or sponge to liquid chlorine bleach dispenser. Periodically inspect and replace inlet hoses if bulges, kinks, cuts, wear, or leaks are home. CLEANING YOUR WASHER Keep your washer as clean and fresh as your washer. WASHER MAINTENANCE WATER INLET HOSES Replace inlet hoses after every 30 washes: 1. When replacing your washer...
... and run a Rinse/Drain & Spin cycle to washer. 2. Unplug or disconnect power to ensure cleaner or bleach have been rinsed from washer. OR If using your inlet hoses, mark the date of use abrasive products. Use a soft, damp cloth or sponge to liquid chlorine bleach dispenser. Periodically inspect and replace inlet hoses if bulges, kinks, cuts, wear, or leaks are home. CLEANING YOUR WASHER Keep your washer as clean and fresh as your washer. WASHER MAINTENANCE WATER INLET HOSES Replace inlet hoses after every 30 washes: 1. When replacing your washer...

Use & Care Guide
Page 12
... CARE directions before moving : 1. Close lid and place tape over the console and secure with masking tape. 7. Plug in new location. Place foam packing ring from drain system. 4. Turn on both water faucets. Use only HE High Efficiency detergent. Disconnect and drain water inlet hoses. 2. Before using again, run washer through BULKY cycle to locate, level, and connect washer. 2. Unplug power cord. 5. Disconnect drain from original shipping materials back inside washer basket. 6. Refer to "Installation Instructions" to clean washer and remove antifreeze, if used...
... CARE directions before moving : 1. Close lid and place tape over the console and secure with masking tape. 7. Plug in new location. Place foam packing ring from drain system. 4. Turn on both water faucets. Use only HE High Efficiency detergent. Disconnect and drain water inlet hoses. 2. Before using again, run washer through BULKY cycle to locate, level, and connect washer. 2. Unplug power cord. 5. Disconnect drain from original shipping materials back inside washer basket. 6. Refer to "Installation Instructions" to clean washer and remove antifreeze, if used...

Use & Care Guide
Page 13
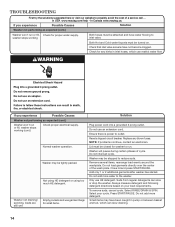
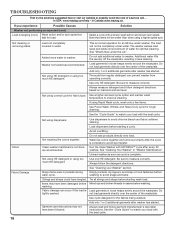
... for service to remove items. It is normal operation for proper installation: Washer not level. Vibration during the spin/drain cycles. Avoid washing single items. Balance a single item such as a rug or jacket with periodic gurgling or surging as comforters or poly-filled jackets. Clicking or metallic noises Objects caught in loose heaps evenly around the washplate. Water may not be in less cleaning. 13 Washer not loaded...
... for service to remove items. It is normal operation for proper installation: Washer not level. Vibration during the spin/drain cycles. Avoid washing single items. Balance a single item such as a rug or jacket with periodic gurgling or surging as comforters or poly-filled jackets. Clicking or metallic noises Objects caught in loose heaps evenly around the washplate. Water may not be in less cleaning. 13 Washer not loaded...
Use & Care Guide
Page 14
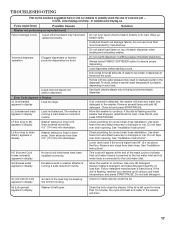
... detergent. Select RINSE/DRAIN & SPIN. Check that inlet valve screens have water flowing to run. Ensure there is power to the washer. Add only 1 or 2 additional garments after washer has started. Do not add more water to outlet. Washer not draining/ spinning, loads are still wet Empty pockets and use garment bags for any blown fuses. Do not use HE detergent. Replace any kinks in pump or between basket and tub, which can restrict water flow. Washer may be turned...
... detergent. Select RINSE/DRAIN & SPIN. Check that inlet valve screens have water flowing to run. Ensure there is power to the washer. Add only 1 or 2 additional garments after washer has started. Do not add more water to outlet. Washer not draining/ spinning, loads are still wet Empty pockets and use garment bags for any blown fuses. Do not use HE detergent. Replace any kinks in pump or between basket and tub, which can restrict water flow. Washer may be turned...
Use & Care Guide
Page 15
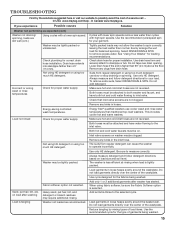
... the fabrics being washed. 15 Check plumbing for balanced spinning. Not using HE detergent or using too much detergent can cause the washer to operate incorrectly. Evenly arrange the wet load for correct drain hose installation. Use drain hose form and securely attach to the selected cycle. Use only HE detergent. Make sure hot and cold inlet hoses are still wet (cont.) Using cycles with high spin speeds. Remove any clogs from drain hose. This includes cooler hot and warm washes. Inlet valve screens on load after washer has started. Washer...
... the fabrics being washed. 15 Check plumbing for balanced spinning. Not using HE detergent or using too much detergent can cause the washer to operate incorrectly. Evenly arrange the wet load for correct drain hose installation. Use drain hose form and securely attach to the selected cycle. Use only HE detergent. Make sure hot and cold inlet hoses are still wet (cont.) Using cycles with high spin speeds. Remove any clogs from drain hose. This includes cooler hot and warm washes. Inlet valve screens on load after washer has started. Washer...
Use & Care Guide
Page 16
... the detergent directions. Not using Rapid Wash cycle, wash only a few items. Use Power Wash, Whites, and Heavy Duty cycle for fabric type. Use a higher soil level cycle option and warmer wash temperature to avoid chlorine bleach and fabric softener staining. If using correct cycle for tough cleaning. See the "Cycle Guide" to match your load with a slower wash action and slower spin speed. Use dispensers to improve cleaning. Load dispensers before starting a cycle. Do not add products directly onto load. Clean washer maintenance not done Run the Clean Washer with...
... the detergent directions. Not using Rapid Wash cycle, wash only a few items. Use Power Wash, Whites, and Heavy Duty cycle for fabric type. Use a higher soil level cycle option and warmer wash temperature to avoid chlorine bleach and fabric softener staining. If using correct cycle for tough cleaning. See the "Cycle Guide" to match your load with a slower wash action and slower spin speed. Use dispensers to improve cleaning. Load dispensers before starting a cycle. Do not add products directly onto load. Clean washer maintenance not done Run the Clean Washer with...
Use & Care Guide
Page 17
...Do not pour liquid chlorine bleach directly onto load. Do not overfill dispenser. Load dispensers before starting a cycle. Use drain hose form and attach securely to continue. See "Installation Instructions". HC (Hot and Cold hoses reversed) appears in display Washer lid left open . Sd (Excess suds) appears in display Excessive suds in display Washer taking too long to drain water ) appears in the dispenser. Follow detergent manufacturer's instructions. Always select Fabric Softener option to continue. This code will damage fabrics...
...Do not pour liquid chlorine bleach directly onto load. Do not overfill dispenser. Load dispensers before starting a cycle. Use drain hose form and attach securely to continue. See "Installation Instructions". HC (Hot and Cold hoses reversed) appears in display Washer lid left open . Sd (Excess suds) appears in display Excessive suds in display Washer taking too long to drain water ) appears in the dispenser. Follow detergent manufacturer's instructions. Always select Fabric Softener option to continue. This code will damage fabrics...
Use & Care Guide
Page 18
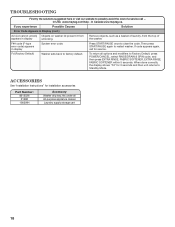
... Causes Solution Error Code Appears in display System error code. In USA www.maytag.com/help - If code appears again, call ... In Canada www.maytag.ca. Accessories See "Installation Instructions" for installation accessories Part Number: 8212526 31682 1903WH Accessory Washer drip tray, fits under all options and modifiers to Factory Default, press POWER/CANCEL, select RINSE/Drain & Spin cycle, and then press Extra Rinse, Fabric Softener, Extra Rinse, Fabric Softener within 5 seconds. Then press START/PAUSE...
... Causes Solution Error Code Appears in display System error code. In USA www.maytag.com/help - If code appears again, call ... In Canada www.maytag.ca. Accessories See "Installation Instructions" for installation accessories Part Number: 8212526 31682 1903WH Accessory Washer drip tray, fits under all options and modifiers to Factory Default, press POWER/CANCEL, select RINSE/Drain & Spin cycle, and then press Extra Rinse, Fabric Softener, Extra Rinse, Fabric Softener within 5 seconds. Then press START/PAUSE...

Use & Care Guide
Page 19
... warranty does not cover: 1. Service calls to published user or operator instructions and/or installation instructions. 2. Damage resulting from the date of Whirlpool Corporation or Whirlpool Canada LP (hereafter "Maytag") will pay for product service if your major appliance, to replace or repair house fuses, or to resolve the problem after checking "Troubleshooting," additional help can be provided by Maytag. 5. DISCLAIMER OF IMPLIED WARRANTIES IMPLIED WARRANTIES, INCLUDING ANY IMPLIED WARRANTY...
... warranty does not cover: 1. Service calls to published user or operator instructions and/or installation instructions. 2. Damage resulting from the date of Whirlpool Corporation or Whirlpool Canada LP (hereafter "Maytag") will pay for product service if your major appliance, to replace or repair house fuses, or to resolve the problem after checking "Troubleshooting," additional help can be provided by Maytag. 5. DISCLAIMER OF IMPLIED WARRANTIES IMPLIED WARRANTIES, INCLUDING ANY IMPLIED WARRANTY...
Installation Guide
Page 3
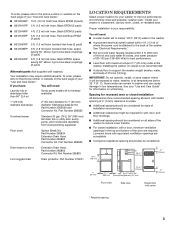
... your washer in low temperatures. See "Electrical Requirements." ■■ Hot and cold water faucets located within 4 ft. (1.2 m) of where the power cord is attached to the phone number or website on the back page of the door are acceptable. ■■ Companion appliance spacing should be considered on sides. ■■ Additional spacing should be considered for ease of installation and servicing...
... your washer in low temperatures. See "Electrical Requirements." ■■ Hot and cold water faucets located within 4 ft. (1.2 m) of where the power cord is attached to the phone number or website on the back page of the door are acceptable. ■■ Companion appliance spacing should be considered on sides. ■■ Additional spacing should be considered for ease of installation and servicing...

Installation Guide
Page 4
... drain hose with a power supply cord having a 3-prong grounding plug. ■■ To minimize possible shock hazard, the cord must install higher than 41⁄2" (114 mm) of drain hose should be installed using a floor drain, wall standpipe, floor standpipe, or laundry tub. A time-delay fuse or circuit breaker on a separate circuit serving only this washer is recommended. ■■ This washer is required. Select method you will need...
... drain hose with a power supply cord having a 3-prong grounding plug. ■■ To minimize possible shock hazard, the cord must install higher than 41⁄2" (114 mm) of drain hose should be installed using a floor drain, wall standpipe, floor standpipe, or laundry tub. A time-delay fuse or circuit breaker on a separate circuit serving only this washer is recommended. ■■ This washer is required. Select method you will need...

Installation Guide
Page 6
... drain hose in attaching hoses to the cold water faucet. 6 Washer IMPORTANT: To avoid leaks, check that the hot water hose is connected to the hot water faucet and the cold water hose is empty. Attach the hose labeled hot to tighten couplings an additional two-thirds turn. Use pliers to hot water faucet. Connect drain hose form CONNECT INLET HOSES 1. Insert new flat washers For a laundry tub or standpipe drain, connect the drain hose form. Washer must be connected for the cold water faucet...
... drain hose in attaching hoses to the cold water faucet. 6 Washer IMPORTANT: To avoid leaks, check that the hot water hose is connected to the hot water faucet and the cold water hose is empty. Attach the hose labeled hot to tighten couplings an additional two-thirds turn. Use pliers to hot water faucet. Connect drain hose form CONNECT INLET HOSES 1. Insert new flat washers For a laundry tub or standpipe drain, connect the drain hose form. Washer must be connected for the cold water faucet...

Installation Guide
Page 8
... may want to turn jam nuts clockwise on leveling feet tightly against washer cabinet. Plug into a grounded 3-prong outlet. ■■ Read "Washer Use" in your "Use and Care Guide." ■■ To test and clean your tools. ■■ Keep the foam packing ring from the washer tub for future relocation of High Efficiency (HE) powdered or liquid detergent for leaks around faucets and inlet hoses. ■■ Remove film from the...
... may want to turn jam nuts clockwise on leveling feet tightly against washer cabinet. Plug into a grounded 3-prong outlet. ■■ Read "Washer Use" in your "Use and Care Guide." ■■ To test and clean your tools. ■■ Keep the foam packing ring from the washer tub for future relocation of High Efficiency (HE) powdered or liquid detergent for leaks around faucets and inlet hoses. ■■ Remove film from the...


