
Installation Instructions
Page 1
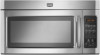
... differ slightly from the illustration in this manual and on your appliance. Table of Contents MICROWAVE HOOD COMBINATION SAFETY 1 INSTALLATION REQUIREMENTS 2 Tools and Parts 2 Remove Cardboard Template 2 Location Requirements 2 Product Dimensions 3 Electrical Requirements 3 INSTALLATION INSTRUCTIONS 4 Remove Mounting Plate 4 Rotate Blower Motor 4 Locate Wall Stud(s 6 Mark Rear Wall 7 Drill Holes in Rear Wall 7 Attach Mounting Plate to reduce the chance of others . These installation instructions cover different models. WARNING You can be killed or seriously injured...
... differ slightly from the illustration in this manual and on your appliance. Table of Contents MICROWAVE HOOD COMBINATION SAFETY 1 INSTALLATION REQUIREMENTS 2 Tools and Parts 2 Remove Cardboard Template 2 Location Requirements 2 Product Dimensions 3 Electrical Requirements 3 INSTALLATION INSTRUCTIONS 4 Remove Mounting Plate 4 Rotate Blower Motor 4 Locate Wall Stud(s 6 Mark Rear Wall 7 Drill Holes in Rear Wall 7 Attach Mounting Plate to reduce the chance of others . These installation instructions cover different models. WARNING You can be killed or seriously injured...

Installation Instructions
Page 2
... use as a rear wall template. 1. Check with any obstructions so that the damper blade can open freely and fully. For other damages. Power supply cord bushing (1) H. See User Instructions.) NOTE: Depending on model, charcoal filters may be installed. Set the cardboard template to the side and refer to back of microwave oven) Cardboard template (part of clearance between the wall and the microwave oven, so that the materials used will be combined. Special Requirements For Wall Venting Installation Only: ■ Cutout...
... use as a rear wall template. 1. Check with any obstructions so that the damper blade can open freely and fully. For other damages. Power supply cord bushing (1) H. See User Instructions.) NOTE: Depending on model, charcoal filters may be installed. Set the cardboard template to the side and refer to back of microwave oven) Cardboard template (part of clearance between the wall and the microwave oven, so that the materials used will be combined. Special Requirements For Wall Venting Installation Only: ■ Cutout...

Installation Instructions
Page 3
... cord. upper cabinet and side cabinet depth Electrical Shock Hazard Plug into an outlet that is equipped with a cord having a grounding wire with a fuse or circuit breaker. Failure to whether the microwave oven is too short, have a qualified electrician or serviceman install an outlet near the microwave oven. Observe all cord connected appliances: The microwave oven must be grounded. or 20-amp electrical supply with a grounding plug. Product Dimensions...
... cord. upper cabinet and side cabinet depth Electrical Shock Hazard Plug into an outlet that is equipped with a cord having a grounding wire with a fuse or circuit breaker. Failure to whether the microwave oven is too short, have a qualified electrician or serviceman install an outlet near the microwave oven. Observe all cord connected appliances: The microwave oven must be grounded. or 20-amp electrical supply with a grounding plug. Product Dimensions...

Installation Instructions
Page 4
...For wall or roof venting, changes must be made to back of microwave oven exterior. A B A. Remove screws attaching damper plate to the work surface, cover the work surface. 1. Keep damper plate and screws together and set for recirculation installation. Screws C. A B C A. A A. Rotate Blower Motor The microwave oven is being handled. Make sure damper plate tabs are using recirculation installation. Remove any remaining contents from the microwave oven cavity. 2. Exhaust port 6. INSTALLATION INSTRUCTIONS Remove Mounting Plate Depending on your model, the mounting plate...
...For wall or roof venting, changes must be made to back of microwave oven exterior. A B A. Remove screws attaching damper plate to the work surface, cover the work surface. 1. Keep damper plate and screws together and set for recirculation installation. Screws C. A B C A. A A. Rotate Blower Motor The microwave oven is being handled. Make sure damper plate tabs are using recirculation installation. Remove any remaining contents from the microwave oven cavity. 2. Exhaust port 6. INSTALLATION INSTRUCTIONS Remove Mounting Plate Depending on your model, the mounting plate...

Installation Instructions
Page 5
... Step 3 of the microwave oven. Make sure damper plate tabs are inserted into microwave oven. Damper plate B. Screws C. Damper plate tabs D. Reattach damper plate. D A. Roof Venting Installation Only 1. Securely tighten screws. Repeat Step 1 from "Wall Venting Installation Only." 4. Repeat Step 3 from "Wall Venting Installation Only." 2. A 6. Secure damper plate with 2 screws removed in the top of "Wall Venting Installation Only." Slots 8. Lower blower motor back into the slots in Step 1 of microwave oven. Rotate blower motor so that exhaust ports face the...
... Step 3 of the microwave oven. Make sure damper plate tabs are inserted into microwave oven. Damper plate B. Screws C. Damper plate tabs D. Reattach damper plate. D A. Roof Venting Installation Only 1. Securely tighten screws. Repeat Step 1 from "Wall Venting Installation Only." 4. Repeat Step 3 from "Wall Venting Installation Only." 2. A 6. Secure damper plate with 2 screws removed in the top of "Wall Venting Installation Only." Slots 8. Lower blower motor back into the slots in Step 1 of microwave oven. Rotate blower motor so that exhaust ports face the...

Installation Instructions
Page 6
... Rear Wall" section), only recirculation or roof venting installation can be done. See illustrations in "Possible Wall Stud Configurations." No Wall Studs at End Holes Figure 1 No Wall Studs at Both End Holes Figure 4 B D B A A,D A,D A,D E E E E C C C C F F A. Support tabs F. End holes (on mounting plate) B. See illustrations in "Possible Wall Stud Configurations." 2. Wall stud centerlines D. Cabinet opening , do not install the microwave oven. 1. Holes for lag screws E. Mark the center of preferred installation...
... Rear Wall" section), only recirculation or roof venting installation can be done. See illustrations in "Possible Wall Stud Configurations." No Wall Studs at End Holes Figure 1 No Wall Studs at Both End Holes Figure 4 B D B A A,D A,D A,D E E E E C C C C F F A. Support tabs F. End holes (on mounting plate) B. See illustrations in "Possible Wall Stud Configurations." 2. Wall stud centerlines D. Cabinet opening , do not install the microwave oven. 1. Holes for lag screws E. Mark the center of preferred installation...

Installation Instructions
Page 7
... cardboard template to the centerline on a level line with the front edge of the cutout area. 14. The blackened holes in place, find and clearly mark the vertical centerline of upper cabinet 3. Set the mounting plate aside. Mark the centerline 3/8" (1 cm) down from the centerline. 5. If the end holes are properly marked. Rear wall B. They must each other. Mark Rear Wall The microwave oven...
... cardboard template to the centerline on a level line with the front edge of the cutout area. 14. The blackened holes in place, find and clearly mark the vertical centerline of upper cabinet 3. Set the mounting plate aside. Mark the centerline 3/8" (1 cm) down from the centerline. 5. If the end holes are properly marked. Rear wall B. They must each other. Mark Rear Wall The microwave oven...

Installation Instructions
Page 8
... 3 of mounting plate, making sure it , trim the template edges so that the holes cut into the wall stud at the other end hole. Remove all lag screws and bolts. The template has trim lines to use as guides. ■ If the wall behind the microwave oven (as at One End Hole" in the "Drill Holes in Step 3 of mounting plate, making sure it fits inside the frame...
... 3 of mounting plate, making sure it , trim the template edges so that the holes cut into the wall stud at the other end hole. Remove all lag screws and bolts. The template has trim lines to use as guides. ■ If the wall behind the microwave oven (as at One End Hole" in the "Drill Holes in Step 3 of mounting plate, making sure it fits inside the frame...

Installation Instructions
Page 9
... damper assembly on Upper Cabinet Template. 8. Failure to be installed around the supply cord hole, as shown. Mounting plate B. Rotate microwave oven up toward upper cabinet. NOTE: If upper cabinet is at the top, and the damper blade opens away from the microwave oven. Install Damper Assembly (for the power supply cord. Check that the damper blade hinge is metal, the supply cord bushing needs to do not grip or use the door or door handle while the microwave oven...
... damper assembly on Upper Cabinet Template. 8. Failure to be installed around the supply cord hole, as shown. Mounting plate B. Rotate microwave oven up toward upper cabinet. NOTE: If upper cabinet is at the top, and the damper blade opens away from the microwave oven. Install Damper Assembly (for the power supply cord. Check that the damper blade hinge is metal, the supply cord bushing needs to do not grip or use the door or door handle while the microwave oven...

Installation Instructions
Page 10
.... ■ See the User Instructions for troubleshooting information. Raised tabs B. NOTE: If microwave oven does not need to be the same thickness as shown. Adjust mounting plate and retighten screws. 9. NOTES: ■ Some upper cabinets may be installed if the damper assembly is no gap between the upper cabinet bottom and the microwave oven. A B A. Sheet metal screw D. Reconnect power. 4. If the microwave oven does not operate: ■ Check that a household fuse has not blown...
.... ■ See the User Instructions for troubleshooting information. Raised tabs B. NOTE: If microwave oven does not need to be the same thickness as shown. Adjust mounting plate and retighten screws. 9. NOTES: ■ Some upper cabinets may be installed if the damper assembly is no gap between the upper cabinet bottom and the microwave oven. A B A. Sheet metal screw D. Reconnect power. 4. If the microwave oven does not operate: ■ Check that a household fuse has not blown...

Installation Instructions
Page 11
... the vent and number of the microwave oven and the transition piece. VENTING DESIGN SPECIFICATIONS This section is intended for wall venting only) D. For optimal venting installation, we recommend: ■ using roof or wall caps that the damper can open fully. Do not vent exhaust air into concealed spaces, such as spaces within the wall for the damper to round transition is used, be sure to vent air outside, unless using caulking...
... the vent and number of the microwave oven and the transition piece. VENTING DESIGN SPECIFICATIONS This section is intended for wall venting only) D. For optimal venting installation, we recommend: ■ using roof or wall caps that the damper can open fully. Do not vent exhaust air into concealed spaces, such as spaces within the wall for the damper to round transition is used, be sure to vent air outside, unless using caulking...

Installation Instructions
Page 12
When you call, you will need additional assistance, call us at our toll free number listed in the User Instructions. Each panel is located behind the door. ■ Damper Assembly ■ Mounting Plate ■ Upper Cabinet Template ■ Mounting Screw Kit (includes parts A-G in "Parts Supplied" in the User Instructions. W10344702B SP PN W10345004B © 2010. To calculate the length of the microwave oven. The filler panels come in China Following is a list of vent. One 3¹⁄...
When you call, you will need additional assistance, call us at our toll free number listed in the User Instructions. Each panel is located behind the door. ■ Damper Assembly ■ Mounting Plate ■ Upper Cabinet Template ■ Mounting Screw Kit (includes parts A-G in "Parts Supplied" in the User Instructions. W10344702B SP PN W10345004B © 2010. To calculate the length of the microwave oven. The filler panels come in China Following is a list of vent. One 3¹⁄...
Owners Manual
Page 1
... you don't immediately follow the specific "PRECAUTIONS TO AVOID POSSIBLE EXPOSURE TO EXCESSIVE MICROWAVE ENERGY" found in this manual and on your model and serial number located on the front facing of injury, and tell you what the potential hazard is the safety alert symbol. IMPORTANT SAFETY INSTRUCTIONS When using the microwave oven. ■ Read and follow instructions. are able to properly...
... you don't immediately follow the specific "PRECAUTIONS TO AVOID POSSIBLE EXPOSURE TO EXCESSIVE MICROWAVE ENERGY" found in this manual and on your model and serial number located on the front facing of injury, and tell you what the potential hazard is the safety alert symbol. IMPORTANT SAFETY INSTRUCTIONS When using the microwave oven. ■ Read and follow instructions. are able to properly...

Owners Manual
Page 2
... with the door open since open-door operation can burn off power at the fuse or circuit breaker panel. - Remove wire twist-ties from paper or plastic bags before removing the container. - Do not leave paper products, cooking utensils, or food in the cavity when not in use. ■ Liquids, such as water, coffee, or tea are placed inside the oven ignite, keep oven door closed, turn the fan on top...
... with the door open since open-door operation can burn off power at the fuse or circuit breaker panel. - Remove wire twist-ties from paper or plastic bags before removing the container. - Do not leave paper products, cooking utensils, or food in the cavity when not in use. ■ Liquids, such as water, coffee, or tea are placed inside the oven ignite, keep oven door closed, turn the fan on top...

Owners Manual
Page 3
... practice using the Vent Fan control. Demo Mode Activate to set the Light On Time and Light Off Time in death, fire, or electrical shock. The plug must be changed. Turntable cannot be turned off during any cooking program. If the power supply cord is helpful when cooking with plates that are bigger than the turntable, or when cooking with Part 18 of -function signals) may be used independently during preset or sensor (on some models) functions. 3 Control Lock...
... practice using the Vent Fan control. Demo Mode Activate to set the Light On Time and Light Off Time in death, fire, or electrical shock. The plug must be changed. Turntable cannot be turned off during any cooking program. If the power supply cord is helpful when cooking with plates that are bigger than the turntable, or when cooking with Part 18 of -function signals) may be used independently during preset or sensor (on some models) functions. 3 Control Lock...

Owners Manual
Page 4
... the vent grille at 100%. Clean with screws. 4 See "Settings" section to reset filter status. ■ Grease filters: Grease filters are off and the microwave oven is time to paper towel. ■ Control panel: sponge or soft cloth and water. ■ Stainless steel (on some models) appears in the microwave oven. Remove bulb cover screw, and open the bulb cover. Warm Hold can be programmed to soil buildup, keep cavity, microwave inlet cover, cooking rack supports, and area where the door touches the frame clean...
... the vent grille at 100%. Clean with screws. 4 See "Settings" section to reset filter status. ■ Grease filters: Grease filters are off and the microwave oven is time to paper towel. ■ Control panel: sponge or soft cloth and water. ■ Stainless steel (on some models) appears in the microwave oven. Remove bulb cover screw, and open the bulb cover. Warm Hold can be programmed to soil buildup, keep cavity, microwave inlet cover, cooking rack supports, and area where the door touches the frame clean...

Owners Manual
Page 5
...; Cooking rack ■ Rack clip ■ Rack support ■ Grease filters ■ Charcoal filter ■ Cooktop light bulb ■ Cavity light bulb 5 Open and close door. Turntable alternates rotation directions ■ This is being started. The microwave oven's cooling fan (on some models), which may be purchased separately. Troubleshooting First try the steps in the microwave oven Check the following: ■ Soil buildup Soil buildup on some models) is on motor rotation at 100% cooking power. If microwave oven still does not operate...
...; Cooking rack ■ Rack clip ■ Rack support ■ Grease filters ■ Charcoal filter ■ Cooktop light bulb ■ Cavity light bulb 5 Open and close door. Turntable alternates rotation directions ■ This is being started. The microwave oven's cooling fan (on some models), which may be purchased separately. Troubleshooting First try the steps in the microwave oven Check the following: ■ Soil buildup Soil buildup on some models) is on motor rotation at 100% cooking power. If microwave oven still does not operate...
Owners Manual
Page 6
... parts and repair labor to correct defects in -home service is covered by an authorized Maytag servicer is not available. 10. You can write to Maytag with published installation instructions. 11. For assistance or service, call 1-800-688-9900. Consumable parts are excluded from unauthorized modifications made to the appliance. 9. Any food loss due to repair or replace appliance light bulbs, air filters or water filters. IMPLIED WARRANTIES, INCLUDING WARRANTIES...
... parts and repair labor to correct defects in -home service is covered by an authorized Maytag servicer is not available. 10. You can write to Maytag with published installation instructions. 11. For assistance or service, call 1-800-688-9900. Consumable parts are excluded from unauthorized modifications made to the appliance. 9. Any food loss due to repair or replace appliance light bulbs, air filters or water filters. IMPLIED WARRANTIES, INCLUDING WARRANTIES...


