Maytag MMMF8030PZ Support and Manuals
Get Help and Manuals for this Maytag item
View All Support Options Below
Free Maytag MMMF8030PZ manuals!
Problems with Maytag MMMF8030PZ?
Ask a Question
Free Maytag MMMF8030PZ manuals!
Problems with Maytag MMMF8030PZ?
Ask a Question
Popular Maytag MMMF8030PZ Manual Pages
Bump Out Kit Installation Instructions - Page 1
....6 cm), use the bump out mounting kit to the owner manual that comes with the microwave hood combination. MICROWAVE OVEN HOOD COMBINATION BUMP OUT KIT
INSTALLATION INSTRUCTIONS
If cabinets are only for the Bump out mounting kit, for full microwave hood combination installation, please refer to replace the mounting bracket that came with your unit.
Bump Out Kit Installation Instructions - Page 3
...cm) depth
1
cabinet
Bump Out Kit Installation Instruction
Installation Instruction
1
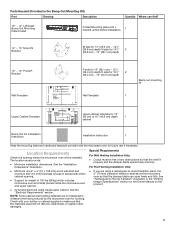
Keep the mounting plate and cardboard ...Parts Needed (Provided in the "Venting Design Specifications" section on the Owner Manual on the product.
3 See the "Electrical Requirements" section.
Location Requirements
Check the opening .
■ Support for future use if necessary. See the "Installation...
Bump Out Kit Installation Instructions - Page 4

... back surface 181⁄4" (46.3 cm) minimum
Exact dimensions may vary depending on the product. Installation Dimensions
NOTE: The grounded 3 prong outlet must be inside the upper cabinet. See the "Electrical Requirements" section on the Owner Manual on type of range/cooktop below table, the sizes in left column are flush, the...
Owners Manual - Page 2
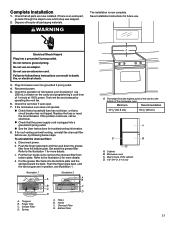
...TO USE THE MICROWAVE. Do not use replacement parts that can be grounded. Visible bubbling ...Install or locate this appliance outdoors. WARNING
You can kill or hurt you don't follow instructions. are very important. Contact nearest authorized service facility for examination, repair, or adjustment.
� Do not cover or block any heating or cooking appliance beneath this manual...
Owners Manual - Page 3

...guided through the steps to set up a user account and to connect your responsibility. Once installed...supporting Wi-Fi, 2.4 Ghz with metal scouring pads. Internet Connectivity Guide for Connected Appliances Only
IMPORTANT: Proper installation... Part 15 of your appliance. The SAID code ...INSTRUCTIONS
When using electrical appliances basic safety precautions should not be adjusted or repaired...
Owners Manual - Page 6
... 2.
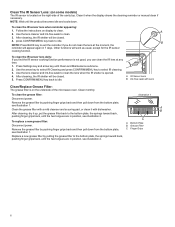
6 Clean the grease filter with a mild cleanser and scouring pad, or clean it with Lens
Clean/Replace Grease Filter:
The grease filter is not good, you do not clean the lens at any time.
1.
Press Settings key and arrow key until the product becomes idle and cools down from the bottom plate...
Owners Manual - Page 7
... the four hooks into the bottom plate and the springs toward the back.
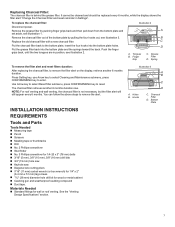
INSTALLATION INSTRUCTIONS
REQUIREMENTS
Tools and Parts
Tools Needed
� Measuring tape � Pencil � Scissors �...then pull down from the bottom plate and set aside, see illustration 3. Illustration 3
A B
A. Finger Grip
C. Replacing Charcoal Filter:
The charcoal filter is not necessary, but...
Owners Manual - Page 9
...Start Guide. Your installation may require additional
parts. To...Specifications" section.
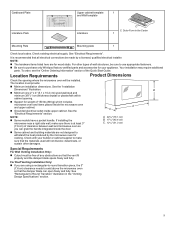
9 See the "Installation
Dimensions" illustration. See "Electrical Requirements". It is at least 3" (7.6 cm) of any obstructions so that all electrical connections be installed.
Location Requirements
Product Dimensions
Check the opening .
� Support for cooking. A C
NOTE:
� Some models...
Owners Manual - Page 11

... with all local codes and ordinances.
NOTE: To avoid ...Setting)
Wall Venting
Roof Venting
11 The plug must be plugged into an appropriate outlet that the door does
not swing open while the microwave oven is being handled. To avoid possible damage to move and install...uninstall the charcoal filter before installation. GROUNDING INSTRUCTIONS
INSTALLATION
For a grounded, cord-...
Owners Manual - Page 12
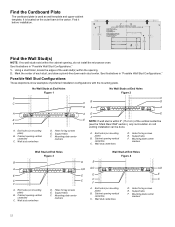
... (15.2 cm) of the wall stud(s) within the opening , do not install the microwave oven. See illustrations in "Possible Wall Stud Configurations." 1. Possible Wall ...the outer foam in the carton. Cabinet opening vertical centerline
C. Holes for lag screws E. Support tabs F. See illustrations in "Possible Wall Stud Configurations." Cabinet opening vertical centerline
C. Mounting plate...
Owners Manual - Page 17
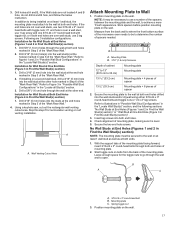
...of the spacers, between the mounting plate and the wall, to being installed on at the other end. Using a keyhole saw, cut out the ... hole, do not drill A and B hole, and follow the below instruction. NOTE: It may be secured to the wall on bolts from the back...-24 x 3" round head bolts with toggle nut; With the support tabs of spacers needed. Skip this step if for the toggle ...
Owners Manual - Page 18
...alignment of "Installation for No Wall Studs at One End Hole (Figure 3 in Rear Wall" section. 7. If installing on the wall. 4.
C A
B
D
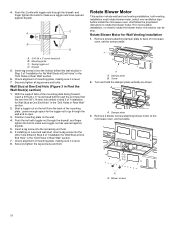
A. 3/16-24 x 3" round-head bolt B. With the support tabs of... installation, no need rotate blower motor, select one ventilation type before install the microwave oven. And follow the propriated instruction to the
microwave oven, and set ...
Owners Manual - Page 19

... Blower motor wire
B
A
B
A. Holes
19
Connector 5. Reconnect the blower motor wire into the microwave oven. A. A
B
A. Exhaust ports face the back of microwave oven, and set aside.
4. A B
A. Rectangular damper vent cover
7. Blower motor bridge B. Screws B. A
A. A
A.
Lift blower motor out of the microwave oven. Blower motor
6. Using diagonal wire cutting pliers...
Owners Manual - Page 22
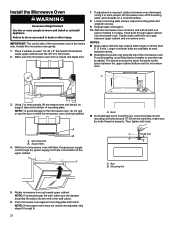
...with at least one
person holding it on support tabs at most hardware stores.
� Overtightening bolts may warp the top of mounting plate, and set aside on each 1/4-20 x 3" flat...so can result in back or other injury. A
3. A. Bolts
� Avoid damage to move and install or uninstall appliance.
NOTES:
� Some upper cabinets may be added. Mounting Nut
5. If adjustment is...
Owners Manual - Page 23
... Grip C. Holes B. Do not use . Check the operation of /recycle all parts are in death, fire, or electrical shock.
3. The height from the highest point of 1 minute at 100% power. Set aside the grease filter. Save Installation Instructions for more details. Test vent fan and exhaust by placing 1 cup (250 mL) of water on...
Maytag MMMF8030PZ Reviews
We have not received any reviews for Maytag yet.