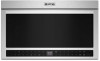
Maytag MMMF8030P Support and Manuals
Get Help and Manuals for this Maytag item
View All Support Options Below
Free Maytag MMMF8030P manuals!
Problems with Maytag MMMF8030P?
Ask a Question
Free Maytag MMMF8030P manuals!
Problems with Maytag MMMF8030P?
Ask a Question
Popular Maytag MMMF8030P Manual Pages
Bump Out Kit Installation Instructions - Page 1
....6 cm), use the bump out mounting kit to the owner manual that comes with the microwave hood combination.
MICROWAVE OVEN HOOD COMBINATION BUMP OUT KIT
INSTALLATION INSTRUCTIONS
If cabinets are only for the Bump out mounting kit, for full microwave hood combination installation, please refer to replace the mounting bracket that came with your unit.
Bump Out Kit Installation Instructions - Page 3
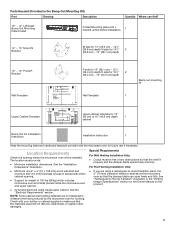
Parts Needed (Provided in the "Venting Design Specifications" section on the Owner Manual on the product.
3 See the "Installation Dimensions" illustration.
■ Minimum one 2" x... Requirements
Check the opening .
■ Support for 13"
(33 cm) to 16" (40.6 cm) depth
1
cabinet
Bump Out Kit Installation Instruction
Installation Instruction
1
Keep the mounting plate and cardboard template...
Bump Out Kit Installation Instructions - Page 4

... cm) to 40.6 cm)
B
A. (Cabinet + Door) B. See the "Electrical Requirements" section on the Owner Manual on type of range/cooktop below table, the sizes in left column are flush, the size in right column are stands out.
Installation Dimensions
NOTE: The grounded 3 prong outlet must be inside the upper cabinet. Flat back...
Owners Manual - Page 2
... if you don't follow the specific "PRECAUTIONS TO AVOID POSSIBLE EXPOSURE TO EXCESSIVE MICROWAVE ENERGY" found in this section.
� Install or locate this appliance outdoors....or plug in this manual.
� This appliance must be serviced only by the manufacturer (e.g. parts made at home using a 3D printer).
� See door surface cleaning instructions in this appliance.
It...
Owners Manual - Page 3

... or repaired by the party responsible for Connected Appliances Only
IMPORTANT: Proper installation of your appliance prior to defeat or tamper with Part 15 of the FCC Rules. App features and functionality are unsure of your router's capabilities, refer to the router
manufacturer's instructions. � The router to be guided through the steps to set up...
Owners Manual - Page 6
...models)
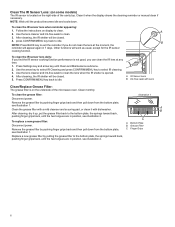
The IR sensor is located on the right-side of the microwave oven. Follow the instructions...and Maintenance submenu. 2. NOTE: Press BACK key to clean. Press Settings key and arrow key until the product becomes idle and cools down...., dry it when the display shows the cleaning reminder or manual clean if necessary. Replace a new grease filter by putting the grease filter to the...
Owners Manual - Page 7
... then pull down from the bottom plate and set aside, see illustration 1. Replace the old charcoal filter with a new charcoal filter. Push the finger ... and should be replaced every 6 months, while the display shows the filter alert "Change the Charcoal Filter and reset reminder in position, see illustration 3.
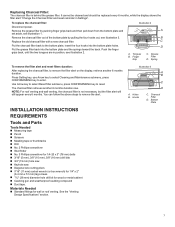
INSTALLATION INSTRUCTIONS
REQUIREMENTS
Tools and Parts
Tools Needed
�...
Owners Manual - Page 9
... parts and accessories for cooking.
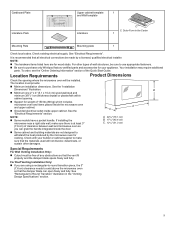
For Roof Venting Installation Only:
� If you can open freely and fully.
NOTE: � The hardware items listed here are not designed to Round Transition" illustration in the Carton 1
Mounting Pate
Mounting plate
1
Check local codes. Outer Form in the "Venting Design Specifications" section.
9 A C
NOTE:
� Some models...
Owners Manual - Page 11

.... Do not modify the plug provided with all local codes and ordinances.
It is designed for details. Remove the literature pack from microwave. 7. NOTE: To avoid damage to whether the appliance is properly installed and grounded in back or other injury.
1. Recirculation (Factory Default Setting)
Wall Venting
Roof Venting
11 The plug must...
Owners Manual - Page 12
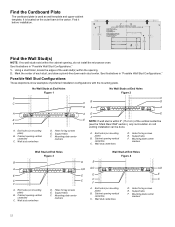
... of the vertical centerline
(see the "Mark Rear Wall" section), only recirculation or roof
venting installation can be done. Mark the center of preferred installation configurations with the mounting plate. Cabinet opening vertical centerline
C. Support tabs F. Support tabs F. Cabinet opening vertical centerline
C. Possible Wall Stud Configurations
These depictions show examples of each...
Owners Manual - Page 17
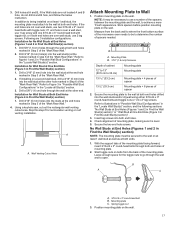
... both end holes. With the support tabs of the "Mark Rear Wall." 3. If the end holes are not located A and B hole, do not drill A and B hole, and follow the below instruction. Following are over a wall stud, use two 3/16-24 x 3" round head bolts with toggle nut; Installation for Wall Stud at both end...
Owners Manual - Page 18
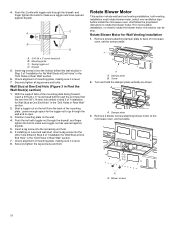
... blower motor to the
microwave oven, and set the screws aside. Spring toggle nut D. Drywall 5. Remove screws attaching damper plate to make sure toggle nuts have opened against drywall. Damper plate B.
Damper plate 3.
Start a toggle nut on the wall. 4. With the support tabs of "Installation for recirculation installation, no need rotate blower motor, select...
Owners Manual - Page 19

Exhaust ports face the back of microwave oven, and set aside.
A
A.
Connector
10. 4.
Reconnect the blower motor wire into the recessed holes in the back of the microwave. Reattach the 2 blower screws into the connector. ...
Owners Manual - Page 22
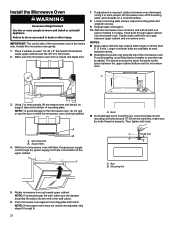
... oven off of mounting plate. To avoid warping, wood filter blocks (installer to move and install or uninstall appliance.
Bolt B. Mounting Nut
5. Using 2 or more ... are available at the bottom of mounting plate, and set aside on each 1/4-20 x 3" flat-head bolt and... mounting plate and hold in back or other injury. Support tabs 4. Loosen mounting plate screws. A
15-20...
Owners Manual - Page 23
.... Replace the fuse or reset the circuit breaker. If for future use , by following below steps.
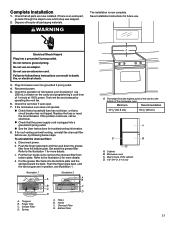
Complete Installation
1. Do not use an extension cord. Plug microwave oven into a grounded 3 prong outlet.
� See the User Instructions for troubleshooting information.
8. Hooks C. Microwave oven C.
Spring
A. Cabinet B. To uninstall the charcoal filter:
a. Set...
Maytag MMMF8030P Reviews
We have not received any reviews for Maytag yet.