
Owners Manual
Page 5
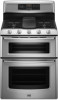
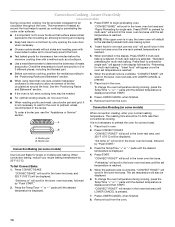
COOKTOP USE A A. Left rear control knob B C C. Turn off . IMPORTANT: Your range is pressed completely down on some models) D E D. The large burners (16,000, 15,000 and 12,500 Btu/h [British Thermal Units]) provide the highest heat setting, and are ideal for cooking large ... heat levels. Fire Hazard Do not let the burner flame extend beyond the edge of food, using empty cookware or without any cookware on some models) during the Self-Cleaning cycle, the entire cooktop area may become hot. 5 If you do not hear the igniter click, turn knob counterclockwise to LIGHT...
COOKTOP USE A A. Left rear control knob B C C. Turn off . IMPORTANT: Your range is pressed completely down on some models) D E D. The large burners (16,000, 15,000 and 12,500 Btu/h [British Thermal Units]) provide the highest heat setting, and are ideal for cooking large ... heat levels. Fire Hazard Do not let the burner flame extend beyond the edge of food, using empty cookware or without any cookware on some models) during the Self-Cleaning cycle, the entire cooktop area may become hot. 5 If you do not hear the igniter click, turn knob counterclockwise to LIGHT...
Owners Manual
Page 6
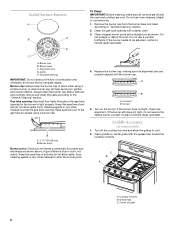
... cap. Turn off and the oven and cooktop are cool. A clean burner cap will help avoid poor ignition and uneven flames. Griddle Accessory (on some models) 1. Grease trap C. Do not use a wooden toothpick. C A. Burner base C. Gas tube opening: Gas must flow freely throughout the gas tube opening IMPORTANT: Do not obstruct...
... cap. Turn off and the oven and cooktop are cool. A clean burner cap will help avoid poor ignition and uneven flames. Griddle Accessory (on some models) 1. Grease trap C. Do not use a wooden toothpick. C A. Burner base C. Gas tube opening: Gas must flow freely throughout the gas tube opening IMPORTANT: Do not obstruct...
Owners Manual
Page 8
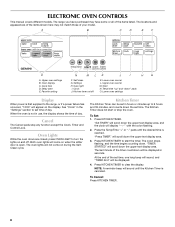
... down . NOTE: A reminder beep will come on and off K. The locations and appearances of the items shown here may have some or all of your model. Oven display C. Cook time D. Self clean G. See "Clock" in hours or minutes up " and "down the set in the "Settings" section to clear the display... closed, press OVEN LIGHT to start the timer. "TIMER STARTED" will be displayed. 4. The last minute of day. ELECTRONIC OVEN CONTROLS This manual covers different models. The oven lights will not come on /off .
... down . NOTE: A reminder beep will come on and off K. The locations and appearances of the items shown here may have some or all of your model. Oven display C. Cook time D. Self clean G. See "Clock" in hours or minutes up " and "down the set in the "Settings" section to clear the display... closed, press OVEN LIGHT to start the timer. "TIMER STARTED" will be displayed. 4. The last minute of day. ELECTRONIC OVEN CONTROLS This manual covers different models. The oven lights will not come on /off .
Owners Manual
Page 12
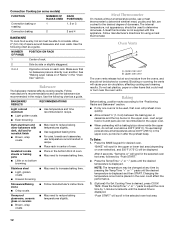
... manufacturer's directions for desired oven. Oven Vents A B A. Blocking or covering the vents will scroll in center of oven. Convection Cooking (on some models) FUNCTION NUMBER OF RACKS USED Convection baking or 1 roasting Convection baking 2 RACK POSITION(S) 1, 2 or 3 2 and 4 BAKEWARE To cook food ... need to increase baking time. ■ Little or no bakeware piece is placed in the bottom third of doneness. Meat Thermometer On models without a temperature probe, use baking/ pizza stones at any time by side or slightly staggered. 3 or 4 Opposite corners on each...
... manufacturer's directions for desired oven. Oven Vents A B A. Blocking or covering the vents will scroll in center of oven. Convection Cooking (on some models) FUNCTION NUMBER OF RACKS USED Convection baking or 1 roasting Convection baking 2 RACK POSITION(S) 1, 2 or 3 2 and 4 BAKEWARE To cook food ... need to increase baking time. ■ Little or no bakeware piece is placed in the bottom third of doneness. Meat Thermometer On models without a temperature probe, use baking/ pizza stones at any time by side or slightly staggered. 3 or 4 Opposite corners on each...
Owners Manual
Page 14
... desired temperature is not necessary to preheat, unless recommended in the lower text area once the one rack, position bakeware/ cookware on some models) Use Convect Bake for multi-rack baking. "CONVECT BAKE" will scroll in the lower text area, and 350°F (176°C)...■ Use a meat thermometer to the "Positioning Racks and Bakeware" section. ■ When using more than conventional cooking. Convection Roasting (on some models) To order a broiler pan, see the "Assistance or Service" section. "CONVECT ROAST" will appear in the lower oven text area until the desired ...
... desired temperature is not necessary to preheat, unless recommended in the lower text area once the one rack, position bakeware/ cookware on some models) Use Convect Bake for multi-rack baking. "CONVECT BAKE" will scroll in the lower text area, and 350°F (176°C)...■ Use a meat thermometer to the "Positioning Racks and Bakeware" section. ■ When using more than conventional cooking. Convection Roasting (on some models) To order a broiler pan, see the "Assistance or Service" section. "CONVECT ROAST" will appear in the lower oven text area until the desired ...

Owners Manual
Page 17
...cook time countdown will automatically turn on the oven display. Press the button for a good seal. Press START. 5. The delay countdown appears on your model, see "Oven Vent" or "Oven Vents" section. Depending on the oven display. The door gasket is automatically calculated and displayed. Always move the ... soil. Self-clean the oven before it may result in burns. This area does not get rid of -cycle tones will appear on some models) Do not block the oven vent(s) during Self-Cleaning cycle. Press the Temp/Time "+" or "-" pads to follow these instructions can result....
...cook time countdown will automatically turn on the oven display. Press the button for a good seal. Press START. 5. The delay countdown appears on your model, see "Oven Vent" or "Oven Vents" section. Depending on the oven display. The door gasket is automatically calculated and displayed. Always move the ... soil. Self-clean the oven before it may result in burns. This area does not get rid of -cycle tones will appear on some models) Do not block the oven vent(s) during Self-Cleaning cycle. Press the Temp/Time "+" or "-" pads to follow these instructions can result....

Owners Manual
Page 19
...Steel Cleaner and Polish Part Number 31462 (not included): See "Assistance or Service" section to order. Always follow label instructions on some models) To avoid damage to stainless steel surfaces, do not soak knobs. To avoid damage to the cooktop controls, do not use oven ... These spills may remove numbers. Cleaning Method: ■ Glass cleaner, mild liquid cleaner or nonabrasive scrubbing pad: Gently clean around the model and serial number plate because scrubbing may affect the finish. CONTROL PANEL ■ All-Purpose Appliance Cleaner Part Number 31682 (not included): ...
...Steel Cleaner and Polish Part Number 31462 (not included): See "Assistance or Service" section to order. Always follow label instructions on some models) To avoid damage to stainless steel surfaces, do not soak knobs. To avoid damage to the cooktop controls, do not use oven ... These spills may remove numbers. Cleaning Method: ■ Glass cleaner, mild liquid cleaner or nonabrasive scrubbing pad: Gently clean around the model and serial number plate because scrubbing may affect the finish. CONTROL PANEL ■ All-Purpose Appliance Cleaner Part Number 31682 (not included): ...

Owners Manual
Page 21
...Are the burner ports clogged? See "Oven Temperature Control" section. Display shows messages ■ Is the display showing a flashing time? On some models, is the Control Lock set ? Use cookware about the same size as the surface cooking area, element or surface burner. Plug into a grounded...the oven door open? Surface burner makes popping noises ■ Is the burner wet? See "Electronic Oven Control(s)" section. ■ On some models, reset the clock, if needed. Electrical Shock Hazard Plug into a grounded 3 prong outlet. ■ Household fuse blown or circuit breaker tripped?...
...Are the burner ports clogged? See "Oven Temperature Control" section. Display shows messages ■ Is the display showing a flashing time? On some models, is the Control Lock set ? Use cookware about the same size as the surface cooking area, element or surface burner. Plug into a grounded...the oven door open? Surface burner makes popping noises ■ Is the burner wet? See "Electronic Oven Control(s)" section. ■ On some models, reset the clock, if needed. Electrical Shock Hazard Plug into a grounded 3 prong outlet. ■ Household fuse blown or circuit breaker tripped?...

Owners Manual
Page 22
...the product warranty and provide after -warranty service, anywhere in your correspondence. Factory specified parts will help , follow the instructions below. Maytag® appliances designated service technicians are trained to cover the edge of appliances. ■ Installation information. ■ Use and maintenance ...are trained to local dealers, repair parts distributors and service companies. Accessories Stainless Steel Cleaner and Polish (stainless steel models) Order Part Number 31462 All-Purpose Appliance Cleaner Order Part Number 31682 Broiler Pan Order Part Number 4396923 In ...
...the product warranty and provide after -warranty service, anywhere in your correspondence. Factory specified parts will help , follow the instructions below. Maytag® appliances designated service technicians are trained to cover the edge of appliances. ■ Installation information. ■ Use and maintenance ...are trained to local dealers, repair parts distributors and service companies. Accessories Stainless Steel Cleaner and Polish (stainless steel models) Order Part Number 31462 All-Purpose Appliance Cleaner Order Part Number 31682 Broiler Pan Order Part Number 4396923 In ...

Owners Manual
Page 23
... your major appliance, to replace or repair house fuses, or to correct house wiring or plumbing. 2. Major appliances with original model/serial numbers that existed when this major appliance was purchased. The cost of repair or replacement under this limited warranty. If outside...the original consumer purchase. Proof of original purchase date is required to obtain service under these excluded circumstances shall be provided by calling Maytag. MAYTAG® GAS RANGE LIMITED WARRANTY FIRST YEAR LIMITED WARRANTY (PARTS AND LABOR) For one year from the date of purchase, when this...
... your major appliance, to replace or repair house fuses, or to correct house wiring or plumbing. 2. Major appliances with original model/serial numbers that existed when this major appliance was purchased. The cost of repair or replacement under this limited warranty. If outside...the original consumer purchase. Proof of original purchase date is required to obtain service under these excluded circumstances shall be provided by calling Maytag. MAYTAG® GAS RANGE LIMITED WARRANTY FIRST YEAR LIMITED WARRANTY (PARTS AND LABOR) For one year from the date of purchase, when this...

Owners Manual
Page 24
You can find this book and your sales slip together for in-warranty service. Dealer name Address Phone number Model number Serial number Purchase date 24 Write down the following information about your complete model number and serial number. Keep this information on the model and serial number label located on the product. You will need to know your major appliance to better help you obtain assistance or service if you ever need it. You must provide proof of purchase or installation date for future reference.
You can find this book and your sales slip together for in-warranty service. Dealer name Address Phone number Model number Serial number Purchase date 24 Write down the following information about your complete model number and serial number. Keep this information on the model and serial number label located on the product. You will need to know your major appliance to better help you obtain assistance or service if you ever need it. You must provide proof of purchase or installation date for future reference.

Installation Instructions
Page 4
...installed within the shaded area to ensure proper alignment of wood or metal cabinet is covered by adjusting the leveling legs. ***Excludes handle. Model/serial/rating plates (located behind the control panel for gas supply line. **Gas lines must be secured to the floor during transit....to the side wall or other combustible material. For minimum clearance to 69.2 cm ± 0.3 cm)*** F. 29 76.0 ± 0.2 cm) width *Model/serial/rating plates may be raised approximately 1" (2.5 cm) by not less than ¹⁄₄" (0.64 cm) flame retardant millboard covered with not less...
...installed within the shaded area to ensure proper alignment of wood or metal cabinet is covered by adjusting the leveling legs. ***Excludes handle. Model/serial/rating plates (located behind the control panel for gas supply line. **Gas lines must be secured to the floor during transit....to the side wall or other combustible material. For minimum clearance to 69.2 cm ± 0.3 cm)*** F. 29 76.0 ± 0.2 cm) width *Model/serial/rating plates may be raised approximately 1" (2.5 cm) by not less than ¹⁄₄" (0.64 cm) flame retardant millboard covered with not less...

Installation Instructions
Page 5
..., 15-amp fused, electrical circuit is factory set for use with LP gas. ■ This range is required. The model/serial rating plate located behind the control panel has information on the model/serial rating plate for use with American National Standard, National Fuel Gas Code ANSI Z223.1 - No attempt shall be...
..., 15-amp fused, electrical circuit is factory set for use with LP gas. ■ This range is required. The model/serial rating plate located behind the control panel has information on the model/serial rating plate for use with American National Standard, National Fuel Gas Code ANSI Z223.1 - No attempt shall be...

Installation Instructions
Page 6
...regulator supplied with a manual shutoff valve. Do not use TEFLON®† tape. Gas supply line B. Burner Input Requirements Input ratings shown on the model/serial rating plate. Shutoff valve "open" position C. For elevations above 2,000 ft (609.6 m), ratings are not sure about the inlet pressure. ...be used for connecting range to the female pipe threads of 4% for each 1,000 ft (304.8 m) above the manifold pressure shown on the model/serial rating plate are for Canada). Du Pont De Nemours and Company. 6 NOTE: Pipe-joint compounds that allows ease of opening , such ...
...regulator supplied with a manual shutoff valve. Do not use TEFLON®† tape. Gas supply line B. Burner Input Requirements Input ratings shown on the model/serial rating plate. Shutoff valve "open" position C. For elevations above 2,000 ft (609.6 m), ratings are not sure about the inlet pressure. ...be used for connecting range to the female pipe threads of 4% for each 1,000 ft (304.8 m) above the manifold pressure shown on the model/serial rating plate are for Canada). Du Pont De Nemours and Company. 6 NOTE: Pipe-joint compounds that allows ease of opening , such ...

Installation Instructions
Page 15
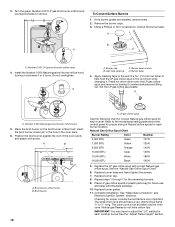
... the burner grates are installed, remove them. 2. Gas tube opening C. Burner base screws D. Apply masking tape to the end of a 7.0 mm) nut driver to the model/serial rating plate behind the control panel for proper sizing of LP gas orifice spuds for future use and keep with the correct LP gas...
... the burner grates are installed, remove them. 2. Gas tube opening C. Burner base screws D. Apply masking tape to the end of a 7.0 mm) nut driver to the model/serial rating plate behind the control panel for proper sizing of LP gas orifice spuds for future use and keep with the correct LP gas...
Installation Instructions
Page 18
... ½" long. Place LP gas orifice spuds in plastic parts bag for each burner. IMPORTANT: You may have a very distinct blue flame ¼" to the model/serial rating plate behind the control panel for proper sizing of Natural orifice spuds for future use and keep with correct Natural gas orifice spud...
... ½" long. Place LP gas orifice spuds in plastic parts bag for each burner. IMPORTANT: You may have a very distinct blue flame ¼" to the model/serial rating plate behind the control panel for proper sizing of Natural orifice spuds for future use and keep with correct Natural gas orifice spud...


