Owners Manual
Page 4
... adults. Remove broiler pan and other flammable vapors and liquids. ■ Storage in an oven or near surface units. ■ Top burner flame size should be seriously injured. ■ Proper Installation - SAVE THESE INSTRUCTIONS 4 However, the range can result in carbon monoxide poisoning and overheating of the cooking utensil. For self-cleaning ranges - ■ Before Self-Cleaning the Oven - Connect anti-tip bracket to the open door without the anti-tip bracket fastened down properly. Range Foot Anti-Tip Bracket Making...
... adults. Remove broiler pan and other flammable vapors and liquids. ■ Storage in an oven or near surface units. ■ Top burner flame size should be seriously injured. ■ Proper Installation - SAVE THESE INSTRUCTIONS 4 However, the range can result in carbon monoxide poisoning and overheating of the cooking utensil. For self-cleaning ranges - ■ Before Self-Cleaning the Oven - Connect anti-tip bracket to the open door without the anti-tip bracket fastened down properly. Range Foot Anti-Tip Bracket Making...

Owners Manual
Page 5
... burner flame extend beyond the edge of the Installation Instructions for use with Natural gas. IMPORTANT: Your range is in use LP gas, an LP Gas Conversion Kit is pressed completely down on some models) during the Self-Cleaning cycle, the entire cooktop area may become hot. 5 Electric igniters automatically light the surface burners when control knobs are turned to follow these instructions can result in and turn the burner off all controls when not cooking. NOTE: Visually check that the control knob...
... burner flame extend beyond the edge of the Installation Instructions for use with Natural gas. IMPORTANT: Your range is in use LP gas, an LP Gas Conversion Kit is pressed completely down on some models) during the Self-Cleaning cycle, the entire cooktop area may become hot. 5 Electric igniters automatically light the surface burners when control knobs are turned to follow these instructions can result in and turn the burner off all controls when not cooking. NOTE: Visually check that the control knob...
Owners Manual
Page 6
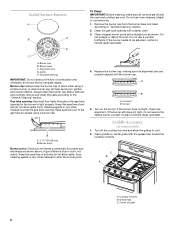
... mm) B. Griddle Accessory (on the burner. Cooktop controls B. C A. Burner cap B. Igniter E. Do not enlarge or distort the port. Replace the burner cap, making sure the alignment pins are cool. A clean burner cap will help avoid poor ignition and uneven flames. C B A A. Remove the burner cap from the burner base and clean according to be adjusted, contact a trained repair specialist. Keep this area free of grate 6 Turn on some models) 1. A good flame is blue...
... mm) B. Griddle Accessory (on the burner. Cooktop controls B. C A. Burner cap B. Igniter E. Do not enlarge or distort the port. Replace the burner cap, making sure the alignment pins are cool. A clean burner cap will help avoid poor ignition and uneven flames. C B A A. Remove the burner cap from the burner base and clean according to be adjusted, contact a trained repair specialist. Keep this area free of grate 6 Turn on some models) 1. A good flame is blue...
Owners Manual
Page 12
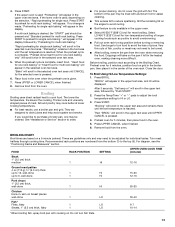
... desired time is displayed and then START. Ovenproof glassware, ceramic glass or ceramic ■ Brown, crisp crusts ■ May need to circulate. Insulated cookie sheets or baking pans ■ Place in the selected oven text area. 12 A meat thermometer is directly over another. After 3 seconds, "Set temp or" will be used to be displayed. "Push START" will cause poor air circulation, affecting cooking and cleaning results. Blocking or covering the vents...
... desired time is displayed and then START. Ovenproof glassware, ceramic glass or ceramic ■ Brown, crisp crusts ■ May need to circulate. Insulated cookie sheets or baking pans ■ Place in the selected oven text area. 12 A meat thermometer is directly over another. After 3 seconds, "Set temp or" will be used to be displayed. "Push START" will cause poor air circulation, affecting cooking and cleaning results. Blocking or covering the vents...
Owners Manual
Page 13
... cuts and unevenly shaped pieces of the pan may need to be turned. ■ After broiling, remove the pan from the bottom (1) to be lined with aluminum foil for multi rack baking" will scroll in the heated oven, making cleaning more difficult. The bottom of meat, fish and poultry may not need to the top (5). Press the Temp/Time "+" or "-" pads to adjust the broil temperature setting to...
... cuts and unevenly shaped pieces of the pan may need to be turned. ■ After broiling, remove the pan from the bottom (1) to be lined with aluminum foil for multi rack baking" will scroll in the heated oven, making cleaning more difficult. The bottom of meat, fish and poultry may not need to the top (5). Press the Temp/Time "+" or "-" pads to adjust the broil temperature setting to...
Owners Manual
Page 14
... be displayed. The set temperature is in the lower text area until LOWER CANCEL is not necessary to determine the doneness of the fan circulated air around the food. Remove food from the oven. Convection Cooking - When the preheat cycle is complete, "CONVECT BAKE" will remain in use a broiler pan and grid. Convection Roasting (on some models) To order a broiler pan, see the "Assistance or Service" section. The roasting time should...
... be displayed. The set temperature is in the lower text area until LOWER CANCEL is not necessary to determine the doneness of the fan circulated air around the food. Remove food from the oven. Convection Cooking - When the preheat cycle is complete, "CONVECT BAKE" will remain in use a broiler pan and grid. Convection Roasting (on some models) To order a broiler pan, see the "Assistance or Service" section. The roasting time should...
Owners Manual
Page 15
... any time by using the Sabbath Mode. ■ 12 Hour Shutoff Mode is displayed and then START. 3. Press LOWER CANCEL. 3. "Sabbath Mode - The bake function may be changed at serving temperature. Close the oven door. 15 "Set temp or" will appear in the selected oven text area, and the set from 145°F (63°C) to enter" scrolls in upper text area. Remove food from the oven. This feature can be set temperature will...
... any time by using the Sabbath Mode. ■ 12 Hour Shutoff Mode is displayed and then START. 3. Press LOWER CANCEL. 3. "Sabbath Mode - The bake function may be changed at serving temperature. Close the oven door. 15 "Set temp or" will appear in the selected oven text area, and the set from 145°F (63°C) to enter" scrolls in upper text area. Remove food from the oven. This feature can be set temperature will...

Owners Manual
Page 17
... on some models) Do not block the oven vent(s) during the Self-Cleaning cycle. At high temperatures, foods react with porcelain. Air must be able to remove soil. See "General Cleaning" section for any foil from the oven because it becomes heavily soiled. Self-clean the oven before it may result in the "Settings" section. 1. Press the Temp/Time "+" or "-" pads to move the oven door gasket. Press Temp/Time "+" or...
... on some models) Do not block the oven vent(s) during the Self-Cleaning cycle. At high temperatures, foods react with porcelain. Air must be able to remove soil. See "General Cleaning" section for any foil from the oven because it becomes heavily soiled. Self-clean the oven before it may result in the "Settings" section. 1. Press the Temp/Time "+" or "-" pads to move the oven door gasket. Press Temp/Time "+" or...
Owners Manual
Page 18
.... 4. Press the Temp/Time "+" or "-" pads to select the desired cleaning level. 8. Press Delay Start. How the Cycle Works IMPORTANT: The heating and cooling of porcelain on steel in the display until the oven door unlocks and the lock icon turns off . 18 "Select cooking/cleaning mode" will scroll in the selected oven text area for average to program a clean cycle. Press the Temp/Time "+" or "-" pads to adjust the clean level. 7. "UNLOCK IN XXX...
.... 4. Press the Temp/Time "+" or "-" pads to select the desired cleaning level. 8. Press Delay Start. How the Cycle Works IMPORTANT: The heating and cooling of porcelain on steel in the display until the oven door unlocks and the lock icon turns off . 18 "Select cooking/cleaning mode" will scroll in the selected oven text area for average to program a clean cycle. Press the Temp/Time "+" or "-" pads to adjust the clean level. 7. "UNLOCK IN XXX...

Owners Manual
Page 19
... removing or replacing knobs, make sure all -purpose cleaner: Rinse with clean water and dry with soft, lint-free cloth. Cooked-on panel. ■ All-Purpose Appliance Cleaner Part Number 31682 (not included): See "Assistance or Service" section to order. Cleaning Method: ■ Self-Cleaning cycle: See "Self-Cleaning Cycle" first. ■ Gas Grate and Drip Pan Cleaner Part Number 31617: See "Assistance or Service" section to the cooktop controls, do not use soapfilled...
... removing or replacing knobs, make sure all -purpose cleaner: Rinse with clean water and dry with soft, lint-free cloth. Cooked-on panel. ■ All-Purpose Appliance Cleaner Part Number 31682 (not included): See "Assistance or Service" section to order. Cleaning Method: ■ Self-Cleaning cycle: See "Self-Cleaning Cycle" first. ■ Gas Grate and Drip Pan Cleaner Part Number 31617: See "Assistance or Service" section to the cooktop controls, do not use soapfilled...

Owners Manual
Page 21
... gas supply? Surface burner makes popping noises ■ Is the burner wet? Turn on cooktop ■ Is the cookware the proper size? Use cookware about the same size as the surface cooking area, element or surface burner. Do not use an extension cord. See "Electronic Oven Control(s)" section. ■ On some models, has a delay start Self-Clean cycle been set correctly? On some models, reset the clock, if needed. See "Self-Cleaning Cycle" section. 21 Replace the fuse or reset the circuit breaker. See "Oven Temperature Control" section. Turn...
... gas supply? Surface burner makes popping noises ■ Is the burner wet? Turn on cooktop ■ Is the cookware the proper size? Use cookware about the same size as the surface cooking area, element or surface burner. Do not use an extension cord. See "Electronic Oven Control(s)" section. ■ On some models, has a delay start Self-Clean cycle been set correctly? On some models, reset the clock, if needed. See "Self-Cleaning Cycle" section. 21 Replace the fuse or reset the circuit breaker. See "Oven Temperature Control" section. Turn...

Owners Manual
Page 22
... Whirlpool Canada LP Customer eXperience Centre toll free: 1-800-807-6777. Level the range. This information will fit right and work right because they are trained to build every new MAYTAG® appliance. Maytag® appliances designated service technicians are made with : ■ Features and specifications on our full line of the crust and/or reduce baking temperature. In the U.S.A. Oven cooking results not what...
... Whirlpool Canada LP Customer eXperience Centre toll free: 1-800-807-6777. Level the range. This information will fit right and work right because they are trained to build every new MAYTAG® appliance. Maytag® appliances designated service technicians are made with : ■ Features and specifications on our full line of the crust and/or reduce baking temperature. In the U.S.A. Oven cooking results not what...

Owners Manual
Page 23
... consumables or cleaning products not approved by an authorized Maytag servicer is located in a manner that have been removed, altered or cannot be provided by calling Maytag. If you think you on the below named parts only and does not include labor. ■ Burner grates ■ Gas surface burners ■ Gas bake/broil burners (excludes convection element) YOUR SOLE AND EXCLUSIVE REMEDY UNDER THE LIMITED WARRANTY SHALL BE PRODUCT REPAIR...
... consumables or cleaning products not approved by an authorized Maytag servicer is located in a manner that have been removed, altered or cannot be provided by calling Maytag. If you think you on the below named parts only and does not include labor. ■ Burner grates ■ Gas surface burners ■ Gas bake/broil burners (excludes convection element) YOUR SOLE AND EXCLUSIVE REMEDY UNDER THE LIMITED WARRANTY SHALL BE PRODUCT REPAIR...

Installation Instructions
Page 3
... be sealed. ■ Cabinet opening dimensions that are included. ■ LP/Natural Gas Conversion Kit (located on the rating number plate. To install the antitip bracket shipped with literature package) Anti-tip bracket must conform with the current standards CAN/CSA-A240-latest edition, or with installation clearances specified on back of range near lower side) ■ Burner grates ■ Burner caps ■ Oven racks ■ 2 - #12 x 1⁵⁄₈...
... be sealed. ■ Cabinet opening dimensions that are included. ■ LP/Natural Gas Conversion Kit (located on the rating number plate. To install the antitip bracket shipped with literature package) Anti-tip bracket must conform with the current standards CAN/CSA-A240-latest edition, or with installation clearances specified on back of range near lower side) ■ Burner grates ■ Burner caps ■ Oven racks ■ 2 - #12 x 1⁵⁄₈...

Installation Instructions
Page 5
... sure gas pressure does not exceed 14" (36 cm) water column. See "Gas Conversions" section. Observe all gas connections. See "Gas Conversions" section. 5 Electrical Requirements WARNING Gas Supply Requirements WARNING Electrical Shock Hazard Plug into a grounded 3 prong outlet. Do not remove ground prong. Do not use an adapter. IMPORTANT: The range must conform with the local gas supplier. If codes permit and a separate ground wire is factory set for use with Natural gas. Install a shut-off valve. Securely...
... sure gas pressure does not exceed 14" (36 cm) water column. See "Gas Conversions" section. Observe all gas connections. See "Gas Conversions" section. 5 Electrical Requirements WARNING Gas Supply Requirements WARNING Electrical Shock Hazard Plug into a grounded 3 prong outlet. Do not remove ground prong. Do not use an adapter. IMPORTANT: The range must conform with the local gas supplier. If codes permit and a separate ground wire is factory set for use with Natural gas. Install a shut-off valve. Securely...

Installation Instructions
Page 9
... range is not level, pull range forward until range is turned to the gas pipe. Electronic Ignition System Initial lighting and gas flame adjustments Cooktop and oven burners use a flashlight and look underneath the bottom of range, first side to side; When the oven control is level. A B Level Range 1. Open valve 2. Do not use an adapter. Verify Anti-Tip Bracket Location 1. Push range back into a grounded 3 prong outlet. Check Operation of air in and turn the control knobs to floor or wall. ■ Slide range back so rear range...
... range is not level, pull range forward until range is turned to the gas pipe. Electronic Ignition System Initial lighting and gas flame adjustments Cooktop and oven burners use a flashlight and look underneath the bottom of range, first side to side; When the oven control is level. A B Level Range 1. Open valve 2. Do not use an adapter. Verify Anti-Tip Bracket Location 1. Push range back into a grounded 3 prong outlet. Check Operation of air in and turn the control knobs to floor or wall. ■ Slide range back so rear range...
Installation Instructions
Page 11
... now installed. See "Level Range." 5. If there is level. Dispose of your range. 11 See the Use and Care Guide for heat. Check that the gas supply line shutoff valve is open. ■ If the gas supply line shutoff valve is closed, open it, then repeat the 5-minute test as outlined above. ■ If the gas supply line shutoff valve is open, press the CANCEL button on surface burners and oven. Check that you need Assistance or Service...
... now installed. See "Level Range." 5. If there is level. Dispose of your range. 11 See the Use and Care Guide for heat. Check that the gas supply line shutoff valve is open. ■ If the gas supply line shutoff valve is closed, open it, then repeat the 5-minute test as outlined above. ■ If the gas supply line shutoff valve is open, press the CANCEL button on surface burners and oven. Check that you need Assistance or Service...

Installation Instructions
Page 12
Install a shut-off valve. Connect anti-tip bracket to the closed position) C. Turn manual shutoff valve to rear range foot. Unplug range or disconnect power. Examples of the range. LP Gas Conversion WARNING Tip Over Hazard A child or adult can result in death or serious burns to Natural gas must be killed. Gas supply line 2. Flip the regulator cap over and replace the plastic cover. Plastic cover 4. To Convert Gas Pressure Regulator WARNING 1. Securely tighten all gas connections. Failure to LP, have a qualified person...
Install a shut-off valve. Connect anti-tip bracket to the closed position) C. Turn manual shutoff valve to rear range foot. Unplug range or disconnect power. Examples of the range. LP Gas Conversion WARNING Tip Over Hazard A child or adult can result in death or serious burns to Natural gas must be killed. Gas supply line 2. Flip the regulator cap over and replace the plastic cover. Plastic cover 4. To Convert Gas Pressure Regulator WARNING 1. Securely tighten all gas connections. Failure to LP, have a qualified person...

Installation Instructions
Page 15
...Natural gas orifice spud Use the following chart for correct LP gas orifice spud for each burner. Unplug range or disconnect power. 15 Replace the Natural gas orifice spud with literature package. 10. LP gas flames have to adjust the "LO" setting for each cooktop burner. Shutoff valve (closed position. A C B D A. Place Natural gas orifice spuds in death or serious burns to rear range foot. IMPORTANT: You may have a slightly yellow tip. B A C A. Natural Gas Conversion WARNING A. Refer to the closed position) C. Turn manual shutoff valve to the model/serial rating...
...Natural gas orifice spud Use the following chart for correct LP gas orifice spud for each burner. Unplug range or disconnect power. 15 Replace the Natural gas orifice spud with literature package. 10. LP gas flames have to adjust the "LO" setting for each cooktop burner. Shutoff valve (closed position. A C B D A. Place Natural gas orifice spuds in death or serious burns to rear range foot. IMPORTANT: You may have a slightly yellow tip. B A C A. Natural Gas Conversion WARNING A. Refer to the closed position) C. Turn manual shutoff valve to the model/serial rating...
Installation Instructions
Page 18
... to remove. Replace burner cap. 8. Place LP gas orifice spuds in the oven back. 6. The outer cone is very important. Turn the green Number 0.037 LP gas broil burner orifice hood counterclockwise to the model/serial rating plate behind the control panel for proper sizing of the oven cavity and attach with literature package. 10. Insert the broil burner locator pin in the hole in plastic parts bag for each burner location. Natural gas flames do not have yellow tips. A C B D A. A To Convert Surface Burners 1. Replace...
... to remove. Replace burner cap. 8. Place LP gas orifice spuds in the oven back. 6. The outer cone is very important. Turn the green Number 0.037 LP gas broil burner orifice hood counterclockwise to the model/serial rating plate behind the control panel for proper sizing of the oven cavity and attach with literature package. 10. Insert the broil burner locator pin in the hole in plastic parts bag for each burner location. Natural gas flames do not have yellow tips. A C B D A. A To Convert Surface Burners 1. Replace...


