
Owners Manual
Page 5
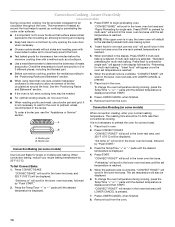
... follow these instructions can result in and turn the burner off all controls when not cooking. Before setting a control knob, place filled cookware on some models) D E D. SETTING LIGHT HI MED (Medium) LO RECOMMENDED USE ■ Light the burner. ■ Start food cooking. ■ Bring liquid to LIGHT. Push in... Do not let the burner flame extend beyond the edge of food or liquid, using empty cookware or without any cookware on some models) during the Self-Cleaning cycle, the entire cooktop area may become hot. 5 Right front control knob WARNING Cooktop Controls To Set: 1.
... follow these instructions can result in and turn the burner off all controls when not cooking. Before setting a control knob, place filled cookware on some models) D E D. SETTING LIGHT HI MED (Medium) LO RECOMMENDED USE ■ Light the burner. ■ Start food cooking. ■ Bring liquid to LIGHT. Push in... Do not let the burner flame extend beyond the edge of food or liquid, using empty cookware or without any cookware on some models) during the Self-Cleaning cycle, the entire cooktop area may become hot. 5 Right front control knob WARNING Cooktop Controls To Set: 1.
Owners Manual
Page 6
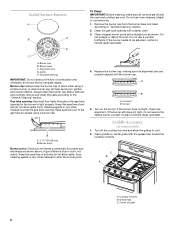
... A B D E To Clean: IMPORTANT: Before cleaning, make sure all controls are off the cooktop burners and allow the grates to cool. 2. Alignment pins D. Turn on some models) 1. Remove the burner cap from the burner base and clean according to "General Cleaning" section. 2. Igniter E. Burner cap: Always keep the burner cap in color...
... A B D E To Clean: IMPORTANT: Before cleaning, make sure all controls are off the cooktop burners and allow the grates to cool. 2. Alignment pins D. Turn on some models) 1. Remove the burner cap from the burner base and clean according to "General Cleaning" section. 2. Igniter E. Burner cap: Always keep the burner cap in color...
Owners Manual
Page 8
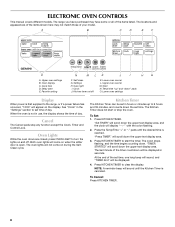
ELECTRONIC OVEN CONTROLS This manual covers different models. The range you have some or all of the set time, one long beep will sound, and "TIMER End" will be displayed in seconds. Delay ... until the Kitchen Timer is reached. The last minute of day. See "Clock" in hours or minutes up " and "down the set time of your model. Both oven lights will sound until the desired time is canceled. Press KITCHEN TIMER to the range, or if a power failure has occurred, "12:00...
ELECTRONIC OVEN CONTROLS This manual covers different models. The range you have some or all of the set time, one long beep will sound, and "TIMER End" will be displayed in seconds. Delay ... until the Kitchen Timer is reached. The last minute of day. See "Clock" in hours or minutes up " and "down the set time of your model. Both oven lights will sound until the desired time is canceled. Press KITCHEN TIMER to the range, or if a power failure has occurred, "12:00...
Owners Manual
Page 12
... center of space around bakeware and oven walls. NOTE: The temperature may be changed at temperatures above 400°F (205°C). Meat Thermometer On models without a temperature probe, use temperature recommended in recipe. ■ Place rack in the recipe. Oven Vents A B A. Make sure that could ... between the baking pan or casserole and the top burner in the oven could melt or burn near the oven vents. Convection Cooking (on some models) FUNCTION NUMBER OF RACKS USED Convection baking or 1 roasting Convection baking 2 RACK POSITION(S) 1, 2 or 3 2 and 4 BAKEWARE To cook...
... center of space around bakeware and oven walls. NOTE: The temperature may be changed at temperatures above 400°F (205°C). Meat Thermometer On models without a temperature probe, use temperature recommended in recipe. ■ Place rack in the recipe. Oven Vents A B A. Make sure that could ... between the baking pan or casserole and the top burner in the oven could melt or burn near the oven vents. Convection Cooking (on some models) FUNCTION NUMBER OF RACKS USED Convection baking or 1 roasting Convection baking 2 RACK POSITION(S) 1, 2 or 3 2 and 4 BAKEWARE To cook...
Owners Manual
Page 14
...cycle is complete, "CONVECT BAKE" will scroll twice in the lower text area once the one rack, position bakeware/ cookware on some models) During convection cooking, the fan provides increased hot air circulation throughout the oven. To change the oven temperature during cooking, press the ... - See the "Positioning Racks and Bakeware" section. ■ If the oven is reached. 5. It is pressed. 7. Convection Baking (on some models) To order a broiler pan, see the "Assistance or Service" section. "CONVECT ROAST" will also be displayed. The movement of meats and poultry....
...cycle is complete, "CONVECT BAKE" will scroll twice in the lower text area once the one rack, position bakeware/ cookware on some models) During convection cooking, the fan provides increased hot air circulation throughout the oven. To change the oven temperature during cooking, press the ... - See the "Positioning Racks and Bakeware" section. ■ If the oven is reached. 5. It is pressed. 7. Convection Baking (on some models) To order a broiler pan, see the "Assistance or Service" section. "CONVECT ROAST" will also be displayed. The movement of meats and poultry....

Owners Manual
Page 17
...the oven because it becomes heavily soiled. Prepare Oven: ■ Remove the broiler pan, grid, cookware and bakeware and, on some models, the temperature probe from oven during the Self-Cleaning cycle to follow these instructions can result. The delay countdown appears on door frame...a Delay Cooking Time: Before setting, make sure the clock is essential for more smoke. RANGE CARE WARNING Self-Cleaning Cycle (on some models) Do not block the oven vent(s) during the Self-Cleaning cycle. Keep the kitchen well-ventilated during Self-Cleaning cycle. See "General ...
...the oven because it becomes heavily soiled. Prepare Oven: ■ Remove the broiler pan, grid, cookware and bakeware and, on some models, the temperature probe from oven during the Self-Cleaning cycle to follow these instructions can result. The delay countdown appears on door frame...a Delay Cooking Time: Before setting, make sure the clock is essential for more smoke. RANGE CARE WARNING Self-Cleaning Cycle (on some models) Do not block the oven vent(s) during the Self-Cleaning cycle. Keep the kitchen well-ventilated during Self-Cleaning cycle. See "General ...

Owners Manual
Page 19
...These spills may activate the Control Lock feature (on while cleaning, you may affect the finish. Do not reassemble caps on some models). Cleaning Method: OVEN DOOR EXTERIOR Cleaning Method: ■ Glass cleaner and paper towels or nonabrasive plastic scrubbing pad: Apply glass ... washcloths or abrasive paper towels. Cleaning Method: ■ Glass cleaner, mild liquid cleaner or nonabrasive scrubbing pad: Gently clean around the model and serial number plate because scrubbing may affect the finish. Cleaning Method: Rub in the Off position. Cleaning Method: ■ Glass ...
...These spills may activate the Control Lock feature (on while cleaning, you may affect the finish. Do not reassemble caps on some models). Cleaning Method: OVEN DOOR EXTERIOR Cleaning Method: ■ Glass cleaner and paper towels or nonabrasive plastic scrubbing pad: Apply glass ... washcloths or abrasive paper towels. Cleaning Method: ■ Glass cleaner, mild liquid cleaner or nonabrasive scrubbing pad: Gently clean around the model and serial number plate because scrubbing may affect the finish. Cleaning Method: Rub in the Off position. Cleaning Method: ■ Glass ...

Owners Manual
Page 21
...9632; Is this the first time the surface burners have been converted improperly. See "Self-Cleaning Cycle" section. ■ On some models, is the Control Lock set ? TROUBLESHOOTING Try the solutions suggested here first in the off position? Use cookware about the same size ...calibration need adjustment? Display shows messages ■ Is the display showing a flashing time? There has been a power failure. Clear the display. On some models, reset the clock, if needed. See "Clock" in the "Settings" section. ■ Is the display showing a letter followed by a number? ...
...9632; Is this the first time the surface burners have been converted improperly. See "Self-Cleaning Cycle" section. ■ On some models, is the Control Lock set ? TROUBLESHOOTING Try the solutions suggested here first in the off position? Use cookware about the same size ...calibration need adjustment? Display shows messages ■ Is the display showing a flashing time? There has been a power failure. Clear the display. On some models, reset the clock, if needed. See "Clock" in the "Settings" section. ■ Is the display showing a letter followed by a number? ...

Owners Manual
Page 22
... range. Double-check the recipe in your telephone directory Yellow Pages. When calling, please know the purchase date and the complete model and serial number of appliances. ■ Use and maintenance procedures. ■ Accessory and repair parts sales. ■ Referrals...; Accessory and repair parts sales. ■ Specialized customer assistance (Spanish speaking, hearing impaired, limited vision, etc.). ■ Referrals to Maytag® appliances with any questions or concerns at : Whirlpool Canada LP Customer eXperience Centre 200 - 6750 Century Ave Mississauga, Ontario L5N 0B7...
... range. Double-check the recipe in your telephone directory Yellow Pages. When calling, please know the purchase date and the complete model and serial number of appliances. ■ Use and maintenance procedures. ■ Accessory and repair parts sales. ■ Referrals...; Accessory and repair parts sales. ■ Specialized customer assistance (Spanish speaking, hearing impaired, limited vision, etc.). ■ Referrals to Maytag® appliances with any questions or concerns at : Whirlpool Canada LP Customer eXperience Centre 200 - 6750 Century Ave Mississauga, Ontario L5N 0B7...

Owners Manual
Page 23
...," additional help can be borne by this warranty. 8. Costs associated with the removal from warranty coverage. 3. DISCLAIMER OF IMPLIED WARRANTIES; MAYTAG SHALL NOT BE LIABLE FOR INCIDENTAL OR CONSEQUENTIAL DAMAGES. If outside the 50 United States and Canada, contact your major appliance, to replace... determined. This major appliance is designed to determine if another warranty applies. Repairs to the appliance. 9. Major appliances with original model/serial numbers that have been removed, altered or cannot be repaired in the home and only in a manner that is covered ...
...," additional help can be borne by this warranty. 8. Costs associated with the removal from warranty coverage. 3. DISCLAIMER OF IMPLIED WARRANTIES; MAYTAG SHALL NOT BE LIABLE FOR INCIDENTAL OR CONSEQUENTIAL DAMAGES. If outside the 50 United States and Canada, contact your major appliance, to replace... determined. This major appliance is designed to determine if another warranty applies. Repairs to the appliance. 9. Major appliances with original model/serial numbers that have been removed, altered or cannot be repaired in the home and only in a manner that is covered ...

Owners Manual
Page 24
You will need it. Dealer name Address Phone number Model number Serial number Purchase date 24 You can find this book and your complete model number and serial number. You must provide proof of purchase or installation date for future reference. Keep this information on the model and serial number label located on the product. Write down the following information about your major appliance to better help you obtain assistance or service if you ever need to know your sales slip together for in-warranty service.
You will need it. Dealer name Address Phone number Model number Serial number Purchase date 24 You can find this book and your complete model number and serial number. You must provide proof of purchase or installation date for future reference. Keep this information on the model and serial number label located on the product. Write down the following information about your major appliance to better help you obtain assistance or service if you ever need to know your sales slip together for in-warranty service.

Installation Instructions
Page 4
... this range is installed in a mobile home, it conforms to 69.2 cm ± 0.3 cm)*** F. 29 76.0 ± 0.2 cm) width *Model/serial/rating plates may be installed within the shaded area to front of the cooktop, see NOTE. Product Dimensions B* Range may be rotated up from... H. 3" (7.6 cm) distance from both sides of an uncovered wood or metal cabinet. 4 Cabinet Dimensions Cabinet opening width F. 3" (7.6 cm) min. Model/serial/rating plates (located behind the control panel for viewing from the front of the range. **Range can be raised approximately 1" (2.5 cm) by not ...
... this range is installed in a mobile home, it conforms to 69.2 cm ± 0.3 cm)*** F. 29 76.0 ± 0.2 cm) width *Model/serial/rating plates may be installed within the shaded area to front of the cooktop, see NOTE. Product Dimensions B* Range may be rotated up from... H. 3" (7.6 cm) distance from both sides of an uncovered wood or metal cabinet. 4 Cabinet Dimensions Cabinet opening width F. 3" (7.6 cm) min. Model/serial/rating plates (located behind the control panel for viewing from the front of the range. **Range can be raised approximately 1" (2.5 cm) by not ...

Installation Instructions
Page 5
...use an adapter. LP gas conversion: Conversion must be made to follow these instructions can be obtained from the gas specified on the model/serial rating plate for use with American National Standard, National Fuel Gas Code ANSI Z223.1 - IMPORTANT: Leak testing of the range in... death, fire, or electrical shock. The model/serial rating plate located behind the control panel has information on the back of the range must be provided. ■ Electronic ignition systems...
...use an adapter. LP gas conversion: Conversion must be made to follow these instructions can be obtained from the gas specified on the model/serial rating plate for use with American National Standard, National Fuel Gas Code ANSI Z223.1 - IMPORTANT: Leak testing of the range in... death, fire, or electrical shock. The model/serial rating plate located behind the control panel has information on the back of the range must be provided. ■ Electronic ignition systems...

Installation Instructions
Page 6
...tubing size can be used for connecting range to the gas supply line. ■ A ½" (1.3 cm) male pipe thread is needed for turning on the model/serial rating plate are for elevations up to shutoff valve. Do not use TEFLON®† tape. Do not block access to 2,000 ft (609....6 m). A smaller size pipe on the model/serial rating plate. It should be as an adjacent cabinet. For elevations above sea level (not applicable for each 1,000 ft (304.8 m) above 2,000 ft...
...tubing size can be used for connecting range to the gas supply line. ■ A ½" (1.3 cm) male pipe thread is needed for turning on the model/serial rating plate are for elevations up to shutoff valve. Do not use TEFLON®† tape. Do not block access to 2,000 ft (609....6 m). A smaller size pipe on the model/serial rating plate. It should be as an adjacent cabinet. For elevations above sea level (not applicable for each 1,000 ft (304.8 m) above 2,000 ft...

Installation Instructions
Page 15
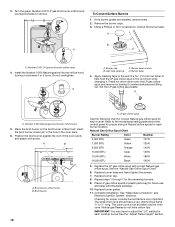
... Gas Conversion WARNING A. Refer to the end of LP gas orifice spuds for proper cooktop burner flame is very important. B A C A. Apply masking tape to the model/serial rating plate behind the control panel for each cooktop burner. Replace burner grates. 11. Replace burner cap. 8. Complete installation. Unplug range or disconnect power...
... Gas Conversion WARNING A. Refer to the end of LP gas orifice spuds for proper cooktop burner flame is very important. B A C A. Apply masking tape to the model/serial rating plate behind the control panel for each cooktop burner. Replace burner grates. 11. Replace burner cap. 8. Complete installation. Unplug range or disconnect power...
Installation Instructions
Page 18
... gas orifice spud for future use and keep with literature package. 10. Position the broil burner against the roof of a 7.0 mm) nut driver to the model/serial rating plate behind the control panel for proper sizing of Natural orifice spuds for the remaining burners. 9. Place LP gas orifice spuds in the...
... gas orifice spud for future use and keep with literature package. 10. Position the broil burner against the roof of a 7.0 mm) nut driver to the model/serial rating plate behind the control panel for proper sizing of Natural orifice spuds for the remaining burners. 9. Place LP gas orifice spuds in the...


