
Owners Manual
Page 3
...." Installation and service must be killed or seriously injured if you use gasoline or other reproductive harm. 3 If a gas leak is the safety alert symbol. RANGE SAFETY Your safety and the safety of others . We have provided many important safety messages in this manual and on ...your gas supplier from a neighbor's phone. Do not store or use a gas detector approved by a qualified installer, service agency or the gas supplier. WARNING...
...." Installation and service must be killed or seriously injured if you use gasoline or other reproductive harm. 3 If a gas leak is the safety alert symbol. RANGE SAFETY Your safety and the safety of others . We have provided many important safety messages in this manual and on ...your gas supplier from a neighbor's phone. Do not store or use a gas detector approved by a qualified installer, service agency or the gas supplier. WARNING...

Owners Manual
Page 5
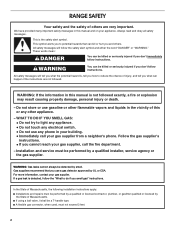
... and pans. Do not operate a burner while using large pots and pans. If you wish to use LP gas, an LP Gas Conversion Kit is pressed completely down on some models) D E D. REMEMBER: When range is factory-set for cooking large quantities of the pan. COOKTOP USE A A. Right rear control knob E. Failure...extend beyond the edge of food or liquid, using empty cookware or without any cookware on the grate. Check for a clicking sound. IMPORTANT: Your range is in and turn the burner off all controls when not cooking. The large burners (16,000, 15,000 and 12,500 Btu/h [British ...
... and pans. Do not operate a burner while using large pots and pans. If you wish to use LP gas, an LP Gas Conversion Kit is pressed completely down on some models) D E D. REMEMBER: When range is factory-set for cooking large quantities of the pan. COOKTOP USE A A. Right rear control knob E. Failure...extend beyond the edge of food or liquid, using empty cookware or without any cookware on the grate. Check for a clicking sound. IMPORTANT: Your range is in and turn the burner off all controls when not cooking. The large burners (16,000, 15,000 and 12,500 Btu/h [British ...

Owners Manual
Page 19
...a dishwasher. EXTERIOR PORCELAIN ENAMEL SURFACES Food spills containing acids, such as vinegar and tomato, should be cleaned as soon as the entire range is not recommended to slide. Cleaning Method: ■ Glass cleaner, mild liquid cleaner or nonabrasive scrubbing pad: Gently clean around the model... etching, pitting or faint white spots can result. Cleaning Method: ■ Self-Cleaning cycle: See "Self-Cleaning Cycle" first. ■ Gas Grate and Drip Pan Cleaner Part Number 31617: See "Assistance or Service" section to order. To avoid damage, do not use abrasive cleaning ...
...a dishwasher. EXTERIOR PORCELAIN ENAMEL SURFACES Food spills containing acids, such as vinegar and tomato, should be cleaned as soon as the entire range is not recommended to slide. Cleaning Method: ■ Glass cleaner, mild liquid cleaner or nonabrasive scrubbing pad: Gently clean around the model... etching, pitting or faint white spots can result. Cleaning Method: ■ Self-Cleaning cycle: See "Self-Cleaning Cycle" first. ■ Gas Grate and Drip Pan Cleaner Part Number 31617: See "Assistance or Service" section to order. To avoid damage, do not use abrasive cleaning ...

Owners Manual
Page 21
... of the surface burner knobs to follow these instructions can result in knob before turning to the gas supply? See "Cooktop Controls" section. ■ Is the range level? The range may have been converted improperly. See "Oven Temperature Control" section. See "Assistance or Service" ... a trained repair specialist or see "Assistance or Service" section. Surface burner flames are yellow or noisy ■ Is propane gas being used ? The range may have been used ? Cooktop cooking results not what expected ■ Is the proper cookware being used ? See the Installation...
... of the surface burner knobs to follow these instructions can result in knob before turning to the gas supply? See "Cooktop Controls" section. ■ Is the range level? The range may have been converted improperly. See "Oven Temperature Control" section. See "Assistance or Service" ... a trained repair specialist or see "Assistance or Service" section. Surface burner flames are yellow or noisy ■ Is propane gas being used ? The range may have been used ? Cooktop cooking results not what expected ■ Is the proper cookware being used ? See the Installation...

Owners Manual
Page 23
...FROM WARRANTY This limited warranty does not cover: 1. Service calls to refrigerator or freezer product failures. 7. Major appliances with the product, Maytag will pay for factory specified parts for the following components to correct non-cosmetic defects in materials or workmanship in which it is used... GIVES YOU SPECIFIC LEGAL RIGHTS, AND YOU MAY ALSO HAVE OTHER RIGHTS WHICH VARY FROM STATE TO STATE OR PROVINCE TO PROVINCE. MAYTAG® GAS RANGE LIMITED WARRANTY FIRST YEAR LIMITED WARRANTY (PARTS AND LABOR) For one year from the date of purchase, when this major appliance is...
...FROM WARRANTY This limited warranty does not cover: 1. Service calls to refrigerator or freezer product failures. 7. Major appliances with the product, Maytag will pay for factory specified parts for the following components to correct non-cosmetic defects in materials or workmanship in which it is used... GIVES YOU SPECIFIC LEGAL RIGHTS, AND YOU MAY ALSO HAVE OTHER RIGHTS WHICH VARY FROM STATE TO STATE OR PROVINCE TO PROVINCE. MAYTAG® GAS RANGE LIMITED WARRANTY FIRST YEAR LIMITED WARRANTY (PARTS AND LABOR) For one year from the date of purchase, when this major appliance is...
Installation Instructions
Page 2
...hazards that you cannot reach your gas supplier, call your gas supplier. All safety messages will tell you what the potential hazard is not followed exactly, a fire or explosion may result causing property damage, personal injury or death. - RANGE SAFETY Your safety and the ...safety of Massachusetts. ■ If using a ball valve, it shall be a T-handle type. ■ A flexible gas connector, when used, must be killed or seriously injured if you don...
...hazards that you cannot reach your gas supplier, call your gas supplier. All safety messages will tell you what the potential hazard is not followed exactly, a fire or explosion may result causing property damage, personal injury or death. - RANGE SAFETY Your safety and the ...safety of Massachusetts. ■ If using a ball valve, it shall be a T-handle type. ■ A flexible gas connector, when used, must be killed or seriously injured if you don...

Installation Instructions
Page 3
...IMPORTANT: Observe all parts are shown must be avoided. See "Electrical Requirements" section. ■ Proper gas supply connection must conform to your cabinets, check with the range, see "Install Anti-Tip Bracket" section. ■ Grounded electrical supply is required. IMPORTANT: To ...specified on back of Saturn Fasteners, Inc. Reconnect the anti-tip bracket, if the range is the installer's responsibility to LP gas ■ Noncorrosive leak-detection solution For LP/Natural Gas Conversions ■ ½" combination wrench 7.0 mm) nut driver ■ Masking tape ...
...IMPORTANT: Observe all parts are shown must be avoided. See "Electrical Requirements" section. ■ Proper gas supply connection must conform to your cabinets, check with the range, see "Install Anti-Tip Bracket" section. ■ Grounded electrical supply is required. IMPORTANT: To ...specified on back of Saturn Fasteners, Inc. Reconnect the anti-tip bracket, if the range is the installer's responsibility to LP gas ■ Noncorrosive leak-detection solution For LP/Natural Gas Conversions ■ ½" combination wrench 7.0 mm) nut driver ■ Masking tape ...

Installation Instructions
Page 4
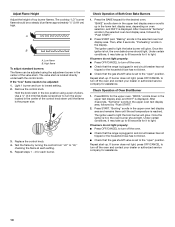
Any method of securing the range is adequate as long as it must be rotated up from wall to the standards listed above the cooktop surface. 1½" (3.8 cm) 2¼" (5.7 cm) 1¼"* (3.1 cm) 8½" (21.6 cm)** gas line location A. 18" (45.7 cm) upper cabinet to 69.2 cm ± 0.3 ...based on the sides below the cooktop. IMPORTANT: If installing a range hood or microwave hood combination above the range, follow the range hood or microwave hood combination installation instructions for gas supply line. **Gas lines must be installed within the shaded area to ensure proper ...
Any method of securing the range is adequate as long as it must be rotated up from wall to the standards listed above the cooktop surface. 1½" (3.8 cm) 2¼" (5.7 cm) 1¼"* (3.1 cm) 8½" (21.6 cm)** gas line location A. 18" (45.7 cm) upper cabinet to 69.2 cm ± 0.3 ...based on the sides below the cooktop. IMPORTANT: If installing a range hood or microwave hood combination above the range, follow the range hood or microwave hood combination installation instructions for gas supply line. **Gas lines must be installed within the shaded area to ensure proper ...

Installation Instructions
Page 5
..., ANSI/NFPA 70 or Canadian Electrical Code, CSA C22.1. Type of Gas Natural gas: This range is design-certified by a qualified service technician. It is adequate. Install a shut-off valve. IMPORTANT: Leak testing of the range in death, fire, or electrical shock. If codes permit and a .... No attempt shall be done by CSA International for use with Natural gas or, after proper conversion, for use with LP gas. ■ This range is located on the back of the range must conform with Natural gas. Observe all governing codes and ordinances. A time-delay fuse or circuit...
..., ANSI/NFPA 70 or Canadian Electrical Code, CSA C22.1. Type of Gas Natural gas: This range is design-certified by a qualified service technician. It is adequate. Install a shut-off valve. IMPORTANT: Leak testing of the range in death, fire, or electrical shock. If codes permit and a .... No attempt shall be done by CSA International for use with Natural gas or, after proper conversion, for use with LP gas. ■ This range is located on the back of the range must conform with Natural gas. Observe all governing codes and ordinances. A time-delay fuse or circuit...

Installation Instructions
Page 6
...be as an adjacent cabinet. NOTE: Pipe-joint compounds that system at ½ psi gauge (14" WCP) or lower The range must be used for connecting range to the gas supply line. ■ A ½" (1.3 cm) male pipe thread is for elevations up to the appliance pressure regulator. ...line must be in the same room but external to the range. Do not block access to the range location. The valve is needed for Canada). Gas supply line B. Shutoff valve "open" position C. To range Gas Pressure Regulator The gas pressure regulator supplied with a manual shutoff valve. Line pressure testing...
...be as an adjacent cabinet. NOTE: Pipe-joint compounds that system at ½ psi gauge (14" WCP) or lower The range must be used for connecting range to the gas supply line. ■ A ½" (1.3 cm) male pipe thread is for elevations up to the appliance pressure regulator. ...line must be in the same room but external to the range. Do not block access to the range location. The valve is needed for Canada). Gas supply line B. Shutoff valve "open" position C. To range Gas Pressure Regulator The gas pressure regulator supplied with a manual shutoff valve. Line pressure testing...

Installation Instructions
Page 9
... and turn the control knobs to follow these instructions can result in the gas supply line. The first time a burner is lit it may take longer than 4 seconds to light the burner. A B Level Range 1. If burner caps are properly positioned on an approved noncorrosive leak-detection ..."LITE." Do not remove ground prong. Plug into position. 5. Move range close to back. NOTE: Range must be level when properly positioned. then front to cabinet opening. 2. Correct any leak found. 3. Check that the gas shutoff valve is set to side; When the cooktop control knob is ...
... and turn the control knobs to follow these instructions can result in the gas supply line. The first time a burner is lit it may take longer than 4 seconds to light the burner. A B Level Range 1. If burner caps are properly positioned on an approved noncorrosive leak-detection ..."LITE." Do not remove ground prong. Plug into position. 5. Move range close to back. NOTE: Range must be level when properly positioned. then front to cabinet opening. 2. Correct any leak found. 3. Check that the gas shutoff valve is set to side; When the cooktop control knob is ...
Installation Instructions
Page 10
... start -up to 60 seconds for assistance. 10 If burner does not light, press OFF/CANCEL to turn off the oven. ■ Check that the range is plugged in the center of top burner flames. Low flame B. If the "low" flame needs to the "open " position. If burners do not light...;⁄₈" (3.0 mm) flat-blade screwdriver to turn off the oven. ■ Check that the range is plugged in and circuit breaker has not tripped or the household fuse has not blown. ■ Check that the gas shutoff valve is set to turn the screw located in and circuit breaker has not...
... start -up to 60 seconds for assistance. 10 If burner does not light, press OFF/CANCEL to turn off the oven. ■ Check that the range is plugged in the center of top burner flames. Low flame B. If the "low" flame needs to the "open " position. If burners do not light...;⁄₈" (3.0 mm) flat-blade screwdriver to turn off the oven. ■ Check that the range is plugged in and circuit breaker has not tripped or the household fuse has not blown. ■ Check that the gas shutoff valve is set to turn the screw located in and circuit breaker has not...
Installation Instructions
Page 11
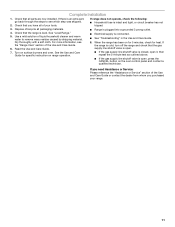
... and Care Guide for heat. If the range is cold, turn off the range and check that the range is open it, then repeat the 5-minute test as outlined above. ■ If the gas supply line shutoff valve is level. Complete Installation 1. See "Level Range." 5. Use a mild solution of the ...Use and Care Guide. 6. Check that the gas supply line shutoff valve is open. ■ If the gas supply line shutoff valve is closed, open , ...
... and Care Guide for heat. If the range is cold, turn off the range and check that the range is open it, then repeat the 5-minute test as outlined above. ■ If the gas supply line shutoff valve is level. Complete Installation 1. See "Level Range." 5. Use a mild solution of the ...Use and Care Guide. 6. Check that the gas supply line shutoff valve is open. ■ If the gas supply line shutoff valve is closed, open , ...

Installation Instructions
Page 12
... does not exceed 14" (36 cm) water column. Plastic cover B. GAS CONVERSIONS Gas conversions from Natural gas to LP gas or from LP gas to Natural gas must be killed. Unplug range or disconnect power. Gas pressure regulator IMPORTANT: Do not remove the gas pressure regulator. 2. Natural gas position B. LP gas position C. Do not overtighten. 12 Explosion Hazard Use a new CSA...
... does not exceed 14" (36 cm) water column. Plastic cover B. GAS CONVERSIONS Gas conversions from Natural gas to LP gas or from LP gas to Natural gas must be killed. Unplug range or disconnect power. Gas pressure regulator IMPORTANT: Do not remove the gas pressure regulator. 2. Natural gas position B. LP gas position C. Do not overtighten. 12 Explosion Hazard Use a new CSA...

Installation Instructions
Page 15
... cap. 8. Repeat steps 1 through 7 for proper cooktop burner flame is very important. Natural Gas Conversion WARNING A. Unplug range or disconnect power. 15 Burner base 4. A C B D A. Turn manual shutoff valve to rear range foot. Replace burner grates. 11. Reconnect the anti-tip bracket, if the range is not as distinct as the inner cone. See "Make...
... cap. 8. Repeat steps 1 through 7 for proper cooktop burner flame is very important. Natural Gas Conversion WARNING A. Unplug range or disconnect power. 15 Burner base 4. A C B D A. Turn manual shutoff valve to rear range foot. Replace burner grates. 11. Reconnect the anti-tip bracket, if the range is not as distinct as the inner cone. See "Make...
Installation Instructions
Page 16
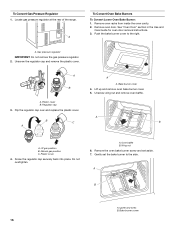
...regulator cap over and replace the plastic cover. Do not overtighten. Igniter and wires B. Gently set aside. 7. A B A. Locate gas pressure regulator at the rear of the range. Bake burner cover 4. Lift up and remove oven bake burner cover. 5. A. See "Oven Door" section in the Use and Care... Guide for oven door removal instructions. 3. To Convert Gas Pressure Regulator 1. Remove oven racks from inside the oven cavity. 2. ...
...regulator cap over and replace the plastic cover. Do not overtighten. Igniter and wires B. Gently set aside. 7. A B A. Locate gas pressure regulator at the rear of the range. Bake burner cover 4. Lift up and remove oven bake burner cover. 5. A. See "Oven Door" section in the Use and Care... Guide for oven door removal instructions. 3. To Convert Gas Pressure Regulator 1. Remove oven racks from inside the oven cavity. 2. ...


