
Warranty Information
Page 1
...factory specified replacement parts and repair labor to access additional resources, or visit https://www.maytag.com/product_help. 2. The cost of the product. 14. MAYTAG® GAS RANGE LIMITED WARRANTY ATTACH YOUR RECEIPT HERE. PROOF OF PURCHASE IS REQUIRED TO OBTAIN WARRANTY SERVICE.... Before contacting us to arrange service, please determine whether your authorized Maytag dealer to province. 1/14 21 Some questions...
...factory specified replacement parts and repair labor to access additional resources, or visit https://www.maytag.com/product_help. 2. The cost of the product. 14. MAYTAG® GAS RANGE LIMITED WARRANTY ATTACH YOUR RECEIPT HERE. PROOF OF PURCHASE IS REQUIRED TO OBTAIN WARRANTY SERVICE.... Before contacting us to arrange service, please determine whether your authorized Maytag dealer to province. 1/14 21 Some questions...

Dimension Guide
Page 1
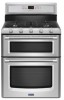
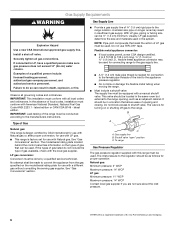
... of E.I .D., flexible metal appliance connector may be used. 30" (76.2 cm) Freestanding Gas Range PRODUCT MODEL NUMBERS MGT8655X MGT8720D MGT8775X MGT8820D MGT8885X GAS SUPPLY REQUIREMENTS Gas supply line: q Provide a gas supply line of ³⁄₄" (1.9 cm) rigid pipe to shutoff valve. See "Gas Conversions" section. †®TEFLON is factory set for connection to the female...
... of E.I .D., flexible metal appliance connector may be used. 30" (76.2 cm) Freestanding Gas Range PRODUCT MODEL NUMBERS MGT8655X MGT8720D MGT8775X MGT8820D MGT8885X GAS SUPPLY REQUIREMENTS Gas supply line: q Provide a gas supply line of ³⁄₄" (1.9 cm) rigid pipe to shutoff valve. See "Gas Conversions" section. †®TEFLON is factory set for connection to the female...

Dimension Guide
Page 2
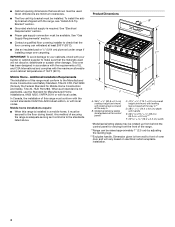
...side wall or other combustible material. from rear wall for dimensional clearances above the range, follow the range hood or microwave hood combination installation instructions for gas supply line. **Gas lines must be installed within the shaded area to ensure proper alignment of this ... materials and specifications without notice. q Electronic ignition systems operate within wide voltage limits, but proper grounding and polarity are necessary. Range may be installed with zero clearance to combustible construction at the rear and on centerline 1¹⁄₄" (3.1 cm) from ...
...side wall or other combustible material. from rear wall for dimensional clearances above the range, follow the range hood or microwave hood combination installation instructions for gas supply line. **Gas lines must be installed within the shaded area to ensure proper alignment of this ... materials and specifications without notice. q Electronic ignition systems operate within wide voltage limits, but proper grounding and polarity are necessary. Range may be installed with zero clearance to combustible construction at the rear and on centerline 1¹⁄₄" (3.1 cm) from ...
Installation Guide
Page 2
... approved by smell. Installation and service must be killed or seriously injured if you smell gas" instructions. WARNING You can happen if the instructions are very important. RANGE SAFETY Your safety and the safety of others . All safety messages will tell you what the potential hazard... result causing property damage, personal injury or death. - This symbol alerts you to do if you don't follow instructions. Follow the gas supplier's instructions. • If you and others are not followed. We have provided many important safety messages in the vicinity of this...
... approved by smell. Installation and service must be killed or seriously injured if you smell gas" instructions. WARNING You can happen if the instructions are very important. RANGE SAFETY Your safety and the safety of others . All safety messages will tell you what the potential hazard... result causing property damage, personal injury or death. - This symbol alerts you to do if you don't follow instructions. Follow the gas supplier's instructions. • If you and others are not followed. We have provided many important safety messages in the vicinity of this...

Installation Guide
Page 3
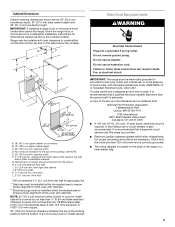
...in death or serious burns to children and adults. See "Electrical Requirements" and "Gas Supply Requirements" sections. Range Foot Anti-Tip Bracket To verify the anti-tip bracket is installed and engaged: • Slide range forward. • Look for the anti-tip bracket securely attached to floor or ...wall. • Slide range back so rear range foot is to be installed must be sealed. †®TORX and T-20 are included. ■ LP/Natural Gas Conversion Kit (located on the rating number plate. INSTALLATION REQUIREMENTS Tools and...
...in death or serious burns to children and adults. See "Electrical Requirements" and "Gas Supply Requirements" sections. Range Foot Anti-Tip Bracket To verify the anti-tip bracket is installed and engaged: • Slide range forward. • Look for the anti-tip bracket securely attached to floor or ...wall. • Slide range back so rear range foot is to be installed must be sealed. †®TORX and T-20 are included. ■ LP/Natural Gas Conversion Kit (located on the rating number plate. INSTALLATION REQUIREMENTS Tools and...
Installation Guide
Page 4
... withstand at least 200°F (93°C). ■ Use an insulated pad or ¼" (0.64 cm) plywood under range if installing range over carpeting. Mobile Home - Any method of 194°F (90°C). See "Gas Supply Requirements" section. ■ Contact a qualified floor covering installer to 69.2 cm ± 0.3 cm)*** F. 29 76.0 ± 0.2 cm...
... withstand at least 200°F (93°C). ■ Use an insulated pad or ¼" (0.64 cm) plywood under range if installing range over carpeting. Mobile Home - Any method of 194°F (90°C). See "Gas Supply Requirements" section. ■ Contact a qualified floor covering installer to 69.2 cm ± 0.3 cm)*** F. 29 76.0 ± 0.2 cm...
Installation Guide
Page 5
...8260;₄" (0.64 cm) flame retardant millboard covered with cabinets. ***Electrical plugs must be installed with cabinets. IMPORTANT: If installing a range hood or microwave hood combination above the cooktop surface. Cabinet door or hinges should not extend into a grounded 3 prong outlet. opening ...width D. Failure to follow the range hood or microwave hood combination installation instructions for gas supply line. **Gas lines must be installed within the shaded area to ensure proper alignment of this oven with zero...
...8260;₄" (0.64 cm) flame retardant millboard covered with cabinets. ***Electrical plugs must be installed with cabinets. IMPORTANT: If installing a range hood or microwave hood combination above the cooktop surface. Cabinet door or hinges should not extend into a grounded 3 prong outlet. opening ...width D. Failure to follow the range hood or microwave hood combination installation instructions for gas supply line. **Gas lines must be installed within the shaded area to ensure proper alignment of this oven with zero...
Installation Guide
Page 6
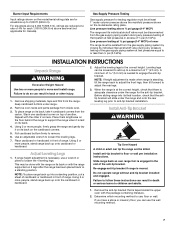
... on the model/serial rating plate for connecting range to the range opening and closing. Gas supply line B. To range Gas Pressure Regulator The gas pressure regulator supplied with this range must conform with American National Standard, National Fuel Gas Code ANSI Z223.1 - Do not block access to the range. LP gas conversion: Conversion must conform with all governing codes...
... on the model/serial rating plate for connecting range to the range opening and closing. Gas supply line B. To range Gas Pressure Regulator The gas pressure regulator supplied with this range must conform with American National Standard, National Fuel Gas Code ANSI Z223.1 - Do not block access to the range. LP gas conversion: Conversion must conform with all governing codes...
Installation Guide
Page 7
...; psi gauge (14" WCP) or lower The range must be isolated from the gas supply piping system by closing its back or with the range supported on its individual manual shutoff valve during any pressure testing of the gas supply piping system at least 1" water column pressure ...Anti-Tip Bracket WARNING Tip Over Hazard A child or adult can result in front of range. Gas Supply Pressure Testing Gas supply pressure for the anti-tip bracket. If range height adjustment is moved. NOTE: To place range back up to a standing position. For elevations above 2,000 ft (609.6 m), ...
...; psi gauge (14" WCP) or lower The range must be isolated from the gas supply piping system by closing its back or with the range supported on its individual manual shutoff valve during any pressure testing of the gas supply piping system at least 1" water column pressure ...Anti-Tip Bracket WARNING Tip Over Hazard A child or adult can result in front of range. Gas Supply Pressure Testing Gas supply pressure for the anti-tip bracket. If range height adjustment is moved. NOTE: To place range back up to a standing position. For elevations above 2,000 ft (609.6 m), ...
Installation Guide
Page 8
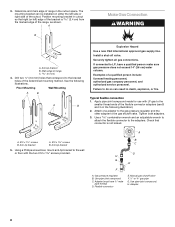
...that connector is 2.4 cm) from the marked edge of the bracket is not kinked. Anti-tip bracket 5. Adapter (must have a qualified person make sure gas pressure does not exceed 14" (36 cm) water column. H. Install a shut-off valve. Tighten both adapters. 3. The mounting bracket can result in cutout... so that correspond to do so can be installed on either the left ) edge of the range, as shown. Anti-tip bracket A. #12 x 1⁵⁄₈" screws B. Use a combination wrench and an adjustable wrench to attach the flexible ...
...that connector is 2.4 cm) from the marked edge of the bracket is not kinked. Anti-tip bracket 5. Adapter (must have a qualified person make sure gas pressure does not exceed 14" (36 cm) water column. H. Install a shut-off valve. Tighten both adapters. 3. The mounting bracket can result in cutout... so that correspond to do so can be installed on either the left ) edge of the range, as shown. Anti-tip bracket A. #12 x 1⁵⁄₈" screws B. Use a combination wrench and an adjustable wrench to attach the flexible ...

Installation Guide
Page 9
...contact information. 6. If burner caps are obstructions keeping the range from sliding into the slot of the range is indicated. If you need assistance or service, refer to the gas pipe. Repeat steps 1 and 2 to ensure that the range foot is securely attached to the floor or wall. ...illustration in the anti-tip bracket. 3. IMPORTANT: If there is an obstruction between the range and the mounting wall. If you encounter immediate resistance, the range foot is shown in the bracket. Gas supply pipe must be located within the shaded area as shown. Do not remove ground...
...contact information. 6. If burner caps are obstructions keeping the range from sliding into the slot of the range is indicated. If you need assistance or service, refer to the gas pipe. Repeat steps 1 and 2 to ensure that the range foot is securely attached to the floor or wall. ...illustration in the anti-tip bracket. 3. IMPORTANT: If there is an obstruction between the range and the mounting wall. If you encounter immediate resistance, the range foot is shown in the bracket. Gas supply pipe must be located within the shaded area as shown. Do not remove ground...
Installation Guide
Page 10
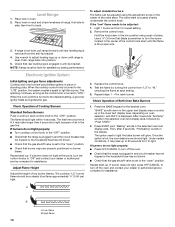
..., after 3 seconds, "Preheating" scrolls in oven. 2. Use wrench to side; Electronic Ignition System Initial lighting and gas flame adjustments Cooktop and oven burners use pilotless igniters in place of range, first side to adjust leveling legs up or down in and turn to lowest setting. 2. If a burner does ... to turn the control knobs to the "OFF" position. ■ Check that the range is plugged in and circuit breaker has not tripped or the household fuse has not blown. ■ Check that the gas shutoff valve is set to be a steady blue flame approximately ¼" (0.64 cm)...
..., after 3 seconds, "Preheating" scrolls in oven. 2. Use wrench to side; Electronic Ignition System Initial lighting and gas flame adjustments Cooktop and oven burners use pilotless igniters in place of range, first side to adjust leveling legs up or down in and turn to lowest setting. 2. If a burner does ... to turn the control knobs to the "OFF" position. ■ Check that the range is plugged in and circuit breaker has not tripped or the household fuse has not blown. ■ Check that the gas shutoff valve is set to be a steady blue flame approximately ¼" (0.64 cm)...

Installation Guide
Page 11
...waxy residue caused by "Push START." 2. Use a mild solution of the Use and Care Guide or User Instructions. 6. If the range is cold, turn off the range and check that the gas shutoff valve is level. "Broiling" scrolls in the Use and Care Guide or User Instructions. 8. Dispose of the User Instructions, or... valve is closed, open it, then repeat the 5-minute test as outlined above. ■ If the gas supply line shutoff valve is an extra part, go back through the steps to see the "Range Care" section of liquid household cleaner and warm water to 60 seconds for heat. The igniter used...
...waxy residue caused by "Push START." 2. Use a mild solution of the Use and Care Guide or User Instructions. 6. If the range is cold, turn off the range and check that the gas shutoff valve is level. "Broiling" scrolls in the Use and Care Guide or User Instructions. 8. Dispose of the User Instructions, or... valve is closed, open it, then repeat the 5-minute test as outlined above. ■ If the gas supply line shutoff valve is an extra part, go back through the steps to see the "Range Care" section of liquid household cleaner and warm water to 60 seconds for heat. The igniter used...
Installation Guide
Page 12
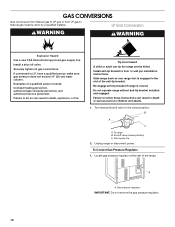
... does not exceed 14" (36 cm) water column. Slide range back so rear range foot is moved. Gas supply line 2. To Convert Gas Pressure Regulator 1. Gas pressure regulator IMPORTANT: Do not remove the gas pressure regulator. 12 B A C A. A A. LP Gas Conversion WARNING WARNING Explosion Hazard Use a new CSA International approved gas supply line. Examples of a qualified person include: licensed...
... does not exceed 14" (36 cm) water column. Slide range back so rear range foot is moved. Gas supply line 2. To Convert Gas Pressure Regulator 1. Gas pressure regulator IMPORTANT: Do not remove the gas pressure regulator. 12 B A C A. A A. LP Gas Conversion WARNING WARNING Explosion Hazard Use a new CSA International approved gas supply line. Examples of a qualified person include: licensed...

Installation Guide
Page 15
...® screwdriver, remove the burner base. Set the Natural gas orifice spud aside. Natural gas orifice spud Use the following chart for correct LP gas orifice spud for each burner. To range B. Broil burner orifice hood B. LP Gas Orifice Spud Chart Burner Rating Color Number 4,000 BTU Blue ...BTU Green 97L 14,000 BTU Red 114L 5. Failure to follow these instructions can tip the range and be killed. Burner cap B. Refer to ½" long. Replace the Natural gas orifice spud with literature package. 10. Repeat steps 1 through 7 for proper sizing of the...
...® screwdriver, remove the burner base. Set the Natural gas orifice spud aside. Natural gas orifice spud Use the following chart for correct LP gas orifice spud for each burner. To range B. Broil burner orifice hood B. LP Gas Orifice Spud Chart Burner Rating Color Number 4,000 BTU Blue ...BTU Green 97L 14,000 BTU Red 114L 5. Failure to follow these instructions can tip the range and be killed. Burner cap B. Refer to ½" long. Replace the Natural gas orifice spud with literature package. 10. Repeat steps 1 through 7 for proper sizing of the...

Installation Guide
Page 16
...plastic cover. A B A. Remove oven racks from inside the oven cavity. 2. Push the bake burner cover to the side. A A. B C A A A. Natural gas position C. A. Bake burner cover 4. Oven baffle B. A A. Screw the regulator cap securely back into place. Bake burner screw 16 A B A. Flip the regulator ...bake burner cover. 5. Wing nut 6. To Convert Oven Bake Burners To Convert Lower Oven Bake Burner: 1. Locate gas pressure regulator at the rear of the range. 3. Plastic cover B. See "Oven Door" section in the Use and Care Guide for oven door removal instructions....
...plastic cover. A B A. Remove oven racks from inside the oven cavity. 2. Push the bake burner cover to the side. A A. B C A A A. Natural gas position C. A. Bake burner cover 4. Oven baffle B. A A. Screw the regulator cap securely back into place. Bake burner screw 16 A B A. Flip the regulator ...bake burner cover. 5. Wing nut 6. To Convert Oven Bake Burners To Convert Lower Oven Bake Burner: 1. Locate gas pressure regulator at the rear of the range. 3. Plastic cover B. See "Oven Door" section in the Use and Care Guide for oven door removal instructions....

Use & Care Guide
Page 3
... not followed. This is detected, follow instructions. WARNING You can kill or hurt you use a gas detector approved by smell. If a gas leak is the safety alert symbol. RANGE SAFETY Your safety and the safety of others . Follow the gas supplier's instructions. • If you what the potential hazard is not followed exactly, a fire...
... not followed. This is detected, follow instructions. WARNING You can kill or hurt you use a gas detector approved by smell. If a gas leak is the safety alert symbol. RANGE SAFETY Your safety and the safety of others . Follow the gas supplier's instructions. • If you what the potential hazard is not followed exactly, a fire...

Use & Care Guide
Page 5
... flame extend beyond the edge of combustion and ventilation air around the burner grate edges. 5 Failure to LIGHT. IMPORTANT: Your range is included with Natural gas. Push in and turn the burner off all controls when not cooking. SETTING RECOMMENDED USE LIGHT ■ Light the burner. ...Simmer. If you do not hear the igniter click, turn knob counterclockwise to follow these instructions can result in use with your new range. See the "Gas Conversions" section of food, using empty cookware or without any cookware on the valve shaft. The large burners (16,000, 15,000...
... flame extend beyond the edge of combustion and ventilation air around the burner grate edges. 5 Failure to LIGHT. IMPORTANT: Your range is included with Natural gas. Push in and turn the burner off all controls when not cooking. SETTING RECOMMENDED USE LIGHT ■ Light the burner. ...Simmer. If you do not hear the igniter click, turn knob counterclockwise to follow these instructions can result in use with your new range. See the "Gas Conversions" section of food, using empty cookware or without any cookware on the valve shaft. The large burners (16,000, 15,000...

Use & Care Guide
Page 17
...OVEN" will appear in the upper text area, and "PRESS (-) FOR LOWER OVEN" will be soaked or scrubbed before going into a dishwasher. ■ Gas Grate and Drip Pan Cleaner Part Number 31617: See "Assistance or Service" section to right. 5. KEY" will scroll from right to left to order. .../cleaning mode" will scroll in the upper or lower text area (depending on cleaning products. In the other or hard surfaces such as the entire range is selected. 4. Soap, water and a soft cloth or sponge are suggested first unless otherwise noted. Cleaning Method: ■ Warm, soapy water: ...
...OVEN" will appear in the upper text area, and "PRESS (-) FOR LOWER OVEN" will be soaked or scrubbed before going into a dishwasher. ■ Gas Grate and Drip Pan Cleaner Part Number 31617: See "Assistance or Service" section to right. 5. KEY" will scroll from right to left to order. .../cleaning mode" will scroll in the upper or lower text area (depending on cleaning products. In the other or hard surfaces such as the entire range is selected. 4. Soap, water and a soft cloth or sponge are suggested first unless otherwise noted. Cleaning Method: ■ Warm, soapy water: ...
Use & Care Guide
Page 21
... of the problem ■ Proof of inaccessible appliances or built-in remote locations where an authorized Maytag servicer is a limited 10-year warranty on how to Maytag within 30 days. 9. gas. 6. Food loss due to determine whether another warranty applies. Pick-up or delivery. Travel or... other damage to appliance finishes unless such damage results from the date of the appliance. 8. MAYTAG SHALL NOT BE LIABLE FOR INCIDENTAL OR CONSEQUENTIAL DAMAGES. MAYTAG® GAS RANGE LIMITED WARRANTY ATTACH YOUR RECEIPT HERE. TEN YEAR LIMITED WARRANTY WHAT IS COVERED WHAT IS NOT...
... of the problem ■ Proof of inaccessible appliances or built-in remote locations where an authorized Maytag servicer is a limited 10-year warranty on how to Maytag within 30 days. 9. gas. 6. Food loss due to determine whether another warranty applies. Pick-up or delivery. Travel or... other damage to appliance finishes unless such damage results from the date of the appliance. 8. MAYTAG SHALL NOT BE LIABLE FOR INCIDENTAL OR CONSEQUENTIAL DAMAGES. MAYTAG® GAS RANGE LIMITED WARRANTY ATTACH YOUR RECEIPT HERE. TEN YEAR LIMITED WARRANTY WHAT IS COVERED WHAT IS NOT...


