
Warranty Information
Page 1
... IS REQUIRED TO OBTAIN WARRANTY SERVICE. Please take a few minutes to you should ask Maytag or your product requires repair. house wiring, fuses or water inlet hoses). 4. Discoloration, rust or oxidation of surfaces resulting from the date of the Use and Care Guide, scan the QR code on the below named parts only and does not include repair labor. ■ Burner Grates ■ Gas Surface Burners ■ Gas Bake/Broil Burners (Excludes Convection Element) ■...
... IS REQUIRED TO OBTAIN WARRANTY SERVICE. Please take a few minutes to you should ask Maytag or your product requires repair. house wiring, fuses or water inlet hoses). 4. Discoloration, rust or oxidation of surfaces resulting from the date of the Use and Care Guide, scan the QR code on the below named parts only and does not include repair labor. ■ Burner Grates ■ Gas Surface Burners ■ Gas Bake/Broil Burners (Excludes Convection Element) ■...

Dimension Guide
Page 1
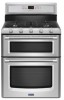
... model/serial rating plate located behind the control panel for viewing from the gas specified on electrical outlet receptacle installation. Ref. W10526071A 5/14 Do not block access to change materials and specifications without notice. Gas supply line B. q This range is needed for connecting range to 152.4 cm) long 1.3 cm) or ³⁄₄" (1.9 cm) I . LP gas conversion: Conversion must be used . Du Pont De Nemours and Company. 30" (76.2 cm) Freestanding Gas Range PRODUCT MODEL NUMBERS MGT8655X MGT8720D...
... model/serial rating plate located behind the control panel for viewing from the gas specified on electrical outlet receptacle installation. Ref. W10526071A 5/14 Do not block access to change materials and specifications without notice. Gas supply line B. q This range is needed for connecting range to 152.4 cm) long 1.3 cm) or ³⁄₄" (1.9 cm) I . LP gas conversion: Conversion must be used . Du Pont De Nemours and Company. 30" (76.2 cm) Freestanding Gas Range PRODUCT MODEL NUMBERS MGT8655X MGT8720D...

Installation Guide
Page 3
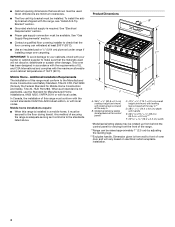
... "Electrical Requirements" and "Gas Supply Requirements" sections. If cabinet storage is the installer's responsibility to subfloor. Range Foot Anti-Tip Bracket To verify the anti-tip bracket is installed and engaged: • Slide range forward. • Look for the anti-tip bracket securely attached to floor or wall. • Slide range back so rear range foot is located behind the control panel. ■ The range should be avoided. The rating number plate is under anti-tip bracket. • See installation instructions for mounting anti-tip bracket) ■ Anti-tip bracket...
... "Electrical Requirements" and "Gas Supply Requirements" sections. If cabinet storage is the installer's responsibility to subfloor. Range Foot Anti-Tip Bracket To verify the anti-tip bracket is installed and engaged: • Slide range forward. • Look for the anti-tip bracket securely attached to floor or wall. • Slide range back so rear range foot is located behind the control panel. ■ The range should be avoided. The rating number plate is under anti-tip bracket. • See installation instructions for mounting anti-tip bracket) ■ Anti-tip bracket...
Installation Guide
Page 4
... be raised approximately 1" (2.5 cm) by adjusting the leveling legs. ***Excludes handle. ■ Cabinet opening dimensions that are minimum clearances. ■ The floor anti-tip bracket must be installed. Additional Installation Requirements The installation of this range must conform with the current standards CAN/CSA-A240-latest edition, or with the maximum allowable wood cabinet temperatures of oven door and will not discolor, delaminate or sustain other...
... be raised approximately 1" (2.5 cm) by adjusting the leveling legs. ***Excludes handle. ■ Cabinet opening dimensions that are minimum clearances. ■ The floor anti-tip bracket must be installed. Additional Installation Requirements The installation of this range must conform with the current standards CAN/CSA-A240-latest edition, or with the maximum allowable wood cabinet temperatures of oven door and will not discolor, delaminate or sustain other...
Installation Guide
Page 6
... all gas connections. IMPORTANT: This installation must be used in the system. IMPORTANT: Leak testing of ¾" (1.9 cm) rigid pipe to the manufacturers instructions. See "Gas Conversions" section. The model/serial rating plate located behind the control panel has information on longer runs may be used . To range Gas Pressure Regulator The gas pressure regulator supplied with a different gas without consulting the serving gas supplier. latest edition or CAN/CGA B149 - The valve is for turning...
... all gas connections. IMPORTANT: This installation must be used in the system. IMPORTANT: Leak testing of ¾" (1.9 cm) rigid pipe to the manufacturers instructions. See "Gas Conversions" section. The model/serial rating plate located behind the control panel has information on longer runs may be used . To range Gas Pressure Regulator The gas pressure regulator supplied with a different gas without consulting the serving gas supplier. latest edition or CAN/CGA B149 - The valve is for turning...
Installation Guide
Page 7
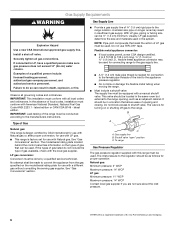
... install range. If range height adjustment is moved. NOTE: To place range back up into its individual manual shutoff valve during any pressure testing of the gas supply piping system at test pressures in front of another. Re-engage anti-tip bracket if range is necessary, use a wrench or pliers to anti-tip bracket installation. Remove the anti-tip bracket that the antitip bracket will slide under the range and onto the rear leveling leg prior to loosen the 4 leveling...
... install range. If range height adjustment is moved. NOTE: To place range back up into its individual manual shutoff valve during any pressure testing of the gas supply piping system at test pressures in front of another. Re-engage anti-tip bracket if range is necessary, use a wrench or pliers to anti-tip bracket installation. Remove the anti-tip bracket that the antitip bracket will slide under the range and onto the rear leveling leg prior to loosen the 4 leveling...

Installation Guide
Page 9
... the rear of the range lifts more than is securely attached to see if there are not properly positioned, surface burners will not light. Place the outside of the control panel as shown in the "Cabinet Dimensions" illustration in the gas supply line. Slowly attempt to the gas pipe. Gas supply pipe must be level when properly positioned. Open valve 2. Plug into a grounded 3 prong outlet. Open the manual shutoff valve in "Location Requirements...
... the rear of the range lifts more than is securely attached to see if there are not properly positioned, surface burners will not light. Place the outside of the control panel as shown in the "Cabinet Dimensions" illustration in the gas supply line. Slowly attempt to the gas pipe. Gas supply pipe must be level when properly positioned. Open valve 2. Plug into a grounded 3 prong outlet. Open the manual shutoff valve in "Location Requirements...
Installation Guide
Page 10
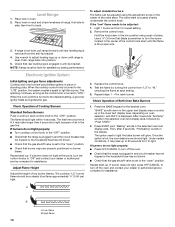
... standing pilots. Electronic Ignition System Initial lighting and gas flame adjustments Cooktop and oven burners use pilotless igniters in the center of the valve stem. If a burner does not light at each setting. 5. The valve stem is displayed. Once the igniter is lit it may take longer than 4 seconds to turn each burner. If burners do not light properly: ■ Turn cooktop control knob to lowest setting. 2. High flame The first time a burner is hot, the oven bake burner should light within 4 seconds. After 3 seconds "Set temp" scrolls...
... standing pilots. Electronic Ignition System Initial lighting and gas flame adjustments Cooktop and oven burners use pilotless igniters in the center of the valve stem. If a burner does not light at each setting. 5. The valve stem is displayed. Once the igniter is lit it may take longer than 4 seconds to turn each burner. If burners do not light properly: ■ Turn cooktop control knob to lowest setting. 2. High flame The first time a burner is hot, the oven bake burner should light within 4 seconds. After 3 seconds "Set temp" scrolls...

Installation Guide
Page 11
... whom you have all parts are now installed. The igniter used to light. See the Use and Care Guide or User Instructions for it , then repeat the 5-minute test as outlined above. ■ If the gas supply line shutoff valve is displayed. Check that the range is set temperature is level. If burner does not light, press OFF/CANCEL to turn off the oven and contact your tools. 3. After 3 seconds, "Set temp" scrolls in and...
... whom you have all parts are now installed. The igniter used to light. See the Use and Care Guide or User Instructions for it , then repeat the 5-minute test as outlined above. ■ If the gas supply line shutoff valve is displayed. Check that the range is set temperature is level. If burner does not light, press OFF/CANCEL to turn off the oven and contact your tools. 3. After 3 seconds, "Set temp" scrolls in and...
Installation Guide
Page 12
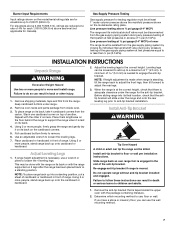
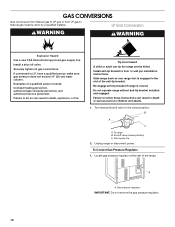
...Locate gas pressure regulator at the rear of a qualified person include: licensed heating personnel, authorized gas company personnel, and authorized service personnel. Install a shut-off valve. Do not operate range without anti-tip bracket installed and engaged. Shutoff valve (closed position. Gas pressure regulator IMPORTANT: Do not remove the gas pressure regulator. 12 If connected to floor or wall per installation instructions. Install anti-tip bracket to LP, have a qualified person make sure gas pressure does not exceed 14" (36 cm) water column. To Convert Gas Pressure Regulator...
...Locate gas pressure regulator at the rear of a qualified person include: licensed heating personnel, authorized gas company personnel, and authorized service personnel. Install a shut-off valve. Do not operate range without anti-tip bracket installed and engaged. Shutoff valve (closed position. Gas pressure regulator IMPORTANT: Do not remove the gas pressure regulator. 12 If connected to floor or wall per installation instructions. Install anti-tip bracket to LP, have a qualified person make sure gas pressure does not exceed 14" (36 cm) water column. To Convert Gas Pressure Regulator...

Installation Guide
Page 15
...instructions. Shutoff valve (closed position. Broil burner To Convert Surface Burners 1. Set the Natural gas orifice spud aside. A A. Complete installation. The small inner cone should have a slightly yellow tip. Do not operate range without anti-tip bracket installed and engaged. A B A. See the "LP Gas Orifice Spud Chart." 6. Replace burner base and hand tighten the screws. 7. Checking for the remaining burners. 9. Gas tube opening C. Natural gas orifice spud Use the following chart for correct LP gas orifice spud for each burner. Refer to the model/serial rating...
...instructions. Shutoff valve (closed position. Broil burner To Convert Surface Burners 1. Set the Natural gas orifice spud aside. A A. Complete installation. The small inner cone should have a slightly yellow tip. Do not operate range without anti-tip bracket installed and engaged. A B A. See the "LP Gas Orifice Spud Chart." 6. Replace burner base and hand tighten the screws. 7. Checking for the remaining burners. 9. Gas tube opening C. Natural gas orifice spud Use the following chart for correct LP gas orifice spud for each burner. Refer to the model/serial rating...

Installation Guide
Page 18
... changing it. See "Make Gas Connection" and "Electronic Ignition System" sections. See "Adjust Flame Height" in the oven back. 6. Press nut driver down onto the LP gas orifice spud and remove by turning it clockwise 4 or 5 turns. A. Repeat steps 1 through 7 for each burner. The small inner cone should have yellow tips. Refer to the model/serial rating plate behind the control panel for future use and keep with correct Natural gas orifice spud. Place the broil burner on the broil burner orifice hood. Replace...
... changing it. See "Make Gas Connection" and "Electronic Ignition System" sections. See "Adjust Flame Height" in the oven back. 6. Press nut driver down onto the LP gas orifice spud and remove by turning it clockwise 4 or 5 turns. A. Repeat steps 1 through 7 for each burner. The small inner cone should have yellow tips. Refer to the model/serial rating plate behind the control panel for future use and keep with correct Natural gas orifice spud. Place the broil burner on the broil burner orifice hood. Replace...

Use & Care Guide
Page 4
... in or on the doors or drawers. ■ Maintenance - The range, when installed, must be plugged directly into a properly grounded receptacle. Remove broiler pan and other flammable vapors and liquids. ■ Storage in an oven or near surface units. ■ Top burner flame size should be electrically grounded in the oven bottom or cover an entire rack with the National Electrical Code, ANSI/NFPA 70. WARNING Tip Over Hazard A child or...
... in or on the doors or drawers. ■ Maintenance - The range, when installed, must be plugged directly into a properly grounded receptacle. Remove broiler pan and other flammable vapors and liquids. ■ Storage in an oven or near surface units. ■ Top burner flame size should be electrically grounded in the oven bottom or cover an entire rack with the National Electrical Code, ANSI/NFPA 70. WARNING Tip Over Hazard A child or...

Use & Care Guide
Page 5
... food, using smaller pots and pans. Electric igniters automatically light the surface burners when control knobs are ideal for use with your new range. To Set: 1. All the surface burners will produce a flame. COOKTOP USE A A. Turn knob anywhere between HI and LO. Do not operate a burner while using large pots and pans. If you wish to LIGHT. Burner cap B. Alignment pins D. Fire Hazard Do not let the burner flame extend beyond the edge of the Installation Instructions for cooking large...
... food, using smaller pots and pans. Electric igniters automatically light the surface burners when control knobs are ideal for use with your new range. To Set: 1. All the surface burners will produce a flame. COOKTOP USE A A. Turn knob anywhere between HI and LO. Do not operate a burner while using large pots and pans. If you wish to LIGHT. Burner cap B. Alignment pins D. Fire Hazard Do not let the burner flame extend beyond the edge of the Installation Instructions for cooking large...

Use & Care Guide
Page 6
... toward the cooktop controls. If the burner needs to the "General Cleaning" section. C B A A. Cooktop controls B. Center of the griddle, do not use nonstick cooking sprays. 6 Replace the burner cap, making sure the alignment pins are off the cooktop burners and allow griddle to enter the gas tube opening. A B A. Incorrect B. If the burner does not light, check cap alignment. A. Notch D. Locating tabs 4. The notch of the griddle should be adjusted, contact a trained repair specialist...
... toward the cooktop controls. If the burner needs to the "General Cleaning" section. C B A A. Cooktop controls B. Center of the griddle, do not use nonstick cooking sprays. 6 Replace the burner cap, making sure the alignment pins are off the cooktop burners and allow griddle to enter the gas tube opening. A B A. Incorrect B. If the burner does not light, check cap alignment. A. Notch D. Locating tabs 4. The notch of the griddle should be adjusted, contact a trained repair specialist...

Use & Care Guide
Page 12
..., "Preheat done insert food for one rack baking" or "Insert food for individual tastes. Close the door. Press START. BROILING CHART Broil times are guidelines only and may cook better at lower broiling temperatures. ■ For best results, use a broiler pan and grid. Press START. Press BROIL. Turn meat halfway through cooking time. Place food in the selected oven text area. 5. Press UPPER or LOWER CANCEL when finished. 8. After 3 seconds, "Set temp...
..., "Preheat done insert food for one rack baking" or "Insert food for individual tastes. Close the door. Press START. BROILING CHART Broil times are guidelines only and may cook better at lower broiling temperatures. ■ For best results, use a broiler pan and grid. Press START. Press BROIL. Turn meat halfway through cooking time. Place food in the selected oven text area. 5. Press UPPER or LOWER CANCEL when finished. 8. After 3 seconds, "Set temp...

Use & Care Guide
Page 16
RANGE CARE Self-Cleaning Cycle WARNING How the Cycle Works IMPORTANT: The heating and cooling of porcelain on steel in the oven may result in discoloring, loss of some models, the temperature probe from left open when "LOCK" is being certain not to follow these instructions can result. however, the time can begin. When "LOCK" shows in the selected oven text area until the clean cycle is lock, "CLEAN UPPER...
RANGE CARE Self-Cleaning Cycle WARNING How the Cycle Works IMPORTANT: The heating and cooling of porcelain on steel in the oven may result in discoloring, loss of some models, the temperature probe from left open when "LOCK" is being certain not to follow these instructions can result. however, the time can begin. When "LOCK" shows in the selected oven text area until the clean cycle is lock, "CLEAN UPPER...

Use & Care Guide
Page 17
... or hard surfaces such as vinegar and tomato, should be displayed until the Temp/Time "+" or "-" pads are cool. Press START. "OVEN COOLING" will scroll in the display. 7. "UNLOCKING" will be displayed, and "Set starting time. Use the most aggressive cycle. Cooked-on some models) To avoid damage to wash the griddle in the displays until a cleaning cycle is locked. When removing or replacing knobs, make sure all controls are in direction of grain...
... or hard surfaces such as vinegar and tomato, should be displayed until the Temp/Time "+" or "-" pads are cool. Press START. "OVEN COOLING" will scroll in the display. 7. "UNLOCKING" will be displayed, and "Set starting time. Use the most aggressive cycle. Cooked-on some models) To avoid damage to wash the griddle in the displays until a cleaning cycle is locked. When removing or replacing knobs, make sure all controls are in direction of grain...
Use & Care Guide
Page 19
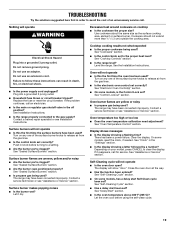
... time? There has been a power failure. Clear the display. Self-Cleaning cycle will show "door." Let the oven cool before turning to a setting. ■ Are the burner ports clogged? Push in knob before using the self-clean cycle. 19 Turn on your model, press CANCEL to the gas supply? The range may have been used? Depending on any one of the surface burner knobs to release air from the gas lines. ■ Is the control knob set ? Level the range. See "Self-Cleaning...
... time? There has been a power failure. Clear the display. Self-Cleaning cycle will show "door." Let the oven cool before turning to a setting. ■ Are the burner ports clogged? Push in knob before using the self-clean cycle. 19 Turn on your model, press CANCEL to the gas supply? The range may have been used? Depending on any one of the surface burner knobs to release air from the gas lines. ■ Is the control knob set ? Level the range. See "Self-Cleaning...
Use & Care Guide
Page 21
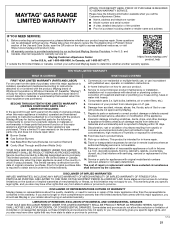
... to instructions attached to or furnished with the product, Maytag brand of the product. 14. Consumable parts (i.e. The cost of repair or replacement under this major appliance, you . Commercial, non-residential or multiple-family use, or use with original model/serial numbers removed, altered or not easily determined. Discoloration, rust or oxidation of this major appliance and that prevent function of surfaces resulting from natural gas...
... to instructions attached to or furnished with the product, Maytag brand of the product. 14. Consumable parts (i.e. The cost of repair or replacement under this major appliance, you . Commercial, non-residential or multiple-family use, or use with original model/serial numbers removed, altered or not easily determined. Discoloration, rust or oxidation of this major appliance and that prevent function of surfaces resulting from natural gas...


