Use & Care Guide
Page 1
For future reference, please make a note of your range at www.maytag.com. These can be found on the label located on the oven frame behind the top right side of Contents RANGE SAFETY 2 The Anti-Tip Bracket 3 KEY USAGE TIPS 4 AquaLift® Self-Cleaning Technology 4 Surface Temperatures 4 Preheating... model and serial numbers. Model Number Serial Number Para una versión de estas instrucciones en español, visite www.maytag.com. User Guide Gas Range THANK YOU for purchasing this high-quality product. Deberá tener a mano el número de modelo y de serie,...
For future reference, please make a note of your range at www.maytag.com. These can be found on the label located on the oven frame behind the top right side of Contents RANGE SAFETY 2 The Anti-Tip Bracket 3 KEY USAGE TIPS 4 AquaLift® Self-Cleaning Technology 4 Surface Temperatures 4 Preheating... model and serial numbers. Model Number Serial Number Para una versión de estas instrucciones en español, visite www.maytag.com. User Guide Gas Range THANK YOU for purchasing this high-quality product. Deberá tener a mano el número de modelo y de serie,...
Use & Care Guide
Page 2
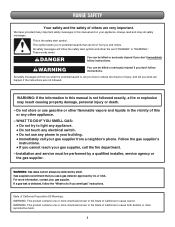
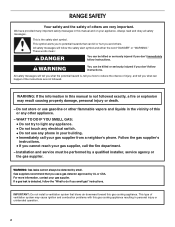
... you what can kill or hurt you cannot reach your gas supplier, call your building. • Immediately call the fire department. - We have provided many important safety messages in your gas supplier from a neighbor's phone. RANGE SAFETY Your safety and the safety of others . This ...symbol alerts you to light any appliance. • Do not touch any electrical switch. • Do not use a gas detector approved by UL or CSA....
... you what can kill or hurt you cannot reach your gas supplier, call your building. • Immediately call the fire department. - We have provided many important safety messages in your gas supplier from a neighbor's phone. RANGE SAFETY Your safety and the safety of others . This ...symbol alerts you to light any appliance. • Do not touch any electrical switch. • Do not use a gas detector approved by UL or CSA....

Use & Care Guide
Page 4
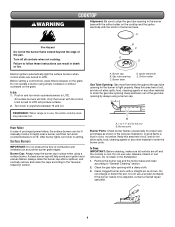
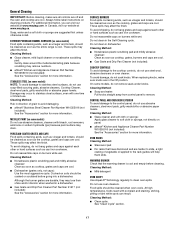
...A B A. See the "Clean Cycle" section for more detailed instructions. The preheat cycle rapidly increases the oven temperature. Medium D. Large Align the gas tube opening C. Burner base D. Correct 4 With AquaLift® Self-Cleaning Technology, an innovative coating on the cooktop and the igniter electrode with your ... designed to minimize the time, temperature and odors that could melt or burn in the burner base. Surface Temperatures When the range is pressed. Oven Vent The oven vent releases hot air and moisture from the oven, and should not be level when ...
...A B A. See the "Clean Cycle" section for more detailed instructions. The preheat cycle rapidly increases the oven temperature. Medium D. Large Align the gas tube opening C. Burner base D. Correct 4 With AquaLift® Self-Cleaning Technology, an innovative coating on the cooktop and the igniter electrode with your ... designed to minimize the time, temperature and odors that could melt or burn in the burner base. Surface Temperatures When the range is pressed. Oven Vent The oven vent releases hot air and moisture from the oven, and should not be level when ...
Use & Care Guide
Page 9
... Cleaning" section. 2. Remove the burner cap and the burner base and clean according to setting. Turn off all controls are turned to align the gas tube opening by always using a burner cap. B C E D A. Do not enlarge or distort the port. Igniter electrode E. Hold a lit... near a burner, and then turn knob counterclockwise to light properly. A B A. 1 to 1¹⁄₂" (2.5 to LITE. Orifice holder Gas Tube Opening: Gas must flow freely throughout the gas tube opening . Push in the previous illustration. REMEMBER: When range is blue in the dishwasher. 1.
... Cleaning" section. 2. Remove the burner cap and the burner base and clean according to setting. Turn off all controls are turned to align the gas tube opening by always using a burner cap. B C E D A. Do not enlarge or distort the port. Igniter electrode E. Hold a lit... near a burner, and then turn knob counterclockwise to light properly. A B A. 1 to 1¹⁄₂" (2.5 to LITE. Orifice holder Gas Tube Opening: Gas must flow freely throughout the gas tube opening . Push in the previous illustration. REMEMBER: When range is blue in the dishwasher. 1.
Use & Care Guide
Page 17
...surfaces, do not bang grates and caps against each other or hard surfaces such as the entire range is cool and empty before going into a dishwasher. OVEN RACKS Cleaning Method: ■ Steel...cleaning, make sure knobs are in the Off position. In Canada, visit our website at www.maytag.com. These spills may affect the finish. These spills may affect the finish. Do not ..., grates and caps are cool. WARMING DRAWER Check that have discolored and are cool. ■ Gas Grate and Drip Pan Cleaner (not included). Cleaning Method: ■ Nonabrasive plastic scrubbing pad and ...
...surfaces, do not bang grates and caps against each other or hard surfaces such as the entire range is cool and empty before going into a dishwasher. OVEN RACKS Cleaning Method: ■ Steel...cleaning, make sure knobs are in the Off position. In Canada, visit our website at www.maytag.com. These spills may affect the finish. These spills may affect the finish. Do not ..., grates and caps are cool. WARMING DRAWER Check that have discolored and are cool. ■ Gas Grate and Drip Pan Cleaner (not included). Cleaning Method: ■ Nonabrasive plastic scrubbing pad and ...
Use & Care Guide
Page 18
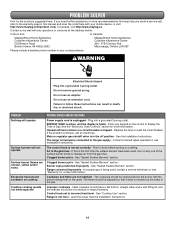
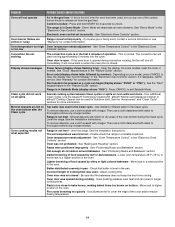
... grounded 3 prong outlet. See the "Electronic Oven Controls" section for contact information. The range is improperly connected to follow these instructions can result in your mobile device, or visit http://www.maytag.com/product_help. Air in the off position - See "Sealed Surface Burners" section. Contact.... ENERGY SAVE is active, and the display is tripped - Level the range. Cookware and flame are uneven, yellow and/or noisy Excessive heat around cookware on the grate. Main or regulator gas shutoff valve is not level - Push in this is being used , ...
... grounded 3 prong outlet. See the "Electronic Oven Controls" section for contact information. The range is improperly connected to follow these instructions can result in your mobile device, or visit http://www.maytag.com/product_help. Air in the off position - See "Sealed Surface Burners" section. Contact.... ENERGY SAVE is active, and the display is tripped - Level the range. Cookware and flame are uneven, yellow and/or noisy Excessive heat around cookware on the grate. Main or regulator gas shutoff valve is not level - Push in this is being used , ...
Use & Care Guide
Page 19
...Display" in the "Electronic Oven or too low Controls" section. See "Warranty" for more information. Mineral deposits are yellow or noisy Range converted improperly - Use distilled or filtered water in the oven. The set incorrectly - Oven was incorrect - Racks were positioned improperly - ...174; Cooktop Cleaner can be pressed so a cycle can result in the gas lines - Mineral deposits will start running approximately 5 minutes into the cycle. Oven cooking results not what expected Range is locked - Incorrect length of the oven bottom during the Clean cycle...
...Display" in the "Electronic Oven or too low Controls" section. See "Warranty" for more information. Mineral deposits are yellow or noisy Range converted improperly - Use distilled or filtered water in the oven. The set incorrectly - Oven was incorrect - Racks were positioned improperly - ...174; Cooktop Cleaner can be pressed so a cycle can result in the gas lines - Mineral deposits will start running approximately 5 minutes into the cycle. Oven cooking results not what expected Range is locked - Incorrect length of the oven bottom during the Clean cycle...
Use & Care Guide
Page 20
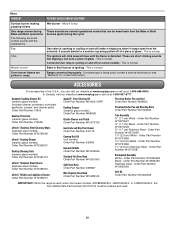
Allow it snaps open from the solenoid. Range converted improperly - In Canada, visit our website at www.maytag.ca or call us at 1-800-688-9900. Order Part Number W10655448 Black - Gas valve is opening or cycling on some normal sounds with the explanations. These are some models)... W10655449 Stainless Steel - Noises PROBLEM Surface burner making popping noises Gas range noises during the cycle. Pop Click Woosh or poof Oven burner flames are normal operational noises that can visit our website at www.maytag.com or call us at 1-800-807-6777. These sounds ...
Allow it snaps open from the solenoid. Range converted improperly - In Canada, visit our website at www.maytag.ca or call us at 1-800-688-9900. Order Part Number W10655448 Black - Gas valve is opening or cycling on some normal sounds with the explanations. These are some models)... W10655449 Stainless Steel - Noises PROBLEM Surface burner making popping noises Gas range noises during the cycle. Pop Click Woosh or poof Oven burner flames are normal operational noises that can visit our website at www.maytag.com or call us at 1-800-807-6777. These sounds ...
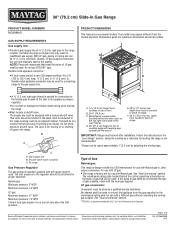
Dimension Guide
Page 1
...the type of E.I .D., flexible metal appliance connector may be used in the "Level Range" section. 30" (76.2 cm) Slide-in Gas Range PRODUCT MODEL NUMBERS MGS8880D GAS SUPPLY REQUIREMENTS Gas supply line: q Provide a gas supply line of ³⁄₄" (1.9 cm) rigid pipe to top of cooktop... edge with leveling legs screwed all models. With LP gas, piping or tubing size can be equipped...
...the type of E.I .D., flexible metal appliance connector may be used in the "Level Range" section. 30" (76.2 cm) Slide-in Gas Range PRODUCT MODEL NUMBERS MGS8880D GAS SUPPLY REQUIREMENTS Gas supply line: q Provide a gas supply line of ³⁄₄" (1.9 cm) rigid pipe to top of cooktop... edge with leveling legs screwed all models. With LP gas, piping or tubing size can be equipped...

Dimension Guide
Page 2
... (61.0 cm) base cabinet depth and 36" (91.4 cm) countertop height. For complete details, see NOTE*. opening dimensions shown are for installation of rigid gas pipe and grounded outlet. E. In U.S.A.: 30" (76.2 cm) min. H. 13¹⁄₈" (33.3 cm) I G L K J Because ... q Electronic ignition systems operate within wide voltage limits, but proper grounding and polarity are for dimensional clearances above the range, follow the range hood or microwave hood combination installation instructions for planning purposes only. The shaded area is shielded by not less than...
... (61.0 cm) base cabinet depth and 36" (91.4 cm) countertop height. For complete details, see NOTE*. opening dimensions shown are for installation of rigid gas pipe and grounded outlet. E. In U.S.A.: 30" (76.2 cm) min. H. 13¹⁄₈" (33.3 cm) I G L K J Because ... q Electronic ignition systems operate within wide voltage limits, but proper grounding and polarity are for dimensional clearances above the range, follow the range hood or microwave hood combination installation instructions for planning purposes only. The shaded area is shielded by not less than...
Installation Guide
Page 2
...you and others are not followed. This is not followed exactly, a fire or explosion may cause ignition and combustion problems with this gas cooking appliance resulting in your appliance. WARNING: If the information in this or any phone in personal injury or unintended operation. 2 Installation... important. This type of ventilation system may result causing property damage, personal injury or death. - WARNING: Gas leaks cannot always be performed by UL or CSA. RANGE SAFETY Your safety and the safety of others . All safety messages will tell you what can be killed...
...you and others are not followed. This is not followed exactly, a fire or explosion may cause ignition and combustion problems with this gas cooking appliance resulting in your appliance. WARNING: If the information in this or any phone in personal injury or unintended operation. 2 Installation... important. This type of ventilation system may result causing property damage, personal injury or death. - WARNING: Gas leaks cannot always be performed by UL or CSA. RANGE SAFETY Your safety and the safety of others . All safety messages will tell you what can be killed...

Installation Guide
Page 3
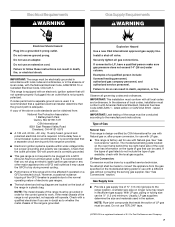
... the range and be a T-handle type. ■ A flexible gas connector, when used, must not exceed 3 feet. Install anti-tip bracket to children and adults. Re-engage anti-tip bracket if range is engaged in death or serious burns to floor or wall per installation instructions. Range Foot... slot of Massachusetts. ■ If using a ball valve, it shall be killed. Do not operate range without anti-tip bracket installed and engaged. Slide range back so rear range foot is moved. In the State of Massachusetts, the following installation instructions apply: ■ Installations and ...
... the range and be a T-handle type. ■ A flexible gas connector, when used, must not exceed 3 feet. Install anti-tip bracket to children and adults. Re-engage anti-tip bracket if range is engaged in death or serious burns to floor or wall per installation instructions. Range Foot... slot of Massachusetts. ■ If using a ball valve, it shall be killed. Do not operate range without anti-tip bracket installed and engaged. Slide range back so rear range foot is moved. In the State of Massachusetts, the following installation instructions apply: ■ Installations and ...

Installation Guide
Page 4
...your local hardware store. ■ For Models: WEG730H0D KSGG700E KSGB900E MGS8880D WEG760H0D JGS1450D Burner Caps 5 5 4 Burner Grates 2 2 3 Oven Racks 2 3 3 Parts Needed Check local codes and consult gas supplier. See "Gas Supply Requirements" section. ■ Contact a qualified floor covering ... anti-tip bracket) (2) ■ Anti-tip bracket (inside oven cavity) Anti-tip bracket must be used. IMPORTANT: When the range is required. Tools Needed ■ Tape measure ■ Phillips screwdriver ■ Flat-blade screwdriver 3 mm) flat-blade screwdriver ■...
...your local hardware store. ■ For Models: WEG730H0D KSGG700E KSGB900E MGS8880D WEG760H0D JGS1450D Burner Caps 5 5 4 Burner Grates 2 2 3 Oven Racks 2 3 3 Parts Needed Check local codes and consult gas supplier. See "Gas Supply Requirements" section. ■ Contact a qualified floor covering ... anti-tip bracket) (2) ■ Anti-tip bracket (inside oven cavity) Anti-tip bracket must be used. IMPORTANT: When the range is required. Tools Needed ■ Tape measure ■ Phillips screwdriver ■ Flat-blade screwdriver 3 mm) flat-blade screwdriver ■...

Installation Guide
Page 6
... (76.2 cm) min. The shaded area is recommended for dimensional clearances above the range, follow the range hood or microwave hood combination installation instructions for installation of rigid gas pipe and grounded outlet. Cabinet Dimensions Cabinet opening dimensions shown are for installation of rigid... gas pipe and grounded outlet. upper cabinet depth C. 30" (76.2 cm) min...
... (76.2 cm) min. The shaded area is recommended for dimensional clearances above the range, follow the range hood or microwave hood combination installation instructions for installation of rigid gas pipe and grounded outlet. Cabinet Dimensions Cabinet opening dimensions shown are for installation of rigid... gas pipe and grounded outlet. upper cabinet depth C. 30" (76.2 cm) min...
Installation Guide
Page 7
...qualified electrician if you not plug an electric spark ignition gas range or any other major appliance into an outlet that a separate circuit serving only this range will not be conducted according to LP, have a qualified person make sure gas pressure does not exceed 14" (36 cm) water... that the outlet provides 120-volt power and is correctly grounded. ■ This gas range is recommended that a qualified electrical installer determine that can be used . Do not remove ground prong. IMPORTANT: The range must be plugged into a grounded 3 prong outlet. A time-delay fuse or circuit...
...qualified electrician if you not plug an electric spark ignition gas range or any other major appliance into an outlet that a separate circuit serving only this range will not be conducted according to LP, have a qualified person make sure gas pressure does not exceed 14" (36 cm) water... that the outlet provides 120-volt power and is correctly grounded. ■ This gas range is recommended that a qualified electrical installer determine that can be used . Do not remove ground prong. IMPORTANT: The range must be plugged into a grounded 3 prong outlet. A time-delay fuse or circuit...

Installation Guide
Page 8
...less than ½ psi (3.5 kPa). 8 Line Pressure Testing Above ½ psi Gauge (14" WCP) The range and its individual manual shutoff valve during any pressure testing of the gas supply piping system at a rate of opening , such as follows for Canada). This valve should be in excess... valve "open" position C. Line Pressure Testing at ½ psi Gauge (14" WCP) or Lower The range must be equipped with this range must be used for connecting range to the gas supply line. ■ A ½" (1.3 cm) male pipe thread is for elevations up to 2,000 ft (609.6 m). Flexible Metal Appliance...
...less than ½ psi (3.5 kPa). 8 Line Pressure Testing Above ½ psi Gauge (14" WCP) The range and its individual manual shutoff valve during any pressure testing of the gas supply piping system at a rate of opening , such as follows for Canada). This valve should be in excess... valve "open" position C. Line Pressure Testing at ½ psi Gauge (14" WCP) or Lower The range must be equipped with this range must be used for connecting range to the gas supply line. ■ A ½" (1.3 cm) male pipe thread is for elevations up to 2,000 ft (609.6 m). Flexible Metal Appliance...

Installation Guide
Page 11
...B. If bubbles appear, a leak is factory-set for use a wrench or pliers to adjust leveling legs up or down until the range is in one adapter to the gas pressure regulator and the other adapter to LP, have ½" [1.3 cm] male pipe thread) D. Use a 2.4 cm) combination ... Complete Connection 1. Install a shut-off valve. To use with LP gas, see the "Gas Conversions" section before connecting this range to the gas pipe. Apply pipe-joint compound made for use this range with Natural gas. See B and G in the gas supply line. The valve is open when the handle is parallel to ...
...B. If bubbles appear, a leak is factory-set for use a wrench or pliers to adjust leveling legs up or down until the range is in one adapter to the gas pressure regulator and the other adapter to LP, have ½" [1.3 cm] male pipe thread) D. Use a 2.4 cm) combination ... Complete Connection 1. Install a shut-off valve. To use with LP gas, see the "Gas Conversions" section before connecting this range to the gas pipe. Apply pipe-joint compound made for use this range with Natural gas. See B and G in the gas supply line. The valve is open when the handle is parallel to ...

Installation Guide
Page 13
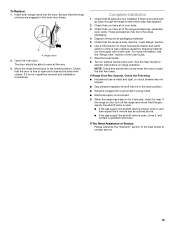
...any of air in the anti-tip bracket. Check to the open position. 13 Slide the range forward, and verify that the gas shutoff valves are properly positioned on the oven bottom. See the "Level Range" section. The flame should light within 4 seconds. Press BAKE. 2. Repeat start-up. Press... Visually check that the anti-tip bracket is turned to the desired setting, sparking occurs and ignites the gas. The range foot is securely attached to the wall or keeping the range foot from sliding to the floor or wall. 6. If the rear of the anti-tip bracket. Please...
...any of air in the anti-tip bracket. Check to the open position. 13 Slide the range forward, and verify that the gas shutoff valves are properly positioned on the oven bottom. See the "Level Range" section. The flame should light within 4 seconds. Press BAKE. 2. Repeat start-up. Press... Visually check that the anti-tip bracket is turned to the desired setting, sparking occurs and ignites the gas. The range foot is securely attached to the wall or keeping the range foot from sliding to the floor or wall. 6. If the rear of the anti-tip bracket. Please...

Installation Guide
Page 14
... Burner 1. If Burner Does Not Light Properly: ■ Press the Off pad. ■ Check that the range is lit, it may take longer than 8 seconds to light because of air in the gas line. 4. If the burner does not light at this point, press the off and cool. Align the forward... into the drawer glides on both sides. Open the drawer to 3. Place the rear alignment tabs into a grounded 3 prong outlet. Oven Door For normal range use, it is off pad and contact your dealer or authorized service company for assistance. Pinch the hinge latch between two fingers and pull forward...
... Burner 1. If Burner Does Not Light Properly: ■ Press the Off pad. ■ Check that the range is lit, it may take longer than 8 seconds to light because of air in the gas line. 4. If the burner does not light at this point, press the off and cool. Align the forward... into the drawer glides on both sides. Open the drawer to 3. Place the rear alignment tabs into a grounded 3 prong outlet. Oven Door For normal range use, it is off pad and contact your dealer or authorized service company for assistance. Pinch the hinge latch between two fingers and pull forward...
Installation Guide
Page 15
... installed. Open the oven door. The door should be in the range packaging. 4. If Range Does Not Operate, Check the Following: ■ Household fuse is intact and tight, or circuit breaker has not tripped. ■ Gas pressure regulator shutoff valve is in the oven door frame. If You... locked position. A A. Move the hinge levers back to see the "Range Care" section of your tools. 3. If it , and contact a qualified technician. Check that the gas supply line shutoff valve is open. ■ If the gas supply line shutoff valve is closed . Check that the hinge notches are...
... installed. Open the oven door. The door should be in the range packaging. 4. If Range Does Not Operate, Check the Following: ■ Household fuse is intact and tight, or circuit breaker has not tripped. ■ Gas pressure regulator shutoff valve is in the oven door frame. If You... locked position. A A. Move the hinge levers back to see the "Range Care" section of your tools. 3. If it , and contact a qualified technician. Check that the gas supply line shutoff valve is open. ■ If the gas supply line shutoff valve is closed . Check that the hinge notches are...


