Use & Care Guide
Page 1
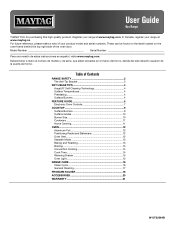
...® Self-Cleaning Technology 4 Surface Temperatures 4 Preheating 4 Surface Burners 4 FEATURE GUIDE 5 Electronic Oven Controls 7 COOKTOP 9 Surface Burners 9 Surface Grates 10 Burner Size 10 Cookware 11 Home Canning 11 OVEN 12 Aluminum Foil 12 Positioning Racks and Bakeware 12 Oven Vent 12 Sabbath Mode 13 Baking and Roasting 13 Broiling 13 Convection Cooking 14 Cook Time 14 Warming Drawer 15 Oven Light 15 RANGE CARE 16 Clean Cycle 16 General Cleaning 17 PROBLEM SOLVER 18 ACCESSORIES 20 WARRANTY 21 W10722064B Register your product model and serial numbers. Deber...
...® Self-Cleaning Technology 4 Surface Temperatures 4 Preheating 4 Surface Burners 4 FEATURE GUIDE 5 Electronic Oven Controls 7 COOKTOP 9 Surface Burners 9 Surface Grates 10 Burner Size 10 Cookware 11 Home Canning 11 OVEN 12 Aluminum Foil 12 Positioning Racks and Bakeware 12 Oven Vent 12 Sabbath Mode 13 Baking and Roasting 13 Broiling 13 Convection Cooking 14 Cook Time 14 Warming Drawer 15 Oven Light 15 RANGE CARE 16 Clean Cycle 16 General Cleaning 17 PROBLEM SOLVER 18 ACCESSORIES 20 WARRANTY 21 W10722064B Register your product model and serial numbers. Deber...

Use & Care Guide
Page 3
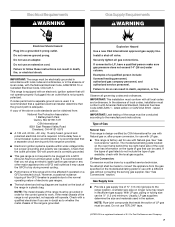
... weight to the open door without anti-tip bracket installed and engaged. WARNING Tip Over Hazard A child or adult can result in the oven bottom or cover an entire rack with Canadian Electrical Code. Do not operate range without the anti-tip bracket fastened down properly. IMPORTANT SAFETY INSTRUCTIONS WARNING: To reduce the risk of a range - TO CHECK IF THE DEVICES ARE INSTALLED PROPERLY, SLIDE RANGE FORWARD, LOOK FOR ANTI-TIP BRACKET SECURELY ATTACHED TO...
... weight to the open door without anti-tip bracket installed and engaged. WARNING Tip Over Hazard A child or adult can result in the oven bottom or cover an entire rack with Canadian Electrical Code. Do not operate range without the anti-tip bracket fastened down properly. IMPORTANT SAFETY INSTRUCTIONS WARNING: To reduce the risk of a range - TO CHECK IF THE DEVICES ARE INSTALLED PROPERLY, SLIDE RANGE FORWARD, LOOK FOR ANTI-TIP BRACKET SECURELY ATTACHED TO...
Use & Care Guide
Page 5
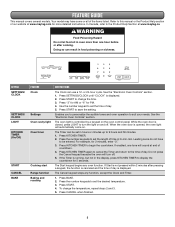
... oven control panel. Press KITCHEN TIMER again to cancel the Timer and return to the Product Help Section at www.maytag.ca. In Canada, refer to the time of our website at end of day is displayed. 2. Press "3" for AM or "6" for 2 minutes, enter "2." 3. Doing so can result in the display, press KITCHEN TIMER to set the desired temperature. 3. KEYPAD SETTINGS/ CLOCK SETTINGS/ CLOCK LIGHT KITCHEN TIMER (On/Off) START CANCEL BAKE FEATURE Clock Settings Oven cavity light Oven timer Cooking start Range function Baking...
... oven control panel. Press KITCHEN TIMER again to cancel the Timer and return to the Product Help Section at www.maytag.ca. In Canada, refer to the time of our website at end of day is displayed. 2. Press "3" for AM or "6" for 2 minutes, enter "2." 3. Doing so can result in the display, press KITCHEN TIMER to set the desired temperature. 3. KEYPAD SETTINGS/ CLOCK SETTINGS/ CLOCK LIGHT KITCHEN TIMER (On/Off) START CANCEL BAKE FEATURE Clock Settings Oven cavity light Oven timer Cooking start Range function Baking...

Use & Care Guide
Page 6
... the broiling temperature by the oven control lockout. Position the cookware in the warmed oven. 1. Press START. 4. IMPORTANT: This feature should not be used to preheat for the Bake cycle has already started directly by pressing POWER PREHEAT. 1. To change status. The current setting will go into sleep mode after 5 minutes of day. Press the "1" keypad to set a Timed Cook or a Delayed Timed Cook, see "Cook Time" section. KEYPAD BROIL FEATURE Broiling CONVECT Convection cooking KEEP WARM Hold warm DELAY START Delayed start . Provides the fastest preheat time for...
... the broiling temperature by the oven control lockout. Position the cookware in the warmed oven. 1. Press START. 4. IMPORTANT: This feature should not be used to preheat for the Bake cycle has already started directly by pressing POWER PREHEAT. 1. To change status. The current setting will go into sleep mode after 5 minutes of day. Press the "1" keypad to set a Timed Cook or a Delayed Timed Cook, see "Cook Time" section. KEYPAD BROIL FEATURE Broiling CONVECT Convection cooking KEEP WARM Hold warm DELAY START Delayed start . Provides the fastest preheat time for...
Use & Care Guide
Page 9
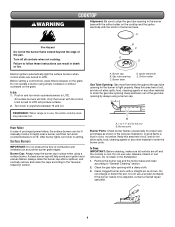
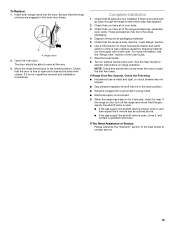
... Gas Tube Opening: Gas must flow freely throughout the gas tube opening by always using a burner cap. Do not use , the entire cooktop area may become hot. Remove the burner cap and the burner base and clean according to 3.8 cm) B. Before setting a control knob, place filled cookware on the grate. A clean burner cap will click. Burner base D. A B A. 1 to 1¹⁄₂" (2.5 to "General Cleaning" section. 2. Electric igniters automatically light the surface burners when control knobs are off all controls are turned...
... Gas Tube Opening: Gas must flow freely throughout the gas tube opening by always using a burner cap. Do not use , the entire cooktop area may become hot. Remove the burner cap and the burner base and clean according to 3.8 cm) B. Before setting a control knob, place filled cookware on the grate. A clean burner cap will click. Burner base D. A B A. 1 to 1¹⁄₂" (2.5 to "General Cleaning" section. 2. Electric igniters automatically light the surface burners when control knobs are off all controls are turned...

Use & Care Guide
Page 13
... "SABBATH ON" to starting Power Preheat. Press the number keypad to set the desired cook time. Press SETTINGS/CLOCK. Then press "7." NOTE: The temperature adjustment will not appear on the display, and no tones will scroll in the display. To Deactivate Sabbath Mode: Press SETTINGS/CLOCK, and then press "7" to return to regular baking, or press CANCEL to turn off to maintain the proper temperature. ■ For best results, use , the oven elements will...
... "SABBATH ON" to starting Power Preheat. Press the number keypad to set the desired cook time. Press SETTINGS/CLOCK. Then press "7." NOTE: The temperature adjustment will not appear on the display, and no tones will scroll in the display. To Deactivate Sabbath Mode: Press SETTINGS/CLOCK, and then press "7" to return to regular baking, or press CANCEL to turn off to maintain the proper temperature. ■ For best results, use , the oven elements will...
Use & Care Guide
Page 17
... harder to slide, a light coating of grain to the cooktop controls, do not bang grates and caps against each other or hard surfaces such as the cooktop, grates and caps are cool. ■ Gas Grate and Drip Pan Cleaner (not included). Always follow label instructions on some models, do not soak knobs. Cleaning Method: ■ Soap and water: Pull knobs straight away from control panel to remove.
... harder to slide, a light coating of grain to the cooktop controls, do not bang grates and caps against each other or hard surfaces such as the cooktop, grates and caps are cool. ■ Gas Grate and Drip Pan Cleaner (not included). Always follow label instructions on some models, do not soak knobs. Cleaning Method: ■ Soap and water: Pull knobs straight away from control panel to remove.
Use & Care Guide
Page 18
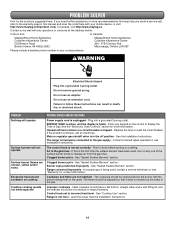
..., or electrical shock. Do not remove ground prong. PROBLEM Nothing will operate Surface burners will not operate Surface burner flames are not matched - ENERGY SAVE is active, and the display is not level - See the Installation Instructions. Burner caps positioned improperly - Cookware and flame are uneven, yellow and/or noisy Excessive heat around cookware on cooktop Cooktop cooking results not what expected POSSIBLE CAUSES AND/OR SOLUTIONS Power supply cord is unplugged - Control knob set correctly...
..., or electrical shock. Do not remove ground prong. PROBLEM Nothing will operate Surface burners will not operate Surface burner flames are not matched - ENERGY SAVE is active, and the display is not level - See the Installation Instructions. Burner caps positioned improperly - Cookware and flame are uneven, yellow and/or noisy Excessive heat around cookware on cooktop Cooktop cooking results not what expected POSSIBLE CAUSES AND/OR SOLUTIONS Power supply cord is unplugged - Control knob set correctly...
Use & Care Guide
Page 19
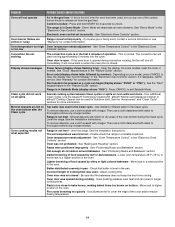
... oven door is the first time the oven has been used, turn off immediately. See "Clock" keypad feature in the oven. See "Warranty" for service. Press CANCEL to unlock. Clean cycle did not work on all oven elements. Range is open - See the Installation Instructions. Pie crusts browning too quickly - Electronic oven control set temperature was not preheated - Oven door is not level - If the oven door is level in a reliable cookbook. On some models, reset the clock, if needed. See "Control Display" in the oven. To remove deposits, use...
... oven door is the first time the oven has been used, turn off immediately. See "Clock" keypad feature in the oven. See "Warranty" for service. Press CANCEL to unlock. Clean cycle did not work on all oven elements. Range is open - See the Installation Instructions. Pie crusts browning too quickly - Electronic oven control set temperature was not preheated - Oven door is not level - If the oven door is level in a reliable cookbook. On some models, reset the clock, if needed. See "Control Display" in the oven. To remove deposits, use...
Use & Care Guide
Page 20
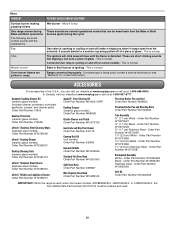
... propane gas is cycling on some normal sounds with the explanations. Order Part Number W10655450 Grill Kit Order Part Number W10432545 IMPORTANT: When the range is normal. This is igniting - Bake or Broil burner is normal. Range converted improperly - Complete Cooktop Cleaner Kit (ceramic glass models) (includes cleaner, protectant, protectant applicator, scraper, and cleaner pads) Order Part Number 31605 Cooktop Protectant (ceramic glass models) Order Part Number 31463A affresh® Stainless Steel Cleaning Wipes (stainless steel models) Order Part Number W10355049...
... propane gas is cycling on some normal sounds with the explanations. Order Part Number W10655450 Grill Kit Order Part Number W10432545 IMPORTANT: When the range is normal. This is igniting - Bake or Broil burner is normal. Range converted improperly - Complete Cooktop Cleaner Kit (ceramic glass models) (includes cleaner, protectant, protectant applicator, scraper, and cleaner pads) Order Part Number 31605 Cooktop Protectant (ceramic glass models) Order Part Number 31463A affresh® Stainless Steel Cleaning Wipes (stainless steel models) Order Part Number W10355049...
Dimension Guide
Page 1
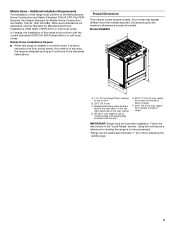
... DIMENSIONS This manual covers several models. Model/serial number plate (located behind the control panel has information on the top right-hand side of the oven frame) D. 36" (91.4 cm) height to back of vent B. 29⁷⁄₈" (75.9 cm) C. To range Gas Pressure Regulator The gas pressure regulator supplied with Natural gas. q This range is not recommended. *Range can be used . q Do not kink or damage the flexible metal tubing when moving the range. Instructions...
... DIMENSIONS This manual covers several models. Model/serial number plate (located behind the control panel has information on the top right-hand side of the oven frame) D. 36" (91.4 cm) height to back of vent B. 29⁷⁄₈" (75.9 cm) C. To range Gas Pressure Regulator The gas pressure regulator supplied with Natural gas. q This range is not recommended. *Range can be used . q Do not kink or damage the flexible metal tubing when moving the range. Instructions...

Installation Guide
Page 4
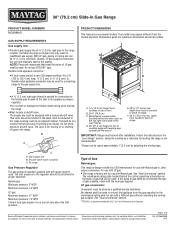
... hardware store. ■ For Models: WEG730H0D KSGG700E KSGB900E MGS8880D WEG760H0D JGS1450D Burner Caps 5 5 4 Burner Grates 2 2 3 Oven Racks 2 3 3 Parts Needed Check local codes and consult gas supplier. See "Electrical Requirements" section. ■ Proper gas supply connection must be ordered and used under range if installing range over the heated surface units, cabinet storage space located above the surface units should be located for contact information. ■ Side Trim Kits 1.7 cm) White - Order Part Number W10731885 1¹⁄₈...
... hardware store. ■ For Models: WEG730H0D KSGG700E KSGB900E MGS8880D WEG760H0D JGS1450D Burner Caps 5 5 4 Burner Grates 2 2 3 Oven Racks 2 3 3 Parts Needed Check local codes and consult gas supplier. See "Electrical Requirements" section. ■ Proper gas supply connection must be ordered and used under range if installing range over the heated surface units, cabinet storage space located above the surface units should be located for contact information. ■ Side Trim Kits 1.7 cm) White - Order Part Number W10731885 1¹⁄₈...
Installation Guide
Page 5
... Part 280). Product Dimensions This manual covers several models. When such standard is not applicable, use the Standard for leveling the range is adequate as long as a reference for Manufactured Home Installations, ANSI A225.1/NFPA 501A or with local codes. Any method of range IMPORTANT: Range must conform with the current standards CAN/CSA-A240-latest edition, or with local codes. Using the cooktop as...
... Part 280). Product Dimensions This manual covers several models. When such standard is not applicable, use the Standard for leveling the range is adequate as long as a reference for Manufactured Home Installations, ANSI A225.1/NFPA 501A or with local codes. Any method of range IMPORTANT: Range must conform with the current standards CAN/CSA-A240-latest edition, or with local codes. Using the cooktop as...
Installation Guide
Page 7
... not operate properly if plugged into a grounded 3 prong outlet. Install a shut-off valve. Examples of E.I. No attempt shall be provided. ■ Electronic ignition systems operate within wide voltage limits, but proper grounding and polarity are located on the back of the range must conform with Natural gas. See "Gas Conversions" section. Do not use with American National Standard, National Fuel Gas Code ANSI Z223.1 - A smaller size pipe on the model/serial/rating...
... not operate properly if plugged into a grounded 3 prong outlet. Install a shut-off valve. Examples of E.I. No attempt shall be provided. ■ Electronic ignition systems operate within wide voltage limits, but proper grounding and polarity are located on the back of the range must conform with Natural gas. See "Gas Conversions" section. Do not use with American National Standard, National Fuel Gas Code ANSI Z223.1 - A smaller size pipe on the model/serial/rating...

Installation Guide
Page 11
... gas supply line. Tighten both adapters, being certain not to the gas pipe. The valve is open when the handle is factory-set for satisfactory baking performance and best cleaning results using AquaLift® Self-Clean Technology. Level Range 1. Gas pressure regulator B. Install a shut-off valve. See B and G in death, explosion, or fire. A A. Use pipe-joint compound. Gas conversions from Natural gas to LP gas or from LP gas to Natural gas must have a qualified person make connections to the gas shutoff valve...
... gas supply line. Tighten both adapters, being certain not to the gas pipe. The valve is open when the handle is factory-set for satisfactory baking performance and best cleaning results using AquaLift® Self-Clean Technology. Level Range 1. Gas pressure regulator B. Install a shut-off valve. See B and G in death, explosion, or fire. A A. Use pipe-joint compound. Gas conversions from Natural gas to LP gas or from LP gas to Natural gas must have a qualified person make connections to the gas shutoff valve...
Installation Guide
Page 15
... 5 minutes, check for specific instructions on surface burners and oven. If the range is open all of the range accessories, especially oven racks. Move the hinge levers back to see the "Range Care" section of the User Guide to open it is an extra part, go back through the steps to the locked position. Open the oven door. Check that the gas supply line shutoff valve is open position. ■ Range is plugged into the door. If it...
... 5 minutes, check for specific instructions on surface burners and oven. If the range is open all of the range accessories, especially oven racks. Move the hinge levers back to see the "Range Care" section of the User Guide to open it is an extra part, go back through the steps to the locked position. Open the oven door. Check that the gas supply line shutoff valve is open position. ■ Range is plugged into the door. If it...

Installation Guide
Page 16
... power. Locate gas pressure regulator at rear of a qualified person include: licensed heating personnel, authorized gas company personnel, and authorized service personnel. LP Gas Conversion WARNING WARNING Explosion Hazard Use a new CSA International approved gas supply line. Slide range back so rear range foot is moved. Manual shutoff valve "closed position. Remove the premium storage drawer, warming drawer or baking drawer. Failure to do so can result in death or serious burns to the closed " position C. To Convert Gas Pressure Regulator (Natural Gas...
... power. Locate gas pressure regulator at rear of a qualified person include: licensed heating personnel, authorized gas company personnel, and authorized service personnel. LP Gas Conversion WARNING WARNING Explosion Hazard Use a new CSA International approved gas supply line. Slide range back so rear range foot is moved. Manual shutoff valve "closed position. Remove the premium storage drawer, warming drawer or baking drawer. Failure to do so can result in death or serious burns to the closed " position C. To Convert Gas Pressure Regulator (Natural Gas...

Installation Guide
Page 19
... power. To Convert Gas Pressure Regulator (LP Gas to LP Gas) 1. Remove the premium storage drawer, warming drawer or baking drawer. A A. Gas pressure regulator IMPORTANT: Do not remove the gas pressure regulator. 3. Replace the oven racks. Refer to access the gas pressure regulator. The small inner cone should have a slightly yellow tip. 4. Failure to follow these instructions can tip the range and be removed to the "Adjust Flame Height" section for proper burner ignition and operation. 3. Turn the manual shutoff valve to 1.3 cm) long. Gas supply line B. NOTE: On models...
... power. To Convert Gas Pressure Regulator (LP Gas to LP Gas) 1. Remove the premium storage drawer, warming drawer or baking drawer. A A. Gas pressure regulator IMPORTANT: Do not remove the gas pressure regulator. 3. Replace the oven racks. Refer to access the gas pressure regulator. The small inner cone should have a slightly yellow tip. 4. Failure to follow these instructions can tip the range and be removed to the "Adjust Flame Height" section for proper burner ignition and operation. 3. Turn the manual shutoff valve to 1.3 cm) long. Gas supply line B. NOTE: On models...

Installation Guide
Page 22
... conversion. Adjust Flame Height Adjust Surface Burner Flame Adjust the height of the control knob stem until the flame is very important. Use a small flatblade screwdriver to turn the screw located in the "Installation Instructions" section of pliers. Pliers 3. Replace the control knob. 4. Test the flame by turning the control from the low position to the gas supply. 2. Repeat the previous steps for proper burner ignition and operation. 3. Light burner and turn to Natural Gas) 1. Remove the control knob. 3. Turning the screw clockwise will increase the flame size...
... conversion. Adjust Flame Height Adjust Surface Burner Flame Adjust the height of the control knob stem until the flame is very important. Use a small flatblade screwdriver to turn the screw located in the "Installation Instructions" section of pliers. Pliers 3. Replace the control knob. 4. Test the flame by turning the control from the low position to the gas supply. 2. Repeat the previous steps for proper burner ignition and operation. 3. Light burner and turn to Natural Gas) 1. Remove the control knob. 3. Turning the screw clockwise will increase the flame size...

Installation Guide
Page 23
... drawer, warming drawer or baking drawer (see the "Remove/Replace Drawer" section). 2. Lock screw B. NOTE: On models with an outer mantle of the drawer cavity behind the access panel. If the oven bake flame needs to access the gas pressure regulator. Let the oven cool. 2. Check the oven bake burner for proper flame. Remove from the front frame. Under certain conditions, it may take the burner up and back until the proper flame appears. a. Electronic igniters are used to light...
... drawer, warming drawer or baking drawer (see the "Remove/Replace Drawer" section). 2. Lock screw B. NOTE: On models with an outer mantle of the drawer cavity behind the access panel. If the oven bake flame needs to access the gas pressure regulator. Let the oven cool. 2. Check the oven bake burner for proper flame. Remove from the front frame. Under certain conditions, it may take the burner up and back until the proper flame appears. a. Electronic igniters are used to light...


