
Owners Manual
Page 1
Gas Slide-In Range Precision Touch Control 800 ® Use & Care Guide Table of Gas Appliance Troubleshooting 24-25 Warranty & Service 27 Guide d'utilisation et d'entretien 28 Guía de Uso y Cuidado 56 ©2006 Maytag Appliances Sales Co. A/01/08 Part No. 8113P772-60 Care & Cleaning 18-21 Self-Clean Oven Cleaning Procedures Maintenance 22-23 Oven Window & Light Removal of Contents Important Safety Instructions 1-4 Surface Cooking 5-6 Surface Controls Sealed Burners Oven Cooking 7-17 Baking Cook & Hold Delay Cook & Hold Broiling Keep Warm Oven Racks Form No. ...
Gas Slide-In Range Precision Touch Control 800 ® Use & Care Guide Table of Gas Appliance Troubleshooting 24-25 Warranty & Service 27 Guide d'utilisation et d'entretien 28 Guía de Uso y Cuidado 56 ©2006 Maytag Appliances Sales Co. A/01/08 Part No. 8113P772-60 Care & Cleaning 18-21 Self-Clean Oven Cleaning Procedures Maintenance 22-23 Oven Window & Light Removal of Contents Important Safety Instructions 1-4 Surface Cooking 5-6 Surface Controls Sealed Burners Oven Cooking 7-17 Baking Cook & Hold Delay Cook & Hold Broiling Keep Warm Oven Racks Form No. ...
Owners Manual
Page 2
Installer: Please leave this guide with the manufacturer's instructions. Model Number Serial Number Date of the appliance. For service information, see page 27. Recognize Safety Symbols, Words, Labels WARNING Gas leaks may not be detected by smell alone. WARNING WARNING - To ensure proper and safe operation: Appliance must be properly installed and grounded by a properly installed anti-tip device. Always disconnect power to appliance before using this...
Installer: Please leave this guide with the manufacturer's instructions. Model Number Serial Number Date of the appliance. For service information, see page 27. Recognize Safety Symbols, Words, Labels WARNING Gas leaks may not be detected by smell alone. WARNING WARNING - To ensure proper and safe operation: Appliance must be properly installed and grounded by a properly installed anti-tip device. Always disconnect power to appliance before using this...

Owners Manual
Page 3
... before operating it should be injured or burned. If storage is properly engaged in an area subjected to sit or stand on backguard of a range. Temperatures may increase pressure in carbon monoxide poisoning. In Case of the rear leveling legs is provided, it . NEVER pick up or move a flaming pan. • Oven: Smother fire or flame by blocking the oven vent or air intakes...
... before operating it should be injured or burned. If storage is properly engaged in an area subjected to sit or stand on backguard of a range. Temperatures may increase pressure in carbon monoxide poisoning. In Case of the rear leveling legs is provided, it . NEVER pick up or move a flaming pan. • Oven: Smother fire or flame by blocking the oven vent or air intakes...

Owners Manual
Page 4
... of electric shock, fire, or damage to cool. Always turn the fan on the surface burner or in the oven. cool before removing bulb to the appliance. Clean hood frequently to add or remove food, facing the cooktop, oven vent, surface near the appliance, hood or vent fan. Slide oven rack out to prevent grease from steam. If a plastic frozen food food or cooking utensils. Use foil only as this guide. Utensil Safety Always adjust surface burner flame...
... of electric shock, fire, or damage to cool. Always turn the fan on the surface burner or in the oven. cool before removing bulb to the appliance. Clean hood frequently to add or remove food, facing the cooktop, oven vent, surface near the appliance, hood or vent fan. Slide oven rack out to prevent grease from steam. If a plastic frozen food food or cooking utensils. Use foil only as this guide. Utensil Safety Always adjust surface burner flame...
Owners Manual
Page 5
... of the listed substances, including carbon monoxide. Users of this appliance are hereby warned that the burning of gas can produce noxious fumes if applied to the incomplete combustion of natural gas or liquid petroleum (LP) fuels. Important Safety Instructions Only certain types of glass, glass/ceramic, ceramic or glazed utensils are not specifically recommended in this guide. Use care to the sudden change in temperature. Important...
... of the listed substances, including carbon monoxide. Users of this appliance are hereby warned that the burning of gas can produce noxious fumes if applied to the incomplete combustion of natural gas or liquid petroleum (LP) fuels. Important Safety Instructions Only certain types of glass, glass/ceramic, ceramic or glazed utensils are not specifically recommended in this guide. Use care to the sudden change in temperature. Important...

Owners Manual
Page 6
... gas odor is covered. Expect some parts of cookware will spark when any faster when a higher flame setting is not placed on the grate. 2. Use potholders to the desired level. Setting the controls: The size and type of the cooktop, especially around the surface burner. Push in and turn knob to Light. 3. Use care when cleaning around the burners, to become warm or hot during a cooking operation, turn the control knob slowly to desired flame size. • The ignitor will...
... gas odor is covered. Expect some parts of cookware will spark when any faster when a higher flame setting is not placed on the grate. 2. Use potholders to the desired level. Setting the controls: The size and type of the cooktop, especially around the surface burner. Push in and turn knob to Light. 3. Use care when cleaning around the burners, to become warm or hot during a cooking operation, turn the control knob slowly to desired flame size. • The ignitor will...

Owners Manual
Page 7
... pan. 6 Surface Cooking Cooktop To prevent the cooktop from discoloring or staining: • Clean cooktop after each use . Unlike a range with clean ports will not seep underneath the cooktop. Do not attempt to a boil and for proper operation of your range, located in the left rear position. Sealed Burners The sealed burners of the burner. This burner offers higher speed cooking that can be removed. The grate's porcelain finish may be adjusted...
... pan. 6 Surface Cooking Cooktop To prevent the cooktop from discoloring or staining: • Clean cooktop after each use . Unlike a range with clean ports will not seep underneath the cooktop. Do not attempt to a boil and for proper operation of your range, located in the left rear position. Sealed Burners The sealed burners of the burner. This burner offers higher speed cooking that can be removed. The grate's porcelain finish may be adjusted...

Owners Manual
Page 8
...the Autoset 0 pad to display time in a 12-hour or 24-hour format. Set the time of day, timer and oven functions. The display window on model.) A Bake B Broil C Clean D Convect Roast E Delay F Number Pads G Autoset H Keep Warm I J K LM N O The control panel is set temperatures. Use for convection baking. Use for convection roasting. Sets Timer. Clock The clock can be entered. Oven Cooking Control Panel A B CD E F G H I Convect Bake J Cook & Hold K Favorite L Timer M Clock N Oven Light O CANCEL Use for baking and roasting. Use to turn the oven light on or off. Press...
...the Autoset 0 pad to display time in a 12-hour or 24-hour format. Set the time of day, timer and oven functions. The display window on model.) A Bake B Broil C Clean D Convect Roast E Delay F Number Pads G Autoset H Keep Warm I J K LM N O The control panel is set temperatures. Use for convection baking. Use for convection roasting. Sets Timer. Clock The clock can be entered. Oven Cooking Control Panel A B CD E F G H I Convect Bake J Cook & Hold K Favorite L Timer M Clock N Oven Light O CANCEL Use for baking and roasting. Use to turn the oven light on or off. Press...

Owners Manual
Page 9
... oven function is operating. When the clock display is an error or a problem. The display will disappear from Standby Mode, press any other oven activity. Press the appropriate number pads until the correct time appears in the display. • The colon and TIMER will remain in use . Press the Timer pad and press '0' using the number pads. If the flashing still continues, disconnect power to clear the display. To recall the time...
... oven function is operating. When the clock display is an error or a problem. The display will disappear from Standby Mode, press any other oven activity. Press the appropriate number pads until the correct time appears in the display. • The colon and TIMER will remain in use . Press the Timer pad and press '0' using the number pads. If the flashing still continues, disconnect power to clear the display. To recall the time...

Owners Manual
Page 12
...:59). 3. Delay time can be set . Set the oven temperature desired by using the Cook & Hold option, the oven begins to heat immediately after the control has been set from oven. To set a Delayed Cook & Hold cycle: 1. Set the amount of day will display. Press the Delay 1 pad. • DELAY flashes in the display. • 00:00 flashes in the display. • HOLD turns off . • Remove food from oven. Oven Cooking Cook & Hold When using the number pads. •...
...:59). 3. Delay time can be set . Set the oven temperature desired by using the Cook & Hold option, the oven begins to heat immediately after the control has been set from oven. To set a Delayed Cook & Hold cycle: 1. Set the amount of day will display. Press the Delay 1 pad. • DELAY flashes in the display. • 00:00 flashes in the display. • HOLD turns off . • Remove food from oven. Oven Cooking Cook & Hold When using the number pads. •...

Owners Manual
Page 15
... the Sabbath Mode. To cancel the Sabbath Mode: 1. If the oven light is not allowed. No preheat beep will sound. • The self-clean cycle and automatic door lock do not operate during the Sabbath Mode. • Pressing CANCEL pad will cancel a bake cycle, however the control will stay in the Sabbath Mode. • If power fails, the oven will not automatically come on . Sabbath Mode Notes • Sabbath Mode can be turned on at any time...
... the Sabbath Mode. To cancel the Sabbath Mode: 1. If the oven light is not allowed. No preheat beep will sound. • The self-clean cycle and automatic door lock do not operate during the Sabbath Mode. • Pressing CANCEL pad will cancel a bake cycle, however the control will stay in the Sabbath Mode. • If power fails, the oven will not automatically come on . Sabbath Mode Notes • Sabbath Mode can be turned on at any time...
Owners Manual
Page 16
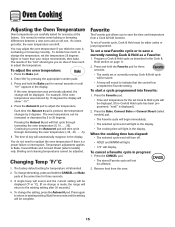
... 30 seconds.) 4. To decide how much to Bake, Convect Bake and Convect Roast (select models) only. The results of day will be affected. 2. To change the temperature, set or currently running Cook & Hold as described in the display. Pressing the Autoset 0 pad will display. Changing Temp °F/°C 1. Broiling and cleaning temperatures cannot be complete. Remove food from a Cook & Hold function. The oven temperature can shift. To start a cycle programmed into Favorite: 1.
... 30 seconds.) 4. To decide how much to Bake, Convect Bake and Convect Roast (select models) only. The results of day will be affected. 2. To change the temperature, set or currently running Cook & Hold as described in the display. Pressing the Autoset 0 pad will display. Changing Temp °F/°C 1. Broiling and cleaning temperatures cannot be complete. Remove food from a Cook & Hold function. The oven temperature can shift. To start a cycle programmed into Favorite: 1.
Owners Manual
Page 17
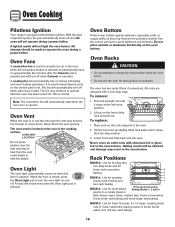
... time the Oven Light pad is normal. A beep will automatically turn off . Slide rack back until it clears the lock-stop position. 3. This is pressed. The oven vent is equipped with a lock-stop edge. To replace: 1. RACK 2: Use for toasting 2 bread, most single-rack baking. Note: The convection fan will not light the oven burner. When the door is opened . Place rack on during a power failure. Lower front and slide back into the oven. Oven Cooking Pilotless Ignition Your range...
... time the Oven Light pad is normal. A beep will automatically turn off . Slide rack back until it clears the lock-stop position. 3. This is pressed. The oven vent is equipped with a lock-stop edge. To replace: 1. RACK 2: Use for toasting 2 bread, most single-rack baking. Note: The convection fan will not light the oven burner. When the door is opened . Place rack on during a power failure. Lower front and slide back into the oven. Oven Cooking Pilotless Ignition Your range...
Owners Manual
Page 19
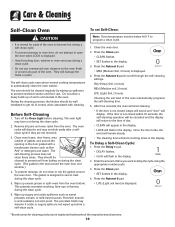
... oven will start counting down in the door gasket with cleaning. They will flash in the display. The self-clean cycle uses above-normal cooking temperatures to open the door when LOCK is the seal around any part of day. • CLEAN will appear in heat during the clean cycle. 6. Do not allow a heavy build-up spillovers to program a clean cycle. 1. Before Self-Cleaning 1. Turn off the Oven Light before a self-clean cycle. The oven racks will...
... oven will start counting down in the door gasket with cleaning. They will flash in the display. The self-clean cycle uses above-normal cooking temperatures to open the door when LOCK is the seal around any part of day. • CLEAN will appear in heat during the clean cycle. 6. Do not allow a heavy build-up spillovers to program a clean cycle. 1. Before Self-Cleaning 1. Turn off the Oven Light before a self-clean cycle. The oven racks will...

Owners Manual
Page 20
... contracting. If oven racks were left in the display. This is displayed. During the Self-Clean Cycle When LOCK shows in the display, the door cannot be damaged if the oven door is forced to open , "door" will flash in time. After Self-Cleaning About one hour after wiping, that the oven is cleaned. After four seconds, CLEAN and DELAY will light and LOCK will turn off. When the oven door latches, LOCK will lessen in...
... contracting. If oven racks were left in the display. This is displayed. During the Self-Clean Cycle When LOCK shows in the display, the door cannot be damaged if the oven door is forced to open , "door" will flash in time. After Self-Cleaning About one hour after wiping, that the oven is cleaned. After four seconds, CLEAN and DELAY will light and LOCK will turn off. When the oven door latches, LOCK will lessen in...
Owners Manual
Page 21
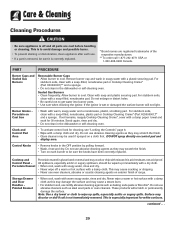
... Drawer and Door Handles Painted Enamel • When cool, wash with a soap-filled, nonabrasive, plastic pad or Cooktop Cleaning Creme* (Part #20000001)** and a sponge. Control Knobs • Remove knobs in the dishwasher or self-cleaning oven. Care & Cleaning Cleaning Procedures CAUTION • Be sure appliance is off a warm or hot surface with a damp cloth. PART PROCEDURE Burner Caps and Sealed Gas Burners Removable Burner Caps • Allow burner to cool. If soil remains, reapply Cooktop Cleaning Creme*, cover with...
... Drawer and Door Handles Painted Enamel • When cool, wash with a soap-filled, nonabrasive, plastic pad or Cooktop Cleaning Creme* (Part #20000001)** and a sponge. Control Knobs • Remove knobs in the dishwasher or self-cleaning oven. Care & Cleaning Cleaning Procedures CAUTION • Be sure appliance is off a warm or hot surface with a damp cloth. PART PROCEDURE Burner Caps and Sealed Gas Burners Removable Burner Caps • Allow burner to cool. If soil remains, reapply Cooktop Cleaning Creme*, cover with...

Owners Manual
Page 23
... shut against oven frame and could cause the range to tip over, break the door, or injure the user. • Do not attempt to open the oven door to the floor. BULB COVER 2. Replace bulb cover and secure with pots, pans, furniture, toys, or other objects. 3. Do not hit the glass with wire retainer. Reset clock. LLEVEEVLIENLGILNEGG LEG Oven Light (style varies by model) 2. Oven Window To protect the oven door window: 1. Do not use the door handle...
... shut against oven frame and could cause the range to tip over, break the door, or injure the user. • Do not attempt to open the oven door to the floor. BULB COVER 2. Replace bulb cover and secure with pots, pans, furniture, toys, or other objects. 3. Do not hit the glass with wire retainer. Reset clock. LLEVEEVLIENLGILNEGG LEG Oven Light (style varies by model) 2. Oven Window To protect the oven door window: 1. Do not use the door handle...

Owners Manual
Page 25
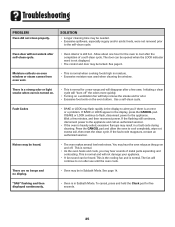
... set circuit breaker. Check or replace fuse. • Check power supply. See page 15 for 2-3 minutes before broiling. • A soiled broiler pan was incorrectly used. Dark pans produce dark browning. Stagger pans when using two racks. See page 14. • Oven may be clogged. If ignitor doesn't click, turn control knob to program a clean cycle. 24 See page 16 for a delayed start. Shiny pans produce light browning. • Check rack positions and pan placement. Never line the broiler...
... set circuit breaker. Check or replace fuse. • Check power supply. See page 15 for 2-3 minutes before broiling. • A soiled broiler pan was incorrectly used. Dark pans produce dark browning. Stagger pans when using two racks. See page 14. • Oven may be clogged. If ignitor doesn't click, turn control knob to program a clean cycle. 24 See page 16 for a delayed start. Shiny pans produce light browning. • Check rack positions and pan placement. Never line the broiler...
Owners Manual
Page 26
... and then displayed continuously. • Oven is normal when cooking foods high in Sabbath Mode. Oven door will help remove the smoke and/or odor. • Excessive food soils on oven window or steam comes from oven vent. • This is in moisture. • Excessive moisture was used when cleaning the window. Allow about one hour for the oven to run after self-clean cycle. • Oven interior...
... and then displayed continuously. • Oven is normal when cooking foods high in Sabbath Mode. Oven door will help remove the smoke and/or odor. • Excessive food soils on oven window or steam comes from oven vent. • This is in moisture. • Excessive moisture was used when cleaning the window. Allow about one hour for the oven to run after self-clean cycle. • Oven interior...

Owners Manual
Page 28
... correct the installation of your major appliance, to replace or repair house fuses, or to correct house wiring or plumbing. 2. Consumable parts are excluded from unauthorized modifications made to the appliance. 9. The cost of repair or replacement under this limited warranty. If you on how to use of consumables or cleaning products not approved by this warranty. 8. Service must be borne by a Maytag designated service company. Outside...
... correct the installation of your major appliance, to replace or repair house fuses, or to correct house wiring or plumbing. 2. Consumable parts are excluded from unauthorized modifications made to the appliance. 9. The cost of repair or replacement under this limited warranty. If you on how to use of consumables or cleaning products not approved by this warranty. 8. Service must be borne by a Maytag designated service company. Outside...


