Owners Manual
Page 2
...RANGE • FOLLOW ALL INSTALLATION INSTRUCTIONS WARNING: To reduce risk of tipping of the appliance from a neighbor's phone. Do not store or use gasoline or other servicing should be necessary to make changes to shut it may occur. Recognize Safety Symbols, Words, Labels WARNING Gas...Appliance must be properly installed and grounded by excessive loading of purchase. Model Number Serial Number Date of Purchase If you the location of this or...., 8 am-8 pm Eastern Time) Internet: http://www.maytag.com In our continuing effort to improve the quality and performance of fire,...
...RANGE • FOLLOW ALL INSTALLATION INSTRUCTIONS WARNING: To reduce risk of tipping of the appliance from a neighbor's phone. Do not store or use gasoline or other servicing should be necessary to make changes to shut it may occur. Recognize Safety Symbols, Words, Labels WARNING Gas...Appliance must be properly installed and grounded by excessive loading of purchase. Model Number Serial Number Date of Purchase If you the location of this or...., 8 am-8 pm Eastern Time) Internet: http://www.maytag.com In our continuing effort to improve the quality and performance of fire,...

Owners Manual
Page 8
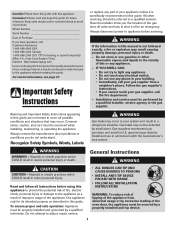
... save a specific Cook & Hold procedure. Use to 24-hour format: 1. Use to select 24 Hr; Press the Autoset 0 pad to turn the oven light on model.) A Bake B Broil C Clean D Convect Roast E Delay F Number Pads G Autoset H Keep Warm I J K LM N O The control panel is designed ... Convect Bake J Cook & Hold K Favorite L Timer M Clock N Oven Light O CANCEL Use for the 12-hour format. Control panel shown includes Convect and other model specific features. (Styling may vary depending on or off. Use to enter temperature. • A beep will sound when any pad is set the Clock section...
... save a specific Cook & Hold procedure. Use to 24-hour format: 1. Use to select 24 Hr; Press the Autoset 0 pad to turn the oven light on model.) A Bake B Broil C Clean D Convect Roast E Delay F Number Pads G Autoset H Keep Warm I J K LM N O The control panel is designed ... Convect Bake J Cook & Hold K Favorite L Timer M Clock N Oven Light O CANCEL Use for the 12-hour format. Control panel shown includes Convect and other model specific features. (Styling may vary depending on or off. Use to enter temperature. • A beep will sound when any pad is set the Clock section...

Owners Manual
Page 10
.... • To recall set from the oven. Allow the oven to 550°. 3. Check cooking progress at the minimum cooking time. Baking with Convection (select models) When convection baking, enter your normal baking temperature. Select the oven temperature. Press Bake pad again or wait four seconds. • BAKE will stop flashing...
.... • To recall set from the oven. Allow the oven to 550°. 3. Check cooking progress at the minimum cooking time. Baking with Convection (select models) When convection baking, enter your normal baking temperature. Select the oven temperature. Press Bake pad again or wait four seconds. • BAKE will stop flashing...
Owners Manual
Page 11
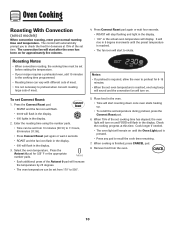
...:10) to check the food for 325° F or the appropriate number pads. • Each additional press of meat. Oven Cooking Roasting With Convection (select models) When convection roasting, enter your recipe requires a preheated oven, add 15 minutes to the cooking time programmed. • Roasting times can vary with different cuts...
...:10) to check the food for 325° F or the appropriate number pads. • Each additional press of meat. Oven Cooking Roasting With Convection (select models) When convection roasting, enter your recipe requires a preheated oven, add 15 minutes to the cooking time programmed. • Roasting times can vary with different cuts...

Owners Manual
Page 12
...cook later in the display. 2. Delay time can be set from 170° F to 550° F. 4. Press Bake, Convect Bake or Convect Roast pad (select models). 6. To set Cook & Hold: 1. Press the Delay 1 pad. • DELAY flashes in the display. • 00:00 flashes in the day. Set the... or seafood. Delay Cook & Hold CAUTION Do not use Delayed Cook & Hold if oven is still flashing, press Bake, Convect Bake or Convect Roast (select models) and select the oven temperature. Notes: • Do not use Delayed Cook & Hold for highly perishable foods such as cakes, cookies, and breads. •...
...cook later in the display. 2. Delay time can be set from 170° F to 550° F. 4. Press Bake, Convect Bake or Convect Roast pad (select models). 6. To set Cook & Hold: 1. Press the Delay 1 pad. • DELAY flashes in the display. • 00:00 flashes in the day. Set the... or seafood. Delay Cook & Hold CAUTION Do not use Delayed Cook & Hold if oven is still flashing, press Bake, Convect Bake or Convect Roast (select models) and select the oven temperature. Notes: • Do not use Delayed Cook & Hold for highly perishable foods such as cakes, cookies, and breads. •...
Owners Manual
Page 16
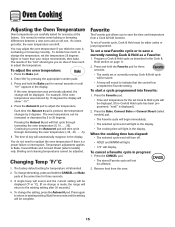
... cycle has been programmed, "nonE" is normal to save a currently running Cook & Hold cycle will be displayed. (If no change is made, the range will return to press the Autoset 0 pad will show "-15°". 4. The results of the "test" should give you an idea of day will.... Remove food from a Cook & Hold function. To adjust the oven temperature: 1. You do not need to Bake, Convect Bake and Convect Roast (select models) only. Favorite The Favorite pad allows you think the oven is a power failure or interruption. It is displayed.) 2. Press the Bake pad. 2. For ...
... cycle has been programmed, "nonE" is normal to save a currently running Cook & Hold cycle will be displayed. (If no change is made, the range will return to press the Autoset 0 pad will show "-15°". 4. The results of the "test" should give you an idea of day will.... Remove food from a Cook & Hold function. To adjust the oven temperature: 1. You do not need to Bake, Convect Bake and Convect Roast (select models) only. Favorite The Favorite pad allows you think the oven is a power failure or interruption. It is displayed.) 2. Press the Bake pad. 2. For ...

Owners Manual
Page 18
... when using the rack in a broiling pan. • The removable section of the rack can be checked for regular or convection baking (select models). Place the cakes on the rack and the oven side wall. • Use caution when removing items from the half rack to avoid burns.... • Carefully remove items from the lower rack to accommodate a large roaster on the oven bottom. Create-A-SpaceTM Half Rack Select range models are equipped with a convertible half rack. Notes • The removable section of the rack can be used as a roasting rack in a broiling pan....
... when using the rack in a broiling pan. • The removable section of the rack can be checked for regular or convection baking (select models). Place the cakes on the rack and the oven side wall. • Use caution when removing items from the half rack to avoid burns.... • Carefully remove items from the lower rack to accommodate a large roaster on the oven bottom. Create-A-SpaceTM Half Rack Select range models are equipped with a convertible half rack. Notes • The removable section of the rack can be used as a roasting rack in a broiling pan....
Owners Manual
Page 22
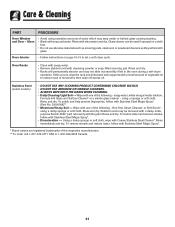
... fingerprints, follow with Stainless Steel Magic Spray* (Part No. 20000008)**. • Moderate/Heavy Soil -- Rinse immediately and dry. Stainless Steel (select models) • DO NOT USE ANY CLEANING PRODUCT CONTAINING CHLORINE BLEACH. • DO NOT USE ABRASIVE OR ORANGE CLEANERS. • ALWAYS WIPE WITH... excessive amounts of the following - Rinse and dry. Rinse and dry. Rinse and dry. Rinse with one of water which may not slide out smoothly if left in the oven during a self-clean operation. Care & Cleaning PART PROCEDURE Oven Window and Door - Wipe with ...
... fingerprints, follow with Stainless Steel Magic Spray* (Part No. 20000008)**. • Moderate/Heavy Soil -- Rinse immediately and dry. Stainless Steel (select models) • DO NOT USE ANY CLEANING PRODUCT CONTAINING CHLORINE BLEACH. • DO NOT USE ABRASIVE OR ORANGE CLEANERS. • ALWAYS WIPE WITH... excessive amounts of the following - Rinse and dry. Rinse and dry. Rinse and dry. Rinse with one of water which may not slide out smoothly if left in the oven during a self-clean operation. Care & Cleaning PART PROCEDURE Oven Window and Door - Wipe with ...

Owners Manual
Page 23
...at each corner of breakage at each side. 2. Grasp door at each side. Align slots in place, then slide wire retainer off cover. Note: The oven door on a new range may feel "spongy" when it is leveled when installed. Remove bulb cover and light bulb. Replace bulb cover and... front oven frame. Hinge arms are cool before replacing light bulb. LLEVEEVLIENLGILNEGG LEG Oven Light (style varies by model) 2. Bulb with a 40 watt, oven-rated appliance bulb. If the range is level. Replace with a brass base is recommended to prevent fusing of the rear leveling legs to cool ...
...at each corner of breakage at each side. 2. Grasp door at each side. Align slots in place, then slide wire retainer off cover. Note: The oven door on a new range may feel "spongy" when it is leveled when installed. Remove bulb cover and light bulb. Replace bulb cover and... front oven frame. Hinge arms are cool before replacing light bulb. LLEVEEVLIENLGILNEGG LEG Oven Light (style varies by model) 2. Bulb with a 40 watt, oven-rated appliance bulb. If the range is level. Replace with a brass base is recommended to prevent fusing of the rear leveling legs to cool ...

Owners Manual
Page 28
...if the factory applied serial number has been altered or removed from your major appliance is located in accordance with original model/serial numbers that is required to published user or operator instructions and/or installation instructions. 4. The removal and reinstallation of...including scratches, dents, chips or other than normal, single-family household use of consumables or cleaning products not approved by a Maytag designated service company. Proof of original purchase date is contrary to obtain service under these excluded circumstances shall be easily determined. ...
...if the factory applied serial number has been altered or removed from your major appliance is located in accordance with original model/serial numbers that is required to published user or operator instructions and/or installation instructions. 4. The removal and reinstallation of...including scratches, dents, chips or other than normal, single-family household use of consumables or cleaning products not approved by a Maytag designated service company. Proof of original purchase date is contrary to obtain service under these excluded circumstances shall be easily determined. ...
Installation Instructions
Page 3
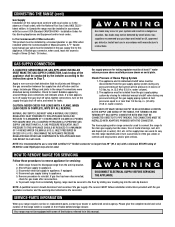
... IN AN ACCESSIBLE LOCATION IN THE SUPPLY LINE AHEAD OF THE RANGE, FOR TURNING ON AND TURNING OFF GAS SUPPLY. The house piping and/or range connector used . Slide range forward to appliance. 5. Disconnect gas supply tubing to disengage range from accidentally tipping, range must be equipped with some of the features referred to all .../ 36 inches. THE CONNECTORS MUST BE INSTALLED WITH ADAPTORS PROVIDED WITH THE CONNECTOR. Dirt, etc. in . NOTE: A qualified servicer should disconnect and reconnect the gas supply. Please give the complete model and serial number of House Piping System 1.
... IN AN ACCESSIBLE LOCATION IN THE SUPPLY LINE AHEAD OF THE RANGE, FOR TURNING ON AND TURNING OFF GAS SUPPLY. The house piping and/or range connector used . Slide range forward to appliance. 5. Disconnect gas supply tubing to disengage range from accidentally tipping, range must be equipped with some of the features referred to all .../ 36 inches. THE CONNECTORS MUST BE INSTALLED WITH ADAPTORS PROVIDED WITH THE CONNECTOR. Dirt, etc. in . NOTE: A qualified servicer should disconnect and reconnect the gas supply. Please give the complete model and serial number of House Piping System 1.


