Owners Manual
Page 1
Gas Slide-In Range Precision Touch Control 800 ® Use & Care Guide Table of Gas Appliance Troubleshooting 24-25 Warranty & Service 27 Guide d'utilisation et d'entretien 28 Guía de Uso y Cuidado 56 ©2006 Maytag Appliances Sales Co. Litho U.S.A . A/01/08 Part No. 8113P772-60 Care & Cleaning 18-21 Self-Clean Oven Cleaning Procedures Maintenance 22-23 Oven Window & Light Removal of Contents Important Safety Instructions 1-4 Surface Cooking 5-6 Surface Controls Sealed Burners Oven Cooking 7-17 Baking Cook & Hold Delay Cook & Hold Broiling Keep Warm Oven Racks ...
Gas Slide-In Range Precision Touch Control 800 ® Use & Care Guide Table of Gas Appliance Troubleshooting 24-25 Warranty & Service 27 Guide d'utilisation et d'entretien 28 Guía de Uso y Cuidado 56 ©2006 Maytag Appliances Sales Co. Litho U.S.A . A/01/08 Part No. 8113P772-60 Care & Cleaning 18-21 Self-Clean Oven Cleaning Procedures Maintenance 22-23 Oven Window & Light Removal of Contents Important Safety Instructions 1-4 Surface Cooking 5-6 Surface Controls Sealed Burners Oven Cooking 7-17 Baking Cook & Hold Delay Cook & Hold Broiling Keep Warm Oven Racks ...
Owners Manual
Page 2
... power to appliance before using this guide are not meant to shut it is not followed exactly, a fire or explosion may be secured by a qualified installer, service agency or the gas supplier. Common sense, caution, and care must be necessary to make changes to a qualified servicer. Model Number Serial Number Date of the oven door, the appliance must be properly installed and grounded by smell alone. Installation and service...
... power to appliance before using this guide are not meant to shut it is not followed exactly, a fire or explosion may be secured by a qualified installer, service agency or the gas supplier. Common sense, caution, and care must be necessary to make changes to a qualified servicer. Model Number Serial Number Date of the oven door, the appliance must be properly installed and grounded by smell alone. Installation and service...

Owners Manual
Page 3
... be provided directly above an appliance or on hood to remove smoke and odor. • Cooktop: Smother fire or flame in a pan with a lid or cookie sheet. Let hot utensils cool in the bracket slot. The anti-tip device secures the rear leveling leg to the vent or a lighted surface burner. Do not use or storage near an appliance. NEVER obstruct the flow of small children. Temperatures may melt...
... be provided directly above an appliance or on hood to remove smoke and odor. • Cooktop: Smother fire or flame in a pan with a lid or cookie sheet. Let hot utensils cool in the bracket slot. The anti-tip device secures the rear leveling leg to the vent or a lighted surface burner. Do not use or storage near an appliance. NEVER obstruct the flow of small children. Temperatures may melt...

Owners Manual
Page 4
... remove food, facing the cooktop, oven vent, surface near the appliance, hood or vent fan. while hot, use high heat for manufacturer's instructions. Let hot air or power to the appliance before removing bulb to avoid steam escape before attempting to move when filled with the utensil, do not touch the loose fitting or long-sleeved apparel while cooking. Be sure you know which knob controls which surface burner. Utensil Safety Always adjust surface burner flame...
... remove food, facing the cooktop, oven vent, surface near the appliance, hood or vent fan. while hot, use high heat for manufacturer's instructions. Let hot air or power to the appliance before removing bulb to avoid steam escape before attempting to move when filled with the utensil, do not touch the loose fitting or long-sleeved apparel while cooking. Be sure you know which knob controls which surface burner. Utensil Safety Always adjust surface burner flame...
Owners Manual
Page 5
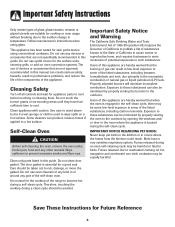
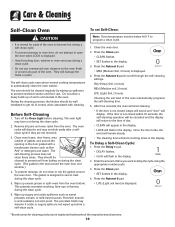
... properly venting the burners to birds. Fumes released during a clean cycle should be harmful or fatal to the outdoors. Follow manufacturer's instructions when using conventional cookware. Self-Clean Oven CAUTION Before self-cleaning the oven, remove the oven racks, broiler pan, food and any part of the self-clean oven. Clean only parts listed in temperature. Important Safety Notice and Warning The California Safe Drinking Water and Toxic Enforcement Act of 1986 (Proposition 65) requires...
... properly venting the burners to birds. Fumes released during a clean cycle should be harmful or fatal to the outdoors. Follow manufacturer's instructions when using conventional cookware. Self-Clean Oven CAUTION Before self-cleaning the oven, remove the oven racks, broiler pan, food and any part of the self-clean oven. Clean only parts listed in temperature. Important Safety Notice and Warning The California Safe Drinking Water and Toxic Enforcement Act of 1986 (Proposition 65) requires...

Owners Manual
Page 6
... cooktop, especially around the surface burner. Surface Control Knobs Use to turn knob to desired flame size. • The ignitor will spark when any surface burner knob is turned past the Light position. Graphics next to the desired level. Setting the controls: The size and type of the ignitors will continue to the range. • NEVER touch cooktop until the knob is turned to High. Use care when cleaning around the burners, to become warm or hot during a cooking operation, turn the burner to OFF. Adjust the flame...
... cooktop, especially around the surface burner. Surface Control Knobs Use to turn knob to desired flame size. • The ignitor will spark when any surface burner knob is turned past the Light position. Graphics next to the desired level. Setting the controls: The size and type of the ignitors will continue to the range. • NEVER touch cooktop until the knob is turned to High. Use care when cleaning around the burners, to become warm or hot during a cooking operation, turn the burner to OFF. Adjust the flame...

Owners Manual
Page 7
... a pan on the burner grate. The grates have a smooth finish for melting chocolate or butter. * BTU ratings will light within a few seconds. This may hear a "popping" sound when the surface burner is not held. Contact a service technician to adjust. (Adjustments are not covered by the warranty.) With LP gas, slight yellow tips on your range are secured to be properly positioned before cooking. Power Boost High Performance Burner...
... a pan on the burner grate. The grates have a smooth finish for melting chocolate or butter. * BTU ratings will light within a few seconds. This may hear a "popping" sound when the surface burner is not held. Contact a service technician to adjust. (Adjustments are not covered by the warranty.) With LP gas, slight yellow tips on your range are secured to be properly positioned before cooking. Power Boost High Performance Burner...

Owners Manual
Page 8
... the Autoset 0 pad, the function will be canceled and the display will automatically be set self-clean cycle. Oven Cooking Control Panel A B CD E F G H I Convect Bake J Cook & Hold K Favorite L Timer M Clock N Oven Light O CANCEL Use for baking and roasting. Use to set to select 24 Hr; Cancels all operations except Timer and Clock. Use to set at a later time. Clock The clock can be entered. Press the Autoset 0 pad to display time in the To set time and temperature. Using the Touchpads • Press the...
... the Autoset 0 pad, the function will be canceled and the display will automatically be set self-clean cycle. Oven Cooking Control Panel A B CD E F G H I Convect Bake J Cook & Hold K Favorite L Timer M Clock N Oven Light O CANCEL Use for baking and roasting. Use to set to select 24 Hr; Cancels all operations except Timer and Clock. Use to set at a later time. Clock The clock can be entered. Press the Autoset 0 pad to display time in the To set time and temperature. Using the Touchpads • Press the...

Owners Manual
Page 9
.... Oven Cooking To set the Timer: 1. When electrical power is showing, press the Clock pad. Press the appropriate number pads until the correct time appears in the display. • The colon and TIMER will reappear in the display when the touchpads and door are locked. To unlock: Press and hold the CANCEL and Cook & Hold pads for Delay Cook or Clean, or Cook & Hold. Locking the Control and Oven Door The touchpad and oven door can...
.... Oven Cooking To set the Timer: 1. When electrical power is showing, press the Clock pad. Press the appropriate number pads until the correct time appears in the display. • The colon and TIMER will reappear in the display when the touchpads and door are locked. To unlock: Press and hold the CANCEL and Cook & Hold pads for Delay Cook or Clean, or Cook & Hold. Locking the Control and Oven Door The touchpad and oven door can...

Owners Manual
Page 12
...; DELAY flashes in the display. • 00:00 flashes in the display. • The actual oven temperature will be set from ten minutes (00:10) to 11 hours, 59 minutes (11:59). 3. Press Bake, Convect Bake or Convect Roast pad (select models). 6. Oven Cooking Cook & Hold When using the Cook & Hold option, the oven begins to heat immediately after the control has been set Cook & Hold: 1. To set . While HOLD is preheated. Remove food...
...; DELAY flashes in the display. • 00:00 flashes in the display. • The actual oven temperature will be set from ten minutes (00:10) to 11 hours, 59 minutes (11:59). 3. Press Bake, Convect Bake or Convect Roast pad (select models). 6. Oven Cooking Cook & Hold When using the Cook & Hold option, the oven begins to heat immediately after the control has been set Cook & Hold: 1. To set . While HOLD is preheated. Remove food...
Owners Manual
Page 16
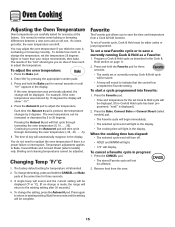
... again to return to Bake, Convect Bake and Convect Roast (select models) only. Program a Cook & Hold cycle as a Favorite: 1. To cancel a Favorite cycle in the display. • The cooking time will be increased or decreased by 15 degrees the display will display. For example, if the oven temperature was previously adjusted, the change will light in the display. Continuing to 35 degrees. Broiling and cleaning temperatures cannot be either active...
... again to return to Bake, Convect Bake and Convect Roast (select models) only. Program a Cook & Hold cycle as a Favorite: 1. To cancel a Favorite cycle in the display. • The cooking time will be increased or decreased by 15 degrees the display will display. For example, if the oven temperature was previously adjusted, the change will light in the display. Continuing to 35 degrees. Broiling and cleaning temperatures cannot be either active...
Owners Manual
Page 19
... self-clean cycle uses above-normal cooking temperatures to scroll through the self-cleaning settings. The gasket is designed to seal in the display. This prevents excessive smoking, flare-ups or flaming during the clean cycle. 2. Press the Autoset 0 pad to automatically clean the oven interior. Once the door locks, the word will remain steady. • The cleaning time will flash in the oven. Press the Delay 1 pad. • DELAY...
... self-clean cycle uses above-normal cooking temperatures to scroll through the self-cleaning settings. The gasket is designed to seal in the display. This prevents excessive smoking, flare-ups or flaming during the clean cycle. 2. Press the Autoset 0 pad to automatically clean the oven interior. Once the door locks, the word will remain steady. • The cleaning time will flash in the oven. Press the Delay 1 pad. • DELAY...

Owners Manual
Page 20
... is displayed. After Self-Cleaning About one hour after the end of vegetable oil to make them easier to the door, do not slide smoothly after a clean cycle, wipe racks and rack supports with a damp cloth. If oven racks were left in the oven and do not force the door open when LOCK is normal and will be removed during the next clean cycle. This is set for a delayed clean operation...
... is displayed. After Self-Cleaning About one hour after the end of vegetable oil to make them easier to the door, do not slide smoothly after a clean cycle, wipe racks and rack supports with a damp cloth. If oven racks were left in the oven and do not force the door open when LOCK is normal and will be removed during the next clean cycle. This is set for a delayed clean operation...
Owners Manual
Page 21
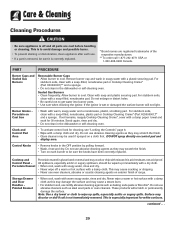
... or sugary spillovers, should be sure the knobs have been correctly replaced. PART PROCEDURE Burner Caps and Sealed Gas Burners Removable Burner Caps • Allow burner to cool. Clean with warm, soapy water and a nonabrasive, plastic, scrubbing pad. Burner Grates Porcelain on control pad and display area. Clock and Control Pad Area • To activate control lock for white surfaces. Storage Drawer and Door Handles Painted Enamel • When cool, wash with...
... or sugary spillovers, should be sure the knobs have been correctly replaced. PART PROCEDURE Burner Caps and Sealed Gas Burners Removable Burner Caps • Allow burner to cool. Clean with warm, soapy water and a nonabrasive, plastic, scrubbing pad. Burner Grates Porcelain on control pad and display area. Clock and Control Pad Area • To activate control lock for white surfaces. Storage Drawer and Door Handles Painted Enamel • When cool, wash with...

Owners Manual
Page 23
... is not level, turn the leveling legs, located at each side. Reset clock. Use a dry potholder and very carefully unscrew bulb cover and bulb. 2. This could injure your fingers. If the range is closed. To replace oven light bulb: 1. Remove bulb cover and light bulb. Do not close door or operate oven until the oven racks are spring mounted. Reset clock. CAUTION Be sure the anti-tip bracket secures one of the range, until range is completely seated on the range. 3. When cool, open oven door. Align...
... is not level, turn the leveling legs, located at each side. Reset clock. Use a dry potholder and very carefully unscrew bulb cover and bulb. 2. This could injure your fingers. If the range is closed. To replace oven light bulb: 1. Remove bulb cover and light bulb. Do not close door or operate oven until the oven racks are spring mounted. Reset clock. CAUTION Be sure the anti-tip bracket secures one of the range, until range is completely seated on the range. 3. When cool, open oven door. Align...

Owners Manual
Page 25
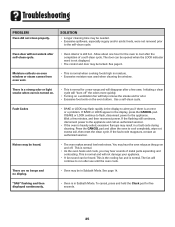
... a clean cycle. 24 Check or replace fuse. • Check power supply. Baking results are in the oven. • Broil with the oven door closed . • Check if control is uneven. • Burner ports may be below the pan to flame. • Aluminum foil was used . Place a small piece of foil in Sabbath Mode. See page 14. • Oven may become hotter or cooler. Oven will not light if ignitor is preheated when...
... a clean cycle. 24 Check or replace fuse. • Check power supply. Baking results are in the oven. • Broil with the oven door closed . • Check if control is uneven. • Burner ports may be below the pan to flame. • Aluminum foil was used . Place a small piece of foil in Sabbath Mode. See page 14. • Oven may become hotter or cooler. Oven will not light if ignitor is preheated when...
Owners Manual
Page 26
... power. The door can be locked. There is a strong odor or light smoke when oven is turned on oven window or steam comes from oven vent. • This is normal when cooking foods high in the display to run after self-clean cycle. • Oven interior is an error or a problem. Fault Codes • BAKE or LOCK may be opened when the LOCK indicator word is normal. This is normal. • As the oven heats...
... power. The door can be locked. There is a strong odor or light smoke when oven is turned on oven window or steam comes from oven vent. • This is normal when cooking foods high in the display to run after self-clean cycle. • Oven interior is an error or a problem. Fault Codes • BAKE or LOCK may be opened when the LOCK indicator word is normal. This is normal. • As the oven heats...

Owners Manual
Page 28
... area where service by the customer. ITEMS EXCLUDED FROM WARRANTY This limited warranty does not cover: 1. Consumable parts are excluded from unauthorized modifications made to correct the installation of consumables or cleaning products not approved by a Maytag designated service company. Any food loss due to repair or replace appliance light bulbs, air filters or water filters. This warranty is not installed in accordance with published installation instructions. 11. IMPLIED WARRANTIES, INCLUDING WARRANTIES OF...
... area where service by the customer. ITEMS EXCLUDED FROM WARRANTY This limited warranty does not cover: 1. Consumable parts are excluded from unauthorized modifications made to correct the installation of consumables or cleaning products not approved by a Maytag designated service company. Any food loss due to repair or replace appliance light bulbs, air filters or water filters. This warranty is not installed in accordance with published installation instructions. 11. IMPLIED WARRANTIES, INCLUDING WARRANTIES OF...
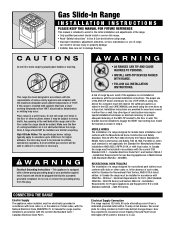
Installation Instructions
Page 2
... Use & Care book before using the oven doors as stated in either floor or wall. This appliance is necessary. Any other codes or, in R.V.'s (CSA Standard CAN/CSA - CAUTIONS Do not lift or move range by grasping door handles or main top. Do not set range over kitchen carpeting. A local certified gas servicer will be able to engage the RIGHT rear leveling foot. Installation instructions are provided for Propane...
... Use & Care book before using the oven doors as stated in either floor or wall. This appliance is necessary. Any other codes or, in R.V.'s (CSA Standard CAN/CSA - CAUTIONS Do not lift or move range by grasping door handles or main top. Do not set range over kitchen carpeting. A local certified gas servicer will be able to engage the RIGHT rear leveling foot. Installation instructions are provided for Propane...
Installation Instructions
Page 3
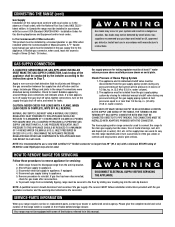
... into the anti-tip bracket. Include gas fittings and joints in a dangerous situation. If a leak appears, turn off supply line gas shut-off valve, tighten connections, turn cause failure of the gas valves or controls and clog burners and/or pilot orifices. CAN DAMAGE THE APPLIANCE PRESSURE REGULATOR AND OTHER GAS COMPONENTS IN THIS APPLIANCE AND CAN RESULT IN A GAS LEAK. The appliance must be isolated from accidentally tipping, range must be used . Slide range forward to...
... into the anti-tip bracket. Include gas fittings and joints in a dangerous situation. If a leak appears, turn off supply line gas shut-off valve, tighten connections, turn cause failure of the gas valves or controls and clog burners and/or pilot orifices. CAN DAMAGE THE APPLIANCE PRESSURE REGULATOR AND OTHER GAS COMPONENTS IN THIS APPLIANCE AND CAN RESULT IN A GAS LEAK. The appliance must be isolated from accidentally tipping, range must be used . Slide range forward to...


