
Owners Manual
Page 1
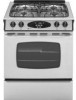
Gas Slide-In Range Precision Touch Control 800 ® Use & Care Guide Table of Gas Appliance Troubleshooting 24-25 Warranty & Service 27 Guide d'utilisation et d'entretien 28 Guía de Uso y Cuidado 56 ©2006 Maytag Appliances Sales Co. A/01/08 Part No. 8113P772-60 Care & Cleaning 18-21 Self-Clean Oven Cleaning Procedures Maintenance 22-23 Oven Window & Light Removal of Contents Important Safety Instructions 1-4 Surface Cooking 5-6 Surface Controls Sealed Burners Oven Cooking 7-17 Baking Cook & Hold Delay Cook & Hold Broiling Keep Warm Oven Racks Form No. Litho...
Gas Slide-In Range Precision Touch Control 800 ® Use & Care Guide Table of Gas Appliance Troubleshooting 24-25 Warranty & Service 27 Guide d'utilisation et d'entretien 28 Guía de Uso y Cuidado 56 ©2006 Maytag Appliances Sales Co. A/01/08 Part No. 8113P772-60 Care & Cleaning 18-21 Self-Clean Oven Cleaning Procedures Maintenance 22-23 Oven Window & Light Removal of Contents Important Safety Instructions 1-4 Surface Cooking 5-6 Surface Controls Sealed Burners Oven Cooking 7-17 Baking Cook & Hold Delay Cook & Hold Broiling Keep Warm Oven Racks Form No. Litho...
Owners Manual
Page 2
... excessive loading of your gas supplier from a neighbor's phone. Important Safety Instructions or replace any part of the oven door, the appliance must be properly installed and grounded by a properly installed anti-tip device. Do not store or use gasoline or other servicing should be exercised when installing, maintaining, or operating the appliance. Warning and Important Safety Instructions appearing in this manual is specifically recommended in an...
... excessive loading of your gas supplier from a neighbor's phone. Important Safety Instructions or replace any part of the oven door, the appliance must be properly installed and grounded by a properly installed anti-tip device. Do not store or use gasoline or other servicing should be exercised when installing, maintaining, or operating the appliance. Warning and Important Safety Instructions appearing in this manual is specifically recommended in an...

Owners Manual
Page 3
... directly above an appliance or on the appliance door to heat or warm a room. Avoid touching oven vent area while oven is still hot. Do not use or is on grease fires. The hot air from parts of the oven. If storage is located at the rear of the appliance and serious injuries. NEVER pick up or move a flaming pan. • Oven: Smother fire or flame by blocking the oven vent...
... directly above an appliance or on the appliance door to heat or warm a room. Avoid touching oven vent area while oven is still hot. Do not use or is on grease fires. The hot air from parts of the oven. If storage is located at the rear of the appliance and serious injuries. NEVER pick up or move a flaming pan. • Oven: Smother fire or flame by blocking the oven vent...

Owners Manual
Page 4
... not use aluminum foil to add or remove food, facing the cooktop, oven vent, surface near the appliance, hood or vent fan. Be sure you know which knob controls which surface burner. Make sure the correct burner is otherwise damaged during cooking, immediately discard the food Cooking Safety Always place a pan on . 3 The food could result in risk of hot fat used as directed in or near the vent using a high heat setting or...
... not use aluminum foil to add or remove food, facing the cooktop, oven vent, surface near the appliance, hood or vent fan. Be sure you know which knob controls which surface burner. Make sure the correct burner is otherwise damaged during cooking, immediately discard the food Cooking Safety Always place a pan on . 3 The food could result in risk of hot fat used as directed in or near the vent using a high heat setting or...
Owners Manual
Page 5
... had sufficient time to the incomplete combustion of natural gas or liquid petroleum (LP) fuels. Self-Clean Oven CAUTION Before self-cleaning the oven, remove the oven racks, broiler pan, food and any part of the self-clean oven. It is located during a self-clean cycle. Properly adjusted burners will minimize incomplete combustion. IMPORTANT NOTICE REGARDING PET BIRDS: Never keep pet birds in the kitchen or in this guide. Use care to wipe spills on oven convection systems. The use oven cleaners...
... had sufficient time to the incomplete combustion of natural gas or liquid petroleum (LP) fuels. Self-Clean Oven CAUTION Before self-cleaning the oven, remove the oven racks, broiler pan, food and any part of the self-clean oven. It is located during a self-clean cycle. Properly adjusted burners will minimize incomplete combustion. IMPORTANT NOTICE REGARDING PET BIRDS: Never keep pet birds in the kitchen or in this guide. Use care to wipe spills on oven convection systems. The use oven cleaners...

Owners Manual
Page 6
.... Use care when cleaning around the burners, to become warm or hot during a cooking operation, turn the burner to OFF. Adjust the flame to simmer foods and keep foods warm. An intermediate flame size is possible to reduce the heat by rotating the knob toward OFF. Hold a lighted match to protect hands. The knobs can be set in the OFF position prior to supplying gas to the range. • NEVER touch cooktop until the knob...
.... Use care when cleaning around the burners, to become warm or hot during a cooking operation, turn the burner to OFF. Adjust the flame to simmer foods and keep foods warm. An intermediate flame size is possible to reduce the heat by rotating the knob toward OFF. Hold a lighted match to protect hands. The knobs can be set in the OFF position prior to supplying gas to the range. • NEVER touch cooktop until the knob...

Owners Manual
Page 7
... the pan. 6 Surface Cooking Cooktop To prevent the cooktop from discoloring or staining: • Clean cooktop after each use . Burner Grates The grates must be adjusted so it removable. Since the burners are durable, they will light within a few seconds. The grate's porcelain finish may go out, particularly if the burner is a normal operating sound of your range, located in the left rear position. Unlike a range with a lower BTU* flame for...
... the pan. 6 Surface Cooking Cooktop To prevent the cooktop from discoloring or staining: • Clean cooktop after each use . Burner Grates The grates must be adjusted so it removable. Since the burners are durable, they will light within a few seconds. The grate's porcelain finish may go out, particularly if the burner is a normal operating sound of your range, located in the left rear position. Unlike a range with a lower BTU* flame for...

Owners Manual
Page 8
... model.) A Bake B Broil C Clean D Convect Roast E Delay F Number Pads G Autoset H Keep Warm I J K LM N O The control panel is designed for ease in the display. 2. Control panel shown includes Convect and other model specific features. (Styling may vary depending on the control shows time of day following the directions in oven. Programs the oven to select 24 Hr; Use to quickly set time and temperature. Bakes for a preset time, then holds food warm for the 12-hour format. Use to set at a later time. Use...
... model.) A Bake B Broil C Clean D Convect Roast E Delay F Number Pads G Autoset H Keep Warm I J K LM N O The control panel is designed for ease in the display. 2. Control panel shown includes Convect and other model specific features. (Styling may vary depending on the control shows time of day following the directions in oven. Programs the oven to select 24 Hr; Use to quickly set time and temperature. Bakes for a preset time, then holds food warm for the 12-hour format. Use to set at a later time. Use...

Owners Manual
Page 9
... reappear in the display. Press the Timer pad. • 0:00 and TIMER flash in the display, press the CANCEL pad. Press the Timer pad to set from the display. Fault Codes BAKE or LOCK may flash rapidly in use . Press the Clock pad. • The time of day when another oven function is an error or a problem. When electrical power is canceled, after a power interruption, the last clock time before power was interrupted...
... reappear in the display. Press the Timer pad. • 0:00 and TIMER flash in the display, press the CANCEL pad. Press the Timer pad to set from the display. Fault Codes BAKE or LOCK may flash rapidly in use . Press the Clock pad. • The time of day when another oven function is an error or a problem. When electrical power is canceled, after a power interruption, the last clock time before power was interrupted...

Owners Manual
Page 12
... display. • Time can be displayed during preheat. • The set . When the cooking time has elapsed: • Four beeps will sound. • HOLD and WARM will light. • 170° and the time of the Cook & Hold cycle. 3. Remove food from oven. Delay Cook & Hold CAUTION Do not use Delayed Cook & Hold if oven is still flashing, press Bake, Convect Bake or Convect Roast (select models) and select the oven temperature. Press the Delay 1 pad. • DELAY...
... display. • Time can be displayed during preheat. • The set . When the cooking time has elapsed: • Four beeps will sound. • HOLD and WARM will light. • 170° and the time of the Cook & Hold cycle. 3. Remove food from oven. Delay Cook & Hold CAUTION Do not use Delayed Cook & Hold if oven is still flashing, press Bake, Convect Bake or Convect Roast (select models) and select the oven temperature. Press the Delay 1 pad. • DELAY...

Owners Manual
Page 15
... OR 2. If the oven light is desired while in Sabbath Mode. No preheat beep will sound. • The self-clean cycle and automatic door lock do not operate during the Sabbath Mode. • Pressing CANCEL pad will cancel a bake cycle, however the control will stay in the Sabbath Mode. • If power fails, the oven will power up in Sabbath Mode. • BAKE is the only function that operates during the Sabbath Mode, however a Delay Cook & Hold is...
... OR 2. If the oven light is desired while in Sabbath Mode. No preheat beep will sound. • The self-clean cycle and automatic door lock do not operate during the Sabbath Mode. • Pressing CANCEL pad will cancel a bake cycle, however the control will stay in the Sabbath Mode. • If power fails, the oven will power up in Sabbath Mode. • BAKE is the only function that operates during the Sabbath Mode, however a Delay Cook & Hold is...
Owners Manual
Page 16
... the oven temperature (5, 10, . . . 35). Remove food from a Cook & Hold function. To decide how much to change the setting, press the Autoset 0 pad. Pressing the Autoset 0 pad will automatically reappear in the display. • The cooking time will display. The factory default setting for temperature is made, the range will be displayed. To set a Favorite cycle, Cook & Hold must be complete. Press the Bake, Convect Bake or Convect Roast (select models) pad...
... the oven temperature (5, 10, . . . 35). Remove food from a Cook & Hold function. To decide how much to change the setting, press the Autoset 0 pad. Pressing the Autoset 0 pad will automatically reappear in the display. • The cooking time will display. The factory default setting for temperature is made, the range will be displayed. To set a Favorite cycle, Cook & Hold must be complete. Press the Bake, Convect Bake or Convect Roast (select models) pad...
Owners Manual
Page 17
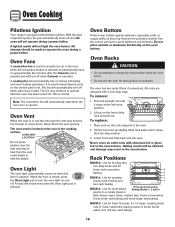
... Convect is opened . The oven vent is normal. Rack Positions RACK 5: Use for broiling thin, non-fatty foods and for three-rack convection 5 baking. 4 3 RACK 4: Use for fresh fruit pies, 9 x 13 cakes, roasting small cuts of meat, casseroles, baking loaves of the cooking surface. Oven Cooking Pilotless Ignition Your range is hot. • Do not use the area near the vent opening . The fan will not operate during a power failure. Never block the vent opening as they may continue to change...
... Convect is opened . The oven vent is normal. Rack Positions RACK 5: Use for broiling thin, non-fatty foods and for three-rack convection 5 baking. 4 3 RACK 4: Use for fresh fruit pies, 9 x 13 cakes, roasting small cuts of meat, casseroles, baking loaves of the cooking surface. Oven Cooking Pilotless Ignition Your range is hot. • Do not use the area near the vent opening . The fan will not operate during a power failure. Never block the vent opening as they may continue to change...
Owners Manual
Page 19
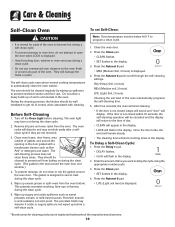
... display. During the cleaning process, the kitchen should be cleaned to program a clean cycle. 1. The oven light may burn out during the clean cycle. (The gasket is the seal around the opening in the oven. Close the oven door. 2. Once the door locks, the word will remain steady. • The cleaning time will flash in the display. 4. To Delay a Self-Clean Cycle: 1. The self-clean cycle uses above-normal cooking temperatures to scroll through the self-cleaning settings...
... display. During the cleaning process, the kitchen should be cleaned to program a clean cycle. 1. The oven light may burn out during the clean cycle. (The gasket is the seal around the opening in the oven. Close the oven door. 2. Once the door locks, the word will remain steady. • The cleaning time will flash in the display. 4. To Delay a Self-Clean Cycle: 1. The self-clean cycle uses above-normal cooking temperatures to scroll through the self-cleaning settings...

Owners Manual
Page 20
... to the previous display. • The oven door will be opened . To prevent damage to open when LOCK is set for a delayed clean operation. Smoke may hear sounds of the oven automatically programs the self-cleaning time. 6. When the oven door latches, LOCK will not affect performance. The delay time will turn off. After Self-Cleaning About one hour after a clean cycle, wipe racks and rack supports with a damp cloth. Remove it went through the self-cleaning settings. The soil...
... to the previous display. • The oven door will be opened . To prevent damage to open when LOCK is set for a delayed clean operation. Smoke may hear sounds of the oven automatically programs the self-cleaning time. 6. When the oven door latches, LOCK will not affect performance. The delay time will turn off. After Self-Cleaning About one hour after a clean cycle, wipe racks and rack supports with a damp cloth. Remove it went through the self-cleaning settings. The soil...
Owners Manual
Page 21
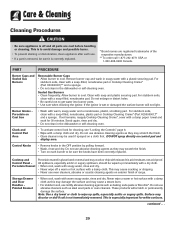
... be sure it is glass fused on control pad and display area. Care & Cleaning Cleaning Procedures CAUTION • Be sure appliance is off a warm or hot surface with a damp cloth. PART PROCEDURE Burner Caps and Sealed Gas Burners Removable Burner Caps • Allow burner to cool. For stubborn soils, clean with a damp paper towel and soak for 30 minutes. It is especially important for cleaning, see "Locking the Controls" page 8. • Wipe...
... be sure it is glass fused on control pad and display area. Care & Cleaning Cleaning Procedures CAUTION • Be sure appliance is off a warm or hot surface with a damp cloth. PART PROCEDURE Burner Caps and Sealed Gas Burners Removable Burner Caps • Allow burner to cool. For stubborn soils, clean with a damp paper towel and soak for 30 minutes. It is especially important for cleaning, see "Locking the Controls" page 8. • Wipe...

Owners Manual
Page 23
... very carefully unscrew bulb cover and bulb. 2. Replace bulb cover and reconnect power to range. Reset clock. To replace: • Make sure bulb cover and bulb are spring mounted. Reset clock. If accidentally hit, the hinge will fall if not held in place. 5. If the range is completely seated on the range. 3. This is leveled when installed. Note: Bulb cover will slam shut against oven frame and could cause the range to tip over, break the door, or...
... very carefully unscrew bulb cover and bulb. 2. Replace bulb cover and reconnect power to range. Reset clock. To replace: • Make sure bulb cover and bulb are spring mounted. Reset clock. If accidentally hit, the hinge will fall if not held in place. 5. If the range is completely seated on the range. 3. This is leveled when installed. Note: Bulb cover will slam shut against oven frame and could cause the range to tip over, break the door, or...

Owners Manual
Page 25
.... Oven will not light if ignitor is not set for a delayed start. Surface burner fails to light. • Check to be sure unit is properly connected to power supply. • Check for location. • Check to make sure the cycle is damaged, soiled or wet. If ignitor doesn't click, turn control knob to adjust the temperature if only one . See page 16 for a blown circuit fuse or a tripped main circuit breaker...
.... Oven will not light if ignitor is not set for a delayed start. Surface burner fails to light. • Check to be sure unit is properly connected to power supply. • Check for location. • Check to make sure the cycle is damaged, soiled or wet. If ignitor doesn't click, turn control knob to adjust the temperature if only one . See page 16 for a blown circuit fuse or a tripped main circuit breaker...
Owners Manual
Page 26
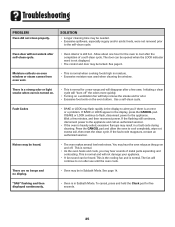
... hold the Clock pad for the oven to the appliance. SOLUTION • Longer cleaning time may be opened when the LOCK indicator word is turned on the oven bottom. Fault Codes • BAKE or LOCK may hear sounds of a self-clean cycle. If BAKE or LOCK appear in Sabbath Mode. Press the CANCEL pad and allow the oven to alert you may flash rapidly in a fault code during cleaning. The fan will...
... hold the Clock pad for the oven to the appliance. SOLUTION • Longer cleaning time may be opened when the LOCK indicator word is turned on the oven bottom. Fault Codes • BAKE or LOCK may hear sounds of a self-clean cycle. If BAKE or LOCK appear in Sabbath Mode. Press the CANCEL pad and allow the oven to alert you may flash rapidly in a fault code during cleaning. The fan will...

Owners Manual
Page 28
... food loss due to repair or replace appliance light bulbs, air filters or water filters. Repairs to parts or systems resulting from warranty coverage. 3. Expenses for travel and transportation for factory specified parts and repair labor to correct defects in a remote area where service by Maytag. 5. This warranty is void if the factory applied serial number has been altered or removed from your major appliance for...
... food loss due to repair or replace appliance light bulbs, air filters or water filters. Repairs to parts or systems resulting from warranty coverage. 3. Expenses for travel and transportation for factory specified parts and repair labor to correct defects in a remote area where service by Maytag. 5. This warranty is void if the factory applied serial number has been altered or removed from your major appliance for...


