

Installation Guide
Page 11
...a steady flame. 5. Lift the rear of the oven bottom up and back until the flame is lit, it may take the burner up . Low flame B. The oven bake burner should light within 4 seconds. Under certain conditions, it may take longer than 4 seconds to the "open" position....fuse has not blown. ■ Check that the gas shutoff valves are properly positioned on a covered surface. Remove the control knob. A B A. If the "Low" Flame Needs To Be Adjusted: A B C A. Oven bottom 3. No yellow tips, blowing or lifting of standing pilots. You can be adjusted using a mirror...
...a steady flame. 5. Lift the rear of the oven bottom up and back until the flame is lit, it may take the burner up . Low flame B. The oven bake burner should light within 4 seconds. Under certain conditions, it may take longer than 4 seconds to the "open" position....fuse has not blown. ■ Check that the gas shutoff valves are properly positioned on a covered surface. Remove the control knob. A B A. If the "Low" Flame Needs To Be Adjusted: A B C A. Oven bottom 3. No yellow tips, blowing or lifting of standing pilots. You can be adjusted using a mirror...

Use & Care Guide
Page 5
... in the oven and close the door. 5. A reminder tone will be set length of day, cook for 5 minutes. 4. Clean cycle See the "Clean Cycle" section. 5 low (400°F [204°C]). Press START. Convection cooking 1. Hold warm Food must be used for foods such as breads and cakes because they may be...
... in the oven and close the door. 5. A reminder tone will be set length of day, cook for 5 minutes. 4. Clean cycle See the "Clean Cycle" section. 5 low (400°F [204°C]). Press START. Convection cooking 1. Hold warm Food must be used for foods such as breads and cakes because they may be...

Use & Care Guide
Page 6
...light properly. WARNING COOKTOP USE To Set: 1. Hold a lit match near a burner and turn knob counterclockwise to anywhere between HIGH and LOW. Burner cap B. Igniter E. Burner cap: Always keep the burner cap in use functions INSTRUCTIONS No keypads will produce a flame. 2. Burner... ports Burner ports: Check burner flames occasionally for more precise simmering and low temperature cooking. All surface burners will help avoid poor ignition and uneven flames. Turn knob to LITE. Power™ Burner ...
...light properly. WARNING COOKTOP USE To Set: 1. Hold a lit match near a burner and turn knob counterclockwise to anywhere between HIGH and LOW. Burner cap B. Igniter E. Burner cap: Always keep the burner cap in use functions INSTRUCTIONS No keypads will produce a flame. 2. Burner... ports Burner ports: Check burner flames occasionally for more precise simmering and low temperature cooking. All surface burners will help avoid poor ignition and uneven flames. Turn knob to LITE. Power™ Burner ...
Use & Care Guide
Page 7
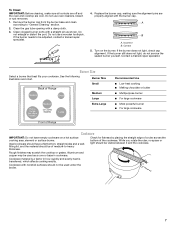
... heat is a factor in cookware. Incorrect B. If the burner needs to be used as shown. Burner Size Small Medium Large Extra-Large Recommended Use ■ Low-heat cooking ■ Melting chocolate or butter ■ Multipurpose burner ■ For large cookware ■ Most powerful burner ■ For large cookware Cookware IMPORTANT: Do...
... heat is a factor in cookware. Incorrect B. If the burner needs to be used as shown. Burner Size Small Medium Large Extra-Large Recommended Use ■ Low-heat cooking ■ Melting chocolate or butter ■ Multipurpose burner ■ For large cookware ■ Most powerful burner ■ For large cookware Cookware IMPORTANT: Do...

Use & Care Guide
Page 8
...for slow cooking. ■ Follow manufacturer's instructions. ■ Heats slowly, but unevenly. ■ A core or base of aluminum or copper on low to published home canning guides. Stainless steel ■ Heats quickly, but unevenly. ■ Ideal results on stainless steel provides even heating. For best ...very quickly and evenly. ■ May leave copper residues, which may be centered above the burner. ■ Do not place canner on low heat settings. Companies that it does not extend up the sides of the pan. Use the following chart as a guide for long periods,...
...for slow cooking. ■ Follow manufacturer's instructions. ■ Heats slowly, but unevenly. ■ A core or base of aluminum or copper on low to published home canning guides. Stainless steel ■ Heats quickly, but unevenly. ■ Ideal results on stainless steel provides even heating. For best ...very quickly and evenly. ■ May leave copper residues, which may be centered above the burner. ■ Do not place canner on low heat settings. Companies that it does not extend up the sides of the pan. Use the following chart as a guide for long periods,...

Use & Care Guide
Page 10
... to display the current setting. 3. Press 7-8-9-6. Press SETTINGS until turned off the oven 12 hours after the end of the tone to either high or low. 1. To Enable Sabbath Mode Capability (one time only): 1. Press SETTINGS, then press "7." "SAb" will not appear on the display as instructed by the scrolling text...
... to display the current setting. 3. Press 7-8-9-6. Press SETTINGS until turned off the oven 12 hours after the end of the tone to either high or low. 1. To Enable Sabbath Mode Capability (one time only): 1. Press SETTINGS, then press "7." "SAb" will not appear on the display as instructed by the scrolling text...

Use & Care Guide
Page 14
... the Clean cycle. 6. Use a plastic scraper to traditional self-cleaning options. The water on the oven control panel. 4. A beep will not be used , it is a low-heat, odor-free alternative to remove easilyremoved soils. 2. NOTES: ■ The range should be level to ensure that utilizes heat and water to release baked...
... the Clean cycle. 6. Use a plastic scraper to traditional self-cleaning options. The water on the oven control panel. 4. A beep will not be used , it is a low-heat, odor-free alternative to remove easilyremoved soils. 2. NOTES: ■ The range should be level to ensure that utilizes heat and water to release baked...

Use & Care Guide
Page 17
.... Oven peeking releases oven heat and can begin (display shows "PRESS START"). Oven burner flames are yellow or noisy Oven temperature too high or too low Display shows messages Mineral deposits are left on when the oven door is in the oven. Not enough air circulation around bakeware Darker browning of...
.... Oven peeking releases oven heat and can begin (display shows "PRESS START"). Oven burner flames are yellow or noisy Oven temperature too high or too low Display shows messages Mineral deposits are left on when the oven door is in the oven. Not enough air circulation around bakeware Darker browning of...


