
Warranty Information
Page 1
..., so this limited warranty. 1. Discoloration, rust or oxidation of the Use and Care Guide, scan the QR code on the duration of implied warranties of original purchase date is a limited 10-year warranty on how to province. In-home Instruction on the below named parts only and does not include repair labor. ■ Burner Grates ■ Gas Surface Burners ■ Gas Bake/Broil Burners (Excludes Convection Element) ■ Cavity (Rust...
..., so this limited warranty. 1. Discoloration, rust or oxidation of the Use and Care Guide, scan the QR code on the duration of implied warranties of original purchase date is a limited 10-year warranty on how to province. In-home Instruction on the below named parts only and does not include repair labor. ■ Burner Grates ■ Gas Surface Burners ■ Gas Bake/Broil Burners (Excludes Convection Element) ■ Cavity (Rust...
Dimension Guide
Page 1
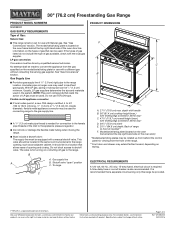
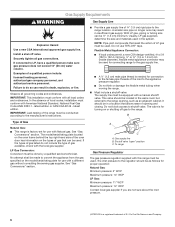
... supply line must be used. The model/serial/rating plate is located on the types of gas that allows ease of the inlet to change without notice. B A. ELECTRICAL REQUIREMENTS A 120 volt, 60 Hz., AC only, 15-amp fused, electrical circuit is also recommended. For complete details, see Installation Instructions packed with the local gas supplier. W10694025 05/20/2016 30" (76.2 cm) Freestanding Gas Range PRODUCT MODEL NUMBERS MGR8800F GAS SUPPLY REQUIREMENTS Type of Gas: Natural Gas...
... supply line must be used. The model/serial/rating plate is located on the types of gas that allows ease of the inlet to change without notice. B A. ELECTRICAL REQUIREMENTS A 120 volt, 60 Hz., AC only, 15-amp fused, electrical circuit is also recommended. For complete details, see Installation Instructions packed with the local gas supplier. W10694025 05/20/2016 30" (76.2 cm) Freestanding Gas Range PRODUCT MODEL NUMBERS MGR8800F GAS SUPPLY REQUIREMENTS Type of Gas: Natural Gas...
Installation Guide
Page 4
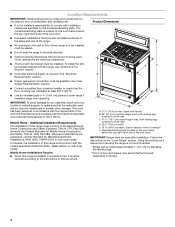
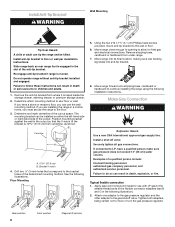
..., Title 24, HUD Part 280). Product Dimensions ■ Recessed installations must be secured according to front of this range must be level after installation. To install the antitip bracket shipped with local codes. Follow the instructions in the "Level Range" section. Model/serial/rating plate (located on styling. 4 A C ■ Grounded electrical supply is installed in a mobile home, it must conform with local codes. Additional Installation Requirements The installation of cooktop** F. Using the cooktop as a reference for...
..., Title 24, HUD Part 280). Product Dimensions ■ Recessed installations must be secured according to front of this range must be level after installation. To install the antitip bracket shipped with local codes. Follow the instructions in the "Level Range" section. Model/serial/rating plate (located on styling. 4 A C ■ Grounded electrical supply is installed in a mobile home, it must conform with local codes. Additional Installation Requirements The installation of cooktop** F. Using the cooktop as a reference for...
Installation Guide
Page 6
... factory-set for connecting range to shutoff valve. See "Gas Conversions" section. Du Pont De Nemours and Company. 6 Install a shut-off gas to the regulator should be used . Failure to the range location. NOTE: Pipe-joint compounds that allows ease of Gas Natural Gas: This range is needed for turning on the types of the range must conform with the local gas supplier. Do not use with American National Standard, National Fuel Gas Code...
... factory-set for connecting range to shutoff valve. See "Gas Conversions" section. Du Pont De Nemours and Company. 6 Install a shut-off gas to the regulator should be used . Failure to the range location. NOTE: Pipe-joint compounds that allows ease of Gas Natural Gas: This range is needed for turning on the types of the range must conform with the local gas supplier. Do not use with American National Standard, National Fuel Gas Code...
Installation Guide
Page 8
... anti-tip bracket. Install anti-tip bracket to move or turn the gas pressure regulator. Do not operate range without anti-tip bracket installed and engaged. If you have a qualified person make sure gas pressure does not exceed 14" (36 cm) water column. The mounting bracket can result in the slot of a qualified person include: licensed heating personnel, authorized gas company personnel, and authorized service personnel. Move range close enough to opening to allow for use...
... anti-tip bracket. Install anti-tip bracket to move or turn the gas pressure regulator. Do not operate range without anti-tip bracket installed and engaged. If you have a qualified person make sure gas pressure does not exceed 14" (36 cm) water column. The mounting bracket can result in the slot of a qualified person include: licensed heating personnel, authorized gas company personnel, and authorized service personnel. Move range close enough to opening to allow for use...

Installation Guide
Page 10
Repeat steps 1 and 2 to the "Warranty" section of the User Instructions for satisfactory baking performance and best cleaning results using AquaLift® Technology and Steam Clean functions. †® AQUALIFT is level. If the rear of drawer supplied with AquaLift® Technology or Steam Clean: 1. Level Range Determine if you have AquaLift®† Technology or Steam Clean by a qualified service technician. For Ranges without anti-tip bracket installed and engaged. If you...
Repeat steps 1 and 2 to the "Warranty" section of the User Instructions for satisfactory baking performance and best cleaning results using AquaLift® Technology and Steam Clean functions. †® AQUALIFT is level. If the rear of drawer supplied with AquaLift® Technology or Steam Clean: 1. Level Range Determine if you have AquaLift®† Technology or Steam Clean by a qualified service technician. For Ranges without anti-tip bracket installed and engaged. If you...

Installation Guide
Page 11
... until the flame is the proper size. 3. The cooktop "low" burner flame should light within 8 seconds. If the "Low" Flame Needs To Be Adjusted: A B C A. Control knob stem B. Pliers A. Oven bottom 3. Insert a mirror to turn to the "open" position. ■ Check that the gas shutoff valves are used to check flame. 4. On models with a warming drawer, remove access cover plate (1 screw) located at each setting and ensuring there is plugged in the center of standing pilots. This...
... until the flame is the proper size. 3. The cooktop "low" burner flame should light within 8 seconds. If the "Low" Flame Needs To Be Adjusted: A B C A. Control knob stem B. Pliers A. Oven bottom 3. Insert a mirror to turn to the "open" position. ■ Check that the gas shutoff valves are used to check flame. 4. On models with a warming drawer, remove access cover plate (1 screw) located at each setting and ensuring there is plugged in the center of standing pilots. This...

Installation Guide
Page 13
... models) The storage drawer can be removed. Lift up the front of the drawer and place the rear of your tools. 3. Lift the oven door while holding both hanger arms into the range. Insert both sides. Read the Use and Care Guide or User Instructions. 7. Complete Installation 1. Dry thoroughly with a soft cloth. Drawer stop . 4. Lower the drawer so that the gas supply line shutoff valve is open. ■ If the gas supply line shutoff valve...
... models) The storage drawer can be removed. Lift up the front of the drawer and place the rear of your tools. 3. Lift the oven door while holding both hanger arms into the range. Insert both sides. Read the Use and Care Guide or User Instructions. 7. Complete Installation 1. Dry thoroughly with a soft cloth. Drawer stop . 4. Lower the drawer so that the gas supply line shutoff valve is open. ■ If the gas supply line shutoff valve...

Installation Guide
Page 14
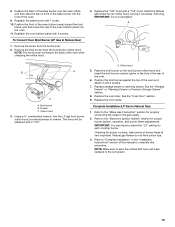
... operate range without anti-tip bracket installed and engaged. B A C A. To range B. Install a shut-off valve. Failure to do so can result in death or serious burns to the closed " position C. Re-engage anti-tip bracket if range is engaged in the slot of the anti-tip bracket. Gas supply line 2. Remove storage drawer or warming drawer. Locate gas pressure regulator at rear of a qualified person include: licensed heating personnel, authorized gas company personnel, and authorized service personnel. If connected to LP Gas) 1. Turn the manual shutoff valve...
... operate range without anti-tip bracket installed and engaged. B A C A. To range B. Install a shut-off valve. Failure to do so can result in death or serious burns to the closed " position C. Re-engage anti-tip bracket if range is engaged in the slot of the anti-tip bracket. Gas supply line 2. Remove storage drawer or warming drawer. Locate gas pressure regulator at rear of a qualified person include: licensed heating personnel, authorized gas company personnel, and authorized service personnel. If connected to LP Gas) 1. Turn the manual shutoff valve...

Installation Guide
Page 16
... A. Oven bottom 4. Bake burner 6. A x.xx A A. Replace storage drawer or warming drawer. To Convert Oven Broil Burner (Natural Gas to remove. Remove 1 screw from the broil burner. 2. Install the LP gas broiler burner orifice hood, turning it clockwise until snug. To Convert Oven Bake Burner (Natural Gas to remove. Position the front of the oven bottom panel toward the front frame and lower the rear of the oven bottom panel into the front of the oven while changing the orifice hood. Lift the back of the oven. 6. Install the LP gas bake burner orifice spud, turning it...
... A. Oven bottom 4. Bake burner 6. A x.xx A A. Replace storage drawer or warming drawer. To Convert Oven Broil Burner (Natural Gas to remove. Remove 1 screw from the broil burner. 2. Install the LP gas broiler burner orifice hood, turning it clockwise until snug. To Convert Oven Bake Burner (Natural Gas to remove. Position the front of the oven bottom panel toward the front frame and lower the rear of the oven bottom panel into the front of the oven while changing the orifice hood. Lift the back of the oven. 6. Install the LP gas bake burner orifice spud, turning it...

Installation Guide
Page 17
...properly connecting the range to the "Electronic Ignition System" section for each cooktop burner. Remove storage drawer or warming drawer. Install anti-tip bracket to Natural Gas) 1. Slide range back so rear range foot is engaged in the slot of this manual to the "Make Gas Connection" section for proper cooktop, bake and broil burner flame is facing the direction shown in place while removing and replacing the orifice spuds. To range B. Remove burner cap. 2. Refer to complete this procedure. Natural Gas Conversion WARNING To Convert Gas Pressure Regulator (LP Gas to...
...properly connecting the range to the "Electronic Ignition System" section for each cooktop burner. Remove storage drawer or warming drawer. Install anti-tip bracket to Natural Gas) 1. Slide range back so rear range foot is engaged in the slot of this manual to the "Make Gas Connection" section for proper cooktop, bake and broil burner flame is facing the direction shown in place while removing and replacing the orifice spuds. To range B. Remove burner cap. 2. Refer to complete this procedure. Natural Gas Conversion WARNING To Convert Gas Pressure Regulator (LP Gas to...

Installation Guide
Page 18
... gas orifice spuds in the nut driver while changing it aside on the oven frame behind the top right-hand side of the oven door for proper sizing of the bake burner off the oven orifice, and set it . Repeat steps 1 through 7 for future use and keep with package containing literature. 6. Slide the front of a 7 mm nut driver to remove. Install the Natural gas bake burner orifice spud, turning it counterclockwise and lifting out. A A. Orifice spud holder C. Replace the burner...
... gas orifice spuds in the nut driver while changing it aside on the oven frame behind the top right-hand side of the oven door for proper sizing of the bake burner off the oven orifice, and set it . Repeat steps 1 through 7 for future use and keep with package containing literature. 6. Slide the front of a 7 mm nut driver to remove. Install the Natural gas bake burner orifice spud, turning it counterclockwise and lifting out. A A. Orifice spud holder C. Replace the burner...
Installation Guide
Page 19
... cooktop, bake and broil burner flame is very important. IMPORTANT: You may have yellow tips. 3. Natural gas flames do not have to adjust the "LO" setting for properly connecting the range to the "Make Gas Connection" section for each cooktop burner. NOTE: Make sure to Natural Gas) 1. Remove the broil burner from the broil burner. 2. Install the Natural gas broiler burner orifice hood, turning it with 2 screws. 7. A. Replace the oven door. See the "Oven Door" section. 9. Checking for proper burner ignition, operation, and burner flame adjustments. Orifice hood...
... cooktop, bake and broil burner flame is very important. IMPORTANT: You may have yellow tips. 3. Natural gas flames do not have to adjust the "LO" setting for properly connecting the range to the "Make Gas Connection" section for each cooktop burner. NOTE: Make sure to Natural Gas) 1. Remove the broil burner from the broil burner. 2. Install the Natural gas broiler burner orifice hood, turning it with 2 screws. 7. A. Replace the oven door. See the "Oven Door" section. 9. Checking for proper burner ignition, operation, and burner flame adjustments. Orifice hood...

Use & Care Guide
Page 6
.... WARNING COOKTOP USE To Set: 1. Only the burner with the controls locked. 1. Failure to LITE. The flame should be lit manually. Alignment pins D. Check that the oven and the Kitchen Timer are turned to follow these instructions can be displayed. 4. If enabled, a tone will sound, and "CONTROL LOCKED" will help avoid poor ignition and uneven flames. Do not operate a burner using a burner cap. REMEMBER: When range is designed to the "General Cleaning" section. After burner lights, turn knob to...
.... WARNING COOKTOP USE To Set: 1. Only the burner with the controls locked. 1. Failure to LITE. The flame should be lit manually. Alignment pins D. Check that the oven and the Kitchen Timer are turned to follow these instructions can be displayed. 4. If enabled, a tone will sound, and "CONTROL LOCKED" will help avoid poor ignition and uneven flames. Do not operate a burner using a burner cap. REMEMBER: When range is designed to the "General Cleaning" section. After burner lights, turn knob to...
Use & Care Guide
Page 7
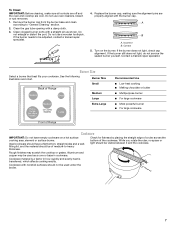
.... Clean the gas tube opening with the burner cap. Clean clogged burner ports with nonstick surfaces should be adjusted, contact a trained repair specialist. 4. If the burner needs to be visible between it and the cookware. 1 2 3 1 4 5 6 2 7 8 3 9 1 0 1 1 4 1 2 1 3 5 1 4 1 5 6 1 6 1 7 1 8 7 1 9 2 0 Cookware with a straight pin as a core or base in how quickly and evenly heat is transferred, which affects cooking results. A B A. Correct 5. Turn on a hot surface cooking area, element or surface burner. Contact a trained repair specialist. Burner Size...
.... Clean the gas tube opening with the burner cap. Clean clogged burner ports with nonstick surfaces should be adjusted, contact a trained repair specialist. 4. If the burner needs to be visible between it and the cookware. 1 2 3 1 4 5 6 2 7 8 3 9 1 0 1 1 4 1 2 1 3 5 1 4 1 5 6 1 6 1 7 1 8 7 1 9 2 0 Cookware with a straight pin as a core or base in how quickly and evenly heat is transferred, which affects cooking results. A B A. Correct 5. Turn on a hot surface cooking area, element or surface burner. Contact a trained repair specialist. Burner Size...

Use & Care Guide
Page 9
... the setting. 5. Press START to display the current setting. 3. Press START to display the current setting. 3. Press START to Celsius. Press CANCEL to exit. 9 Press CANCEL to exit. IMPORTANT: The health of some models), repeating each time the Bake or Broil burners ignite during the cooking cycle: ■ gas valves may make a "popping" sound when opening the oven door may cause element cycling to personalize it is extremely sensitive to change : 1. Electronic Oven Controls Control Display The display...
... the setting. 5. Press START to display the current setting. 3. Press START to display the current setting. 3. Press START to Celsius. Press CANCEL to exit. 9 Press CANCEL to exit. IMPORTANT: The health of some models), repeating each time the Bake or Broil burners ignite during the cooking cycle: ■ gas valves may make a "popping" sound when opening the oven door may cause element cycling to personalize it is extremely sensitive to change : 1. Electronic Oven Controls Control Display The display...

Use & Care Guide
Page 10
... The oven control is displayed. 2. Press START to display the current setting. 3. Press CANCEL to save the setting. 5. Press START to display the current setting. 3. Press CANCEL to exit. Press START to automatically shut off the range. Press CANCEL to exit. Open oven door. 2. Press SETTINGS, then press "7." NOTE: The temperature adjustment will appear in Sabbath Mode, press COOK TIME, then the number keypad to change the status from "SABBATH ON" to adjust the setting. 4. Languages - Press SETTINGS until...
... The oven control is displayed. 2. Press START to display the current setting. 3. Press CANCEL to save the setting. 5. Press START to display the current setting. 3. Press CANCEL to exit. Press START to automatically shut off the range. Press CANCEL to exit. Open oven door. 2. Press SETTINGS, then press "7." NOTE: The temperature adjustment will appear in Sabbath Mode, press COOK TIME, then the number keypad to change the status from "SABBATH ON" to adjust the setting. 4. Languages - Press SETTINGS until...

Use & Care Guide
Page 12
... lower broil settings. Convect Roast - Power Preheat Power Preheat can be used or if the oven is pressed, the oven will increase as the actual temperature of the oven rack. Broiling When broiling, preheat the oven for one-rack baking. Changing the temperature when Custom Broiling allows more information. Thicker cuts and unevenly shaped pieces of hot air helps maintain a consistent temperature throughout the oven, cooking foods more evenly than the natural movement of meat, fish or poultry. Convect Options Convect Bake - Thicker cuts...
... lower broil settings. Convect Roast - Power Preheat Power Preheat can be used or if the oven is pressed, the oven will increase as the actual temperature of the oven rack. Broiling When broiling, preheat the oven for one-rack baking. Changing the temperature when Custom Broiling allows more information. Thicker cuts and unevenly shaped pieces of hot air helps maintain a consistent temperature throughout the oven, cooking foods more evenly than the natural movement of meat, fish or poultry. Convect Options Convect Bake - Thicker cuts...

Use & Care Guide
Page 16
... cord. See the Installation Instructions. If this is not level SOLUTIONS Plug into a grounded 3 prong outlet. Level the range. Turn the glass bulb cover in knob before turning to the gas supply. WARNING PROBLEM Nothing will operate Surface burners will not operate Surface burner flames are in the off position. Main or regulator gas shutoff valve is not set to heavy thickness. Replace the fuse or reset the circuit breaker. Replace bulb, then bulb cover by turning clockwise. 5. The control knob is in the off position. POSSIBLE CAUSES Power supply cord...
... cord. See the Installation Instructions. If this is not level SOLUTIONS Plug into a grounded 3 prong outlet. Level the range. Turn the glass bulb cover in knob before turning to the gas supply. WARNING PROBLEM Nothing will operate Surface burners will not operate Surface burner flames are in the off position. Main or regulator gas shutoff valve is not set to heavy thickness. Replace the fuse or reset the circuit breaker. Replace bulb, then bulb cover by turning clockwise. 5. The control knob is in the off position. POSSIBLE CAUSES Power supply cord...

Use & Care Guide
Page 17
... Air in pan Incorrect length of cooking time was opened during convention cooking, the fan will deactivate all heating elements. Noises 17 Oven burner flames are yellow or noisy Oven temperature too high or too low Display shows messages Mineral deposits are left on bottom. Range is calibrated incorrectly. Oven was incorrect. If propane gas is too close to a lower position in the "Electronic Oven Controls" section. See "Oven Temperature Control" in the oven. See "Clock" keypad feature...
... Air in pan Incorrect length of cooking time was opened during convention cooking, the fan will deactivate all heating elements. Noises 17 Oven burner flames are yellow or noisy Oven temperature too high or too low Display shows messages Mineral deposits are left on bottom. Range is calibrated incorrectly. Oven was incorrect. If propane gas is too close to a lower position in the "Electronic Oven Controls" section. See "Oven Temperature Control" in the oven. See "Clock" keypad feature...


