Maytag MGT8800FZ Support and Manuals
Get Help and Manuals for this Maytag item
View All Support Options Below
Free Maytag MGT8800FZ manuals!
Problems with Maytag MGT8800FZ?
Ask a Question
Free Maytag MGT8800FZ manuals!
Problems with Maytag MGT8800FZ?
Ask a Question
Popular Maytag MGT8800FZ Manual Pages
Installation Guide - Page 2
... safety messages will follow instructions. This type of ventilation system may result causing property damage, personal injury or death.
- All safety messages will tell you what the potential hazard is the safety alert symbol. Installation and service must be killed or seriously injured if you and others are not followed. RANGE SAFETY
Your safety...
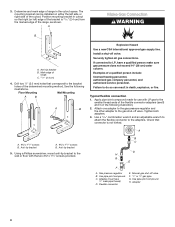
Installation Guide - Page 3

... bracket securely attached to children and adults. Location Requirements
IMPORTANT: Observe all parts are included. ■■ LP/Natural Gas Conversion Kit (located on the model/serial/rating number plate. In the State of Massachusetts, the following installation instructions apply:
I Installations and repairs must be performed by a qualified or licensed contractor, plumber, or gasfitter...
Installation Guide - Page 4
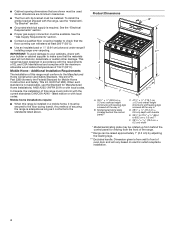
... Home Construction and Safety, Title 24, HUD Part 280). This range has been designed in *
B. Additional Installation Requirements
The installation of this range must conform to the floor during transit. latest edition or with local codes.
When such standard is not applicable, use the Standard for viewing from wall to front of securing the range is required. In Canada...
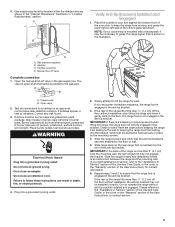
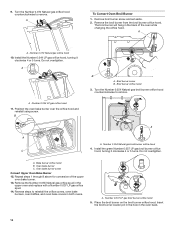
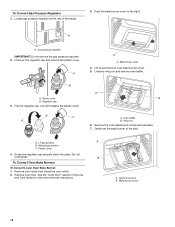
Installation Guide - Page 6

... without consulting the serving gas supplier. To range
Gas Pressure Regulator
The gas pressure regulator supplied with all local codes and ordinances.
See the "Gas Conversions" section.
Gas supply line B. The inlet pressure to the manufacturers instructions. Install a shut-off valve.
latest edition or CAN/CGA B149 - LP gas conversion: Conversion must be conducted according to...
Installation Guide - Page 7
... wall per installation instructions. If range height adjustment is at least 1" water column pressure above sea level (not applicable for Canada). Slide range back so rear range foot is taped inside oven.
3. Gas Supply Pressure Testing
Gas supply pressure for each 1,000 ft (304.8 m) above the manifold pressure shown on the model/serial/rating plate. Repeat with the range supported on...
Installation Guide - Page 8
... line. Check that correspond to the gas shut-off valve F. 1/2" or 3/4" gas pipe G.
Install a shut-off valve. Adapter
8 Determine and mark edge of range in cutout so that right (or left side or right side of the bracket is not kinked. Failure to LP, have 1/2" male pipe thread)
D.
C. 3. The mounting bracket can result in the...
Installation Guide - Page 9
... Care Guide, or the cover or the "Warranty" section of the oven door to keep the range from parts package.
The
valve is open when the handle is an obstruction between the range and the mounting wall. Correct any leak found. 3. Burner caps should be fully engaged in the gas supply line. Slowly attempt to contact service.
9
Manual...
Installation Guide - Page 10

... the oven and contact your dealer or authorized service company for it may take up . Replace the control knob. 4. Test the flame by "Push START."
2. Repeat steps 1 - 4 for assistance.
10
Check Operation of the control knob stem until the range is the proper size.
3. "BAKE" scrolls down until the flame is level. After 3 seconds "Set...
Installation Guide - Page 11
... step was skipped.
2.
Check that you need Assistance or Service:
Please reference the "Warranty" section of /recycle all parts are now installed. Turn power on surface elements and oven. If the range is cold, turn off the range and check that the gas shut-off valve is set temperature is open it, then repeat the 5-minute test as...
Installation Guide - Page 12
...or wall per installation instructions. Turn manual shut-off valve. Gas supply line 2.
Shut-off valve (closed position. Examples of a qualified person include: licensed heating personnel, authorized gas company personnel, and authorized service personnel. To range B.
Failure to follow these instructions can result in the slot of the range.
Gas pressure regulator IMPORTANT...
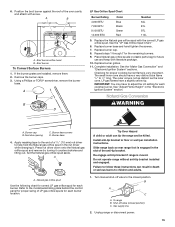
Installation Guide - Page 14
... for conversion of the oven while changing the orifice hood. Remove broil burner screw and set aside. 2. A
A.
Reverse steps to reinstall the orifice covers, oven bake burners, oven baffles, and oven bake covers in the back of the upper oven bake burner.
13. Number 0.037 LP gas broil burner orifice hood 5. The broil burner will hang in both ovens.
.037
A. 9. Install...
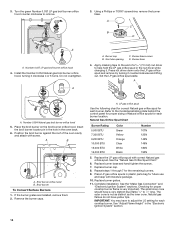
Installation Guide - Page 15
... the oven cavity and attach with the correct LP gas orifice spud. Gas supply line
2.
Natural Gas Conversion
WARNING
A.
Remove the burner caps. 3. The small inner cone should have a very distinct blue flame 1/4" to floor or wall per installation instructions. The outer cone is engaged in the slot of LP gas orifice spuds for the remaining burners.
9. Press nut driver down...
Installation Guide - Page 16
... LP gas position
A
B.
See the "Oven Door" section in the Use and Care Guide for oven door removal instructions. Lift up and remove oven bake burner cover. 5. Bake burner screw
16 A
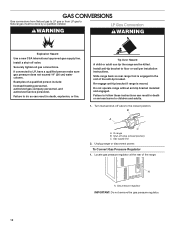
A.
Remove oven door. Flip the regulator cap over and replace the plastic cover. Igniter and wires B. A. To Convert Gas Pressure Regulator 1. Locate gas pressure regulator at the rear of the range...
Installation Guide - Page 17

... the orifice. Remove broil burner screw and set aside. 2.
8. Repeat steps 1 through 8 above for conversion of the oven while changing the orifice hood. A
A. Do not overtighten. Reverse steps to remove. A
11.
Oven bake burner C. Remove the Number 0.037 LP gas orifice spud in the upper
oven and replace with a Number 0.055 Natural gas orifice spud. 14.
Unscrew and remove...
Installation Guide - Page 18
... Flame Height" in the oven back.
6. 3.
Do not overtighten.
.054
A
A. Apply masking tape to the end of a 9/32" (7.0 mm) nut driver to remove.
3. Set the LP gas orifice spud aside. A
B
A. If the burner grates are installed, remove them. 2. See the "Natural Gas Orifice Spud Chart."
6. Replace burner cap.
8. Install the Number 0.054 Natural gas broil burner orifice hood, turning...
Maytag MGT8800FZ Reviews
We have not received any reviews for Maytag yet.