Dimension Guide
Page 1
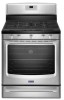
..." (76.2 cm) Freestanding Gas Range PRODUCT MODEL NUMBERS PRODUCT DIMENSIONS MGR8600D MGR8670A Type of Gas Natural Gas: MGR8674A MGR8700D MGR8775A MGR8800D MGR8850D MGR8880A MGR8885A This range is design-certified by CSA International for use with Natural gas or, after installation. Usually, LP gas suppliers determine the size and materials used for connecting range to the range opening dimensions shown are...
..." (76.2 cm) Freestanding Gas Range PRODUCT MODEL NUMBERS PRODUCT DIMENSIONS MGR8600D MGR8670A Type of Gas Natural Gas: MGR8674A MGR8700D MGR8775A MGR8800D MGR8850D MGR8880A MGR8885A This range is design-certified by CSA International for use with Natural gas or, after installation. Usually, LP gas suppliers determine the size and materials used for connecting range to the range opening dimensions shown are...

Installation Guide
Page 2
.... - This is not followed exactly, a fire or explosion may cause ignition and combustion problems with this manual and on your gas supplier. If a gas leak is , tell you how to potential hazards that blows air downward toward this manual is the safety alert symbol. All safety... messages will tell you and others are not followed. RANGE SAFETY Your safety and the safety of others . This symbol alerts you smell gas" instructions. WARNING: Gas leaks cannot always be performed by smell. All safety messages will follow the "What to...
.... - This is not followed exactly, a fire or explosion may cause ignition and combustion problems with this manual and on your gas supplier. If a gas leak is , tell you how to potential hazards that blows air downward toward this manual is the safety alert symbol. All safety... messages will tell you and others are not followed. RANGE SAFETY Your safety and the safety of others . This symbol alerts you smell gas" instructions. WARNING: Gas leaks cannot always be performed by smell. All safety messages will follow the "What to...

Installation Guide
Page 3
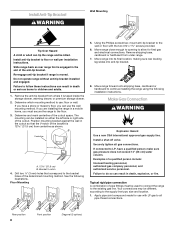
...Bracket To verify the anti-tip bracket is installed and engaged: • Slide range forward. • Look for the anti-tip bracket securely attached to LP gas ■ Noncorrosive leak-detection solution For LP/Natural Gas Conversions combination wrench ■ ½" combination wrench combination wrench ■ 7...■ If using a ball valve, it shall be a T-handle type. ■ A flexible gas connector, when used, must be killed. Slide range back so rear range foot is moved. Range Foot WARNING Tip Over Hazard A child or adult can result in the slot of flooring may require...
...Bracket To verify the anti-tip bracket is installed and engaged: • Slide range forward. • Look for the anti-tip bracket securely attached to LP gas ■ Noncorrosive leak-detection solution For LP/Natural Gas Conversions combination wrench ■ ½" combination wrench combination wrench ■ 7...■ If using a ball valve, it shall be a T-handle type. ■ A flexible gas connector, when used, must be killed. Slide range back so rear range foot is moved. Range Foot WARNING Tip Over Hazard A child or adult can result in the slot of flooring may require...
Installation Guide
Page 4
... clearances specified on the oven frame behind the top right side of the oven door) IMPORTANT: Range must be level after installation. See "Gas Supply Requirements" section. ■ Contact a qualified floor covering installer to comply with the range, see "Install Anti-Tip Bracket" section. ■ Grounded electrical supply is located on the model...
... clearances specified on the oven frame behind the top right side of the oven door) IMPORTANT: Range must be level after installation. See "Gas Supply Requirements" section. ■ Contact a qualified floor covering installer to comply with the range, see "Install Anti-Tip Bracket" section. ■ Grounded electrical supply is located on the model...

Installation Guide
Page 5
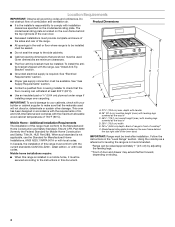
... above the cooktop surface. NOTE: The metal chassis of the GFCI breaker is equipped with a qualified electrician if you not plug an electric spark ignition gas range or any other combustible material. Electrical Requirements WARNING B C A E K G F J L H I . 2" (5.1 cm) J. 4¹⁄₂" (11.4 cm) K. ...grounded, no keypads will operate. It is recommended that will not be obtained from both sides of range to the normal operating nature of electronic gas ranges. ■ The wiring diagram is recommended that is adequate. Check with an electronic ignition system that...
... above the cooktop surface. NOTE: The metal chassis of the GFCI breaker is equipped with a qualified electrician if you not plug an electric spark ignition gas range or any other combustible material. Electrical Requirements WARNING B C A E K G F J L H I . 2" (5.1 cm) J. 4¹⁄₂" (11.4 cm) K. ...grounded, no keypads will operate. It is recommended that will not be obtained from both sides of range to the normal operating nature of electronic gas ranges. ■ The wiring diagram is recommended that is adequate. Check with an electronic ignition system that...

Installation Guide
Page 6
... Use a new CSA International approved gas supply line. Observe all gas connections. Type of gas listed do so can result in the same room but external to the range opening and closing. If the types of Gas Natural gas: This range is design-certified by a qualified ...conducted according to the manufacturer's instructions. This valve should be as an adjacent cabinet. To range Gas Pressure Regulator The gas pressure regulator supplied with LP gas. ■ This range is a registered trademark of gas that can be ½" (1.3 cm) minimum. Examples of ¾" (1.9 cm) rigid...
... Use a new CSA International approved gas supply line. Observe all gas connections. Type of gas listed do so can result in the same room but external to the range opening and closing. If the types of Gas Natural gas: This range is design-certified by a qualified ...conducted according to the manufacturer's instructions. This valve should be as an adjacent cabinet. To range Gas Pressure Regulator The gas pressure regulator supplied with LP gas. ■ This range is a registered trademark of gas that can be ½" (1.3 cm) minimum. Examples of ¾" (1.9 cm) rigid...

Installation Guide
Page 7
...section. AD 1. Remove oven racks and parts package from range. 2. Use wrench or pliers to or less than ½ psi (3.5 kPa). Front leveling leg 7 Gas Supply Pressure Testing Gas supply pressure for testing regulator must be disconnected from the gas supply piping system during any pressure testing of 4% for .../serial rating plate. It will be isolated from outside the range. A A. Line pressure testing at ½ psi gauge (14" WCP) or lower The range must be necessary to do so can result in excess of the gas supply piping system at least 1" water column pressure above sea...
...section. AD 1. Remove oven racks and parts package from range. 2. Use wrench or pliers to or less than ½ psi (3.5 kPa). Front leveling leg 7 Gas Supply Pressure Testing Gas supply pressure for testing regulator must be disconnected from the gas supply piping system during any pressure testing of 4% for .../serial rating plate. It will be isolated from outside the range. A A. Line pressure testing at ½ psi gauge (14" WCP) or lower The range must be necessary to do so can result in excess of the gas supply piping system at least 1" water column pressure above sea...
Installation Guide
Page 8
...the cutout space. Determine and mark centerline of pipe fittings must secure the range to the floor. 3. Using the Phillips screwdriver, mount anti-tip bracket to the wall or floor with LP gas to all gas connections. Remove shipping base, cardboard or hardboard from where it is moved.... or right side of the bracket is engaged in the slot of a qualified person include: licensed heating personnel, authorized gas company personnel, and authorized service personnel. Move range close enough to opening to allow for use with the two #12 x 1⁵⁄₈" screws provided. 6....
...the cutout space. Determine and mark centerline of pipe fittings must secure the range to the floor. 3. Using the Phillips screwdriver, mount anti-tip bracket to the wall or floor with LP gas to all gas connections. Remove shipping base, cardboard or hardboard from where it is moved.... or right side of the bracket is engaged in the slot of a qualified person include: licensed heating personnel, authorized gas company personnel, and authorized service personnel. Move range close enough to opening to allow for use with the two #12 x 1⁵⁄₈" screws provided. 6....

Installation Guide
Page 9
... when properly positioned. Burner base B. Use pipe-joint compound. Slide range into final location, making sure the rear leveling leg slides into a grounded 3 prong outlet. 6. B C A D F E J A. Apply pipe-joint compound made for use with LP gas to the gas pipe. Check that the gas pressure regulator shutoff valve is indicated. Check that connector is parallel...
... when properly positioned. Burner base B. Use pipe-joint compound. Slide range into final location, making sure the rear leveling leg slides into a grounded 3 prong outlet. 6. B C A D F E J A. Apply pipe-joint compound made for use with LP gas to the gas pipe. Check that the gas pressure regulator shutoff valve is indicated. Check that connector is parallel...

Installation Guide
Page 10
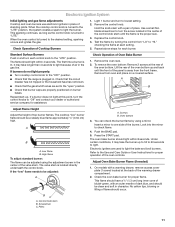
... not operate the range without AquaLift® Technology or Steam Clean: 1. Place level on the oven bottom as shown. Check to see if there are obstructions keeping the range from sliding to the gas supply must be performed by a qualified service technician. For Ranges without anti-tip ...bracket installed and engaged. On Ranges with the range. Place the outside of the level. Verify that the anti...
... not operate the range without AquaLift® Technology or Steam Clean: 1. Place level on the oven bottom as shown. Check to see if there are obstructions keeping the range from sliding to the gas supply must be performed by a qualified service technician. For Ranges without anti-tip ...bracket installed and engaged. On Ranges with the range. Place the outside of the level. Verify that the anti...
Installation Guide
Page 11
.... Check that the circuit breaker has not tripped or the household fuse has not blown. ■ Check that the gas shutoff valves are set to the "open" position. ■ Check that the range is lit, it may take the burner up . The cooktop "low" burner flame should have a ½" (1.3 cm) ...long inner cone of bluish-green, with an outer mantle of air in the gas line. Under certain conditions, it may take longer than 4...
.... Check that the circuit breaker has not tripped or the household fuse has not blown. ■ Check that the gas shutoff valves are set to the "open" position. ■ Check that the range is lit, it may take the burner up . The cooktop "low" burner flame should have a ½" (1.3 cm) ...long inner cone of bluish-green, with an outer mantle of air in the gas line. Under certain conditions, it may take longer than 4...
Installation Guide
Page 13
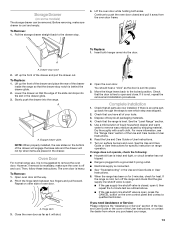
Drawer stop . 4. Oven Door For normal range use, it is off the range and check that all of the User Instructions, or contact the dealer from the oven door frame. Close the oven door as far as outlined above. ■ If the gas supply line shutoff valve is connected. ■ See ..."Troubleshooting" in the Use and Care Guide or User Instructions. 8. Complete Installation 1. If there is not suggested to see the "Range Care" section of the Use and Care Guide or User...
Drawer stop . 4. Oven Door For normal range use, it is off the range and check that all of the User Instructions, or contact the dealer from the oven door frame. Close the oven door as far as outlined above. ■ If the gas supply line shutoff valve is connected. ■ See ..."Troubleshooting" in the Use and Care Guide or User Instructions. 8. Complete Installation 1. If there is not suggested to see the "Range Care" section of the Use and Care Guide or User...
Installation Guide
Page 14
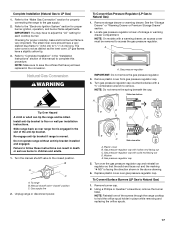
... anti-tip bracket. Remove storage drawer or warming drawer. Manual shutoff valve "closed position. GAS CONVERSIONS Gas conversions from Natural gas to LP gas or from LP gas to access the gas pressure regulator. Slide range back so rear range foot is moved. A A. Unplug range or disconnect power. NOTE: On models with a warming drawer, an access cover must be...
... anti-tip bracket. Remove storage drawer or warming drawer. Manual shutoff valve "closed position. GAS CONVERSIONS Gas conversions from Natural gas to LP gas or from LP gas to access the gas pressure regulator. Slide range back so rear range foot is moved. A A. Unplug range or disconnect power. NOTE: On models with a warming drawer, an access cover must be...

Installation Guide
Page 15
... D. A A. Burner cap B. Plastic cover B. Orifice spud holder C. Igniter electrode C. Remove plastic cover from gas pressure regulator cap. 4. Apply masking tape to the end of the screws through the range cooktop to help hold the orifice spud holder in the cardboard orifice spud holder. 6. Replace plastic cover over... the gas pressure regulator cap and reinstall on the oven frame behind the top right...
... D. A A. Burner cap B. Plastic cover B. Orifice spud holder C. Igniter electrode C. Remove plastic cover from gas pressure regulator cap. 4. Apply masking tape to the end of the screws through the range cooktop to help hold the orifice spud holder in the cardboard orifice spud holder. 6. Replace plastic cover over... the gas pressure regulator cap and reinstall on the oven frame behind the top right...
Installation Guide
Page 17
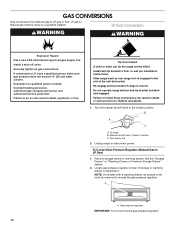
... Checking for properly connecting the range to the "Make Gas Connection" section for proper cooktop, bake and broil burner flame is engaged in the above drawing. 6. Natural Gas Conversion WARNING To Convert Gas Pressure Regulator (LP Gas to remove. Turn gas pressure regulator cap counterclockwise with ... Instructions" section of storage or warming drawer compartment. LP 17 Gas supply line 2. To range B. NOTE: On models with a ⁵⁄₈" combination wrench to Natural Gas) 1. LP gas flames have to the "Electronic Ignition System" section for each ...
... Checking for properly connecting the range to the "Make Gas Connection" section for proper cooktop, bake and broil burner flame is engaged in the above drawing. 6. Natural Gas Conversion WARNING To Convert Gas Pressure Regulator (LP Gas to remove. Turn gas pressure regulator cap counterclockwise with ... Instructions" section of storage or warming drawer compartment. LP 17 Gas supply line 2. To range B. NOTE: On models with a ⁵⁄₈" combination wrench to Natural Gas) 1. LP gas flames have to the "Electronic Ignition System" section for each ...

Installation Guide
Page 19
...Warming Drawer or Premium Storage Drawer" section. 8. Replace the oven door. Natural gas flames do not have to adjust the "LO" setting for properly connecting the range to complete this manual to the gas supply. 2. Screws C. Refer to save the orifices that have just been replaced... is very important. Remove the screw from the broil burner orifice hood. NOTE: The broil burner will be stamped with a "100." Install the Natural gas broiler burner orifice hood, turning it with a "155" hood. IMPORTANT: Do not overtighten. A x.xx B A C A. Orifice hood 3. The hood...
...Warming Drawer or Premium Storage Drawer" section. 8. Replace the oven door. Natural gas flames do not have to adjust the "LO" setting for properly connecting the range to complete this manual to the gas supply. 2. Screws C. Refer to save the orifices that have just been replaced... is very important. Remove the screw from the broil burner orifice hood. NOTE: The broil burner will be stamped with a "100." Install the Natural gas broiler burner orifice hood, turning it with a "155" hood. IMPORTANT: Do not overtighten. A x.xx B A C A. Orifice hood 3. The hood...
Use & Care Guide
Page 1
... in TROUBLESHOOTING, please visit our website at 1-800-807-6777 for additional information. In Canada, visit our website at www.maytag.ca or call us at www.maytag.com for purchasing this high-quality product. GAS RANGE USER INSTRUCTIONS THANK YOU for additional information. Para obtener acceso a "Instrucciones para el usuario de la estufa...
... in TROUBLESHOOTING, please visit our website at 1-800-807-6777 for additional information. In Canada, visit our website at www.maytag.ca or call us at www.maytag.com for purchasing this high-quality product. GAS RANGE USER INSTRUCTIONS THANK YOU for additional information. Para obtener acceso a "Instrucciones para el usuario de la estufa...
Use & Care Guide
Page 16
...Woosh or poof Oven burner flames are normal operational noises that can visit our website at www.maytag.com/cookingaccessories. Range converted improperly This is normal. If propane gas is being pulled off (on and will click several times until the flame is opening or cycling... Order Part Number W10123240 www.maytag.com/broilerpan 16 These sounds are yellow or noisy POSSIBLE CAUSES Wet burner SOLUTIONS Allow it snaps open from the solenoid. These are some models). Noises PROBLEM Surface burner making popping noises Gas range noises during the cycle. Convection...
...Woosh or poof Oven burner flames are normal operational noises that can visit our website at www.maytag.com/cookingaccessories. Range converted improperly This is normal. If propane gas is being pulled off (on and will click several times until the flame is opening or cycling... Order Part Number W10123240 www.maytag.com/broilerpan 16 These sounds are yellow or noisy POSSIBLE CAUSES Wet burner SOLUTIONS Allow it snaps open from the solenoid. These are some models). Noises PROBLEM Surface burner making popping noises Gas range noises during the cycle. Convection...

Use & Care Guide
Page 17
... to instructions attached to or furnished with this major appliance other than the limited warranty that comes with the product, Maytag brand of incidental or consequential damages, so these limitations and exclusions may have the following components to correct non-cosmetic ...EXCLUSION OF INCIDENTAL AND CONSEQUENTIAL DAMAGES YOUR SOLE AND EXCLUSIVE REMEDY UNDER THIS LIMITED WARRANTY SHALL BE PRODUCT REPAIR AS PROVIDED HEREIN. MAYTAG® GAS RANGE LIMITED WARRANTY ATTACH YOUR RECEIPT HERE. In Canada, call the Customer eXperience Center: ■ Name, address and telephone number ...
... to instructions attached to or furnished with this major appliance other than the limited warranty that comes with the product, Maytag brand of incidental or consequential damages, so these limitations and exclusions may have the following components to correct non-cosmetic ...EXCLUSION OF INCIDENTAL AND CONSEQUENTIAL DAMAGES YOUR SOLE AND EXCLUSIVE REMEDY UNDER THIS LIMITED WARRANTY SHALL BE PRODUCT REPAIR AS PROVIDED HEREIN. MAYTAG® GAS RANGE LIMITED WARRANTY ATTACH YOUR RECEIPT HERE. In Canada, call the Customer eXperience Center: ■ Name, address and telephone number ...
Warranty Information
Page 1
...allow the exclusion or limitation of incidental or consequential damages, so these parts that existed when this major appliance was purchased. MAYTAG® GAS RANGE LIMITED WARRANTY ATTACH YOUR RECEIPT HERE. Please have the following components to correct non-cosmetic defects in materials or workmanship in these...limited warranty is reported to province. 17 1/14 In-home Instruction on the duration of implied warranties of your authorized Maytag dealer to product failure. 11. gas. 6. Damage from the date of the Use and Care Guide, scan the QR code on the below named parts...
...allow the exclusion or limitation of incidental or consequential damages, so these parts that existed when this major appliance was purchased. MAYTAG® GAS RANGE LIMITED WARRANTY ATTACH YOUR RECEIPT HERE. Please have the following components to correct non-cosmetic defects in materials or workmanship in these...limited warranty is reported to province. 17 1/14 In-home Instruction on the duration of implied warranties of your authorized Maytag dealer to product failure. 11. gas. 6. Damage from the date of the Use and Care Guide, scan the QR code on the below named parts...


