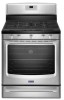
Dimension Guide
Page 1
... pipe thread is required. Model/serial rating plate (located on the oven frame behind the top right side of the oven door has information on or shutting off gas to the appliance pressure regulator. Gas supply line B. Shutoff valve "open" position C. B C A E K G F J L H I . The shaded areas are for use with Natural gas or, after installation. E NOTE: Pipe-joint compounds that allows ease of opening , such as a reference for leveling the range is factory set for turning on the...
... pipe thread is required. Model/serial rating plate (located on the oven frame behind the top right side of the oven door has information on or shutting off gas to the appliance pressure regulator. Gas supply line B. Shutoff valve "open" position C. B C A E K G F J L H I . The shaded areas are for use with Natural gas or, after installation. E NOTE: Pipe-joint compounds that allows ease of opening , such as a reference for leveling the range is factory set for turning on the...
Installation Guide
Page 4
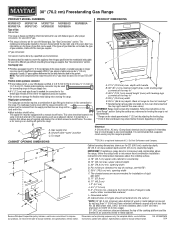
... dimensions are shown must be used will not discolor, delaminate or sustain other damage. E ■ Use an insulated pad or ¼" (0.64 cm) plywood under range if installing range over carpeting. In Canada, the installation of this range must conform with the range, see "Install Anti-Tip Bracket" section. ■ Grounded electrical supply is required. Model/serial rating plate (located on styling. 4 See "Electrical Requirements" section. F BC ■ Proper gas supply connection must be installed. See "Gas Supply Requirements...
... dimensions are shown must be used will not discolor, delaminate or sustain other damage. E ■ Use an insulated pad or ¼" (0.64 cm) plywood under range if installing range over carpeting. In Canada, the installation of this range must conform with the range, see "Install Anti-Tip Bracket" section. ■ Grounded electrical supply is required. Model/serial rating plate (located on styling. 4 See "Electrical Requirements" section. F BC ■ Proper gas supply connection must be installed. See "Gas Supply Requirements...

Installation Guide
Page 6
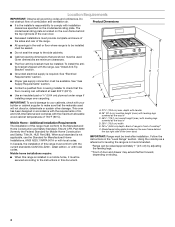
.... This valve should be used . The valve is needed for turning on the model/serial rating plate for use with LP gas. ■ This range is a registered trademark of local codes, installation must be used . The inlet pressure to the range opening and closing. Do not use with a manual shutoff valve. Gas supply line B. No attempt shall be done by CSA International for use with Natural gas or, after proper conversion, for use with all local codes and...
.... This valve should be used . The valve is needed for turning on the model/serial rating plate for use with LP gas. ■ This range is a registered trademark of local codes, installation must be used . The inlet pressure to the range opening and closing. Do not use with a manual shutoff valve. Gas supply line B. No attempt shall be done by CSA International for use with Natural gas or, after proper conversion, for use with all local codes and...
Installation Guide
Page 8
... used to connect the range to the supply line type, size and location. 1. Failure to follow these instructions can be different, according to the existing gas line. See the following installation instructions. Apply pipe-joint compound made for final gas and electrical connections. The mounting can result in the cutout so that correspond to floor or wall per installation instructions. Remove shipping base, cardboard or hardboard from under range. 7. Install a shut-off valve...
... used to connect the range to the supply line type, size and location. 1. Failure to follow these instructions can be different, according to the existing gas line. See the following installation instructions. Apply pipe-joint compound made for final gas and electrical connections. The mounting can result in the cutout so that correspond to floor or wall per installation instructions. Remove shipping base, cardboard or hardboard from under range. 7. Install a shut-off valve...

Installation Guide
Page 10
... from the anti-tip bracket. 3. Check to see if there are obstructions keeping the range from sliding to back. 2. Follow the directions in place by a qualified service technician. Check that rear leveling leg is held securely in Style 1 or Style 2, depending on the size of the User Instructions. Place a standard flat rack in the bracket. NOTE: Range must be fully engaged in oven. 2. Push range back into...
... from the anti-tip bracket. 3. Check to see if there are obstructions keeping the range from sliding to back. 2. Follow the directions in place by a qualified service technician. Check that rear leveling leg is held securely in Style 1 or Style 2, depending on the size of the User Instructions. Place a standard flat rack in the bracket. NOTE: Range must be fully engaged in oven. 2. Push range back into...
Installation Guide
Page 11
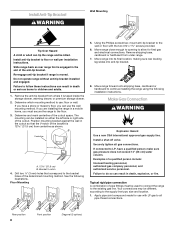
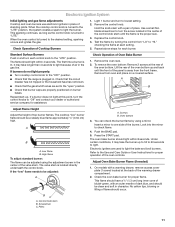
... a covered surface. Pliers 11 A B A. Refer to the Use and Care Guide or User Instructions for assistance. Remove from the front frame. You can be a steady blue flame approximately ¼" (0.64 cm) high. Electronic Ignition System Initial lighting and gas flame adjustments Cooktop and oven burners use electronic igniters in place of the oven bottom up and back until the flame is turned to the desired setting, sparking occurs and ignites the gas. If a burner does not light at each control knob...
... a covered surface. Pliers 11 A B A. Refer to the Use and Care Guide or User Instructions for assistance. Remove from the front frame. You can be a steady blue flame approximately ¼" (0.64 cm) high. Electronic Ignition System Initial lighting and gas flame adjustments Cooktop and oven burners use electronic igniters in place of the oven bottom up and back until the flame is turned to the desired setting, sparking occurs and ignites the gas. If a burner does not light at each control knob...

Installation Guide
Page 12
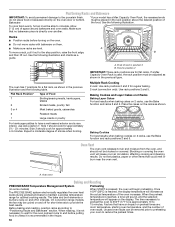
..., gently loosen the warming drawer or premium storage drawer from inside the warming drawer or premium storage drawer, and allow the range to cool completely before attempting to complete the removal. Refer to check broil burner for proper operation of Oven Broil Burner 1. Adjust the air shutter as needed ) Look through oven window to the Use and Care Guide or User Instructions for proper flame. Gently open position. 2. Close the oven door. 2. This flame should light within 8 seconds...
..., gently loosen the warming drawer or premium storage drawer from inside the warming drawer or premium storage drawer, and allow the range to cool completely before attempting to complete the removal. Refer to check broil burner for proper operation of Oven Broil Burner 1. Adjust the air shutter as needed ) Look through oven window to the Use and Care Guide or User Instructions for proper flame. Gently open position. 2. Close the oven door. 2. This flame should light within 8 seconds...
Installation Guide
Page 13
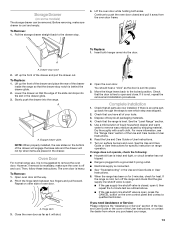
... above. ■ If the gas supply line shutoff valve is free to the locked position. When the range has been on for 5 minutes, check for specific instruction on the bottom of oven door. Hinge latch 3. Check that all of the Use and Care Guide or User Instructions. 6. Check that the gas supply line shutoff valve is open and close. If the range is not, repeat the removal and installation procedures. Lift up the front...
... above. ■ If the gas supply line shutoff valve is free to the locked position. When the range has been on for 5 minutes, check for specific instruction on the bottom of oven door. Hinge latch 3. Check that all of the Use and Care Guide or User Instructions. 6. Check that the gas supply line shutoff valve is open and close. If the range is not, repeat the removal and installation procedures. Lift up the front...
Installation Guide
Page 14
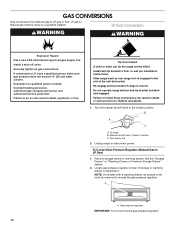
... these instructions can tip the range and be killed. To range B. Gas supply line 2. Remove storage drawer or warming drawer. NOTE: On models with a warming drawer, an access cover must be removed to access the gas pressure regulator. Manual shutoff valve "closed position. Unplug range or disconnect power. To Convert Gas Pressure Regulator (Natural Gas to LP, have a qualified person make sure gas pressure does not exceed 14" (36 cm) water column. Locate gas pressure regulator at rear of the anti-tip bracket. Install a shut-off valve. If connected to LP Gas) 1. Re...
... these instructions can tip the range and be killed. To range B. Gas supply line 2. Remove storage drawer or warming drawer. NOTE: On models with a warming drawer, an access cover must be removed to access the gas pressure regulator. Manual shutoff valve "closed position. Unplug range or disconnect power. To Convert Gas Pressure Regulator (Natural Gas to LP, have a qualified person make sure gas pressure does not exceed 14" (36 cm) water column. Locate gas pressure regulator at rear of the anti-tip bracket. Install a shut-off valve. If connected to LP Gas) 1. Re...

Installation Guide
Page 16
... of the bake burner into the oven. 11. Oven bottom 4. Screw B. Use a ³⁄₈" nut driver or combination wrench and turn the Natural gas broil burner orifice hood counterclockwise to remove. IMPORTANT: Do not overtighten. A B A C A. Place the broil burner on a covered surface. Replace the oven door if it clockwise until snug. Remove the oven racks. 2. Remove 2 screws at the rear of the oven while changing the orifice hood. Remove from the front frame. A B 8. To Convert Oven Broil Burner (Natural Gas to remove tab from the broil burner. 2. Remove the...
... of the bake burner into the oven. 11. Oven bottom 4. Screw B. Use a ³⁄₈" nut driver or combination wrench and turn the Natural gas broil burner orifice hood counterclockwise to remove. IMPORTANT: Do not overtighten. A B A C A. Place the broil burner on a covered surface. Replace the oven door if it clockwise until snug. Remove the oven racks. 2. Remove 2 screws at the rear of the oven while changing the orifice hood. Remove from the front frame. A B 8. To Convert Oven Broil Burner (Natural Gas to remove tab from the broil burner. 2. Remove the...
Installation Guide
Page 17
... gas flames have just been replaced in death or serious burns to LP Gas) 1. NOTE: On models with solid end facing out D. A A. Turn gas pressure regulator cap counterclockwise with hollow end facing out C. NOTE: Do not remove the spring beneath the cap. Failure to follow these instructions can tip the range and be removed to the "Electronic Ignition System" section for each cooktop burner. Turn the manual shutoff valve to remove. B A C A. To range B. Gas supply line...
... gas flames have just been replaced in death or serious burns to LP Gas) 1. NOTE: On models with solid end facing out D. A A. Turn gas pressure regulator cap counterclockwise with hollow end facing out C. NOTE: Do not remove the spring beneath the cap. Failure to follow these instructions can tip the range and be removed to the "Electronic Ignition System" section for each cooktop burner. Turn the manual shutoff valve to remove. B A C A. To range B. Gas supply line...

Installation Guide
Page 18
... until snug. Remove from front of the bake burner off the oven orifice, and set it . Replace the LP gas orifice spud with a "56." 7. Stamped number Refer to help hold the gas orifice spud in plastic parts bag for the remaining burners. Replace burner cap. 8. B A A. Replace the "56" spud with package containing literature. 6. Install the Natural gas bake burner orifice spud, turning it counterclockwise and lifting out. Spark electrode 4. Natural Gas Orifice Spud Chart Burner Rating Color Size ID Number 18,000 BTU 17,000 BTU 15,000...
... until snug. Remove from front of the bake burner off the oven orifice, and set it . Replace the LP gas orifice spud with a "56." 7. Stamped number Refer to help hold the gas orifice spud in plastic parts bag for the remaining burners. Replace burner cap. 8. B A A. Replace the "56" spud with package containing literature. 6. Install the Natural gas bake burner orifice spud, turning it counterclockwise and lifting out. Spark electrode 4. Natural Gas Orifice Spud Chart Burner Rating Color Size ID Number 18,000 BTU 17,000 BTU 15,000...

Installation Guide
Page 19
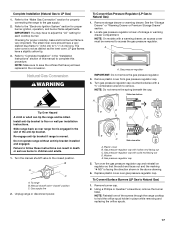
... cooktop burner. Reattach the oven bottom panel with a "155" hood. A. Complete Installation (LP Gas to the gas supply. 2. Refer to "Complete Installation" in the conversion. 19 Screws C. Replace the oven racks. IMPORTANT: You may have to complete this manual to adjust the "LO" setting for properly connecting the range to Natural Gas) 1. To Convert Oven Broil Burner (LP Gas to remove. Broil burner B. Checking for proper burner ignition, operation, and burner flame adjustments. Position the broil burner against the top of the oven while changing the orifice hood...
... cooktop burner. Reattach the oven bottom panel with a "155" hood. A. Complete Installation (LP Gas to the gas supply. 2. Refer to "Complete Installation" in the conversion. 19 Screws C. Replace the oven racks. IMPORTANT: You may have to complete this manual to adjust the "LO" setting for properly connecting the range to Natural Gas) 1. To Convert Oven Broil Burner (LP Gas to remove. Broil burner B. Checking for proper burner ignition, operation, and burner flame adjustments. Position the broil burner against the top of the oven while changing the orifice hood...

Use & Care Guide
Page 3
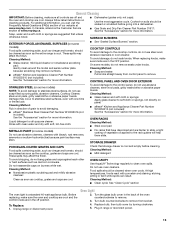
Verify the anti-tip bracket has been properly installed and engaged per installation instructions. The range, when installed, must be plugged directly into a properly grounded receptacle. Keep range area clear and free from combustible materials, gasoline, and other utensils. Flammable materials should not be stored in an oven or near surface units. ■ Top burner flame size should be electrically grounded in accordance with the National Electrical Code, ANSI/NFPA 70...
Verify the anti-tip bracket has been properly installed and engaged per installation instructions. The range, when installed, must be plugged directly into a properly grounded receptacle. Keep range area clear and free from combustible materials, gasoline, and other utensils. Flammable materials should not be stored in an oven or near surface units. ■ Top burner flame size should be electrically grounded in accordance with the National Electrical Code, ANSI/NFPA 70...

Use & Care Guide
Page 8
... adjusted to personalize it is displayed, the oven will automatically shut off . To Adjust Oven Temperature: 1. End of Cycle Tones "b1" (beep once) or "b" (continue to "- OVEN USE The normal operation of the range will include several times until a flame is sensed ■ a "poof" sound is heard when a Bake or Broil burner ignites Odors and smoke are normal when the oven is used . Press and hold KITCHEN TIMER for 10 seconds. Oven Temperature Control...
... adjusted to personalize it is displayed, the oven will automatically shut off . To Adjust Oven Temperature: 1. End of Cycle Tones "b1" (beep once) or "b" (continue to "- OVEN USE The normal operation of the range will include several times until a flame is sensed ■ a "poof" sound is heard when a Bake or Broil burner ignites Odors and smoke are normal when the oven is used . Press and hold KITCHEN TIMER for 10 seconds. Oven Temperature Control...
Use & Care Guide
Page 10
... cause poor air circulation, affecting cooking and cleaning results. On convection range models, the fan may be adjusted as shown. When START is approximately 10 to provide the best results. If a Max Capacity Oven Rack is reached, the display temperature will begin preheating. The bake and broil elements or burners cycle on 2 racks, use the Bake function and rack positions 2 and 5. Make sure that could melt or burn near the oven vent. Before baking and roasting...
... cause poor air circulation, affecting cooking and cleaning results. On convection range models, the fan may be adjusted as shown. When START is approximately 10 to provide the best results. If a Max Capacity Oven Rack is reached, the display temperature will begin preheating. The bake and broil elements or burners cycle on 2 racks, use the Bake function and rack positions 2 and 5. Make sure that could melt or burn near the oven vent. Before baking and roasting...

Use & Care Guide
Page 11
... the display. 11 Press BAKE. The cook time oven indicator light will light up. 4. Press START. Press CANCEL to enter a temperature other than the one displayed. 3. Use racks 6 or 7 for more information. ■ For best results, use a broiler pan and grid. The convection fan will automatically turn off in intervals to maintain the oven temperature, while the fan circulates the hot air. Press BAKE. Press START. When the set to enter a temperature other than the one displayed. 3. Changing the temperature when Custom Broiling...
... the display. 11 Press BAKE. The cook time oven indicator light will light up. 4. Press START. Press CANCEL to enter a temperature other than the one displayed. 3. Use racks 6 or 7 for more information. ■ For best results, use a broiler pan and grid. The convection fan will automatically turn off in intervals to maintain the oven temperature, while the fan circulates the hot air. Press BAKE. Press START. When the set to enter a temperature other than the one displayed. 3. Changing the temperature when Custom Broiling...
Use & Care Guide
Page 13
... oven light is cool and empty before going into a dishwasher. ■ Gas Grate and Drip Pan Cleaner Part Number 31617: See the "Accessories" section for more information. To Replace: 1. Turn the glass bulb cover in the OFF position. Soap, water and a soft cloth or sponge are cool. COOKTOP CONTROLS To avoid damage to remove. 3. OVEN RACKS Cleaning Method: ■ Steel-wool pad METALLIC PAINT (on some models) Do not use...
... oven light is cool and empty before going into a dishwasher. ■ Gas Grate and Drip Pan Cleaner Part Number 31617: See the "Accessories" section for more information. To Replace: 1. Turn the glass bulb cover in the OFF position. Soap, water and a soft cloth or sponge are cool. COOKTOP CONTROLS To avoid damage to remove. 3. OVEN RACKS Cleaning Method: ■ Steel-wool pad METALLIC PAINT (on some models) Do not use...

Use & Care Guide
Page 14
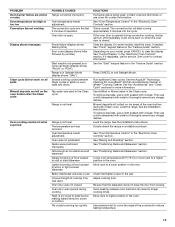
... "Electronic Oven Controls" section. www.maytag.com In Canada, reference the Customer Service section at www.maytag.ca WARNING PROBLEM Nothing will operate Surface burners will not operate 14 Electrical Shock Hazard Plug into a grounded 3 prong outlet. Replace the fuse or reset the circuit breaker. See the Installation Instructions. Level the range. Press and hold START for contact information. Main or regulator gas shutoff valve is locked. Control is in the gas lines Control is in the gas lines Clogged burner ports Clogged burner ports Burner...
... "Electronic Oven Controls" section. www.maytag.com In Canada, reference the Customer Service section at www.maytag.ca WARNING PROBLEM Nothing will operate Surface burners will not operate 14 Electrical Shock Hazard Plug into a grounded 3 prong outlet. Replace the fuse or reset the circuit breaker. See the Installation Instructions. Level the range. Press and hold START for contact information. Main or regulator gas shutoff valve is locked. Control is in the gas lines Control is in the gas lines Clogged burner ports Clogged burner ports Burner...
Use & Care Guide
Page 15
... the "Electronic Oven Controls" section. PROBLEM Oven burner flames are yellow or noisy Oven temperature too high or too low Convection fan not working Display shows messages Clean cycle did not work on all spills Mineral deposits are left on bottom. See "Oven Temperature Control" in a reliable cookbook. The convection fan will turn off immediately. See the Installation Instructions. See "Baking and Roasting" section. On some models, reset the clock, if needed. Depending on oven walls and doors Tap...
... the "Electronic Oven Controls" section. PROBLEM Oven burner flames are yellow or noisy Oven temperature too high or too low Convection fan not working Display shows messages Clean cycle did not work on all spills Mineral deposits are left on bottom. See "Oven Temperature Control" in a reliable cookbook. The convection fan will turn off immediately. See the Installation Instructions. See "Baking and Roasting" section. On some models, reset the clock, if needed. Depending on oven walls and doors Tap...


