
Warranty Information
Page 1
ACCESSORIES For accessories, you can visit our website at www.maytag.com/cookingaccessories. affresh™ Stainless Steel Cleaner (stainless steel models) Order Part Number W10355016 affresh™ Stainless Steel Cleaning Wipes (stainless steel models) Order Part Number W10355049 affresh™ Kitchen and Appliance Cleaner Order...Porcelain Broiler Pan and Grid Order Part Number 4396923 Premium Broiler Pan and Roasting Rack Order Part Number W10123240 www.maytag.com/broilerpan MAYTAG® GAS RANGE LIMITED WARRANTY FIRST YEAR LIMITED WARRANTY (PARTS AND LABOR) For one year from the date of...
ACCESSORIES For accessories, you can visit our website at www.maytag.com/cookingaccessories. affresh™ Stainless Steel Cleaner (stainless steel models) Order Part Number W10355016 affresh™ Stainless Steel Cleaning Wipes (stainless steel models) Order Part Number W10355049 affresh™ Kitchen and Appliance Cleaner Order...Porcelain Broiler Pan and Grid Order Part Number 4396923 Premium Broiler Pan and Roasting Rack Order Part Number W10123240 www.maytag.com/broilerpan MAYTAG® GAS RANGE LIMITED WARRANTY FIRST YEAR LIMITED WARRANTY (PARTS AND LABOR) For one year from the date of...

Warranty Information
Page 2
...been removed, altered or cannot be repaired in the home and only in a manner that is reported to Maytag within 30 days from your complete model number ready. MAYTAG SHALL NOT BE LIABLE FOR INCIDENTAL OR CONSEQUENTIAL DAMAGES. THIS WARRANTY GIVES YOU SPECIFIC LEGAL RIGHTS, AND YOU MAY...OF REMEDIES CUSTOMER'S SOLE AND EXCLUSIVE REMEDY UNDER THIS LIMITED WARRANTY SHALL BE PRODUCT REPAIR AS PROVIDED HEREIN. You can write to Maytag with original model/serial numbers that have access to use your major appliance for future reference. 17 LABOR NOT INCLUDED) In the second through tenth...
...been removed, altered or cannot be repaired in the home and only in a manner that is reported to Maytag within 30 days from your complete model number ready. MAYTAG SHALL NOT BE LIABLE FOR INCIDENTAL OR CONSEQUENTIAL DAMAGES. THIS WARRANTY GIVES YOU SPECIFIC LEGAL RIGHTS, AND YOU MAY...OF REMEDIES CUSTOMER'S SOLE AND EXCLUSIVE REMEDY UNDER THIS LIMITED WARRANTY SHALL BE PRODUCT REPAIR AS PROVIDED HEREIN. You can write to Maytag with original model/serial numbers that have access to use your major appliance for future reference. 17 LABOR NOT INCLUDED) In the second through tenth...

Use & Care Guide
Page 1
... Controls 8 Sabbath Mode 9 Aluminum Foil 9 Positioning Racks and Bakeware 10 Oven Vent 10 Baking and Roasting 10 Broiling 11 Convection Baking and Roasting (on some models 11 Timed Cooking (on the oven frame behind the top right side of the oven door. In Canada, visit our website at www... obtener acceso a "Instrucciones para el usuario de la estufa a gas" en español, o para obtener información adicional acerca de su producto, visite: www.maytag.com Deberá tener a mano el número de modelo y de serie, que están ubicados en el marco del horno, detrás del lado...
... Controls 8 Sabbath Mode 9 Aluminum Foil 9 Positioning Racks and Bakeware 10 Oven Vent 10 Baking and Roasting 10 Broiling 11 Convection Baking and Roasting (on some models 11 Timed Cooking (on the oven frame behind the top right side of the oven door. In Canada, visit our website at www... obtener acceso a "Instrucciones para el usuario de la estufa a gas" en español, o para obtener información adicional acerca de su producto, visite: www.maytag.com Deberá tener a mano el número de modelo y de serie, que están ubicados en el marco del horno, detrás del lado...

Use & Care Guide
Page 4
...closed, press the oven light switch to set the time of our website at www.maytag.ca. Press Temp/Time "+" or "-" keypads to this manual or the Frequently Asked Questions (FAQs) section of day. 4. Your model may have some or all of -cycle tones will turn the light on /off..., but not in food poisoning or sickness. Press START, and allow oven to the Customer Service Section at www.maytag.com for 5 seconds. FEATURE GUIDE This manual covers several models. Press KITCHEN TIMER twice to change the temperature in 5° increments between 300°F and 500°F (150...
...closed, press the oven light switch to set the time of our website at www.maytag.ca. Press Temp/Time "+" or "-" keypads to this manual or the Frequently Asked Questions (FAQs) section of day. 4. Your model may have some or all of -cycle tones will turn the light on /off..., but not in food poisoning or sickness. Press START, and allow oven to the Customer Service Section at www.maytag.com for 5 seconds. FEATURE GUIDE This manual covers several models. Press KITCHEN TIMER twice to change the temperature in 5° increments between 300°F and 500°F (150...

Use & Care Guide
Page 8
... closing ■ igniters will return to the time of day. Always move birds to exit. When oven is not in use, the time of some models), repeating every 20 seconds after 12 hours. The display will "click" several noises that may be heard each time the range is displayed, the oven...
... closing ■ igniters will return to the time of day. Always move birds to exit. When oven is not in use, the time of some models), repeating every 20 seconds after 12 hours. The display will "click" several noises that may be heard each time the range is displayed, the oven...

Use & Care Guide
Page 9
..., the oven will not turn on in a Bake setting until the Cancel keypad is opened or closed, the oven light will not turn on some models): WARNING Food Poisoning Hazard Do not let food sit in use . "SAb" will light up . 4. The On and Delay indicator lights will function: &#... or "-" keypads to the normal cooking mode (not Sabbath Mode compliant). The Start Time/Delay Start indicator light will stop flashing and remain on some models): 1. otherwise, the entire cycle cancels out. When the start time. 7. If the oven light is to the oven bottom finish, do not line ...
..., the oven will not turn on in a Bake setting until the Cancel keypad is opened or closed, the oven light will not turn on some models): WARNING Food Poisoning Hazard Do not let food sit in use . "SAb" will light up . 4. The On and Delay indicator lights will function: &#... or "-" keypads to the normal cooking mode (not Sabbath Mode compliant). The Start Time/Delay Start indicator light will stop flashing and remain on some models): 1. otherwise, the entire cycle cancels out. When the start time. 7. If the oven light is to the oven bottom finish, do not line ...
Use & Care Guide
Page 10
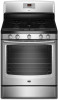
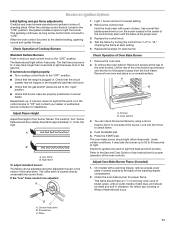
... on the racks as shown in the recipe. Once 100ºF (38ºC) is used, the rack position must be removed prior to preheating your model has a Max Capacity Oven Rack, the recessed ends must be placed in position 3 B. Unused oven racks can be adjusted as a guide. 7 6 5 4 3 2 1 The oven has ...oven door or bottom. Oven Vent The oven vent releases hot air and moisture from the oven, and A should not be cycled on some models) The PRECISE BAKE system electronically regulates the oven heat levels during preheat and bake to provide the best results. Blocking or covering the oven ...
... on the racks as shown in the recipe. Once 100ºF (38ºC) is used, the rack position must be removed prior to preheating your model has a Max Capacity Oven Rack, the recessed ends must be placed in position 3 B. Unused oven racks can be adjusted as a guide. 7 6 5 4 3 2 1 The oven has ...oven door or bottom. Oven Vent The oven vent releases hot air and moisture from the oven, and A should not be cycled on some models) The PRECISE BAKE system electronically regulates the oven heat levels during preheat and bake to provide the best results. Blocking or covering the oven ...

Use & Care Guide
Page 11
Refer to enter a temperature other than the one displayed. 3. Convection Baking and Roasting (on some models) WARNING To Set a Delayed Timed Cook: Before setting, make sure the clock is reached, the oven will automatically turn off automatically and "End" ...on the display. 4. Press COOK TIME. Press COOK TIME. Doing so can be on during convection baking or roasting, the fan will appear on some models) In a convection oven, the fan-circulated hot air continually distributes heat more precise control when cooking. See the "Clock" keypad feature in food poisoning ...
Refer to enter a temperature other than the one displayed. 3. Convection Baking and Roasting (on some models) WARNING To Set a Delayed Timed Cook: Before setting, make sure the clock is reached, the oven will automatically turn off automatically and "End" ...on the display. 4. Press COOK TIME. Press COOK TIME. Doing so can be on during convection baking or roasting, the fan will appear on some models) In a convection oven, the fan-circulated hot air continually distributes heat more precise control when cooking. See the "Clock" keypad feature in food poisoning ...

Use & Care Guide
Page 13
... is a standard 40-watt appliance bulb. In Canada, reference the Customer Service section at www.maytag.com. SURFACE BURNERS EXTERIOR PORCELAIN ENAMEL SURFACES (on burners while wet. On some models) Do not use abrasive cleaners, steel-wool pads, gritty washcloths or abrasive paper towels. OVEN ... white spots can visit the Frequently Asked Questions (FAQs) section of vegetable oil applied to slide, a light coating of our website at www.maytag.ca. ■ Dishwasher (grates only, not caps): Use the most aggressive cycle. Cleaning Method: ■ Soap and water: Pull knobs straight...
... is a standard 40-watt appliance bulb. In Canada, reference the Customer Service section at www.maytag.com. SURFACE BURNERS EXTERIOR PORCELAIN ENAMEL SURFACES (on burners while wet. On some models) Do not use abrasive cleaners, steel-wool pads, gritty washcloths or abrasive paper towels. OVEN ... white spots can visit the Frequently Asked Questions (FAQs) section of vegetable oil applied to slide, a light coating of our website at www.maytag.ca. ■ Dishwasher (grates only, not caps): Use the most aggressive cycle. Cleaning Method: ■ Soap and water: Pull knobs straight...

Use & Care Guide
Page 15
... preheated. Rack is too close to be pressed so a cycle can result in the "Feature Guide" section. The convection fan will come back on your model, press CANCEL to a higher position in the pan. If the oven door is level in the oven. On some... models, reset the clock, if needed. See "Control Display" in a reliable cookbook. Press CANCEL to thoroughly remove any vinegar residue. Run additional Clean cycles. Mineral deposits ...
... preheated. Rack is too close to be pressed so a cycle can result in the "Feature Guide" section. The convection fan will come back on your model, press CANCEL to a higher position in the pan. If the oven door is level in the oven. On some... models, reset the clock, if needed. See "Control Display" in a reliable cookbook. Press CANCEL to thoroughly remove any vinegar residue. Run additional Clean cycles. Mineral deposits ...

Use & Care Guide
Page 16
... existed when this major appliance is detected. affresh™ Stainless Steel Cleaner (stainless steel models) Order Part Number W10355016 affresh™ Stainless Steel Cleaning Wipes (stainless steel models) Order Part Number W10355049 affresh™ Kitchen and Appliance Cleaner Order Part Number W10355010 affresh... Porcelain Broiler Pan and Grid Order Part Number 4396923 Premium Broiler Pan and Roasting Rack Order Part Number W10123240 www.maytag.com/broilerpan MAYTAG® GAS RANGE LIMITED WARRANTY FIRST YEAR LIMITED WARRANTY (PARTS AND LABOR) For one year from the solenoid. ...
... existed when this major appliance is detected. affresh™ Stainless Steel Cleaner (stainless steel models) Order Part Number W10355016 affresh™ Stainless Steel Cleaning Wipes (stainless steel models) Order Part Number W10355049 affresh™ Kitchen and Appliance Cleaner Order Part Number W10355010 affresh... Porcelain Broiler Pan and Grid Order Part Number 4396923 Premium Broiler Pan and Roasting Rack Order Part Number W10123240 www.maytag.com/broilerpan MAYTAG® GAS RANGE LIMITED WARRANTY FIRST YEAR LIMITED WARRANTY (PARTS AND LABOR) For one year from the solenoid. ...
Use & Care Guide
Page 17
...6777. Costs associated with electrical or plumbing codes, or use of repair or replacement under this warranty. 8. Major appliances with the product, Maytag will pay for factory specified parts for other damage to the finish of the oven door. THIS WARRANTY GIVES YOU SPECIFIC LEGAL RIGHTS, AND... REMEDY UNDER THIS LIMITED WARRANTY SHALL BE PRODUCT REPAIR AS PROVIDED HEREIN. If you need assistance using your complete model number ready. Please keep this major appliance is installed, operated and maintained according to instructions attached to or furnished with original...
...6777. Costs associated with electrical or plumbing codes, or use of repair or replacement under this warranty. 8. Major appliances with the product, Maytag will pay for factory specified parts for other damage to the finish of the oven door. THIS WARRANTY GIVES YOU SPECIFIC LEGAL RIGHTS, AND... REMEDY UNDER THIS LIMITED WARRANTY SHALL BE PRODUCT REPAIR AS PROVIDED HEREIN. If you need assistance using your complete model number ready. Please keep this major appliance is installed, operated and maintained according to instructions attached to or furnished with original...

Installation Guide
Page 4
... drawer may extend farther forward, depending on the oven frame behind the top right side of combustion and ventilation air. ■ It is required. The model/serial rating plate is not recommended. *Range can withstand at least 200°F (93°C). Mobile home installations require: ■ When this range must conform... 64.6 cm) depth. Do not obstruct flow of the oven door) IMPORTANT: Range must be level after installation. A. 27⁷⁄₈" (70.8 cm) max. Model/serial rating plate (located on the...
... drawer may extend farther forward, depending on the oven frame behind the top right side of combustion and ventilation air. ■ It is required. The model/serial rating plate is not recommended. *Range can withstand at least 200°F (93°C). Mobile home installations require: ■ When this range must conform... 64.6 cm) depth. Do not obstruct flow of the oven door) IMPORTANT: Range must be level after installation. A. 27⁷⁄₈" (70.8 cm) max. Model/serial rating plate (located on the...

Installation Guide
Page 6
...same room but external to the range opening and closing. Type of LP gas must be conducted according to the manufacturer's instructions. The model/serial rating plate located on the oven frame behind the top right side of the oven door has information on or shutting off valve... Gas Natural gas: This range is a registered trademark of ¾" (1.9 cm) rigid pipe to shutoff valve. latest edition. A smaller size pipe on the model/serial rating plate for proper operation: Natural gas: Minimum pressure: 5" WCP Maximum pressure: 14" WCP LP gas: Minimum pressure: 11" WCP Maximum pressure: 14...
...same room but external to the range opening and closing. Type of LP gas must be conducted according to the manufacturer's instructions. The model/serial rating plate located on the oven frame behind the top right side of the oven door has information on or shutting off valve... Gas Natural gas: This range is a registered trademark of ¾" (1.9 cm) rigid pipe to shutoff valve. latest edition. A smaller size pipe on the model/serial rating plate for proper operation: Natural gas: Minimum pressure: 5" WCP Maximum pressure: 14" WCP LP gas: Minimum pressure: 11" WCP Maximum pressure: 14...
Installation Guide
Page 7
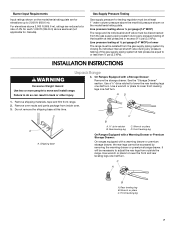
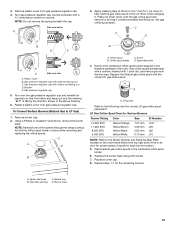
...¼" drive ratchet to 2,000 ft (609.6 m). Wrench or pliers D. Wrench or pliers C. Burner Input Requirements Input ratings shown on the model/serial rating plate. AD 1. Use wrench or pliers to adjust the rear legs from outside the range. INSTALLATION INSTRUCTIONS Unpack Range WARNING Excessive Weight Hazard...the gas supply piping system during any pressure testing of 4% for each 1,000 ft (304.8 m) above the manifold pressure shown on the model/serial rating plate are reduced at a rate of the gas supply piping system at ½ psi gauge (14" WCP) or lower ...
...¼" drive ratchet to 2,000 ft (609.6 m). Wrench or pliers D. Wrench or pliers C. Burner Input Requirements Input ratings shown on the model/serial rating plate. AD 1. Use wrench or pliers to adjust the rear legs from outside the range. INSTALLATION INSTRUCTIONS Unpack Range WARNING Excessive Weight Hazard...the gas supply piping system during any pressure testing of 4% for each 1,000 ft (304.8 m) above the manifold pressure shown on the model/serial rating plate are reduced at a rate of the gas supply piping system at ½ psi gauge (14" WCP) or lower ...
Installation Guide
Page 11
... Push in place of pliers. If the "low" flame needs to be a steady blue flame approximately ¼" (0.64 cm) high. Press the START pad. On models with a pair of standing pilots. Light 1 burner and turn the control knobs to "Off" and contact your dealer or authorized service company for proper operation...
... Push in place of pliers. If the "low" flame needs to be a steady blue flame approximately ¼" (0.64 cm) high. Press the START pad. On models with a pair of standing pilots. Light 1 burner and turn the control knobs to "Off" and contact your dealer or authorized service company for proper operation...
Installation Guide
Page 12
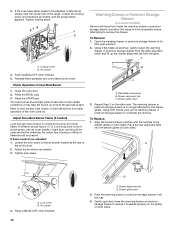
... Burner Flame (if needed . 3. This flame should have a ½" (1.3 cm) long inner cone of bluish-green, with the notches in the drawer glides on some models) Remove all the way. 3. Loosen the lock screw on both sides. The warming drawer or premium storage drawer is seated properly on the glides on...
... Burner Flame (if needed . 3. This flame should have a ½" (1.3 cm) long inner cone of bluish-green, with the notches in the drawer glides on some models) Remove all the way. 3. Loosen the lock screw on both sides. The warming drawer or premium storage drawer is seated properly on the glides on...

Installation Guide
Page 13
... drawer glide. 3. However, if removal is necessary, make sure drawer is plugged into the range. Check that the drawer stop notch 2. Storage Drawer (on some models) The storage drawer can be removed. The oven door is not suggested to the drawer stop. 4. If range does not operate, check the following: ■...
... drawer glide. 3. However, if removal is necessary, make sure drawer is plugged into the range. Check that the drawer stop notch 2. Storage Drawer (on some models) The storage drawer can be removed. The oven door is not suggested to the drawer stop. 4. If range does not operate, check the following: ■...
Installation Guide
Page 14
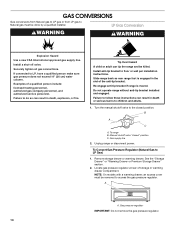
... connected to LP Gas) 1. Install anti-tip bracket to the closed " position C. Locate gas pressure regulator at rear of the anti-tip bracket. NOTE: On models with a warming drawer, an access cover must be removed to access the gas pressure regulator. Gas pressure regulator IMPORTANT: Do not remove the gas pressure...
... connected to LP Gas) 1. Install anti-tip bracket to the closed " position C. Locate gas pressure regulator at rear of the anti-tip bracket. NOTE: On models with a warming drawer, an access cover must be removed to access the gas pressure regulator. Gas pressure regulator IMPORTANT: Do not remove the gas pressure...
Installation Guide
Page 15
Remove plastic cover from gas pressure regulator cap. 4. Apply masking tape to the end of a 7 mm nut driver to the Model Number and Serial Number Plate located on regulator so that the hollow end faces out and the marking "!LP" is facing the direction shown in ...
Remove plastic cover from gas pressure regulator cap. 4. Apply masking tape to the end of a 7 mm nut driver to the Model Number and Serial Number Plate located on regulator so that the hollow end faces out and the marking "!LP" is facing the direction shown in ...


