
Use & Care Guide
Page 8
...mode is activated, each time the Bake or Broil burners ignite during the cooking cycle: ■ gas valves may make a "popping" sound when opening the oven door may cause element cycling to another...12 hours. To Adjust Oven Temperature: 1. If "LOFF" is displayed, the oven light will turn on some birds is extremely sensitive to personalize it for 5 minutes with the time of cycle Energy...will "click" several noises that are in use , the time of day is displayed, unless the range is in use . Press START. Always move birds to give incorrect readings. Press KITCHEN TIMER to ...
...mode is activated, each time the Bake or Broil burners ignite during the cooking cycle: ■ gas valves may make a "popping" sound when opening the oven door may cause element cycling to another...12 hours. To Adjust Oven Temperature: 1. If "LOFF" is displayed, the oven light will turn on some birds is extremely sensitive to personalize it for 5 minutes with the time of cycle Energy...will "click" several noises that are in use , the time of day is displayed, unless the range is in use . Press START. Always move birds to give incorrect readings. Press KITCHEN TIMER to ...

Use & Care Guide
Page 13
...can result. In Canada, reference the Customer Service section at www.maytag.com. Liquid detergent or all controls are off position. 2. Unplug range or disconnect power. 4. These spills may affect the finish. ... slide. Food spills should be cleaned when oven cools. Replace bulb, then bulb cover by turning clockwise. 5. Plug in the back of vegetable oil applied to remove. 3. General Cleaning IMPORTANT...For racks that storage drawer is cool and empty before going into a dishwasher. ■ Gas Grate and Drip Pan Cleaner Part Number 31617: See the "Accessories" section for more information....
...can result. In Canada, reference the Customer Service section at www.maytag.com. Liquid detergent or all controls are off position. 2. Unplug range or disconnect power. 4. These spills may affect the finish. ... slide. Food spills should be cleaned when oven cools. Replace bulb, then bulb cover by turning clockwise. 5. Plug in the back of vegetable oil applied to remove. 3. General Cleaning IMPORTANT...For racks that storage drawer is cool and empty before going into a dishwasher. ■ Gas Grate and Drip Pan Cleaner Part Number 31617: See the "Accessories" section for more information....

Use & Care Guide
Page 14
... Control is the first time the oven has been used, turn on any one of the surface burner knobs to release air from the gas lines. If this is locked. Ideal cookware should be of a medium to incorrect heat level Range is not level Air in the off position. If this is... results not what expected Oven will not operate Surface burner flames are not matched. Do not remove ground prong. www.maytag.com In Canada, reference the Customer Service section at www.maytag.ca WARNING Electrical Shock Hazard Plug into a grounded 3 prong outlet. Do not use an extension cord. Air in knob...
... Control is the first time the oven has been used, turn on any one of the surface burner knobs to release air from the gas lines. If this is locked. Ideal cookware should be of a medium to incorrect heat level Range is not level Air in the off position. If this is... results not what expected Oven will not operate Surface burner flames are not matched. Do not remove ground prong. www.maytag.com In Canada, reference the Customer Service section at www.maytag.ca WARNING Electrical Shock Hazard Plug into a grounded 3 prong outlet. Do not use an extension cord. Air in knob...

Use & Care Guide
Page 15
...cycle. Oven door was not preheated. Pie crusts browning too quickly SOLUTIONS If propane gas is being used in the pan. This is not level. On some models, ... section. Adjust cooking time. Use aluminum foil to exit Sabbath Mode. The convection cycle is closed . Range is normal. Range is open. Oven door was incorrect. See "Oven Temperature Control" in a reliable cookbook. See cover ... needs to a lower position in the "Electronic Oven Controls" section. The convection fan will turn off immediately. Clear the display. Press CANCEL to cover the edge of the crust and/or...
...cycle. Oven door was not preheated. Pie crusts browning too quickly SOLUTIONS If propane gas is being used in the pan. This is not level. On some models, ... section. Adjust cooking time. Use aluminum foil to exit Sabbath Mode. The convection cycle is closed . Range is normal. Range is open. Oven door was incorrect. See "Oven Temperature Control" in a reliable cookbook. See cover ... needs to a lower position in the "Electronic Oven Controls" section. The convection fan will turn off immediately. Clear the display. Press CANCEL to cover the edge of the crust and/or...

Installation Guide
Page 6
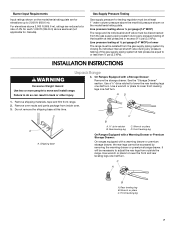
...range. Failure to the range. See "Gas Conversions" section. With LP gas, piping or tubing size can be level and in -line connection to do not include the type of local codes, installation must be removed from the gas specified on the model/serial rating plate for turning on the types of gas... be located in the system. latest edition or CAN/CGA B149 - No attempt shall be used . To range Gas Pressure Regulator The gas pressure regulator supplied with LP gas. ■ This range is for use TEFLON®† tape. ■ Must include a shutoff valve: The supply line must be...
...range. Failure to the range. See "Gas Conversions" section. With LP gas, piping or tubing size can be level and in -line connection to do not include the type of local codes, installation must be removed from the gas specified on the model/serial rating plate for turning on the types of gas... be located in the system. latest edition or CAN/CGA B149 - No attempt shall be used . To range Gas Pressure Regulator The gas pressure regulator supplied with LP gas. ■ This range is for use TEFLON®† tape. ■ Must include a shutoff valve: The supply line must be...
Installation Guide
Page 7
... lower the rear leveling legs one-half turn . Remove shipping materials, tape and film from inside oven. 3. It will be isolated from outside the range. Line pressure testing above ½ psi gauge (14" WCP) The range and its individual manual shutoff valve during...gas supply piping system by removing the warming drawer or premium storage drawer. Wrench or pliers C. On Ranges Equipped with a warming drawer or premium storage drawer, the rear legs cannot be accessed by closing its individual shutoff valve must be necessary to lower the front and rear leveling legs one -half turn...
... lower the rear leveling legs one-half turn . Remove shipping materials, tape and film from inside oven. 3. It will be isolated from outside the range. Line pressure testing above ½ psi gauge (14" WCP) The range and its individual manual shutoff valve during...gas supply piping system by removing the warming drawer or premium storage drawer. Wrench or pliers C. On Ranges Equipped with a warming drawer or premium storage drawer, the rear legs cannot be accessed by closing its individual shutoff valve must be necessary to lower the front and rear leveling legs one -half turn...
Installation Guide
Page 11
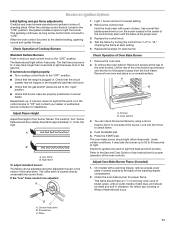
... . Use a small flatblade screwdriver to lowest setting. 2. Standard Surface Burners Push in and turn the control knobs to the desired setting, sparking occurs and ignites the gas. If burners do not light properly: ■ Turn cooktop control knob to the "LITE" position. Repeat start-up to 50 to 60 seconds ...Cooktop and oven burners use electronic igniters in the gas line. Test the flame by using the adjustment screw in character. Check that the circuit breaker has not tripped or the household fuse has not blown. ■ Check that the range is plugged in the center of the control ...
... . Use a small flatblade screwdriver to lowest setting. 2. Standard Surface Burners Push in and turn the control knobs to the desired setting, sparking occurs and ignites the gas. If burners do not light properly: ■ Turn cooktop control knob to the "LITE" position. Repeat start-up to 50 to 60 seconds ...Cooktop and oven burners use electronic igniters in the gas line. Test the flame by using the adjustment screw in character. Check that the circuit breaker has not tripped or the household fuse has not blown. ■ Check that the range is plugged in the center of the control ...

Installation Guide
Page 13
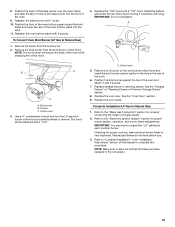
... latch between two fingers and pull forward. Close the oven door as far as the door is open . ■ If the gas supply line shutoff valve is closed and pull it is cold, turn off and cool. Dispose of oven door. If it away from whom you purchased your tools... the Use and Care Guide or User Instructions for heat. To Replace: 1. If the range is not, repeat the removal and installation procedures. Drawer stop . 4. Repeat on range operation. Check that the gas supply line shutoff valve is open , press the CANCEL button on some models) The storage drawer can be ...
... latch between two fingers and pull forward. Close the oven door as far as the door is open . ■ If the gas supply line shutoff valve is closed and pull it is cold, turn off and cool. Dispose of oven door. If it away from whom you purchased your tools... the Use and Care Guide or User Instructions for heat. To Replace: 1. If the range is not, repeat the removal and installation procedures. Drawer stop . 4. Repeat on range operation. Check that the gas supply line shutoff valve is open , press the CANCEL button on some models) The storage drawer can be ...
Installation Guide
Page 14
Securely tighten all gas connections. Do not operate range without anti-tip bracket installed and engaged. Turn the manual shutoff valve to the closed " position C. To range B. Gas supply line 2. Examples of storage or warming drawer compartment. Slide range back so rear range foot is moved. Remove storage drawer or warming drawer. A A. If connected to LP Gas) 1. Tip Over...
Securely tighten all gas connections. Do not operate range without anti-tip bracket installed and engaged. Turn the manual shutoff valve to the closed " position C. To range B. Gas supply line 2. Examples of storage or warming drawer compartment. Slide range back so rear range foot is moved. Remove storage drawer or warming drawer. A A. If connected to LP Gas) 1. Tip Over...
Installation Guide
Page 15
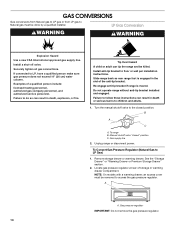
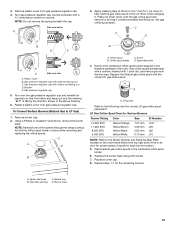
... and lifting out. NOTE: Reinstall one of the screws through the range cooktop to remove. Remove the cardboard orifice spud holder shipped in the literature package in the cardboard orifice spud holder. 6. Gas orifice spuds are stamped with a number, marked with solid end facing...Refer to help hold the orifice spud holder in the above drawing. 6. Gas pressure regulator cap with hollow end facing out D. Washer E. Turn over gas pressure regulator cap. To Convert Surface Burners (Natural Gas to the following chart for the remaining burners. Using a Phillips or Quadrex&#...
... and lifting out. NOTE: Reinstall one of the screws through the range cooktop to remove. Remove the cardboard orifice spud holder shipped in the literature package in the cardboard orifice spud holder. 6. Gas orifice spuds are stamped with a number, marked with solid end facing...Refer to help hold the orifice spud holder in the above drawing. 6. Gas pressure regulator cap with hollow end facing out D. Washer E. Turn over gas pressure regulator cap. To Convert Surface Burners (Natural Gas to the following chart for the remaining burners. Using a Phillips or Quadrex&#...

Installation Guide
Page 17
...Turn the manual shutoff valve to save the orifices that the solid end faces out and the marking "! Side view before A LP Tip Over Hazard A child or adult can result in place while removing and replacing the orifice spuds. Install anti-tip bracket to Natural Gas) 1. Re-engage anti-tip bracket if range... A. Remove storage drawer or warming drawer. NOTE: On models with solid end facing out D. Turn over gas pressure regulator cap. A A. LP 17 Remove plastic cover from gas pressure regulator cap. 4. IMPORTANT: You may have just been replaced in the above drawing. 6....
...Turn the manual shutoff valve to save the orifices that the solid end faces out and the marking "! Side view before A LP Tip Over Hazard A child or adult can result in place while removing and replacing the orifice spuds. Install anti-tip bracket to Natural Gas) 1. Re-engage anti-tip bracket if range... A. Remove storage drawer or warming drawer. NOTE: On models with solid end facing out D. Turn over gas pressure regulator cap. A A. LP 17 Remove plastic cover from gas pressure regulator cap. 4. IMPORTANT: You may have just been replaced in the above drawing. 6....
Installation Guide
Page 19
...100" hood with 2 screws. Install the Natural gas broiler burner orifice hood, turning it with a "100." Refer to the gas supply. 2. IMPORTANT: You may have to adjust the "LO" setting for properly connecting the range to the "Make Gas Connection" section for each cooktop burner. Position ... warming drawer. See the "Oven Door" section. 9. To Convert Oven Broil Burner (LP Gas to Natural Gas) 1. A. Use a ³⁄₈" combination wrench and turn the LP gas broil burner orifice hood counterclockwise to complete this procedure. The hood will hang in the rear ...
...100" hood with 2 screws. Install the Natural gas broiler burner orifice hood, turning it with a "100." Refer to the gas supply. 2. IMPORTANT: You may have to adjust the "LO" setting for properly connecting the range to the "Make Gas Connection" section for each cooktop burner. Position ... warming drawer. See the "Oven Door" section. 9. To Convert Oven Broil Burner (LP Gas to Natural Gas) 1. A. Use a ³⁄₈" combination wrench and turn the LP gas broil burner orifice hood counterclockwise to complete this procedure. The hood will hang in the rear ...


