Installation Instructions
Page 4
... with local codes. Check existing gas supply and electrical supply. Do not seal the range to check that are included. Mobile Home - Mobile home installations require: • When this range is located on the model/serial rating plate. The model/serial rating plate is installed in the kitchen. The range should be used will not discolor...
... with local codes. Check existing gas supply and electrical supply. Do not seal the range to check that are included. Mobile Home - Mobile home installations require: • When this range is located on the model/serial rating plate. The model/serial rating plate is installed in the kitchen. The range should be used will not discolor...

Installation Instructions
Page 6
... National Fuel Gas Code ANSI Z223.1 - latest edition. See "Gas Conversions" section. This range is adequate. A time-delay fuse or circuit breaker is required. Securely tighten al( gas connections. if connected to the manufacturer's instructions. The model/serial rating plate located behind... Hazard Plug into an outlet that a separate circuit serving only this range be obtained from the gas specified on the model/serial rating plate for use with a different gas without consulting the serving gas supplier. See "Gas Conversions" section. 6 Do not remove ground prong.
... National Fuel Gas Code ANSI Z223.1 - latest edition. See "Gas Conversions" section. This range is adequate. A time-delay fuse or circuit breaker is required. Securely tighten al( gas connections. if connected to the manufacturer's instructions. The model/serial rating plate located behind... Hazard Plug into an outlet that a separate circuit serving only this range be obtained from the gas specified on the model/serial rating plate for use with a different gas without consulting the serving gas supplier. See "Gas Conversions" section. 6 Do not remove ground prong.
Installation Instructions
Page 7
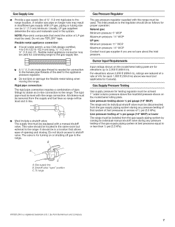
... .D., flexible metal appliance connector may result in the system. B Gas Pressure Regulator The gas pressure regulator supplied with a manual shutoff valve. Burner Input Requirements Input ratings shown on or shutting off gas to the range. Must include a shutoff valve: The supply line must be level... requires a combination of 3_,,(1.9 cm) rigid pipe to the range location. For elevations above 2,000 ft (609.6 m), ratings are reduced at test pressures in line. Gas supply fine B. Gas Supply Line Provide a gas supply line of pipe fittings to obtain an in-line connection to...
... .D., flexible metal appliance connector may result in the system. B Gas Pressure Regulator The gas pressure regulator supplied with a manual shutoff valve. Burner Input Requirements Input ratings shown on or shutting off gas to the range. Must include a shutoff valve: The supply line must be level... requires a combination of 3_,,(1.9 cm) rigid pipe to the range location. For elevations above 2,000 ft (609.6 m), ratings are reduced at test pressures in line. Gas supply fine B. Gas Supply Line Provide a gas supply line of pipe fittings to obtain an in-line connection to...

Installation Instructions
Page 15
... and Serial Number Plate located behind the left side of the storage or warming drawer for proper sizing of the range near the gas inlet. A. Groove 15 Repeat steps 1-7 for correct LP gas orifice spud placement. Replace burner cap. 8. Orifice spud B. Screw D. ToConverSt urfaceBurners 1= Remove burner cap. 2. ...the burner base. NOTE: Reinstall one of a sAe"nut driver to hold the gas orifice spud in the hex area. Set gas orifice spud aside. LP Gas Orifice Spud Chart for Surface Burners Burner Rating Color Size ID Number 14,000 BTU 11,000 BTU 8,000 BTU 5,000 BTU...
... and Serial Number Plate located behind the left side of the storage or warming drawer for proper sizing of the range near the gas inlet. A. Groove 15 Repeat steps 1-7 for correct LP gas orifice spud placement. Replace burner cap. 8. Orifice spud B. Screw D. ToConverSt urfaceBurners 1= Remove burner cap. 2. ...the burner base. NOTE: Reinstall one of a sAe"nut driver to hold the gas orifice spud in the hex area. Set gas orifice spud aside. LP Gas Orifice Spud Chart for Surface Burners Burner Rating Color Size ID Number 14,000 BTU 11,000 BTU 8,000 BTU 5,000 BTU...
Installation Instructions
Page 17
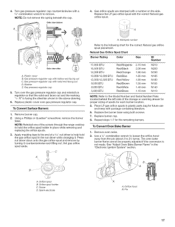
... Replace the LP gas orifice spud with sofid end facing out D. Gas pressure regulator cap with the correct Natural gas orifice spud. B / C Side view after A. Gas pressure regulator cap 5. Gas pressure regulator cap with a 5/8"combination wrench to remove. Side view before 4= Gas orifice spuds are ...stamped with a number on regulator so that the solid end faces out and the marking " Plastic cover B. Turn over the gas pressure regulator cap and reinstall on the side. 4. Turn gas pressure regulator cap counterclockwise with...
... Replace the LP gas orifice spud with sofid end facing out D. Gas pressure regulator cap with the correct Natural gas orifice spud. B / C Side view after A. Gas pressure regulator cap 5. Gas pressure regulator cap with a 5/8"combination wrench to remove. Side view before 4= Gas orifice spuds are ...stamped with a number on regulator so that the solid end faces out and the marking " Plastic cover B. Turn over the gas pressure regulator cap and reinstall on the side. 4. Turn gas pressure regulator cap counterclockwise with...
