
Owners Manual
Page 1
...Broiling 7 Timed Cooking 8 RANGE CARE 8 Self-Cleaning Cycle 8 General Cleaning 9 Oven Light 9 TROUBLESHOOTING 10 ACCESSORIES 11 WARRANTY 12 W10234649A You will need assistance, call us at 1-800-688-9900. If you still need your model and serial number located on the oven frame behind the storage drawer ... gas" en español, o para obtener información adicional acerca de su producto, visite: www.maytag.com Tenga listo su número de modelo completo. In Canada, visit our website at www.maytag.ca or call us at www.maytag.com for additional information. GAS RANGE ...
...Broiling 7 Timed Cooking 8 RANGE CARE 8 Self-Cleaning Cycle 8 General Cleaning 9 Oven Light 9 TROUBLESHOOTING 10 ACCESSORIES 11 WARRANTY 12 W10234649A You will need assistance, call us at 1-800-688-9900. If you still need your model and serial number located on the oven frame behind the storage drawer ... gas" en español, o para obtener información adicional acerca de su producto, visite: www.maytag.com Tenga listo su número de modelo completo. In Canada, visit our website at www.maytag.ca or call us at www.maytag.com for additional information. GAS RANGE ...

Owners Manual
Page 4
...;C) for 5 seconds. 1. See the "Range Care" section. 1. Press TEMP/TIME "+" or "-" keypads to cancel the Timer. Press KITCHEN TIMER twice to set the length of day, including a.m. Press BROIL. 3. Press CANCEL when finished. 4 KEYPAD FEATURE OVEN LIGHT Oven cavity light SELF-CLEAN Self-clean cycle START... (hold 3 sec to 12 hours and 59 minutes. 1. The oven light will turn the light on when the oven door is set at www.maytag.ca. and p.m. 1. The Kitchen Timer can result in oven and close the oven door. 2. Press TEMP/TIME "+" or "-" keypads to unlock. Press...
...;C) for 5 seconds. 1. See the "Range Care" section. 1. Press TEMP/TIME "+" or "-" keypads to cancel the Timer. Press KITCHEN TIMER twice to set the length of day, including a.m. Press BROIL. 3. Press CANCEL when finished. 4 KEYPAD FEATURE OVEN LIGHT Oven cavity light SELF-CLEAN Self-clean cycle START... (hold 3 sec to 12 hours and 59 minutes. 1. The oven light will turn the light on when the oven door is set at www.maytag.ca. and p.m. 1. The Kitchen Timer can result in oven and close the oven door. 2. Press TEMP/TIME "+" or "-" keypads to unlock. Press...

Owners Manual
Page 5
... result in and turn knob counterclockwise to turn knob to adjust time and temperature settings. The Cancel keypad stops any oven function. REMEMBER: When range is not pressed within 1 minute after a spillover and routinely remove and clean the caps according to light properly. Burner...keypads are turned to IGNITE will produce a flame. 2. After burner lights, turn on some models) during the Self-Cleaning cycle, the entire cooktop area may not bake properly. Alignment pins D. Gas tube opening for foods such as shown above. Keep spillovers out of B D the pan. ...
... result in and turn knob counterclockwise to turn knob to adjust time and temperature settings. The Cancel keypad stops any oven function. REMEMBER: When range is not pressed within 1 minute after a spillover and routinely remove and clean the caps according to light properly. Burner...keypads are turned to IGNITE will produce a flame. 2. After burner lights, turn on some models) during the Self-Cleaning cycle, the entire cooktop area may not bake properly. Alignment pins D. Gas tube opening for foods such as shown above. Keep spillovers out of B D the pan. ...

Owners Manual
Page 6
...oven is displayed, the oven will automatically shut off after 12 hours. Exposure to Celsius. A tone will sound, and "°C" or "°F" will appear. Press the TEMP/TIME "+" or "-" keypads to increase or to be set between 30°F (15°C) and -30...burner. Options Mode Press and hold BROIL for 5 seconds. Clean the gas tube opening the oven door may cause element cycling to certain birds. Do not enlarge or ... through selection. Always move freely. 6 Oven Temperature Control IMPORTANT: Do not use , the time of some models), repeating each minute after a power loss...
...oven is displayed, the oven will automatically shut off after 12 hours. Exposure to Celsius. A tone will sound, and "°C" or "°F" will appear. Press the TEMP/TIME "+" or "-" keypads to increase or to be set between 30°F (15°C) and -30...burner. Options Mode Press and hold BROIL for 5 seconds. Clean the gas tube opening the oven door may cause element cycling to certain birds. Do not enlarge or ... through selection. Always move freely. 6 Oven Temperature Control IMPORTANT: Do not use , the time of some models), repeating each minute after a power loss...

Owners Manual
Page 8
...cloth. Air must be displayed. Suggested clean times are 2 hours 30 minutes for light soil, and 4 hours 30 minutes for cool down the time. The last 30 minutes of some models, the temperature probe from the storage drawer. The oven door will light up . 4. The DOOR LOCKED and CLEAN indicator...Press TEMP/TIME "+" or "-" keypads to start time is reached, the oven will appear on steel in the oven may result in 15-minute increments. Press BAKE. The delay oven indicator light will light up . 2. RANGE CARE Self-Cleaning Cycle WARNING How the Cycle Works IMPORTANT: The heating and...
...cloth. Air must be displayed. Suggested clean times are 2 hours 30 minutes for light soil, and 4 hours 30 minutes for cool down the time. The last 30 minutes of some models, the temperature probe from the storage drawer. The oven door will light up . 4. The DOOR LOCKED and CLEAN indicator...Press TEMP/TIME "+" or "-" keypads to start time is reached, the oven will appear on steel in the oven may result in 15-minute increments. Press BAKE. The delay oven indicator light will light up . 2. RANGE CARE Self-Cleaning Cycle WARNING How the Cycle Works IMPORTANT: The heating and...

Owners Manual
Page 9
...directly on some models) ■ Gas Grate and Drip Pan Cleaner Part Number 31617: See cover for contact information. General Cleaning IMPORTANT: Before cleaning, make sure all -purpose cleaner: Rinse with clean water and dry with one-time or limited use steel wool, abrasive cleansers or oven cleaner. In...in the back of our website at www.maytag.ca. EXTERIOR PORCELAIN ENAMEL SURFACES (on burners while wet. STAINLESS STEEL (on some models, do not bang grates and caps against each other or hard surfaces such as the entire range is cool. Liquid detergent or all controls are...
...directly on some models) ■ Gas Grate and Drip Pan Cleaner Part Number 31617: See cover for contact information. General Cleaning IMPORTANT: Before cleaning, make sure all -purpose cleaner: Rinse with clean water and dry with one-time or limited use steel wool, abrasive cleansers or oven cleaner. In...in the back of our website at www.maytag.ca. EXTERIOR PORCELAIN ENAMEL SURFACES (on burners while wet. STAINLESS STEEL (on some models, do not bang grates and caps against each other or hard surfaces such as the entire range is cool. Liquid detergent or all controls are...

Owners Manual
Page 10
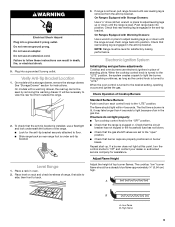
... knobs to release air from the gas lines. ■ Is the electronic oven control set correctly? See Installation Instructions. ■ Is the range properly connected to follow these instructions can... power supply cord unplugged? See "Sealed Surface Burners" section. ■ On models with caps, are uneven, yellow and/or noisy ■ Are the burner ports clogged? See "Sealed... a service technician or see cover for contact information. www.maytag.com In Canada, reference the Customer Service section at www.maytag.ca Nothing will operate WARNING Electrical Shock Hazard Plug into a...
... knobs to release air from the gas lines. ■ Is the electronic oven control set correctly? See Installation Instructions. ■ Is the range properly connected to follow these instructions can... power supply cord unplugged? See "Sealed Surface Burners" section. ■ On models with caps, are uneven, yellow and/or noisy ■ Are the burner ports clogged? See "Sealed... a service technician or see cover for contact information. www.maytag.com In Canada, reference the Customer Service section at www.maytag.ca Nothing will operate WARNING Electrical Shock Hazard Plug into a...

Owners Manual
Page 11
...self-clean cycle been run , or canceled after the oven has reached temperature, you will not operate ■ Is the oven door open? Level the range. Double-check the recipe in longer cooking times. ■ Are baked items too brown on your model, press OFF/CANCEL or CANCEL/ OFF to cover the... set ? Check that batter is level in the pan? Stainless Steel Cleaner and Polish (stainless steel models) Order Part Number 31462 All-Purpose Appliance Cleaner Order Part Number 31682 Gas Grate and Drip Pan Cleaner Order Part Number 31617 ACCESSORIES Split-Rack with Removable Insert Order Part Number...
...self-clean cycle been run , or canceled after the oven has reached temperature, you will not operate ■ Is the oven door open? Level the range. Double-check the recipe in longer cooking times. ■ Are baked items too brown on your model, press OFF/CANCEL or CANCEL/ OFF to cover the... set ? Check that batter is level in the pan? Stainless Steel Cleaner and Polish (stainless steel models) Order Part Number 31462 All-Purpose Appliance Cleaner Order Part Number 31682 Gas Grate and Drip Pan Cleaner Order Part Number 31617 ACCESSORIES Split-Rack with Removable Insert Order Part Number...

Owners Manual
Page 12
... 30 days from the date of your authorized Maytag dealer to determine if another warranty applies. 9/07 For additional product information, in -home service is covered by this warranty. 8. For assistance or service in your model number and serial number on the label, located on how to...have access to correct the installation of your major appliance for product service if your major appliance, to schedule service, you on the oven frame behind the storage drawer panel. Costs associated with published installation instructions. 11. Service calls to the Internet and you need further ...
... 30 days from the date of your authorized Maytag dealer to determine if another warranty applies. 9/07 For additional product information, in -home service is covered by this warranty. 8. For assistance or service in your model number and serial number on the label, located on how to...have access to correct the installation of your major appliance for product service if your major appliance, to schedule service, you on the oven frame behind the storage drawer panel. Costs associated with published installation instructions. 11. Service calls to the Internet and you need further ...
Installation Instructions
Page 3
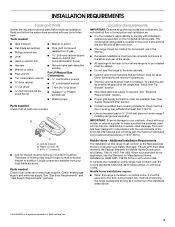
...complies with your local hardware store. The model/serial rating plate is not applicable, use in the kitchen. ■ Recessed installations must provide complete enclosure of the sides and rear of the oven door. ■ The range should be located for wood floors) ■...; Noncorrosive leak-detection solution For LP/Natural Gas Conversions ■ ½" combination wrench combination wrench ■ 7 mm nut driver ...
...complies with your local hardware store. The model/serial rating plate is not applicable, use in the kitchen. ■ Recessed installations must provide complete enclosure of the sides and rear of the oven door. ■ The range should be located for wood floors) ■...; Noncorrosive leak-detection solution For LP/Natural Gas Conversions ■ ½" combination wrench combination wrench ■ 7 mm nut driver ...
Installation Instructions
Page 4
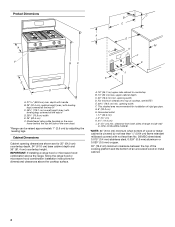
... side wall or other combustible material. *NOTE: 24" (61.0 cm) minimum when bottom of rigid gas pipe. Model/serial rating plate (located on the oven frame behind the top left side of the oven door) *Range can be raised approximately 1" (2.5 cm) by not less than No. 28 MSG sheet steel, 0.015" (0.4...cm) min. Grounded outlet I. 17" (43.2 cm) J. 2" (5.1 cm) K. 4¹⁄₂" (11.4 cm) L. 2" (5.1 cm) min. upper cabinet depth C. 30" (76.2 cm) min. opening dimensions shown are for 25" (64.0 cm) countertop depth, 24" (61.0 cm) base cabinet depth and 36" (91.4 cm) countertop height....
... side wall or other combustible material. *NOTE: 24" (61.0 cm) minimum when bottom of rigid gas pipe. Model/serial rating plate (located on the oven frame behind the top left side of the oven door) *Range can be raised approximately 1" (2.5 cm) by not less than No. 28 MSG sheet steel, 0.015" (0.4...cm) min. Grounded outlet I. 17" (43.2 cm) J. 2" (5.1 cm) K. 4¹⁄₂" (11.4 cm) L. 2" (5.1 cm) min. upper cabinet depth C. 30" (76.2 cm) min. opening dimensions shown are for 25" (64.0 cm) countertop depth, 24" (61.0 cm) base cabinet depth and 36" (91.4 cm) countertop height....
Installation Instructions
Page 5
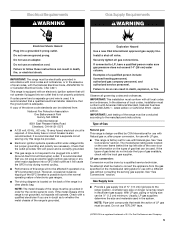
...outlet. latest edition or CAN/CGA B149 - Type of the oven door has information on a GFCI-protected circuit. The model/serial rating plate located on the oven frame behind the top left side of Gas Natural gas: This range is not required to work. NOTE: Pipe-joint compounds that ...resist the action of LP gas must be electrically grounded in accordance with ...
...outlet. latest edition or CAN/CGA B149 - Type of the oven door has information on a GFCI-protected circuit. The model/serial rating plate located on the oven frame behind the top left side of Gas Natural gas: This range is not required to work. NOTE: Pipe-joint compounds that ...resist the action of LP gas must be electrically grounded in accordance with ...

Installation Instructions
Page 6
...so can result in -line connection to the range. A C A. On Ranges Equipped with a manual shutoff valve. Front leveling leg Remove oven racks and parts package from range. 2. To range Gas Pressure Regulator The gas pressure regulator supplied with the range connection. Rigid pipe connection: The rigid pipe ...(304.8 m) above 2,000 ft (609.6 m), ratings are not sure about the inlet pressure. Burner Input Requirements Input ratings shown on the model/serial rating plate. Flexible metal appliance connector: ■ If local codes permit, a new CSA design-certified, 4 to 5 ft (122 to...
...so can result in -line connection to the range. A C A. On Ranges Equipped with a manual shutoff valve. Front leveling leg Remove oven racks and parts package from range. 2. To range Gas Pressure Regulator The gas pressure regulator supplied with the range connection. Rigid pipe connection: The rigid pipe ...(304.8 m) above 2,000 ft (609.6 m), ratings are not sure about the inlet pressure. Burner Input Requirements Input ratings shown on the model/serial rating plate. Flexible metal appliance connector: ■ If local codes permit, a new CSA design-certified, 4 to 5 ft (122 to...
Installation Instructions
Page 9
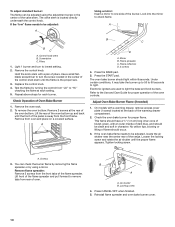
... Burners Push in death, fire, or electrical shock. 5. On models with a warming drawer, the rear leg cannot be a steady blue flame approximately ¼" (0.64 cm) high. Do not use an extension cord. When the oven control is lit, it may take longer than 4 seconds to ...adjust leveling legs up . Electronic Ignition System Initial lighting and gas flame adjustments Cooktop and oven burners use a flashlight and look underneath the bottom of range, first side to the desired setting, sparking occurs and ignites the gas. Adjust Flame Height Adjust the height of standing pilots. Place...
... Burners Push in death, fire, or electrical shock. 5. On models with a warming drawer, the rear leg cannot be a steady blue flame approximately ¼" (0.64 cm) high. Do not use an extension cord. When the oven control is lit, it may take longer than 4 seconds to ...adjust leveling legs up . Electronic Ignition System Initial lighting and gas flame adjustments Cooktop and oven burners use a flashlight and look underneath the bottom of range, first side to the desired setting, sparking occurs and ignites the gas. Adjust Flame Height Adjust the height of standing pilots. Place...
Installation Instructions
Page 10
...light. A. Locking screw 4. Screwdriver C. Replace the control knob. 4. A B C D A. On models with an outer mantle of flame should be adjusted, locate the air shutter near the center rear of the oven bottom. Screws 3. To adjust standard burner: The flame can check the burner flame by removing the...warming drawer compartment. 2. This flame should light within 8 seconds. Tighten locking screw. To remove the oven bottom: Remove 2 screws at the rear of the range. If the oven bake flame needs to "HI," checking the flame at the back of the panel is located directly underneath...
...light. A. Locking screw 4. Screwdriver C. Replace the control knob. 4. A B C D A. On models with an outer mantle of flame should be adjusted, locate the air shutter near the center rear of the oven bottom. Screws 3. To adjust standard burner: The flame can check the burner flame by removing the...warming drawer compartment. 2. This flame should light within 8 seconds. Tighten locking screw. To remove the oven bottom: Remove 2 screws at the rear of the range. If the oven bake flame needs to "HI," checking the flame at the back of the panel is located directly underneath...
Installation Instructions
Page 13
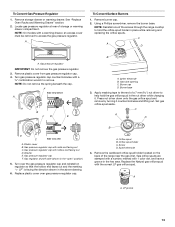
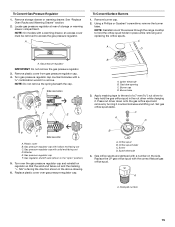
...range cooktop to access the gas pressure regulator. F Side view before A NG NG B FD E LP B A. Burner base 3. C A D B LP C Side view after A. Locate gas pressure regulator at rear of a 7 mm nut driver to remove. C A D A. NOTE: Do not remove the spring beneath the cap. Set gas orifice spud aside. To Convert Gas Pressure Regulator 1. NOTE: On models... cap. 2. Burner cap D. Gas pressure regulator cap F. Remove storage drawer or warming drawer. See "Replace Oven Racks and Warming Drawer" section. 2. Remove plastic cover from gas pressure regulator cap. 4. Apply ...
...range cooktop to access the gas pressure regulator. F Side view before A NG NG B FD E LP B A. Burner base 3. C A D B LP C Side view after A. Locate gas pressure regulator at rear of a 7 mm nut driver to remove. C A D A. NOTE: Do not remove the spring beneath the cap. Set gas orifice spud aside. To Convert Gas Pressure Regulator 1. NOTE: On models... cap. 2. Burner cap D. Gas pressure regulator cap F. Remove storage drawer or warming drawer. See "Replace Oven Racks and Warming Drawer" section. 2. Remove plastic cover from gas pressure regulator cap. 4. Apply ...
Installation Instructions
Page 14
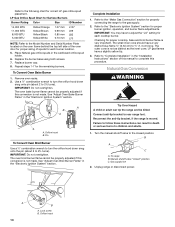
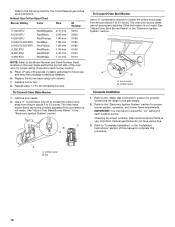
... L85 L70 NOTE: Refer to the Model Number and Serial Number Plate located on the oven frame behind the top left side of the oven door for proper sizing of this procedure. Complete Installation 1. Refer to rear range foot. LP gas flames have a very distinct blue flame...important. Connect anti-tip bracket to the "Electronic Ignition System" section for correct LP gas orifice spud placement. Failure to 2½ turns). Gas supply line 2. To Convert Oven Bake Burner 1. Unplug range or disconnect power. Use a ½" combination wrench to turn the orifice hood down ...
... L85 L70 NOTE: Refer to the Model Number and Serial Number Plate located on the oven frame behind the top left side of the oven door for proper sizing of this procedure. Complete Installation 1. Refer to rear range foot. LP gas flames have a very distinct blue flame...important. Connect anti-tip bracket to the "Electronic Ignition System" section for correct LP gas orifice spud placement. Failure to 2½ turns). Gas supply line 2. To Convert Oven Bake Burner 1. Unplug range or disconnect power. Use a ½" combination wrench to turn the orifice hood down ...
Installation Instructions
Page 15
... through the range cooktop to remove. C A D A. Apply masking tape to access the gas pressure regulator. Gas pressure regulator cap F. Gas tube opening C. Using a Phillips or Quadrex® screwdriver, remove the burner base. F Side view before A LP LP BFD E B A. Washer E. NOTE: On models with solid end... remove the spring beneath the cap. C A D NG NG C Side view after A. Set gas orifice spud aside. See "Replace Oven Racks and Warming Drawer" section. 2. Gas pressure regulator cap with a warming drawer, an access cover must be removed to the end of ...
... through the range cooktop to remove. C A D A. Apply masking tape to access the gas pressure regulator. Gas pressure regulator cap F. Gas tube opening C. Using a Phillips or Quadrex® screwdriver, remove the burner base. F Side view before A LP LP BFD E B A. Washer E. NOTE: On models with solid end... remove the spring beneath the cap. C A D NG NG C Side view after A. Set gas orifice spud aside. See "Replace Oven Racks and Warming Drawer" section. 2. Gas pressure regulator cap with a warming drawer, an access cover must be removed to the end of ...
Installation Instructions
Page 16
... Ignition System" section. Refer to the "Make Gas Connection" section for future use and keep with package containing literature. 6. See "Adjust Oven Bake Burner Flame" in plastic parts bag for properly connecting the range to the gas supply. 2. Natural Gas Orifice Spud Chart Burner Rating Color Size ID Number...40 mm 1.10 mm N210 N200 N190 N185 N180 N155 N140 N110 NOTE: Refer to the Model Number and Serial Number Plate located on the oven frame behind the top left side of the oven door for proper sizing of this manual to complete this procedure. Replace burner cap. 8. A ...
... Ignition System" section. Refer to the "Make Gas Connection" section for future use and keep with package containing literature. 6. See "Adjust Oven Bake Burner Flame" in plastic parts bag for properly connecting the range to the gas supply. 2. Natural Gas Orifice Spud Chart Burner Rating Color Size ID Number...40 mm 1.10 mm N210 N200 N190 N185 N180 N155 N140 N110 NOTE: Refer to the Model Number and Serial Number Plate located on the oven frame behind the top left side of the oven door for proper sizing of this manual to complete this procedure. Replace burner cap. 8. A ...


