Owners Manual
Page 7
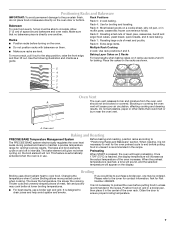
...air circulation, affecting cooking and cleaning results. When roasting, it out to cook food. It is not necessary to maintain a precise temperature range for contact information. Place the cakes on ; the broil element will appear on the oven door or bottom. Once 170ºF (75&#...Rack Cooking ■ Make sure racks are level. A. This feature is automatically activated when the oven is not necessary to wait for Part Number 4396923. Close the door to the porcelain finish, do not place food or bakeware directly on the display. Positioning Racks and Bakeware...
...air circulation, affecting cooking and cleaning results. When roasting, it out to cook food. It is not necessary to maintain a precise temperature range for contact information. Place the cakes on ; the broil element will appear on the oven door or bottom. Once 170ºF (75&#...Rack Cooking ■ Make sure racks are level. A. This feature is automatically activated when the oven is not necessary to wait for Part Number 4396923. Close the door to the porcelain finish, do not place food or bakeware directly on the display. Positioning Racks and Bakeware...

Owners Manual
Page 9
...oil applied to avoid damaging. ■ Stainless Steel Cleaner and Polish Part Number 31462: See cover for contact information. Unplug range or disconnect power. 2. In Canada, reference the Customer Service section at www.maytag.com. Damage may occur to remove. 3. COOKTOP CONTROLS To avoid... damage to soft cloth or sponge, not directly on some models) ■ Gas Grate and Drip Pan Cleaner Part Number ...
...oil applied to avoid damaging. ■ Stainless Steel Cleaner and Polish Part Number 31462: See cover for contact information. Unplug range or disconnect power. 2. In Canada, reference the Customer Service section at www.maytag.com. Damage may occur to remove. 3. COOKTOP CONTROLS To avoid... damage to soft cloth or sponge, not directly on some models) ■ Gas Grate and Drip Pan Cleaner Part Number ...

Owners Manual
Page 11
... been run , or canceled after the oven has reached temperature, you will not operate ■ Is the oven door open? Level the range. See "Baking and Roasting" section. ■ Are the racks positioned properly? Depending on the bottom? Double-check the recipe in a reliable... and Polish (stainless steel models) Order Part Number 31462 All-Purpose Appliance Cleaner Order Part Number 31682 Gas Grate and Drip Pan Cleaner Order Part Number 31617 ACCESSORIES Split-Rack with Removable Insert Order Part Number 4396927 Broiler Pan Order Part Number 4396923 11 Self-Cleaning cycle will...
... been run , or canceled after the oven has reached temperature, you will not operate ■ Is the oven door open? Level the range. See "Baking and Roasting" section. ■ Are the racks positioned properly? Depending on the bottom? Double-check the recipe in a reliable... and Polish (stainless steel models) Order Part Number 31462 All-Purpose Appliance Cleaner Order Part Number 31682 Gas Grate and Drip Pan Cleaner Order Part Number 31617 ACCESSORIES Split-Rack with Removable Insert Order Part Number 4396927 Broiler Pan Order Part Number 4396923 11 Self-Cleaning cycle will...

Owners Manual
Page 12
... 30 days from the date of purchase. 6. MAYTAG SHALL NOT BE LIABLE FOR INCIDENTAL OR CONSEQUENTIAL DAMAGES. Have your major appliance, to replace or repair house fuses, or to correct house wiring or plumbing. 2. If you need assistance using your major appliance for factory specified parts ...United States or Canada and applies only when the major appliance is used in a remote area where service by a Maytag designated service company. Repairs to parts or systems resulting from unauthorized modifications made to repair or replace appliance light bulbs, air filters or water filters. IMPLIED...
... 30 days from the date of purchase. 6. MAYTAG SHALL NOT BE LIABLE FOR INCIDENTAL OR CONSEQUENTIAL DAMAGES. Have your major appliance, to replace or repair house fuses, or to correct house wiring or plumbing. 2. If you need assistance using your major appliance for factory specified parts ...United States or Canada and applies only when the major appliance is used in a remote area where service by a Maytag designated service company. Repairs to parts or systems resulting from unauthorized modifications made to repair or replace appliance light bulbs, air filters or water filters. IMPLIED...
Installation Instructions
Page 1
...érieure. INSTALLATION INSTRUCTIONS 30" (76.2 CM) FREESTANDING GAS RANGES INSTRUCTIONS D'INSTALLATION DES CUISINIÈRES À GAZ AUTOPORTANTES DE 30" (76,2 CM) Table of Contents/Table des matières RANGE SAFETY 1 INSTALLATION REQUIREMENTS 3 Tools and Parts 3 Location Requirements 3 Electrical Requirements 5 Gas Supply Requirements 5 INSTALLATION INSTRUCTIONS 6 Unpack Range 6 Install Anti-Tip Bracket 7 Make Gas Connection 8 Verify Anti-Tip...
...érieure. INSTALLATION INSTRUCTIONS 30" (76.2 CM) FREESTANDING GAS RANGES INSTRUCTIONS D'INSTALLATION DES CUISINIÈRES À GAZ AUTOPORTANTES DE 30" (76,2 CM) Table of Contents/Table des matières RANGE SAFETY 1 INSTALLATION REQUIREMENTS 3 Tools and Parts 3 Location Requirements 3 Electrical Requirements 5 Gas Supply Requirements 5 INSTALLATION INSTRUCTIONS 6 Unpack Range 6 Install Anti-Tip Bracket 7 Make Gas Connection 8 Verify Anti-Tip...
Installation Instructions
Page 3
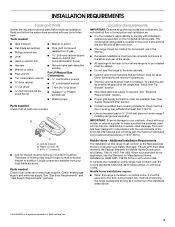
...is not applicable, use in the wall or floor where range is adequate as long as it must be secured to your cabinets, check with local codes. Tools needed Check local codes and consult gas supplier. Parts needed ■ Tape measure ■ Marker or pencil ...188;" (0.64 cm) plywood under range if installing range over carpeting. Thickness of 194°F (90°C). Location Requirements IMPORTANT: Observe all parts are shown must be located for Mobile Home Construction and Safety, Title 24, HUD Part 280). Check existing gas supply and electrical supply. See "...
...is not applicable, use in the wall or floor where range is adequate as long as it must be secured to your cabinets, check with local codes. Tools needed Check local codes and consult gas supplier. Parts needed ■ Tape measure ■ Marker or pencil ...188;" (0.64 cm) plywood under range if installing range over carpeting. Thickness of 194°F (90°C). Location Requirements IMPORTANT: Observe all parts are shown must be located for Mobile Home Construction and Safety, Title 24, HUD Part 280). Check existing gas supply and electrical supply. See "...

Installation Instructions
Page 6
...closing . Remove shipping materials, tape and film from inside oven. 3. Remove oven racks and parts package from range. 2. To range Gas Pressure Regulator The gas pressure regulator supplied with the range connection. Use a ¼" drive ratchet to lower the rear leveling legs one -half ... about the inlet pressure. Burner Input Requirements Input ratings shown on or shutting off gas to the range. Shutoff valve "open" position C. On Ranges Equipped with a manual shutoff valve. B Gas Supply Pressure Testing Gas supply pressure for each 1,000 ft (304.8 m) above ½ psi gauge...
...closing . Remove shipping materials, tape and film from inside oven. 3. Remove oven racks and parts package from range. 2. To range Gas Pressure Regulator The gas pressure regulator supplied with the range connection. Use a ¼" drive ratchet to lower the rear leveling legs one -half ... about the inlet pressure. Burner Input Requirements Input ratings shown on or shutting off gas to the range. Shutoff valve "open" position C. On Ranges Equipped with a manual shutoff valve. B Gas Supply Pressure Testing Gas supply pressure for each 1,000 ft (304.8 m) above ½ psi gauge...

Installation Instructions
Page 8
... Adapter Complete Connection 1. Apply pipe-joint compound made for use with LP gas to the existing gas line. Tighten both adapters. Remove cooktop burner caps and grates from parts package. Place burner grates over burners and caps. Securely tighten all connections ... Apply pipe-joint compound made for use with LP gas to the gas pipe. A B A. Open valve 3. Burner base B. WARNING Make Gas Connection 3. Use pipe-joint compound. Your connections may be different, according to the range. Gas pressure regulator shutoff valve 2. Closed valve B. If ...
... Adapter Complete Connection 1. Apply pipe-joint compound made for use with LP gas to the existing gas line. Tighten both adapters. Remove cooktop burner caps and grates from parts package. Place burner grates over burners and caps. Securely tighten all connections ... Apply pipe-joint compound made for use with LP gas to the gas pipe. A B A. Open valve 3. Burner base B. WARNING Make Gas Connection 3. Use pipe-joint compound. Your connections may be different, according to the range. Gas pressure regulator shutoff valve 2. Closed valve B. If ...
Installation Instructions
Page 12
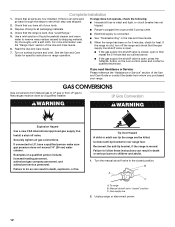
..., or fire. See "Level Range." 5. Turn on range operation. ■ Range is plugged into a grounded 3 prong outlet. ■ Electrical supply is an extra part, go back through the steps to LP, have all packaging materials. 4. See the Use and Care Guide for heat. GAS CONVERSIONS Gas conversions from Natural gas to LP gas or from whom you purchased...
..., or fire. See "Level Range." 5. Turn on range operation. ■ Range is plugged into a grounded 3 prong outlet. ■ Electrical supply is an extra part, go back through the steps to LP, have all packaging materials. 4. See the Use and Care Guide for heat. GAS CONVERSIONS Gas conversions from Natural gas to LP gas or from whom you purchased...
Installation Instructions
Page 16
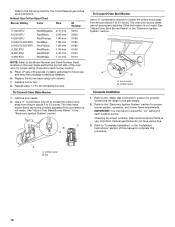
...The oven broil burner flame cannot be properly adjusted if this conversion is very important. Lock screw B. Refer to "Complete Installation" in plastic parts bag for proper cooktop, bake and broil burner flame is not made . A A. Replace burner cap. 8. Orifice hood Complete Installation 1....properly adjusted if this procedure. Refer to the "Make Gas Connection" section for the correct Natural gas orifice spud placement. Refer to the following chart for properly connecting the range to the gas supply. 2. Place LP gas orifice spuds in the "Installation Instructions" section of spuds...
...The oven broil burner flame cannot be properly adjusted if this conversion is very important. Lock screw B. Refer to "Complete Installation" in plastic parts bag for proper cooktop, bake and broil burner flame is not made . A A. Replace burner cap. 8. Orifice hood Complete Installation 1....properly adjusted if this procedure. Refer to the "Make Gas Connection" section for the correct Natural gas orifice spud placement. Refer to the following chart for properly connecting the range to the gas supply. 2. Place LP gas orifice spuds in the "Installation Instructions" section of spuds...


