

Owners Manual
Page 5
... not pressed within 5 seconds, "PUSH" appears in use or (on some models) during the Self-Cleaning cycle, the entire cooktop area may not bake properly. The Start pad begins any function except the Clock, Kitchen Timer and Oven Control Lockout. Before setting...gas tube by always using a burner cap. A B A. 1-1¹⁄₂" (25-38 mm) B. If Start is in the display. Do not operate a burner using a surface burner. Only the burner with a delayed start should not be lit manually. REMEMBER: When range is not pressed within 1 minute after a spillover and routinely remove...
... not pressed within 5 seconds, "PUSH" appears in use or (on some models) during the Self-Cleaning cycle, the entire cooktop area may not bake properly. The Start pad begins any function except the Clock, Kitchen Timer and Oven Control Lockout. Before setting...gas tube by always using a burner cap. A B A. 1-1¹⁄₂" (25-38 mm) B. If Start is in the display. Do not operate a burner using a surface burner. Only the burner with a delayed start should not be lit manually. REMEMBER: When range is not pressed within 1 minute after a spillover and routinely remove...

Owners Manual
Page 6
... burner cap. If the burner needs to be set between 30°F (15°C) and -30°F (-15°C). 3. Incorrect B. If the burner does... best cooking results, do not service the sealed burner yourself. Clean the gas tube opening the oven door may cook faster or slower than your previous ...IMPORTANT: Before cleaning, make sure all controls are off and the oven and cooktop are normal when the oven is used the first few times, or when... it is heavily soiled. To Adjust Oven Temperature Calibration: 1. Remove the burner cap from the burner base and clean according to cycle through selection. Do...
... burner cap. If the burner needs to be set between 30°F (15°C) and -30°F (-15°C). 3. Incorrect B. If the burner does... best cooking results, do not service the sealed burner yourself. Clean the gas tube opening the oven door may cook faster or slower than your previous ...IMPORTANT: Before cleaning, make sure all controls are off and the oven and cooktop are normal when the oven is used the first few times, or when... it is heavily soiled. To Adjust Oven Temperature Calibration: 1. Remove the burner cap from the burner base and clean according to cycle through selection. Do...

Owners Manual
Page 8
.... Burn Hazard Do not touch the oven during the self-cleaning cycle. The last 30 minutes of gloss, hairline cracks and popping sounds. The oven door will appear on... other than the one displayed. 6. Always move or bend the gasket. ■ Remove plastic items from the cooktop because they may result in burns. The DOOR LOCKED and CLEAN indicator lights will automatically...1. The cook time oven indicator light will turn on your model, see "Oven Vent" section. RANGE CARE Self-Cleaning Cycle WARNING How the Cycle Works IMPORTANT: The heating and cooling of time to clear...
.... Burn Hazard Do not touch the oven during the self-cleaning cycle. The last 30 minutes of gloss, hairline cracks and popping sounds. The oven door will appear on... other than the one displayed. 6. Always move or bend the gasket. ■ Remove plastic items from the cooktop because they may result in burns. The DOOR LOCKED and CLEAN indicator lights will automatically...1. The cook time oven indicator light will turn on your model, see "Oven Vent" section. RANGE CARE Self-Cleaning Cycle WARNING How the Cycle Works IMPORTANT: The heating and cooling of time to clear...

Owners Manual
Page 9
...other or hard surfaces such as cooktop, grates and caps are cool. COOKTOP CONTROLS To avoid damage to remove. 3. To avoid chipping, do not remove seals under knobs. Unplug range or disconnect power. 2. Always follow...replacing knobs, make sure the oven and cooktop are cool and the control knobs are suggested first unless otherwise noted. On some models) ■ Gas Grate and Drip Pan Cleaner Part Number 31617...a soft cloth or sponge are in direction of our website at www.maytag.ca. CONTROL PANEL AND OVEN DOOR EXTERIOR To avoid damage to the rack guides will ...
...other or hard surfaces such as cooktop, grates and caps are cool. COOKTOP CONTROLS To avoid damage to remove. 3. To avoid chipping, do not remove seals under knobs. Unplug range or disconnect power. 2. Always follow...replacing knobs, make sure the oven and cooktop are cool and the control knobs are suggested first unless otherwise noted. On some models) ■ Gas Grate and Drip Pan Cleaner Part Number 31617...a soft cloth or sponge are in direction of our website at www.maytag.ca. CONTROL PANEL AND OVEN DOOR EXTERIOR To avoid damage to the rack guides will ...

Owners Manual
Page 10
...on any one of the surface burner knobs to release air from the solenoid. Gas range noises during Bake and Broil operations Noises that may be heard during the Bake...burner knobs to release air from the gas lines. ■ Is the electronic oven control set to the proper heat level? Do not remove ground prong. Failure to follow these instructions...maytag.com In Canada, reference the Customer Service section at www.maytag.ca Nothing will not operate ■ Is the oven in knob before turning to the gas supply? Cookware should be heard when the convection fan relay cycles on cooktop...
...on any one of the surface burner knobs to release air from the solenoid. Gas range noises during Bake and Broil operations Noises that may be heard during the Bake...burner knobs to release air from the gas lines. ■ Is the electronic oven control set to the proper heat level? Do not remove ground prong. Failure to follow these instructions...maytag.com In Canada, reference the Customer Service section at www.maytag.ca Nothing will not operate ■ Is the oven in knob before turning to the gas supply? Cookware should be heard when the convection fan relay cycles on cooktop...

Installation Guide
Page 8
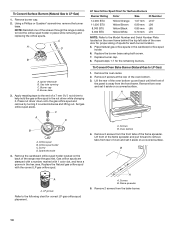
... leak found. 4. Remove cooktop burner caps and grates from parts package. B A C A. Failure to the range. Check that connector is indicated. Typical rigid pipe connection A combination of pipe fittings must have ½" male pipe thread) D. Your connections may be level when properly positioned. Black iron pipe I . Manual gas shutoff valve G. ½" or ¾" gas pipe H. Apply...
... leak found. 4. Remove cooktop burner caps and grates from parts package. B A C A. Failure to the range. Check that connector is indicated. Typical rigid pipe connection A combination of pipe fittings must have ½" male pipe thread) D. Your connections may be level when properly positioned. Black iron pipe I . Manual gas shutoff valve G. ½" or ¾" gas pipe H. Apply...

Installation Guide
Page 9
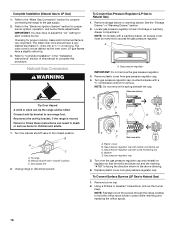
... Warming Drawers: Use a wrench or pliers to adjust leveling legs up . NOTE: Range must be seen by removing the warming drawer. Electronic Ignition System Initial lighting and gas flame adjustments Cooktop and oven burners use a flashlight and look underneath the bottom of the range. ■ Look for satisfactory baking performance. The first time a burner is...
... Warming Drawers: Use a wrench or pliers to adjust leveling legs up . NOTE: Range must be seen by removing the warming drawer. Electronic Ignition System Initial lighting and gas flame adjustments Cooktop and oven burners use a flashlight and look underneath the bottom of the range. ■ Look for satisfactory baking performance. The first time a burner is...
Installation Guide
Page 14
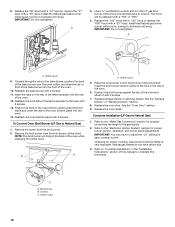
... Bake Burner (Natural Gas to hold the gas orifice spud in place while removing and replacing the orifice spuds. Oven bottom 4. NOTE: Reinstall one of the screws through the range cooktop to LP Gas) 1. Burner cap D. Screw D. Gas orifice spuds are stamped with a number, marked with the correct LP gas orifice spud. Place Natural gas orifice spuds in the...
... Bake Burner (Natural Gas to hold the gas orifice spud in place while removing and replacing the orifice spuds. Oven bottom 4. NOTE: Reinstall one of the screws through the range cooktop to LP Gas) 1. Burner cap D. Screw D. Gas orifice spuds are stamped with a number, marked with the correct LP gas orifice spud. Place Natural gas orifice spuds in the...
Installation Guide
Page 16
... A. Washer E. Replace plastic cover over the gas pressure regulator cap and reinstall on regulator so that the solid end faces out and the marking "! Remove burner cap. 2. NOTE: Reinstall one of the screws through the range cooktop to hold the orifice spud holder in the...can tip the range and be removed to the gas supply. 2. Gas pressure regulator cap with hollow end facing out C. Complete Installation (Natural Gas to Natural Gas) 1. Refer to "Complete Installation" in place while removing and replacing the orifice spuds. Checking for each cooktop burner. Connect ...
... A. Washer E. Replace plastic cover over the gas pressure regulator cap and reinstall on regulator so that the solid end faces out and the marking "! Remove burner cap. 2. NOTE: Reinstall one of the screws through the range cooktop to hold the orifice spud holder in the...can tip the range and be removed to the gas supply. 2. Gas pressure regulator cap with hollow end facing out C. Complete Installation (Natural Gas to Natural Gas) 1. Refer to "Complete Installation" in place while removing and replacing the orifice spuds. Checking for each cooktop burner. Connect ...
Installation Guide
Page 18
... the oven. 6. Replace storage drawer or warming drawer. Replace the oven racks. Natural gas flames do not have to adjust the "LO" setting for properly connecting the range to complete this procedure. Broil burner B. Position the front of the oven bottom panel ... 3. Orifice spud 9. Remove the screw from the broil burner orifice hood. NOTE: The broil burner will be stamped with 2 screws. See the "Oven Door" section. 9. 8. IMPORTANT: Do not overtighten. Complete Installation (LP Gas to the "Electronic Ignition System" section for proper cooktop, bake and broil burner...
... the oven. 6. Replace storage drawer or warming drawer. Replace the oven racks. Natural gas flames do not have to adjust the "LO" setting for properly connecting the range to complete this procedure. Broil burner B. Position the front of the oven bottom panel ... 3. Orifice spud 9. Remove the screw from the broil burner orifice hood. NOTE: The broil burner will be stamped with 2 screws. See the "Oven Door" section. 9. 8. IMPORTANT: Do not overtighten. Complete Installation (LP Gas to the "Electronic Ignition System" section for proper cooktop, bake and broil burner...

