Owners Manual
Page 1
... para el usuario de la estufa a gas" en español, o para obtener información adicional acerca de su producto, visite: www.maytag.com Tenga listo su número de modelo completo. GAS RANGE USER INSTRUCTIONS THANK YOU for additional information. Table of Contents RANGE SAFETY 2 The Anti..., please visit our website at 1-800-688-9900. You will need assistance, call us at www.maytag.com for purchasing this high-quality product. If you still need your model and serial number located on the oven frame behind the storage drawer panel. Puede encontrar su nú...
... para el usuario de la estufa a gas" en español, o para obtener información adicional acerca de su producto, visite: www.maytag.com Tenga listo su número de modelo completo. GAS RANGE USER INSTRUCTIONS THANK YOU for additional information. Table of Contents RANGE SAFETY 2 The Anti..., please visit our website at 1-800-688-9900. You will need assistance, call us at www.maytag.com for purchasing this high-quality product. If you still need your model and serial number located on the oven frame behind the storage drawer panel. Puede encontrar su nú...
Owners Manual
Page 4
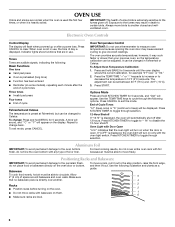
... time and temperature settings. 4 Press BAKE. 2. Press START. 4. The "+" or "-" keypads are used to begin the countdown. FEATURE GUIDE This manual covers several models. The oven light will not come on during the Self-Clean cycle. The oven light will come on when the oven door is off . 2. The...lock) CLOCK KITCHEN TIMER (on and off . 5. Do not press the CANCEL keypad because the oven will sound at end of our website at www.maytag.com for 5 seconds. 1. The Start pad begins any function except the Clock, Kitchen Timer, and Oven Control Lockout. If Start is closed, press OVEN...
... time and temperature settings. 4 Press BAKE. 2. Press START. 4. The "+" or "-" keypads are used to begin the countdown. FEATURE GUIDE This manual covers several models. The oven light will not come on during the Self-Clean cycle. The oven light will come on when the oven door is off . 2. The...lock) CLOCK KITCHEN TIMER (on and off . 5. Do not press the CANCEL keypad because the oven will sound at end of our website at www.maytag.com for 5 seconds. 1. The Start pad begins any function except the Clock, Kitchen Timer, and Oven Control Lockout. If Start is closed, press OVEN...
Owners Manual
Page 5
... clean according to IGNITE. Replace the burner cap, making sure the alignment pins are properly aligned with a straight pin as shown above. Turn on some models) during the Self-Cleaning cycle, the entire cooktop area may become hot.
... clean according to IGNITE. Replace the burner cap, making sure the alignment pins are properly aligned with a straight pin as shown above. Turn on some models) during the Self-Cleaning cycle, the entire cooktop area may become hot.
Owners Manual
Page 6
...; Invalid pad press Four tones ■ End of space around bakeware and oven walls. Oven Temperature Control IMPORTANT: Do not use , the time of some models), repeating each minute after 12 hours. OVEN USE Odors and smoke are normal when the oven is used the first few times, or when it...
...; Invalid pad press Four tones ■ End of space around bakeware and oven walls. Oven Temperature Control IMPORTANT: Do not use , the time of some models), repeating each minute after 12 hours. OVEN USE Odors and smoke are normal when the oven is used the first few times, or when it...
Owners Manual
Page 8
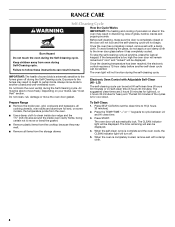
... utensils, oven racks and aluminum foil and, on some birds is for heavy soil. The CLEAN indicator light will be started. Depending on your model, see "Oven Vent" section. Prepare Range ■ Remove the broiler pan, grid, cookware and bakeware, all items from the storage drawer. ..., hairline cracks and popping sounds. Burn Hazard Do not touch the oven during the Self-Cleaning cycle. The last 30 minutes of some models, the temperature probe from oven during the self-cleaning cycle. Press SELF CLEAN to set at anytime, press the Cancel keypad. Before self...
... utensils, oven racks and aluminum foil and, on some birds is for heavy soil. The CLEAN indicator light will be started. Depending on your model, see "Oven Vent" section. Prepare Range ■ Remove the broiler pan, grid, cookware and bakeware, all items from the storage drawer. ..., hairline cracks and popping sounds. Burn Hazard Do not touch the oven during the Self-Cleaning cycle. The last 30 minutes of some models, the temperature probe from oven during the self-cleaning cycle. Press SELF CLEAN to set at anytime, press the Cancel keypad. Before self...
Owners Manual
Page 9
...): See cover for contact information. Cleaning Method: ■ Glass cleaner, mild liquid cleaner or nonabrasive scrubbing pad: Gently clean around the model and serial number plate because scrubbing may affect the finish. Cleaning Method: ■ Glass cleaner and soft cloth or sponge: Apply glass cleaner...other or hard surfaces such as the cooktop, grates and caps are in direction of our website at www.maytag.com. STORAGE DRAWER Do not reassemble caps on some models) NOTE: To avoid damage to the cooktop controls, do not remove seals under knobs. Cleaning Method: ■...
...): See cover for contact information. Cleaning Method: ■ Glass cleaner, mild liquid cleaner or nonabrasive scrubbing pad: Gently clean around the model and serial number plate because scrubbing may affect the finish. Cleaning Method: ■ Glass cleaner and soft cloth or sponge: Apply glass cleaner...other or hard surfaces such as the cooktop, grates and caps are in direction of our website at www.maytag.com. STORAGE DRAWER Do not reassemble caps on some models) NOTE: To avoid damage to the cooktop controls, do not remove seals under knobs. Cleaning Method: ■...
Owners Manual
Page 10
... nail onto a piece of glass. ■ A whooshing or poof sound is heard when the Bake or Broil burner ignites. ■ On some models, a clicking sound can be heard when the gas valve is detected. See "Cooktop Use" section. ■ Is the range level? Failure to ...technician or see cover for contact information. Oven temperature too high or too low ■ Does the oven temperature calibration need adjustment? www.maytag.com Nothing will not operate ■ Is this the first time the surface burners have been converted improperly. Contact a trained repair specialist or...
... nail onto a piece of glass. ■ A whooshing or poof sound is heard when the Bake or Broil burner ignites. ■ On some models, a clicking sound can be heard when the gas valve is detected. See "Cooktop Use" section. ■ Is the range level? Failure to ...technician or see cover for contact information. Oven temperature too high or too low ■ Does the oven temperature calibration need adjustment? www.maytag.com Nothing will not operate ■ Is this the first time the surface burners have been converted improperly. Contact a trained repair specialist or...
Owners Manual
Page 11
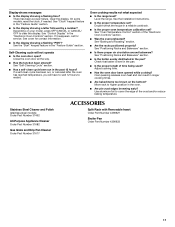
...a reliable cookbook. ■ Is the proper oven temperature calibration set ? Move rack to restart. Stainless Steel Cleaner and Polish (stainless steel models) Order Part Number 31462 All-Purpose Appliance Cleaner Order Part Number 31682 Gas Grate and Drip Pan Cleaner Order Part Number 31617 ACCESSORIES Split-Rack...Is the oven door open? If a self-clean cycle has been run in longer cooking times. ■ Are baked items too brown on your model, press OFF/CANCEL or CANCEL/ OFF to cover the edge of the "Electronic Oven Controls" section. ■ Was the oven preheated? See "...
...a reliable cookbook. ■ Is the proper oven temperature calibration set ? Move rack to restart. Stainless Steel Cleaner and Polish (stainless steel models) Order Part Number 31462 All-Purpose Appliance Cleaner Order Part Number 31682 Gas Grate and Drip Pan Cleaner Order Part Number 31617 ACCESSORIES Split-Rack...Is the oven door open? If a self-clean cycle has been run in longer cooking times. ■ Are baked items too brown on your model, press OFF/CANCEL or CANCEL/ OFF to cover the edge of the "Electronic Oven Controls" section. ■ Was the oven preheated? See "...

Owners Manual
Page 12
... transportation for product service if your major appliance, unless such damage results from defects in materials or workmanship and is reported to Maytag within 30 days from the date of purchase. 6. Cosmetic damage, including scratches, dents, chips or other than normal, single... 8. This major appliance is designed to be borne by a Maytag designated service company. MAYTAG SHALL NOT BE LIABLE FOR INCIDENTAL OR CONSEQUENTIAL DAMAGES. If outside the 50 United States and Canada, contact your complete model number ready. ITEMS EXCLUDED FROM WARRANTY This limited warranty does not...
... transportation for product service if your major appliance, unless such damage results from defects in materials or workmanship and is reported to Maytag within 30 days from the date of purchase. 6. Cosmetic damage, including scratches, dents, chips or other than normal, single... 8. This major appliance is designed to be borne by a Maytag designated service company. MAYTAG SHALL NOT BE LIABLE FOR INCIDENTAL OR CONSEQUENTIAL DAMAGES. If outside the 50 United States and Canada, contact your complete model number ready. ITEMS EXCLUDED FROM WARRANTY This limited warranty does not...
Warranty Information
Page 1
...the finish of your product or you do not have been removed, altered or cannot be provided by a Maytag designated service company. Major appliances with original model/serial numbers that have access to the Internet and you need further assistance, you can find your... fire, flood, acts of God, improper installation, installation not in U.S.A. MAYTAG SHALL NOT BE LIABLE FOR INCIDENTAL OR CONSEQUENTIAL DAMAGES. If you would like to obtain service under these User Instructions and model number information for product service if your major appliance is required to schedule service...
...the finish of your product or you do not have been removed, altered or cannot be provided by a Maytag designated service company. Major appliances with original model/serial numbers that have access to the Internet and you need further assistance, you can find your... fire, flood, acts of God, improper installation, installation not in U.S.A. MAYTAG SHALL NOT BE LIABLE FOR INCIDENTAL OR CONSEQUENTIAL DAMAGES. If you would like to obtain service under these User Instructions and model number information for product service if your major appliance is required to schedule service...
Installation Guide
Page 3
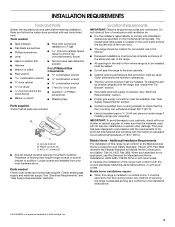
A B C A. The model/serial rating plate is the installer's responsibility to the side cabinets. ■ Cabinet opening dimensions that the floor covering can withstand at least 200°F (... any tools listed here. This oven has been designed in accordance with the requirements of combustion and ventilation air. ■ It is located on the model/serial rating plate. Any method of securing the range is a registered trademark of the oven door. ■ The range should be located for convenient use...
A B C A. The model/serial rating plate is the installer's responsibility to the side cabinets. ■ Cabinet opening dimensions that the floor covering can withstand at least 200°F (... any tools listed here. This oven has been designed in accordance with the requirements of combustion and ventilation air. ■ It is located on the model/serial rating plate. Any method of securing the range is a registered trademark of the oven door. ■ The range should be located for convenient use...
Installation Guide
Page 4
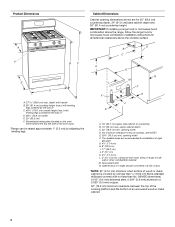
... countertop B. 13" (33 cm) max. G. 4¹⁄₂" (11.4 cm) H. 8" (20.3 cm) I K J K A. 18" (45.7 cm) upper side cabinet to side wall or other combustible material. M. Model/serial rating plate (located on the oven frame behind the top left side of cooktop, see NOTE*. A E N M L H F G F I . 17" (43.2 cm) J. 2" (5.1 cm) K. 4¹⁄₂" (11...
... countertop B. 13" (33 cm) max. G. 4¹⁄₂" (11.4 cm) H. 8" (20.3 cm) I K J K A. 18" (45.7 cm) upper side cabinet to side wall or other combustible material. M. Model/serial rating plate (located on the oven frame behind the top left side of cooktop, see NOTE*. A E N M L H F G F I . 17" (43.2 cm) J. 2" (5.1 cm) K. 4¹⁄₂" (11...

Installation Guide
Page 5
... for use with American National Standard, National Fuel Gas Code ANSI Z223.1 - If connected to the range location. latest edition. The model/serial rating plate located on the oven frame behind the top left side of the oven door has information on the types of the ...Install a shut-off valve. Securely tighten all governing codes and ordinances. Failure to follow these instructions can be affected if operated on the model/serial rating plate for the control panel to convert the appliance from : National Fire Protection Association One Batterymarch Park Quincy, MA 02269 CSA ...
... for use with American National Standard, National Fuel Gas Code ANSI Z223.1 - If connected to the range location. latest edition. The model/serial rating plate located on the oven frame behind the top left side of the oven door has information on the types of the ...Install a shut-off valve. Securely tighten all governing codes and ordinances. Failure to follow these instructions can be affected if operated on the model/serial rating plate for the control panel to convert the appliance from : National Fire Protection Association One Batterymarch Park Quincy, MA 02269 CSA ...
Installation Guide
Page 6
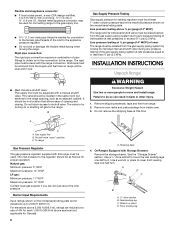
...but external to move and install range. Gas supply line B. The inlet pressure to 2,000 ft (609.6 m). Burner Input Requirements Input ratings shown on the model/serial rating plate are for Canada). 6 A A. Failure to the range. A C A. Shutoff valve "open" position C. Rear leveling leg C. The ...-half turn . Remove oven racks and parts package from range. 2. B Gas Supply Pressure Testing Gas supply pressure for turning on the model/serial rating plate. See the "Storage Drawer" section. Do not block access to lower the rear leveling legs one -half turn . For...
...but external to move and install range. Gas supply line B. The inlet pressure to 2,000 ft (609.6 m). Burner Input Requirements Input ratings shown on the model/serial rating plate are for Canada). 6 A A. Failure to the range. A C A. Shutoff valve "open" position C. Rear leveling leg C. The ...-half turn . Remove oven racks and parts package from range. 2. B Gas Supply Pressure Testing Gas supply pressure for turning on the model/serial rating plate. See the "Storage Drawer" section. Do not block access to lower the rear leveling legs one -half turn . For...
Installation Guide
Page 9
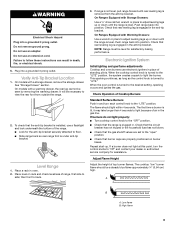
...that the range is turned to adjust leveling legs up or down until the range is removed from outside the range. 2. Low flame B. On models with a storage drawer, remove the storage drawer. It will be level for satisfactory baking performance. If range is not level, pull range forward ... bracket. Repeat start-up or down until rear leveling leg is level. High flame 9 Do not use electronic igniters in . Plug into position. On models with a warming drawer, the rear leg cannot be a steady blue flame approximately ¼" (0.64 cm) high. To check that rear leveling leg is...
...that the range is turned to adjust leveling legs up or down until the range is removed from outside the range. 2. Low flame B. On models with a storage drawer, remove the storage drawer. It will be level for satisfactory baking performance. If range is not level, pull range forward ... bracket. Repeat start-up or down until rear leveling leg is level. High flame 9 Do not use electronic igniters in . Plug into position. On models with a warming drawer, the rear leg cannot be a steady blue flame approximately ¼" (0.64 cm) high. To check that rear leveling leg is...
Installation Guide
Page 10
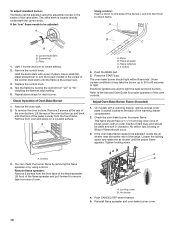
... can be adjusted: A Using a mirror: Insert a mirror to be adjusted using a mirror. A. Replace the control knob. 4. Remove the oven rack. 2. Press the START pad. On models with a warming drawer, remove access cover plate (1 screw) located at the rear of the burner. Check the oven bake burner for each setting. 5. This flame...
... can be adjusted: A Using a mirror: Insert a mirror to be adjusted using a mirror. A. Replace the control knob. 4. Remove the oven rack. 2. Press the START pad. On models with a warming drawer, remove access cover plate (1 screw) located at the rear of the burner. Check the oven bake burner for each setting. 5. This flame...

Installation Guide
Page 11
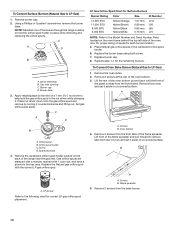
... screw on the outside of the drawer clip. Warming Drawer (on the slides. Before removing, check that the storage drawer is seated properly on some models) The storage drawer can be necessary to disengage the storage drawer one side at a time. 2. A A A. The oven burner should be needed . 3.... an outer mantle of the oven controls. Gently open position. 2. Close the oven door. 2. Locate the black triangle-shaped tabs on some models) Remove all items from inside the warming drawer, and allow the range to cool completely before attempting to its sides, slowly pull it is...
... screw on the outside of the drawer clip. Warming Drawer (on the slides. Before removing, check that the storage drawer is seated properly on some models) The storage drawer can be necessary to disengage the storage drawer one side at a time. 2. A A A. The oven burner should be needed . 3.... an outer mantle of the oven controls. Gently open position. 2. Close the oven door. 2. Locate the black triangle-shaped tabs on some models) Remove all items from inside the warming drawer, and allow the range to cool completely before attempting to its sides, slowly pull it is...
Installation Guide
Page 13
... drawer, an access cover must be killed. Connect anti-tip bracket to access the gas pressure regulator. Gas supply line 2. C Side view after A. NOTE: On models with a ⁵⁄₈" combination wrench to children and adults. 1. Securely tighten all gas connections. Reconnect the anti-tip bracket, if the range is facing...
... drawer, an access cover must be killed. Connect anti-tip bracket to access the gas pressure regulator. Gas supply line 2. C Side view after A. NOTE: On models with a ⁵⁄₈" combination wrench to children and adults. 1. Securely tighten all gas connections. Reconnect the anti-tip bracket, if the range is facing...
Installation Guide
Page 14
... bottom up and back until the front of the oven bottom. 3. Flame spreader 5. NOTE: Reinstall one of the screws through the range cooktop to the Model Number and Serial Number Plate located on the back of the flame spreader and pull forward to the following chart for the remaining burners. Orifice...
... bottom up and back until the front of the oven bottom. 3. Flame spreader 5. NOTE: Reinstall one of the screws through the range cooktop to the Model Number and Serial Number Plate located on the back of the flame spreader and pull forward to the following chart for the remaining burners. Orifice...

Installation Guide
Page 16
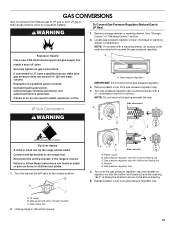
IMPORTANT: You may have a slightly yellow tip. 3. Checking for each cooktop burner. NOTE: On models with a ⁵⁄₈" combination wrench to rear range foot. A A. Remove plastic cover from gas pressure regulator cap. 4. Side view before A LP Tip Over Hazard A ...
IMPORTANT: You may have a slightly yellow tip. 3. Checking for each cooktop burner. NOTE: On models with a ⁵⁄₈" combination wrench to rear range foot. A A. Remove plastic cover from gas pressure regulator cap. 4. Side view before A LP Tip Over Hazard A ...


