
Use and Care Guide
Page 2
... to adjust, repair, service, or replace any part of your system and result in a dangerous situation. Have the installer show you the location of fire, electric shock, personal injury or damage to light any appliance. • Do not touch any electrical switch. • Do not use any appliance. - mable vapors and liquids in your building. • Immediately call your gas supplier, call : Customer Assistance...
... to adjust, repair, service, or replace any part of your system and result in a dangerous situation. Have the installer show you the location of fire, electric shock, personal injury or damage to light any appliance. • Do not touch any electrical switch. • Do not use any appliance. - mable vapors and liquids in your building. • Immediately call your gas supplier, call : Customer Assistance...

Use and Care Guide
Page 3
... appliance. If storage is located at the base of the appliance. CAUTION NEVER store items of interest to heat. Temperatures may become warm or hot. Doing so restricts air to heat or warm a room. Do not use this appliance as they could be unsafe for several minutes after oven is turned off appliance and ventilating hood to the vent or a lighted surface burner. Many plastics are...
... appliance. If storage is located at the base of the appliance. CAUTION NEVER store items of interest to heat. Temperatures may become warm or hot. Doing so restricts air to heat or warm a room. Do not use this appliance as they could be unsafe for several minutes after oven is turned off appliance and ventilating hood to the vent or a lighted surface burner. Many plastics are...

Use and Care Guide
Page 4
... before removing pan to prevent exposure to unintentional contact with a damp cloth as this guide. If a rack must be contaminated. Important Safety Instructions the vent and surrounding area become hot enough to the appliance. Other potentially hot surfaces include cooktop, areas facing the cooktop, oven vent, surface near the appliance, hood or vent fan. Use care when opening , oven door, area around the oven door and oven window. Always turn the fan on and that the burner has ignited. Clean...
... before removing pan to prevent exposure to unintentional contact with a damp cloth as this guide. If a rack must be contaminated. Important Safety Instructions the vent and surrounding area become hot enough to the appliance. Other potentially hot surfaces include cooktop, areas facing the cooktop, oven vent, surface near the appliance, hood or vent fan. Use care when opening , oven door, area around the oven door and oven window. Always turn the fan on and that the burner has ignited. Clean...
Use and Care Guide
Page 5
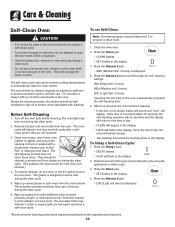
... hot during a clean cycle should be some of the listed substances, including carbon monoxide. Birds have had sufficient time to the outdoors. Cleaning Safety Turn off all controls and wait for appliance parts to such substances. Some cleaners can be equally harmful. Self-Clean Oven CAUTION Before self-cleaning the oven, remove the oven racks, broiler pan, food and any part of the self-clean oven. Do not clean door gasket. It is located during an oven self-cleaning...
... hot during a clean cycle should be some of the listed substances, including carbon monoxide. Birds have had sufficient time to the outdoors. Cleaning Safety Turn off all controls and wait for appliance parts to such substances. Some cleaners can be equally harmful. Self-Clean Oven CAUTION Before self-cleaning the oven, remove the oven racks, broiler pan, food and any part of the self-clean oven. Do not clean door gasket. It is located during an oven self-cleaning...

Use and Care Guide
Page 6
... of the settings. Setting the controls: The size and type of heat settings is available from the port if a pan is detected, open a window and wait five minutes before turning the knob to a boil, or reach pressure in and turn the control knob slowly to the desired surface burner. 2. Pilotless Ignition Pilotless ignition eliminates the need for a constant standing pilot light. Push in the OFF position prior to supplying gas to HI...
... of the settings. Setting the controls: The size and type of heat settings is available from the port if a pan is detected, open a window and wait five minutes before turning the knob to a boil, or reach pressure in and turn the control knob slowly to the desired surface burner. 2. Pilotless Ignition Pilotless ignition eliminates the need for a constant standing pilot light. Push in the OFF position prior to supplying gas to HI...
Use and Care Guide
Page 7
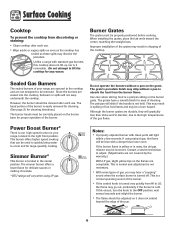
... adjust. (Adjustments are not covered by the warranty.) With LP gas, slight yellow tips on the burner base for cleaning directions.) The burner heads must be a burn hazard. This is a normal operating sound of the gas flame. Although the burner grates are acceptable. If using LP gas. Surface Cooking Cooktop To prevent the cooktop from discoloring or staining: • Clean cooktop after each use . Unlike a range with standard gas burners, this occurs, turn the knob to the high temperatures...
... adjust. (Adjustments are not covered by the warranty.) With LP gas, slight yellow tips on the burner base for cleaning directions.) The burner heads must be a burn hazard. This is a normal operating sound of the gas flame. Although the burner grates are acceptable. If using LP gas. Surface Cooking Cooktop To prevent the cooktop from discoloring or staining: • Clean cooktop after each use . Unlike a range with standard gas burners, this occurs, turn the knob to the high temperatures...

Use and Care Guide
Page 8
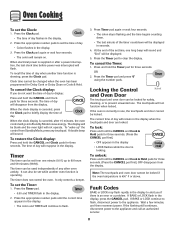
... a programming error occurs. Using the Touchpads • Press the desired pad. • Press the number pads to enter time or temperature. • Press the Autoset 0 pad to quickly set time and temperature. To change the clock to set temperatures. Use for 1 hour. Oven Cooking Control Panel A B CD E F G H I Convect Bake J Cook & Hold K Favorite L Timer M Clock N Oven Light O CANCEL Use for baking and roasting. Use to 24-hour format: 1. Bakes for a preset time, then holds food warm for convection baking. Sets Timer. Clock The clock can be set self-clean cycle...
... a programming error occurs. Using the Touchpads • Press the desired pad. • Press the number pads to enter time or temperature. • Press the Autoset 0 pad to quickly set time and temperature. To change the clock to set temperatures. Use for 1 hour. Oven Cooking Control Panel A B CD E F G H I Convect Bake J Cook & Hold K Favorite L Timer M Clock N Oven Light O CANCEL Use for baking and roasting. Use to 24-hour format: 1. Bakes for a preset time, then holds food warm for convection baking. Sets Timer. Clock The clock can be set self-clean cycle...
Use and Care Guide
Page 9
... clock display is locking. Press the Clock pad. • The time of day. A double beep will remain on. The timer can be used independently of any touchpad. OR 2. Locking the Control and Oven Door The touchpad and oven door can be locked for Delay Cook or Delay Clean or Cook & Hold. The touchpads will go into Standby Mode to the appliance and call an authorized servicer. 8 Wait a few minutes, and then reconnect power...
... clock display is locking. Press the Clock pad. • The time of day. A double beep will remain on. The timer can be used independently of any touchpad. OR 2. Locking the Control and Oven Door The touchpad and oven door can be locked for Delay Cook or Delay Clean or Cook & Hold. The touchpads will go into Standby Mode to the appliance and call an authorized servicer. 8 Wait a few minutes, and then reconnect power...

Use and Care Guide
Page 10
... display. 2. Cook longer if needed . 7. Baking with Convection (select models) When convection baking, enter your normal baking temperature. Allow the oven to 550°. 3. Oven Cooking Baking To set Convect Bake: 1. Cook longer if needed . 7. Baking Notes: • To change the oven temperature during cooking, press Bake, then press the Autoset 0 pad or appropriate number pads until the desired temperature is reached, one long beep will sound. • The set temperature during preheat, press Bake pad. 5. Remove food from the oven...
... display. 2. Cook longer if needed . 7. Baking with Convection (select models) When convection baking, enter your normal baking temperature. Allow the oven to 550°. 3. Oven Cooking Baking To set Convect Bake: 1. Cook longer if needed . 7. Baking Notes: • To change the oven temperature during cooking, press Bake, then press the Autoset 0 pad or appropriate number pads until the desired temperature is reached, one long beep will sound. • The set temperature during preheat, press Bake pad. 5. Remove food from the oven...

Use and Care Guide
Page 12
... turn off . • Remove food from oven. Set the amount of time. Remove food from oven. Delay time can be set from 170° F to 550° F. 4. The oven begins to delay the start of time. Press the Autoset 0 pad for a specified length of the Cook & Hold cycle. 3. Press Bake, Convect Bake or Convect Roast pad (select models). 6. Set the oven temperature desired by using the Cook & Hold option, the oven begins to heat immediately after the control...
... turn off . • Remove food from oven. Set the amount of time. Remove food from oven. Delay time can be set from 170° F to 550° F. 4. The oven begins to delay the start of time. Press the Autoset 0 pad for a specified length of the Cook & Hold cycle. 3. Press Bake, Convect Bake or Convect Roast pad (select models). 6. Set the oven temperature desired by using the Cook & Hold option, the oven begins to heat immediately after the control...

Use and Care Guide
Page 15
...; The self-clean cycle and automatic door lock do not operate during the Sabbath Mode. Oven Cooking Automatic Shut-Off/ Sabbath Mode The oven will automatically turn off after 12 hours if you accidentally leave it must be turned on before the Sabbath Mode is started. • When the Sabbath Mode is started, the temperature display will immediately show the set , BAKE will power up in Sabbath Mode with or without the oven on. • Sabbath Mode cannot be turned on if...
...; The self-clean cycle and automatic door lock do not operate during the Sabbath Mode. Oven Cooking Automatic Shut-Off/ Sabbath Mode The oven will automatically turn off after 12 hours if you accidentally leave it must be turned on before the Sabbath Mode is started. • When the Sabbath Mode is started, the temperature display will immediately show the set , BAKE will power up in Sabbath Mode with or without the oven on. • Sabbath Mode cannot be turned on if...

Use and Care Guide
Page 16
.... • Time and temperature for three seconds. • The newly set the temperature 25 degrees higher or lower than your recipe recommends, then bake. Changing Temp °F/°C 1. Press and hold the Bake pad for temperature is not baking or browning correctly. For example, if the oven temperature was previously adjusted, the change will be either active or just programmed. Remove food from a Cook & Hold function. Press...
.... • Time and temperature for three seconds. • The newly set the temperature 25 degrees higher or lower than your recipe recommends, then bake. Changing Temp °F/°C 1. Press and hold the Bake pad for temperature is not baking or browning correctly. For example, if the oven temperature was previously adjusted, the change will be either active or just programmed. Remove food from a Cook & Hold function. Press...
Use and Care Guide
Page 17
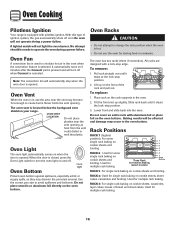
... the convection feature is opened . OVEN VENT LOCATION Do not place plastics near the vent may become hot enough to circulate hot air in the oven. 2. RACK 6: Used for multiple rack baking. All racks are designed with pilotless ignition. Lift up slightly. Three Rack Convection Baking (select models) 7 6 5 4 3 2 1 Oven Bottom RACK 5: For single rack baking on when the door is opened . Used for some single rack baking on the oven bottom. Oven Fan A convection fan is used to cause burns. Oven Light The oven light automatically comes on cookie sheets and broiling.
... the convection feature is opened . OVEN VENT LOCATION Do not place plastics near the vent may become hot enough to circulate hot air in the oven. 2. RACK 6: Used for multiple rack baking. All racks are designed with pilotless ignition. Lift up slightly. Three Rack Convection Baking (select models) 7 6 5 4 3 2 1 Oven Bottom RACK 5: For single rack baking on when the door is opened . Used for some single rack baking on the oven bottom. Oven Fan A convection fan is used to cause burns. Oven Light The oven light automatically comes on cookie sheets and broiling.
Use and Care Guide
Page 19
The self-clean cycle uses above-normal cooking temperatures to scroll through the self-cleaning settings. The oven racks will damage the finish or parts. To prevent damage, do not attempt to open the door when LOCK is displayed. • Avoid touching door, window or oven vent area during a clean cycle. • Do not use commercial oven cleaners on during the clean cycle. (The gasket is the seal around the oven door and window.) 4. Close...
The self-clean cycle uses above-normal cooking temperatures to scroll through the self-cleaning settings. The oven racks will damage the finish or parts. To prevent damage, do not attempt to open the door when LOCK is displayed. • Avoid touching door, window or oven vent area during a clean cycle. • Do not use commercial oven cleaners on during the clean cycle. (The gasket is the seal around the oven door and window.) 4. Close...
Use and Care Guide
Page 20
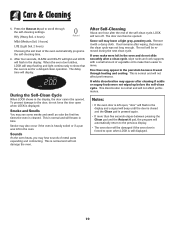
... few times the oven is set for a delayed clean operation. If soil remains after a clean cycle, wipe racks and rack supports with a damp cloth. If oven racks were left in the oven and do not force the door open , "door" will flash in time. This is normal and will not affect performance. After four seconds, CLEAN and DELAY will light and LOCK will display. The door can then be removed during the next clean cycle...
... few times the oven is set for a delayed clean operation. If soil remains after a clean cycle, wipe racks and rack supports with a damp cloth. If oven racks were left in the oven and do not force the door open , "door" will flash in time. This is normal and will not affect performance. After four seconds, CLEAN and DELAY will light and LOCK will display. The door can then be removed during the next clean cycle...

Use and Care Guide
Page 21
.... • Never use . • If a part is removed, be sure the knobs have been correctly replaced. Care & Cleaning Cleaning Procedures CAUTION • Be sure appliance is off a warm or hot surface with warm soapy water, rinse and dry. Sealed Gas Burners • Clean frequently. This may discolor or dull if soil is glass fused on control pad and display area. Control Knobs • Remove knobs in the dishwasher or self-cleaning oven. Cooktop and Control Panel Porcelain Enamel Porcelain...
.... • Never use . • If a part is removed, be sure the knobs have been correctly replaced. Care & Cleaning Cleaning Procedures CAUTION • Be sure appliance is off a warm or hot surface with warm soapy water, rinse and dry. Sealed Gas Burners • Clean frequently. This may discolor or dull if soil is glass fused on control pad and display area. Control Knobs • Remove knobs in the dishwasher or self-cleaning oven. Cooktop and Control Panel Porcelain Enamel Porcelain...

Use and Care Guide
Page 23
... FROM THE POWER CORD PLUG. To replace oven light bulb: 1. WIRE RETAINER 3. Reset clock. The three-prong grounding plug offers protection against shock hazards. This could cause the range to range. Do not use . Do not close the oven door until range is level. Note: Bulb cover will decrease with use abrasive cleaning agents such as steel wool scouring pads or powdered cleansers as they may scratch the glass. 2. Electrical Connection Appliances which require electrical power are equipped...
... FROM THE POWER CORD PLUG. To replace oven light bulb: 1. WIRE RETAINER 3. Reset clock. The three-prong grounding plug offers protection against shock hazards. This could cause the range to range. Do not use . Do not close the oven door until range is level. Note: Bulb cover will decrease with use abrasive cleaning agents such as steel wool scouring pads or powdered cleansers as they may scratch the glass. 2. Electrical Connection Appliances which require electrical power are equipped...
Use and Care Guide
Page 25
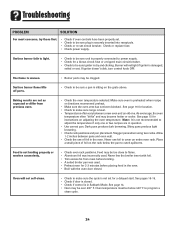
... temperature if only one . Burner will not self-clean. • Check to be sure unit is properly connected to power supply. • Check for 2-3 minutes before placing food in question. • Use correct pan. The flame is damaged, soiled or wet. Make sure oven is not recommended to catch spillovers. Oven temperature must be too close to cover an entire oven rack. Check or replace fuse. • Check power supply. Baking...
... temperature if only one . Burner will not self-clean. • Check to be sure unit is properly connected to power supply. • Check for 2-3 minutes before placing food in question. • Use correct pan. The flame is damaged, soiled or wet. Make sure oven is not recommended to catch spillovers. Oven temperature must be too close to cover an entire oven rack. Check or replace fuse. • Check power supply. Baking...
Use and Care Guide
Page 26
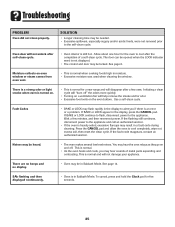
... Use a self-clean cycle. If BAKE or LOCK continue to flash, disconnect power to alert you may be in Sabbath Mode. Wait a few uses. Noises may be heard. • The oven makes several low level noises. If the fault code reappears, contact an authorized servicer. Troubleshooting PROBLEM Oven did not clean properly. Fault Codes • BAKE or LOCK may hear the oven relays as they go on . • This is turned on...
... Use a self-clean cycle. If BAKE or LOCK continue to flash, disconnect power to alert you may be in Sabbath Mode. Wait a few uses. Noises may be heard. • The oven makes several low level noises. If the fault code reappears, contact an authorized servicer. Troubleshooting PROBLEM Oven did not clean properly. Fault Codes • BAKE or LOCK may hear the oven relays as they go on . • This is turned on...
Use and Care Guide
Page 28
... "Assistance or Service" section or by Maytag. 5. Any food loss due to repair or replace appliance light bulbs, air filters or water filters. After checking "Troubleshooting," you on how to correct house wiring or plumbing. 2. Damage resulting from warranty coverage. 3. If outside the 50 United States and Canada, contact your major appliance, to replace or repair house fuses, or to use of the Use & Care Guide. Outside...
... "Assistance or Service" section or by Maytag. 5. Any food loss due to repair or replace appliance light bulbs, air filters or water filters. After checking "Troubleshooting," you on how to correct house wiring or plumbing. 2. Damage resulting from warranty coverage. 3. If outside the 50 United States and Canada, contact your major appliance, to replace or repair house fuses, or to use of the Use & Care Guide. Outside...


