
Use and Care Guide
Page 2
... this manual with the manufacturer's instructions. Recognize Safety Symbols, Words, Labels cian. Do not attempt to a qualified servicer. Installation and service must be detected by a properly installed anti-tip device. WARNING Gas leaks may be referred to adjust, repair, service, or replace any part of the appliance. Install and use in severe personal injury or death. Hazards or unsafe practices which COULD result in this guide is specifically...
... this manual with the manufacturer's instructions. Recognize Safety Symbols, Words, Labels cian. Do not attempt to a qualified servicer. Installation and service must be detected by a properly installed anti-tip device. WARNING Gas leaks may be referred to adjust, repair, service, or replace any part of the appliance. Install and use in severe personal injury or death. Hazards or unsafe practices which COULD result in this guide is specifically...
Use and Care Guide
Page 3
... to 2 Some parts of the rear leveling legs is turned off appliance and ventilating hood to heat or warm a room. The hot air from the vent may ignite flammable items and may result in carbon monoxide poisoning. • Cooktop: Smother fire or flame in closed containers which are EXPLOSIVE when exposed to remove smoke and odor. Many plastics are removed from blowing over hot surface burners, cabinet storage...
... to 2 Some parts of the rear leveling legs is turned off appliance and ventilating hood to heat or warm a room. The hot air from the vent may ignite flammable items and may result in carbon monoxide poisoning. • Cooktop: Smother fire or flame in closed containers which are EXPLOSIVE when exposed to remove smoke and odor. Many plastics are removed from blowing over hot surface burners, cabinet storage...
Use and Care Guide
Page 4
... to cover oven racks or oven bottom. Always turn burner off , do not extend handles over adjacent surface burners. Clothing may ignite. Should the bulb break, disconnect power to burner flame. If a rack must be used for deep fat frying cool before removing pan to prevent exposure to the appliance before moving or replacing food. Do not use high heat for food or cooking utensils. Make sure the correct burner is turned on hood or...
... to cover oven racks or oven bottom. Always turn burner off , do not extend handles over adjacent surface burners. Clothing may ignite. Should the bulb break, disconnect power to burner flame. If a rack must be used for deep fat frying cool before removing pan to prevent exposure to the appliance before moving or replacing food. Do not use high heat for food or cooking utensils. Make sure the correct burner is turned on hood or...
Use and Care Guide
Page 5
... range to become hot during the self-clean cycle. Cleaning Safety Turn off all controls and wait for cooktop or oven usage without breaking due to the sudden change in or around any other utensils. Use care to avoid steam burns if a wet sponge or cloth is located during a self-clean cycle. Fumes released during a clean cycle should be avoided. Important Safety Instructions Only certain types of glass, glass/ceramic, ceramic...
... range to become hot during the self-clean cycle. Cleaning Safety Turn off all controls and wait for cooktop or oven usage without breaking due to the sudden change in or around any other utensils. Use care to avoid steam burns if a wet sponge or cloth is located during a self-clean cycle. Fumes released during a clean cycle should be avoided. Important Safety Instructions Only certain types of glass, glass/ceramic, ceramic...
Use and Care Guide
Page 6
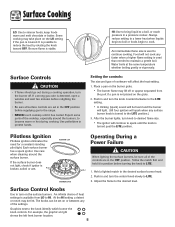
... of the controls are set on the burner grate. • The burner flame may lift off . Setting the controls: The size and type of heat settings is available from the port if a pan is turned past the LITE position. Use care when cleaning around the burners, to become warm or hot during a cooking operation, turn the control knob slowly to LITE. 3. Strike the match first and hold it in position before supplying gas to maintain...
... of the controls are set on the burner grate. • The burner flame may lift off . Setting the controls: The size and type of heat settings is available from the port if a pan is turned past the LITE position. Use care when cleaning around the burners, to become warm or hot during a cooking operation, turn the control knob slowly to LITE. 3. Strike the match first and hold it in position before supplying gas to maintain...
Use and Care Guide
Page 7
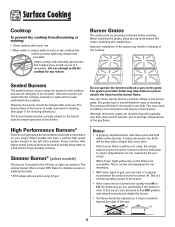
... when using natural gas, the flame will slide if the handle is located in spilling of cleaning. Do not operate the burners without a pan to absorb the heat from HI to the high temperatures of gas, you may be removed. The grates have a second high speed burner located in chipping of the burner. Although the burner grates are not designed to lift the cooktop for large-quantity cooking. High Performance Burners* There...
... when using natural gas, the flame will slide if the handle is located in spilling of cleaning. Do not operate the burners without a pan to absorb the heat from HI to the high temperatures of gas, you may be removed. The grates have a second high speed burner located in chipping of the burner. Although the burner grates are not designed to lift the cooktop for large-quantity cooking. High Performance Burners* There...
Use and Care Guide
Page 8
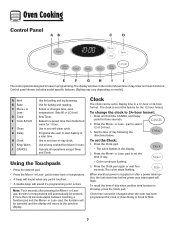
Oven Cooking Control Panel A B C D E F G H I Keep Warm J CANCEL Use for baking and roasting. The display window on model.) A Broil B Bake C More+ or LessD Timer E Cook & Hold F Clean G Delay H Clock I J The control panel is designed for ease in a 12-hour or 24-hour format. Sets HI or LO broil. Bakes for a preset time, then holds food warm for three seconds. 2. Use to set the Clock: 1. Cancels all operations except Timer and Clock. Clock The clock can be changed when the oven has been programmed for the...
Oven Cooking Control Panel A B C D E F G H I Keep Warm J CANCEL Use for baking and roasting. The display window on model.) A Broil B Bake C More+ or LessD Timer E Cook & Hold F Clean G Delay H Clock I J The control panel is designed for ease in a 12-hour or 24-hour format. Sets HI or LO broil. Bakes for a preset time, then holds food warm for three seconds. 2. Use to set the Clock: 1. Cancels all operations except Timer and Clock. Clock The clock can be changed when the oven has been programmed for the...
Use and Care Guide
Page 9
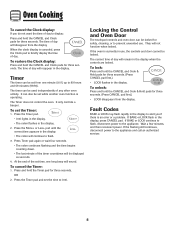
... BAKE or LOCK flash in the display. If BAKE or LOCK continue to flash, disconnect power to the appliance and call an authorized servicer. 8 Timer The timer can be set from the display. Press the Timer pad. • 0:00 lights in the display. • The colon flashes in use . OR 2. Press the Timer pad and set the Timer: 1. It can be locked. To set the time to prevent unwanted use , the controls and door...
... BAKE or LOCK flash in the display. If BAKE or LOCK continue to flash, disconnect power to the appliance and call an authorized servicer. 8 Timer The timer can be set from the display. Press the Timer pad. • 0:00 lights in the display. • The colon flashes in use . OR 2. Press the Timer pad and set the Timer: 1. It can be locked. To set the time to prevent unwanted use , the controls and door...
Use and Care Guide
Page 11
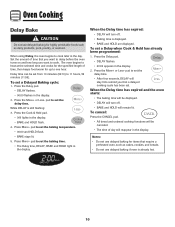
... use delayed baking if oven is already hot. 10 Set the amount of time that require a preheated oven, such as dairy products, pork, poultry, or seafood. When using Delay, the oven begins to heat at the selected time and cooks for the specified length of day will turn off . • Baking time is displayed. • BAKE and HOLD are displayed. The oven begins to cook later in the display. To set the baking time. • The Delay time, DELAY, BAKE and HOLD light...
... use delayed baking if oven is already hot. 10 Set the amount of time that require a preheated oven, such as dairy products, pork, poultry, or seafood. When using Delay, the oven begins to heat at the selected time and cooks for the specified length of day will turn off . • Baking time is displayed. • BAKE and HOLD are displayed. The oven begins to cook later in the display. To set the baking time. • The Delay time, DELAY, BAKE and HOLD light...

Use and Care Guide
Page 12
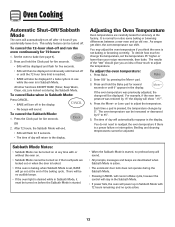
... quality, oven cooked foods should be displayed while Keep Warm is Fahrenheit. 2. WARM and the temperature will be displayed (°F or °C). (If no longer than 1 to set 170° F. - Changing Temp °F/°C 1. A single beep will sound and the current setting will return to increase the temperature. • Press the Less- Press or press and hold the CANCEL and Bake pads at...
... quality, oven cooked foods should be displayed while Keep Warm is Fahrenheit. 2. WARM and the temperature will be displayed (°F or °C). (If no longer than 1 to set 170° F. - Changing Temp °F/°C 1. A single beep will sound and the current setting will return to increase the temperature. • Press the Less- Press or press and hold the CANCEL and Bake pads at...
Use and Care Guide
Page 13
... be displayed and flash for five seconds. pad to adjust the temperature. Each time a pad is pressed, the temperature changes by 5° to change will then be turned on if the touchpads are locked out or when the door is locked. • If the oven is baking when Sabbath Mode is set the temperature 25° higher or lower than your recipe recommends, then bake. Broiling and cleaning temperatures cannot be displayed.
... be displayed and flash for five seconds. pad to adjust the temperature. Each time a pad is pressed, the temperature changes by 5° to change will then be turned on if the touchpads are locked out or when the door is locked. • If the oven is baking when Sabbath Mode is set the temperature 25° higher or lower than your recipe recommends, then bake. Broiling and cleaning temperatures cannot be displayed.
Use and Care Guide
Page 15
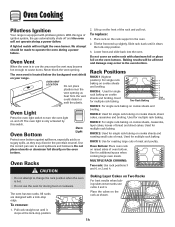
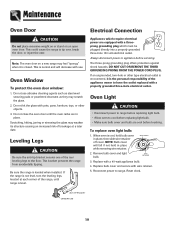
Oven Vent When the oven is in the oven. 2. The oven vent is only activated by this type of oven bottom. Oven Light Press the oven light switch to change the rack position when the oven is equipped with pilotless ignition. Use the correct pan size to cause burns. Oven Racks CAUTION • Do not attempt to turn the oven light on and off and the oven will not light the oven burner. Lift up slightly. To replace: 1. Baking results will...
Oven Vent When the oven is in the oven. 2. The oven vent is only activated by this type of oven bottom. Oven Light Press the oven light switch to change the rack position when the oven is equipped with pilotless ignition. Use the correct pan size to cause burns. Oven Racks CAUTION • Do not attempt to turn the oven light on and off and the oven will not light the oven burner. Lift up slightly. To replace: 1. Baking results will...
Use and Care Guide
Page 16
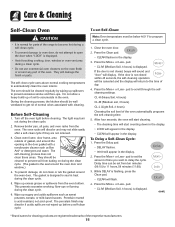
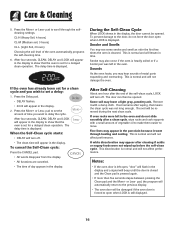
... to seal in the door gasket with cleaning. Close the oven door. 2. Press the More+ or Less- To Delay a Self-Clean Cycle: 1. Delay time can be cleaned regularly by wiping up excess grease or spillovers from baking on the oven finish or around the opening in heat during the clean cycle. 5. cont. * Brand names for parts of the respective manufacturers. 15 Remove broiler pan, all pans, and oven racks from ten minutes...
... to seal in the door gasket with cleaning. Close the oven door. 2. Press the More+ or Less- To Delay a Self-Clean Cycle: 1. Delay time can be cleaned regularly by wiping up excess grease or spillovers from baking on the oven finish or around the opening in heat during the clean cycle. 5. cont. * Brand names for parts of the respective manufacturers. 15 Remove broiler pan, all pans, and oven racks from ten minutes...
Use and Care Guide
Page 17
... seconds, CLEAN, DELAY and LOCK will appear in the display. After Self-Cleaning About one hour after wiping, that the oven is displayed. The door can then be removed during the next clean cycle. If soil remains after the end of metal parts expanding and contracting. Fine lines may see some smoke and smell an odor the first few times the oven is set for a delayed clean operation. A white...
... seconds, CLEAN, DELAY and LOCK will appear in the display. After Self-Cleaning About one hour after wiping, that the oven is displayed. The door can then be removed during the next clean cycle. If soil remains after the end of metal parts expanding and contracting. Fine lines may see some smoke and smell an odor the first few times the oven is set for a delayed clean operation. A white...
Use and Care Guide
Page 18
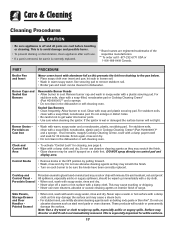
... Gas Burners • Clean frequently. Clean with a soap-filled, nonabrasive, plastic pad or Cooktop Cleaning Creme* (Part #20000001)** and a sponge. Cooktop and Control Panel Porcelain Enamel Porcelain enamel is not immediately removed. Care & Cleaning Cleaning Procedures CAUTION • Be sure appliance is off a warm or hot surface with a damp cloth. Burner Grates Porcelain on control pad and display area. Clock and Control Pad Area • To activate "Control Lock" for 30 minutes. Side Panels, Storage Drawer and Door Handles...
... Gas Burners • Clean frequently. Clean with a soap-filled, nonabrasive, plastic pad or Cooktop Cleaning Creme* (Part #20000001)** and a sponge. Cooktop and Control Panel Porcelain Enamel Porcelain enamel is not immediately removed. Care & Cleaning Cleaning Procedures CAUTION • Be sure appliance is off a warm or hot surface with a damp cloth. Burner Grates Porcelain on control pad and display area. Clock and Control Pad Area • To activate "Control Lock" for 30 minutes. Side Panels, Storage Drawer and Door Handles...
Use and Care Guide
Page 20
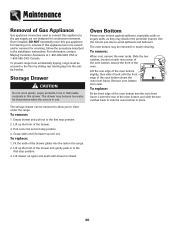
... a 40-watt appliance bulb. 4. If the range is not level, turn the leveling legs, located at each corner of breakage at a later date. Appliances which require electrical power are equipped with wire retainer. 5. DO NOT CUT OR REMOVE THE THIRD GROUNDING PRONG FROM THE POWER CORD PLUG. BULB COVER 2. Reconnect power to tip over, break the door, or injure the user. Reset clock. Do not hit the glass with use abrasive cleaning agents such as steel...
... a 40-watt appliance bulb. 4. If the range is not level, turn the leveling legs, located at each corner of breakage at a later date. Appliances which require electrical power are equipped with wire retainer. 5. DO NOT CUT OR REMOVE THE THIRD GROUNDING PRONG FROM THE POWER CORD PLUG. BULB COVER 2. Reconnect power to tip over, break the door, or injure the user. Reset clock. Do not hit the glass with use abrasive cleaning agents such as steel...
Use and Care Guide
Page 21
... used to connect this appliance to the floor by sliding rear leveling leg into the antitip bracket. Storage Drawer CAUTION Do not store plastic, paper products, food or flammable materials in the installation instructions. To remove: 1. To replace: 1. Lower the rear of the drawer. 3. If this appliance has to be secured to the gas supply are not designed for easier cleaning. Pull out to clean under the range...
... used to connect this appliance to the floor by sliding rear leveling leg into the antitip bracket. Storage Drawer CAUTION Do not store plastic, paper products, food or flammable materials in the installation instructions. To remove: 1. To replace: 1. Lower the rear of the drawer. 3. If this appliance has to be secured to the gas supply are not designed for easier cleaning. Pull out to clean under the range...
Use and Care Guide
Page 22
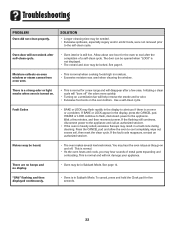
... piece of foil in Sabbath Mode. Dark pans produce dark browning. See page 12. • Oven may be sure ignitor is closed . Surface burner fails to light. • Check to be sure unit is properly connected to power supply. • Check for a blown circuit fuse or a tripped main circuit breaker. • Check to be too close to cover an entire oven rack. If ignitor doesn't click, turn control knob OFF.
... piece of foil in Sabbath Mode. Dark pans produce dark browning. See page 12. • Oven may be sure ignitor is closed . Surface burner fails to light. • Check to be sure unit is properly connected to power supply. • Check for a blown circuit fuse or a tripped main circuit breaker. • Check to be too close to cover an entire oven rack. If ignitor doesn't click, turn control knob OFF.
Use and Care Guide
Page 23
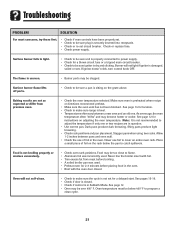
Troubleshooting PROBLEM Oven did not clean properly. The door can be opened when "LOCK" is an error or a problem. See page 8. Fault Codes • BAKE or LOCK may hear the oven relays as they go on and off " the odors more quickly. • Turning on oven window or steam comes from oven vent. • This is normal for five seconds. 22 If BAKE or LOCK appear in Sabbath Mode. Wait a few uses. You may...
Troubleshooting PROBLEM Oven did not clean properly. The door can be opened when "LOCK" is an error or a problem. See page 8. Fault Codes • BAKE or LOCK may hear the oven relays as they go on and off " the odors more quickly. • Turning on oven window or steam comes from oven vent. • This is normal for five seconds. 22 If BAKE or LOCK appear in Sabbath Mode. Wait a few uses. You may...
Use and Care Guide
Page 24
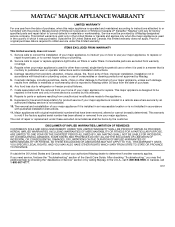
... or by a Maytag designated service company. Service calls to correct the installation of purchase. 6. Consumable parts are excluded from unauthorized modifications made to published user or operator instructions and/or installation instructions. 4. If outside the 50 United States and Canada, contact your major appliance, to replace or repair house fuses, or to determine if another warranty applies. Costs associated with original model/serial numbers that is used in the...
... or by a Maytag designated service company. Service calls to correct the installation of purchase. 6. Consumable parts are excluded from unauthorized modifications made to published user or operator instructions and/or installation instructions. 4. If outside the 50 United States and Canada, contact your major appliance, to replace or repair house fuses, or to determine if another warranty applies. Costs associated with original model/serial numbers that is used in the...


