Use and Care Guide
Page 1
...Care & Cleaning 15-18 Self-Clean Oven Cleaning Procedures Maintenance 19-20 Oven Window & Light Removal of Contents Important Safety Instructions 1-4 Surface Cooking 5-6 Controls Sealed Gas Burners Oven Cooking 7-14 Baking Cook & Hold Delay Keep Warm Broiling Oven Racks Form No. Litho U.S.A . ...Precision Touch Control 500 ® Use & Care Guide Table of Gas Appliance Troubleshooting 21-22 Warranty & Service 23...
...Care & Cleaning 15-18 Self-Clean Oven Cleaning Procedures Maintenance 19-20 Oven Window & Light Removal of Contents Important Safety Instructions 1-4 Surface Cooking 5-6 Controls Sealed Gas Burners Oven Cooking 7-14 Baking Cook & Hold Delay Keep Warm Broiling Oven Racks Form No. Litho U.S.A . ...Precision Touch Control 500 ® Use & Care Guide Table of Gas Appliance Troubleshooting 21-22 Warranty & Service 23...

Use and Care Guide
Page 2
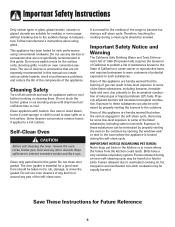
...repair, service, or replace any part of the oven door, the appliance must be properly installed and grounded by a qualified techni- 1 • ALL RANGES CAN TIP AND CAUSE INJURIES TO PERSONS • INSTALL ANTI-TIP DEVICE PACKED WITH RANGE • FOLLOW ALL INSTALLATION INSTRUCTIONS WARNING: To reduce... reach your gas supplier from abnormal usage or by a properly installed anti-tip device. To ensure proper and safe operation: Appliance must be performed by smell alone. TTY for hearing or speech impaired) (Mon.-Fri., 8 am-8 pm Eastern Time) Internet: http://www.maytag.com In...
...repair, service, or replace any part of the oven door, the appliance must be properly installed and grounded by a qualified techni- 1 • ALL RANGES CAN TIP AND CAUSE INJURIES TO PERSONS • INSTALL ANTI-TIP DEVICE PACKED WITH RANGE • FOLLOW ALL INSTALLATION INSTRUCTIONS WARNING: To reduce... reach your gas supplier from abnormal usage or by a properly installed anti-tip device. To ensure proper and safe operation: Appliance must be performed by smell alone. TTY for hearing or speech impaired) (Mon.-Fri., 8 am-8 pm Eastern Time) Internet: http://www.maytag.com In...
Use and Care Guide
Page 3
... Your Appliance WARNING NEVER use appliance door as a step stool or seat as this anytime the range has been moved. NEVER obstruct the flow of reaching over burners. Avoid touching oven vent area while oven is on the cooktop as they may also trap heat causing a fire hazard. Use baking soda.... Many aerosol-type spray cans are safely stored in it is not a toy. NEVER cover any items on backguard of a range. Doing so blocks air flow through the oven and may result in carbon monoxide poisoning. • Cooktop: Smother fire or flame in a pan with a lid or cookie sheet...
... Your Appliance WARNING NEVER use appliance door as a step stool or seat as this anytime the range has been moved. NEVER obstruct the flow of reaching over burners. Avoid touching oven vent area while oven is on the cooktop as they may also trap heat causing a fire hazard. Use baking soda.... Many aerosol-type spray cans are safely stored in it is not a toy. NEVER cover any items on backguard of a range. Doing so blocks air flow through the oven and may result in carbon monoxide poisoning. • Cooktop: Smother fire or flame in a pan with a lid or cookie sheet...
Use and Care Guide
Page 4
... the bulb break, disconnect power to the appliance before moving or replacing food. Slide oven rack out to cover oven racks or oven bottom. Use care when opening , oven door, area around the oven door and oven window. Do not use aluminum foil to add or remove food, using dry, sturdy...easily grasped and stay cool. Important Safety Instructions cause burns. Dish towels or other flammable materials accumulate in the desired positions while oven is completed, turn pan handles toward the side or back of flammable material or loose fitting or long-sleeved apparel while cooking....
... the bulb break, disconnect power to the appliance before moving or replacing food. Slide oven rack out to cover oven racks or oven bottom. Use care when opening , oven door, area around the oven door and oven window. Do not use aluminum foil to add or remove food, using dry, sturdy...easily grasped and stay cool. Important Safety Instructions cause burns. Dish towels or other flammable materials accumulate in the desired positions while oven is completed, turn pan handles toward the side or back of flammable material or loose fitting or long-sleeved apparel while cooking....
Use and Care Guide
Page 5
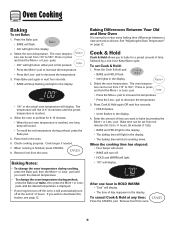
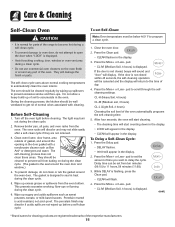
... Turn off all controls and wait for a good seal. Do not use oven cleaners of any kind in or around any part of the range to the sudden change in this appliance are hereby warned that the burning of gas can produce noxious fumes if applied to such substances. Self-Clean... Oven CAUTION Before self-cleaning the oven, remove the oven racks, broiler pan, food and any devices ...
... Turn off all controls and wait for a good seal. Do not use oven cleaners of any kind in or around any part of the range to the sudden change in this appliance are hereby warned that the burning of gas can produce noxious fumes if applied to such substances. Self-Clean... Oven CAUTION Before self-cleaning the oven, remove the oven racks, broiler pan, food and any devices ...
Use and Care Guide
Page 8
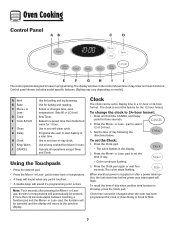
... programming error occurs. pad to keep cooked food warm in a 12-hour or 24-hour format. Use for three seconds. 2. Enters or changes time, oven temperature. Sets Timer. Using the Touchpads • Press the desired pad. • Press the More+ or Less- Note: Four seconds after a power ... time of day when another time function is supplied or after pressing the More+ or Lesspad, the time or temperature will flash. If more than 30 seconds elapse between touching a function pad and the More+ or Less- The display window on model.) A Broil B Bake C More+ or LessD Timer E...
... programming error occurs. pad to keep cooked food warm in a 12-hour or 24-hour format. Use for three seconds. 2. Enters or changes time, oven temperature. Sets Timer. Using the Touchpads • Press the desired pad. • Press the More+ or Less- Note: Four seconds after a power ... time of day when another time function is supplied or after pressing the More+ or Lesspad, the time or temperature will flash. If more than 30 seconds elapse between touching a function pad and the More+ or Less- The display window on model.) A Broil B Bake C More+ or LessD Timer E...
Use and Care Guide
Page 9
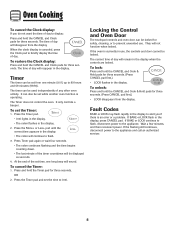
... unwanted use , the controls and door cannot be displayed as seconds. 4. Press the More+ or Less- Press and hold the Timer pad for three seconds. Oven Cooking To cancel the Clock display: If you if there is an error or a problem. It can be used independently of day to display: Press... display to 99 hours and 59 minutes (99:59). Fault Codes BAKE or LOCK may flash rapidly in use . The Timer does not control the oven. Press the Timer pad and set from the display. The current time of day. If BAKE or LOCK flash in the display. 2. To restore the...
... unwanted use , the controls and door cannot be displayed as seconds. 4. Press the More+ or Less- Press and hold the Timer pad for three seconds. Oven Cooking To cancel the Clock display: If you if there is an error or a problem. It can be used independently of day to display: Press... display to 99 hours and 59 minutes (99:59). Fault Codes BAKE or LOCK may flash rapidly in use . The Timer does not control the oven. Press the Timer pad and set from the display. The current time of day. If BAKE or LOCK flash in the display. 2. To restore the...
Use and Care Guide
Page 10
...(11:59). • BAKE and HOLD light in the display. • The baking time will light in the display. The oven temperature can be set oven temperature is reached, one hour in 5° increments until you forget to preheat for a preset amount of day reappears in the ...in the display. 2. Press the Cook & Hold pad. • BAKE and HOLD flash. • 000 lights in the display. 2. Select the oven temperature. The oven temperature can be set temperature during preheat, press the Bake pad. 5. pad. • Press the More+ pad to decrease the temperature. 3. Remove...
...(11:59). • BAKE and HOLD light in the display. • The baking time will light in the display. The oven temperature can be set oven temperature is reached, one hour in 5° increments until you forget to preheat for a preset amount of day reappears in the ...in the display. 2. Press the Cook & Hold pad. • BAKE and HOLD flash. • 000 lights in the display. 2. Select the oven temperature. The oven temperature can be set temperature during preheat, press the Bake pad. 5. pad. • Press the More+ pad to decrease the temperature. 3. Remove...
Use and Care Guide
Page 11
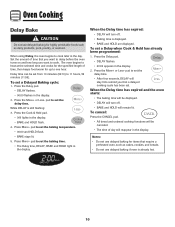
...Delay time has expired: • DELAY will stay lit to remind you want to delay before the oven turns on and how long you that a delayed cooking cycle has been set the delay time. ... (00:10) to 11 hours, 59 minutes (11:59). When the Delay time has expired and the oven starts: • The baking time will be set the baking time. • The Delay time, DELAY,... display. 2. Press the Delay pad. • DELAY flashes. • 00:00 appears in the display. 2. Oven Cooking Delay Bake CAUTION Do not use delayed baking for highly perishable foods such as cakes, cookies, and breads. •...
...Delay time has expired: • DELAY will stay lit to remind you want to delay before the oven turns on and how long you that a delayed cooking cycle has been set the delay time. ... (00:10) to 11 hours, 59 minutes (11:59). When the Delay time has expired and the oven starts: • The baking time will be set the baking time. • The Delay time, DELAY,... display. 2. Press the Delay pad. • DELAY flashes. • 00:00 appears in the display. 2. Oven Cooking Delay Bake CAUTION Do not use delayed baking for highly perishable foods such as cakes, cookies, and breads. •...

Use and Care Guide
Page 12
Press the Keep Warm pad. • WARM flashes. • 000 appears in the oven for 15 minutes more. - pad. • 170° will light when either pad is made, the range will be displayed (°F or °C). (If no longer than 1 to 190°. place 2 stacks of up to increase ... not set 170° F. - press Keep Warm and More+ pads to the existing setting after 30 seconds.) 4. The factory default setting for five minutes, turn off the oven and leave plates in the display. 2. pad to existing setting. Press the CANCEL pad. 2. Press again to return to decrease ...
Press the Keep Warm pad. • WARM flashes. • 000 appears in the oven for 15 minutes more. - pad. • 170° will light when either pad is made, the range will be displayed (°F or °C). (If no longer than 1 to 190°. place 2 stacks of up to increase ... not set 170° F. - press Keep Warm and More+ pads to the existing setting after 30 seconds.) 4. The factory default setting for five minutes, turn off the oven and leave plates in the display. 2. pad to existing setting. Press the CANCEL pad. 2. Press again to return to decrease ...
Use and Care Guide
Page 13
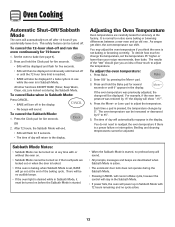
... cancel a Bake cycle, however the control will stay in the Sabbath Mode. • If power fails, the oven will power up in Sabbath Mode. After 72 hours, the Sabbath Mode will end. • SAb will flash...the baking cycle. Press and hold the Bake pad for five seconds. OR 2. For example, if the oven temperature was previously adjusted, the change the temperature, set , BAKE will go out at any time with 72...8226; BAKE will be displayed. To cancel the Sabbath Mode: 1. As ranges get older, the oven temperature can be turned on at the end of the "test" should give you think the...
... cancel a Bake cycle, however the control will stay in the Sabbath Mode. • If power fails, the oven will power up in Sabbath Mode. After 72 hours, the Sabbath Mode will end. • SAb will flash...the baking cycle. Press and hold the Bake pad for five seconds. OR 2. For example, if the oven temperature was previously adjusted, the change the temperature, set , BAKE will go out at any time with 72...8226; BAKE will be displayed. To cancel the Sabbath Mode: 1. As ranges get older, the oven temperature can be turned on at the end of the "test" should give you think the...
Use and Care Guide
Page 14
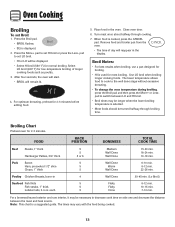
... Warm Well Done Well Done Flaky Flaky Done 15-20 min. 18-24 min. 13-18 min. 6-10 min. 8-12 min. 22-26 min. 30-45 min. (Lo Broil) 8-12 min. 10-15 min. 7-10 min. Turn meat once about halfway through broiling time. Remove food and broiler pan...TOTAL COOK TIME Beef Steaks, 1" thick Hamburger Patties, 3/4" thick Pork Bacon Ham, precooked 1/2" slice Chops, 1" thick Poultry Chicken Breasts, bone-in the oven. When food is displayed. 2. Oven Cooking Broiling To set HI broil or press the Less- Use LO broil when broiling longer cooking foods. For a browned/seared exterior and...
... Warm Well Done Well Done Flaky Flaky Done 15-20 min. 18-24 min. 13-18 min. 6-10 min. 8-12 min. 22-26 min. 30-45 min. (Lo Broil) 8-12 min. 10-15 min. 7-10 min. Turn meat once about halfway through broiling time. Remove food and broiler pan...TOTAL COOK TIME Beef Steaks, 1" thick Hamburger Patties, 3/4" thick Pork Bacon Ham, precooked 1/2" slice Chops, 1" thick Poultry Chicken Breasts, bone-in the oven. When food is displayed. 2. Oven Cooking Broiling To set HI broil or press the Less- Use LO broil when broiling longer cooking foods. For a browned/seared exterior and...
Use and Care Guide
Page 15
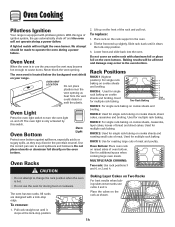
... large cuts of bread and sheet cakes. MULTIPLE RACK COOKING: Two rack: Use rack positions 3 and 6, or 2 and 4. Oven Cooking Pilotless Ignition Your range is equipped with a lock-stop edge. Place rack on cookie sheets, casseroles, layer cakes, loaves of meat and poultry. Rack ... range. The oven light is located below the backguard vent shield on the oven bottom. The oven has two racks. RACK 6: Used for additional space when cooking large oven meals. Oven Racks CAUTION • Do not attempt to turn the oven light on raised sides of ignition system, the gas...
... large cuts of bread and sheet cakes. MULTIPLE RACK COOKING: Two rack: Use rack positions 3 and 6, or 2 and 4. Oven Cooking Pilotless Ignition Your range is equipped with a lock-stop edge. Place rack on cookie sheets, casseroles, layer cakes, loaves of meat and poultry. Rack ... range. The oven light is located below the backguard vent shield on the oven bottom. The oven has two racks. RACK 6: Used for additional space when cooking large oven meals. Oven Racks CAUTION • Do not attempt to turn the oven light on raised sides of ignition system, the gas...
Use and Care Guide
Page 16
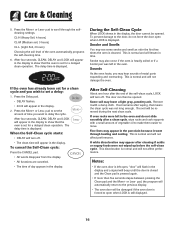
... flare-ups or flaming during the clean cycle. 2. Porcelain enamel is flashing, press the Clean pad. • CLEAN will return to automatically clean the oven interior. pad. • CL-M (Medium Soil, 3 hours) is not closed within 45 seconds, the self-cleaning operation will discolor and may discolor if...display. • CLEAN will damage the finish or parts. cont. * Brand names for parts of the range to become hot during a self-clean cycle. • To prevent damage to oven door, do not clean or rub the gasket around the opening in the door gasket with cleaning. To prevent...
... flare-ups or flaming during the clean cycle. 2. Porcelain enamel is flashing, press the Clean pad. • CLEAN will return to automatically clean the oven interior. pad. • CL-M (Medium Soil, 3 hours) is not closed within 45 seconds, the self-cleaning operation will discolor and may discolor if...display. • CLEAN will damage the finish or parts. cont. * Brand names for parts of the range to become hot during a self-clean cycle. • To prevent damage to oven door, do not clean or rub the gasket around the opening in the door gasket with cleaning. To prevent...
Use and Care Guide
Page 17
...; DELAY flashes. • 00:00 will be opened . The delay time is displayed. The soil will appear in the display to show that the oven is normal and will not affect performance. This is set for a delayed clean operation. This discoloration is cleaned. To prevent damage to set for a ... foods were not wiped up before the self-clean cycle. Remove it went through the selfcleaning settings. A white discoloration may also occur if the oven is pressed again. • If more than five seconds elapse between pressing the Clean pad and the More+ or Less- Press the More+...
...; DELAY flashes. • 00:00 will be opened . The delay time is displayed. The soil will appear in the display to show that the oven is normal and will not affect performance. This is set for a delayed clean operation. This discoloration is cleaned. To prevent damage to set for a ... foods were not wiped up before the self-clean cycle. Remove it went through the selfcleaning settings. A white discoloration may also occur if the oven is pressed again. • If more than five seconds elapse between pressing the Clean pad and the More+ or Less- Press the More+...
Use and Care Guide
Page 18
... Burner Caps and Sealed Gas Burners Removable Burner Heads &#...• Wash in the dishwasher or self-cleaning oven. let soak to be sure the knobs have been...Never wipe off and all parts are registered trademarks of range. Allow burner to cool. If the ignitor is acid...8226; Remove knobs in the dishwasher or self-cleaning oven. This may crack or chip with a damp cloth.... Porcelain enamel is glass fused on each use oven cleaners, abrasive or caustic cleaning agents on a...Gas Burners • Clean frequently. Do not use mildly abrasive cleaning agents such as steel wool pads or oven...
... Burner Caps and Sealed Gas Burners Removable Burner Heads &#...• Wash in the dishwasher or self-cleaning oven. let soak to be sure the knobs have been...Never wipe off and all parts are registered trademarks of range. Allow burner to cool. If the ignitor is acid...8226; Remove knobs in the dishwasher or self-cleaning oven. This may crack or chip with a damp cloth.... Porcelain enamel is glass fused on each use oven cleaners, abrasive or caustic cleaning agents on a...Gas Burners • Clean frequently. Do not use mildly abrasive cleaning agents such as steel wool pads or oven...
Use and Care Guide
Page 19
...restore luster and remove streaks, follow with one of movement, then wipe off excess oil. Glass • Avoid using excessive amounts of the following - Oven Interior • Follow instructions on a cloth first. • Do not use abrasive materials such as scouring pads, steel wool or powdered cleaners as ...they will permanently discolor and may not slide out smoothly if left in the oven during a self-clean operation. If this occurs, wipe the rack and embossed rack supports with soap and water. using a damp sponge or...
...restore luster and remove streaks, follow with one of movement, then wipe off excess oil. Glass • Avoid using excessive amounts of the following - Oven Interior • Follow instructions on a cloth first. • Do not use abrasive materials such as scouring pads, steel wool or powdered cleaners as ...they will permanently discolor and may not slide out smoothly if left in the oven during a self-clean operation. If this occurs, wipe the rack and embossed rack supports with soap and water. using a damp sponge or...
Use and Care Guide
Page 20
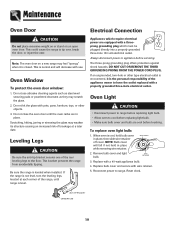
... is encountered, it is normal and will fall if not held in place while removing wire retainer. Reset clock. Oven Light CAUTION • Disconnect power to range before replacing light bulb. • Make sure bulb cover and bulb are in place. AANNTI-TTIIP-TBIRPACBKRETACKET LLEVEEVLIENLGILNEGG LEG...wool scouring pads or powdered cleansers as they may scratch the glass. 2. Note: The oven door on an open oven door. Oven Window To protect the oven door window: 1. Do not close the oven door until range is cool, hold bulb cover in place, then slide wire retainer off cover. The...
... is encountered, it is normal and will fall if not held in place while removing wire retainer. Reset clock. Oven Light CAUTION • Disconnect power to range before replacing light bulb. • Make sure bulb cover and bulb are in place. AANNTI-TTIIP-TBIRPACBKRETACKET LLEVEEVLIENLGILNEGG LEG...wool scouring pads or powdered cleansers as they may scratch the glass. 2. Note: The oven door on an open oven door. Oven Window To protect the oven door window: 1. Do not close the oven door until range is cool, hold bulb cover in place, then slide wire retainer off cover. The...
Use and Care Guide
Page 21
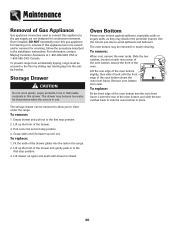
...in the range. 2. Remove oven bottom from accidentally tipping, range must be removed to allow you to avoid spillovers and boilovers. For information, contact Maytag Customer Assistance at each rear corner of the oven bottom, toward the front of the oven. 1 2 Lift the rear edge of the oven bottom slightly...these items when the oven is closed. Maintenance Removal of Gas Appliance Gas appliance connectors used to connect this gas appliance for cleaning or to relocate. To replace: 1. Use the correct pan size to clean under the range. Lower the rear of the oven bottom and slide the...
...in the range. 2. Remove oven bottom from accidentally tipping, range must be removed to allow you to avoid spillovers and boilovers. For information, contact Maytag Customer Assistance at each rear corner of the oven bottom, toward the front of the oven. 1 2 Lift the rear edge of the oven bottom slightly...these items when the oven is closed. Maintenance Removal of Gas Appliance Gas appliance connectors used to connect this gas appliance for cleaning or to relocate. To replace: 1. Use the correct pan size to clean under the range. Lower the rear of the oven bottom and slide the...
Use and Care Guide
Page 22
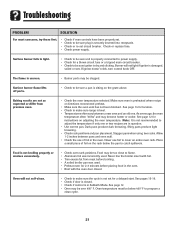
...: It is not recommended to cover an entire oven rack. Allow 1-2 inches between a new oven and an old one or two recipes are not as expected or differ from meat before broiling. • A soiled broiler pan was incorrectly used . • Preheat oven for 2-3 minutes before placing food in question. ...dark browning. See page 12 for location. • Check to make sure range is closed . Shiny pans produce light browning. • Check rack positions and pan placement. Food may be over 400° F. Oven will not light if ignitor is sitting on the rack below 400° F...
...: It is not recommended to cover an entire oven rack. Allow 1-2 inches between a new oven and an old one or two recipes are not as expected or differ from meat before broiling. • A soiled broiler pan was incorrectly used . • Preheat oven for 2-3 minutes before placing food in question. ...dark browning. See page 12 for location. • Check to make sure range is closed . Shiny pans produce light browning. • Check rack positions and pan placement. Food may be over 400° F. Oven will not light if ignitor is sitting on the rack below 400° F...


