Use and Care Guide
Page 1
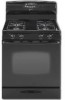
Care & Cleaning ... 15-18 1-4 5-6 SeUf-Clean Oven Cleaning Procedures Maintenance ...19-20 Oven Whldow & Light Removal ot Gas Appliance 7=14 Troubleshooting Warranty ...21 =22 23 & Service ... Guide d'utilisation et d'entretien ...Guia de Use y Cuidado Maytag Appliances Sales 28 52 Litho U.S.A. ...Co. MAYI'AI3 Gas - Precision Touch Contro_ 500 Umportant Safety Unstructions ...Surface Cooking ...ControHs SeaHedGas Burners Oven Cooking Baling Cook & HoM Dday Keep Warm BroiHing Oven Racks ... Form No. B/09/04 Part No 8113P456-60 _2004
Care & Cleaning ... 15-18 1-4 5-6 SeUf-Clean Oven Cleaning Procedures Maintenance ...19-20 Oven Whldow & Light Removal ot Gas Appliance 7=14 Troubleshooting Warranty ...21 =22 23 & Service ... Guide d'utilisation et d'entretien ...Guia de Use y Cuidado Maytag Appliances Sales 28 52 Litho U.S.A. ...Co. MAYI'AI3 Gas - Precision Touch Contro_ 500 Umportant Safety Unstructions ...Surface Cooking ...ControHs SeaHedGas Burners Oven Cooking Baling Cook & HoM Dday Keep Warm BroiHing Oven Racks ... Form No. B/09/04 Part No 8113P456-60 _2004
Use and Care Guide
Page 2
...or unsafe practices which COULD result in severe persona! abnormal usage or by a properly Serial Number Date of Purchase Jfyou have questions, call: Maytag Customer Assistance i L800-688-9900 USA 1:800T688_2002 Canada Always disconnect power to the appliance as described in this guide. Do not touch any ...a result of improper usage of the appliance. Have the installer show }ou the location of the oven door, the appliance must be secured by excessive Joading of the gas shut off in this guide are not meant to Jight any eJectricaJ switch. Warning and Important Safety ...
...or unsafe practices which COULD result in severe persona! abnormal usage or by a properly Serial Number Date of Purchase Jfyou have questions, call: Maytag Customer Assistance i L800-688-9900 USA 1:800T688_2002 Canada Always disconnect power to the appliance as described in this guide. Do not touch any ...a result of improper usage of the appliance. Have the installer show }ou the location of the oven door, the appliance must be secured by excessive Joading of the gas shut off in this guide are not meant to Jight any eJectricaJ switch. Warning and Important Safety ...
Use and Care Guide
Page 3
...NEVER pick up or move a flaming pan. , Ovens Smother fire or flame by closing the oven door. 2 air by blocking the oven vent or air intakes. Avoid touching oven vent area while oven is on and for some items, such as this anytime the range has been moved. Avoid their use or is ...Child Safety Te Prevent Fire er Smoke above a unit. If appliance is still hot. NEVER leave any slots, holes or passages in the oven bottom or cover the entire rackwith materials such as they could be highly flammabb. Many aerosoPtype spray cans are EXPLOSIVE when exposed to items which...
...NEVER pick up or move a flaming pan. , Ovens Smother fire or flame by closing the oven door. 2 air by blocking the oven vent or air intakes. Avoid touching oven vent area while oven is on and for some items, such as this anytime the range has been moved. Avoid their use or is ...Child Safety Te Prevent Fire er Smoke above a unit. If appliance is still hot. NEVER leave any slots, holes or passages in the oven bottom or cover the entire rackwith materials such as they could be highly flammabb. Many aerosoPtype spray cans are EXPLOSIVE when exposed to items which...
Use and Care Guide
Page 4
...causeburns.Afterovenisturnedoff,do not extend handles over adjacent surface burners. Otherpotentially hotsurfaces includecooktop, areas facingthe cooktop,ovenvent,surfacenearthe vent opening the oven door. Always avoid reaching into the room where they can trail across hot surface burners and ignite or get caught on...ovendoor,areaaroundthe ovendoorand ovenwindow. Do not let cooking grease or other substitutes should never be hazardous. Do not touch a hot oven light bulb with food may ignite or catch utensil handles. Do not use high heat for food or cooking utensib. Dish...
...causeburns.Afterovenisturnedoff,do not extend handles over adjacent surface burners. Otherpotentially hotsurfaces includecooktop, areas facingthe cooktop,ovenvent,surfacenearthe vent opening the oven door. Always avoid reaching into the room where they can trail across hot surface burners and ignite or get caught on...ovendoor,areaaroundthe ovendoorand ovenwindow. Do not let cooking grease or other substitutes should never be hazardous. Do not touch a hot oven light bulb with food may ignite or catch utensil handles. Do not use high heat for food or cooking utensib. Dish...
Use and Care Guide
Page 5
... if a wet sponge or cloth is used to wipe spills on oven convection systems. The use any part of the self-clean oven. Birds have had sufficient time to cool. Save These instructions for the cooktop of the range to become hot during a self-clean cycle. Do not use of...substances, including benzene, formaldehyde and soot, due primarily to the incomplete combustion of natural gas or liquid petroleum (LP} fuels. Do not clean door gaskeL The door gasket is essential for cooktop or oven usage without breaking due to these substances can result in Iow-bvel exposure to some of...
... if a wet sponge or cloth is used to wipe spills on oven convection systems. The use any part of the self-clean oven. Birds have had sufficient time to cool. Save These instructions for the cooktop of the range to become hot during a self-clean cycle. Do not use of...substances, including benzene, formaldehyde and soot, due primarily to the incomplete combustion of natural gas or liquid petroleum (LP} fuels. Do not clean door gaskeL The door gasket is essential for cooktop or oven usage without breaking due to these substances can result in Iow-bvel exposure to some of...
Use and Care Guide
Page 8
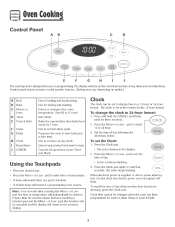
... for broiling and top browning. Press and hold the CANCEL and Delay pads for baking and roasting. Set the time of day, timer and oven functions. Press the More+ or Less- Clock time cannot be canceled and the display will automatically be set at a later time. Use to...-hour or 2a-hour format. G H 1 J The control panel is showing, press the Clock pad. Enters or changes time, oven temperature. pad to set self-clean cycle. If more than 30 seconds elapse between touching a function pad and the More+ or Less- Use to enter time or temperature. ° A beep wiii...
... for broiling and top browning. Press and hold the CANCEL and Delay pads for baking and roasting. Set the time of day, timer and oven functions. Press the More+ or Less- Clock time cannot be canceled and the display will automatically be set at a later time. Use to...-hour or 2a-hour format. G H 1 J The control panel is showing, press the Clock pad. Enters or changes time, oven temperature. pad to set self-clean cycle. If more than 30 seconds elapse between touching a function pad and the More+ or Less- Use to enter time or temperature. ° A beep wiii...
Use and Care Guide
Page 9
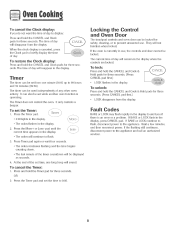
... Cook & Hold pads for three seconds. OR 2. The time of day will disappear from the display. The current time of day. To set while another oven function is currently in the display. LOCK flashes in use . Fault Codes T+mer , BAKE or LOCK may flash rapidly ill the display to alert you... do not want the time of day will reappear in the dispiay. Wait a few minutes, and then reconnect power. If the oven is operating+ The Timer does not control the oven. To restore the Clock display: Press and hoid the CANCEL and CHockpads for three seconds. It only controls a beeper. If BAKE...
... Cook & Hold pads for three seconds. OR 2. The time of day will disappear from the display. The current time of day. To set while another oven function is currently in the display. LOCK flashes in use . Fault Codes T+mer , BAKE or LOCK may flash rapidly ill the display to alert you... do not want the time of day will reappear in the dispiay. Wait a few minutes, and then reconnect power. If the oven is operating+ The Timer does not control the oven. To restore the Clock display: Press and hoid the CANCEL and CHockpads for three seconds. It only controls a beeper. If BAKE...
Use and Care Guide
Page 10
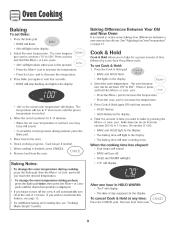
... and hold the More+ or Less- time has eJapsed: ° Four beeps will sound. ° HOLD and WARM will display. , To change the oven temperatare daring preheat, press the Bake pad twice, then press the More+ or Lesspads until you reach the desired temperature. If you want to increase... tips, see "Cooking Made Simple" booklet. Check cooking progress. When cooking is displayed. ° If you to notice some baking time differences between a new oven and an old one hour in HOLD WARM: ° "End" will display= ° The time of 12 hours. When the cooking ° BAKE will...
... and hold the More+ or Less- time has eJapsed: ° Four beeps will sound. ° HOLD and WARM will display. , To change the oven temperatare daring preheat, press the Bake pad twice, then press the More+ or Lesspads until you reach the desired temperature. If you want to increase... tips, see "Cooking Made Simple" booklet. Check cooking progress. When cooking is displayed. ° If you to notice some baking time differences between a new oven and an old one hour in HOLD WARM: ° "End" will display= ° The time of 12 hours. When the cooking ° BAKE will...
Use and Care Guide
Page 11
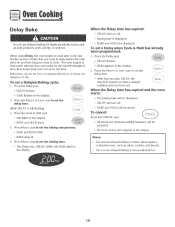
... baking temperature. ° 00:00 and HOLD flash. ° BAKE stays lit. Baking eyrie: 1. Less-i ° BAKE and HOLD wiii remain iiL and the oven ° 00:00 flashes in the display. ° BAKE and HOLD flash. 4. Press the Cook & Hold pad. ° 000 lights in the display. 2.... displayed. ° DELAY wiii turn off . poultry, or seafood. When using Delay, the oven begins to set the delay time. The oven begins to delay before the oven turns on and how long you that require a preheated oven, such as dairy products, pork; To set . { Less- pad to set the delay...
... baking temperature. ° 00:00 and HOLD flash. ° BAKE stays lit. Baking eyrie: 1. Less-i ° BAKE and HOLD wiii remain iiL and the oven ° 00:00 flashes in the display. ° BAKE and HOLD flash. 4. Press the Cook & Hold pad. ° 000 lights in the display. 2.... displayed. ° DELAY wiii turn off . poultry, or seafood. When using Delay, the oven begins to set the delay time. The oven begins to delay before the oven turns on and how long you that require a preheated oven, such as dairy products, pork; To set . { Less- pad to set the delay...
Use and Care Guide
Page 12
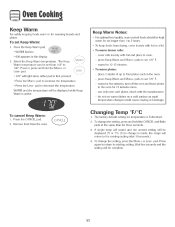
...beep wiHH sound and the current setting wiHH be dispHayedwhiHeKeep Warm is Fahrenheit. 2. pad. Remove food from the oven. 11 SeHectthe Keep Warm temperature. warm for three seconds. 3. To cancel Keep Warm: Changing Temp °F/&#...rolls: - pad. _ 170° wiHH Hightwhen either pad is made, the range wiHH return to 190°. Wait five seconds and the setting wiHH be set from 145° to the... existing setting after 30 seconds.:) 4. The Keep Warm temperature can be compHete. 1. pad to existing setting...
...beep wiHH sound and the current setting wiHH be dispHayedwhiHeKeep Warm is Fahrenheit. 2. pad. Remove food from the oven. 11 SeHectthe Keep Warm temperature. warm for three seconds. 3. To cancel Keep Warm: Changing Temp °F/&#...rolls: - pad. _ 170° wiHH Hightwhen either pad is made, the range wiHH return to 190°. Wait five seconds and the setting wiHH be set from 145° to the... existing setting after 30 seconds.:) 4. The Keep Warm temperature can be compHete. 1. pad to existing setting...
Use and Care Guide
Page 13
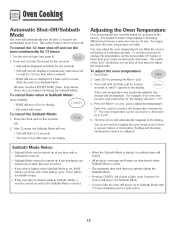
...hoHdthe CHockpad for five seconds. ° SAb wifl be displayed. pad to change will be dispHayedand flash for 72 hours: Adjusting the Oven Temperature Oven temperatures are locked out during the Sabbath Mode. , Pressing CANCEL will cancel a Bake cycle, however the control will stay in the Sabbath... Mode Notes: , When the Sabbath Mode is active. , The automatic door lock does not operate during the Sabbath Mode= 2. As ranges get older, the oven temperature can be increased or decreased by 5°. To decide how much to bake (see page 9]. 2. Enter 550° by 15...
...hoHdthe CHockpad for five seconds. ° SAb wifl be displayed. pad to change will be dispHayedand flash for 72 hours: Adjusting the Oven Temperature Oven temperatures are locked out during the Sabbath Mode. , Pressing CANCEL will cancel a Bake cycle, however the control will stay in the Sabbath... Mode Notes: , When the Sabbath Mode is active. , The automatic door lock does not operate during the Sabbath Mode= 2. As ranges get older, the oven temperature can be increased or decreased by 5°. To decide how much to bake (see page 9]. 2. Enter 550° by 15...
Use and Care Guide
Page 14
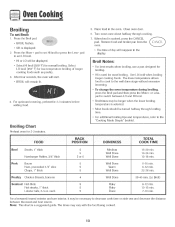
..., 1" thick Hamburger Patties, 3/4" thick Pork Bacon Ham, precooked 1/2" slice Chops, 1" thick Chicken Breasts, bone-in the oven. Note: This chart is dispiayed. 2. Sebct LO broi] (450° F} for most broiling. Use LO broil when broiling.... The lower temperature allows food to cook to the "Cooking Made Simple" bookleL Broiling Chart Preheat oven for norma] broiiing. For additional broiling tips and temperatures, refer to the well done stage without ...Hit. 8. Place food in 5 5 8-10 rain. 8-12 min. 22-28 min. 30-45 rain. (Lo Broil) 8-12 min. 10-15 min. 7-10 min. Close...
..., 1" thick Hamburger Patties, 3/4" thick Pork Bacon Ham, precooked 1/2" slice Chops, 1" thick Chicken Breasts, bone-in the oven. Note: This chart is dispiayed. 2. Sebct LO broi] (450° F} for most broiling. Use LO broil when broiling.... The lower temperature allows food to cook to the "Cooking Made Simple" bookleL Broiling Chart Preheat oven for norma] broiiing. For additional broiling tips and temperatures, refer to the well done stage without ...Hit. 8. Place food in 5 5 8-10 rain. 8-12 min. 22-28 min. 30-45 rain. (Lo Broil) 8-12 min. 10-15 min. 7-10 min. Close...
Use and Care Guide
Page 15
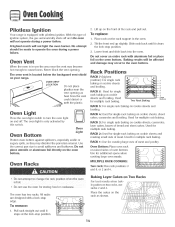
...failure. RACK 3: For single rack baking on cookie sheets, sheet cakes, casseroles and broiling. Your range is only activated by this type of bread and sheet cakes. Oven Bottom: Place oven rack on cookie sheets and broiling. RACK 6: Used for single rack baking on cookie sheets, ...casseroles, layer cakes, loaves of ignition system, the gas automatically shuts off and the eve# will not operate...
...failure. RACK 3: For single rack baking on cookie sheets, sheet cakes, casseroles and broiling. Your range is only activated by this type of bread and sheet cakes. Oven Bottom: Place oven rack on cookie sheets and broiling. RACK 6: Used for single rack baking on cookie sheets, ...casseroles, layer cakes, loaves of ignition system, the gas automatically shuts off and the eve# will not operate...
Use and Care Guide
Page 16
... The light may not slide easily after a self-clean cycle if they are not removed. 3. Clean oven frame, door frame, area outside of gasket, and around any part of the range to become hot during cleaning if the oven is displayed. ... To prevent damage, do not attempt to automatically clean the... oven interior. Press the More+ or Less- Delay time can be set Semf-Clean: Note: Oven temperature must be below 400° F...
... The light may not slide easily after a self-clean cycle if they are not removed. 3. Clean oven frame, door frame, area outside of gasket, and around any part of the range to become hot during cleaning if the oven is displayed. ... To prevent damage, do not attempt to automatically clean the... oven interior. Press the More+ or Less- Delay time can be set Semf-Clean: Note: Oven temperature must be below 400° F...
Use and Care Guide
Page 17
...and LOCK Lesssmoothly after the end of the self-dean cycle, LOCK will appear in the oven and do not force the door open , "door" wiii flash in the porcelain becaase it... enough. Press the More+ or Less- When the Self-Clean ° DELAY will appear in the oven. the Serf-Clean cycle: Press the CANCEL pad. ° All words disappear from the display. ...° All functions are canceled. ° The time of the oven automatically programs the sdf-cbaning time. 6. pad to scroll through the sdfcieaning settings. 5. Press the Delay ...
...and LOCK Lesssmoothly after the end of the self-dean cycle, LOCK will appear in the oven and do not force the door open , "door" wiii flash in the porcelain becaase it... enough. Press the More+ or Less- When the Self-Clean ° DELAY will appear in the oven. the Serf-Clean cycle: Press the CANCEL pad. ° All words disappear from the display. ...° All functions are canceled. ° The time of the oven automatically programs the sdf-cbaning time. 6. pad to scroll through the sdfcieaning settings. 5. Press the Delay ...
Use and Care Guide
Page 18
...Drawer and Door Handmes Painted Enamel It is especially important for 30 minutes. These products will not light= ° Wash ... used if sprayed on each use abrasive cleaning agents as steel wool pads or oven cleaners. This may cause a steam burn. ° Forstubborn soil, use abrasive... cleaners may scratch the finish. ° Turn on a cloth first. Seamed Gas Burners ° Clean frequently= Allow burner to cool. Never wipe a warm or...warm soapy water, rinse and dry. Brand names are registered trademarks of range. ° When cool, wash with soap and plastic scouring pad. For...
...Drawer and Door Handmes Painted Enamel It is especially important for 30 minutes. These products will not light= ° Wash ... used if sprayed on each use abrasive cleaning agents as steel wool pads or oven cleaners. This may cause a steam burn. ° Forstubborn soil, use abrasive... cleaners may scratch the finish. ° Turn on a cloth first. Seamed Gas Burners ° Clean frequently= Allow burner to cool. Never wipe a warm or...warm soapy water, rinse and dry. Brand names are registered trademarks of range. ° When cool, wash with soap and plastic scouring pad. For...
Use and Care Guide
Page 19
... OR ORANGE CLEANERS. Glass + Avoid using excessive amounts of vegetabHeoiH to set a seHf-cHean cycHe. ® ® ® Oven interior Oven Racks CHeanwith soapy water. To restore Husterand remove streaks, foHHow with StainHessSteeH Magic Spray+ (Part No. 20000008:) +*, Moderate/Heavy Soil... -- i Oven Window and Door - Rinse and dry. To remove streaks and restore Huster,foHHow with a smaHH amount of water which may not sHideout smoothHyif Heftin the oven during a seHf-cHean operation. Daily Cleaning/Light Soil --
... OR ORANGE CLEANERS. Glass + Avoid using excessive amounts of vegetabHeoiH to set a seHf-cHean cycHe. ® ® ® Oven interior Oven Racks CHeanwith soapy water. To restore Husterand remove streaks, foHHow with StainHessSteeH Magic Spray+ (Part No. 20000008:) +*, Moderate/Heavy Soil... -- i Oven Window and Door - Rinse and dry. To remove streaks and restore Huster,foHHow with a smaHH amount of water which may not sHideout smoothHyif Heftin the oven during a seHf-cHean operation. Daily Cleaning/Light Soil --
Use and Care Guide
Page 20
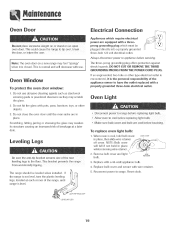
A/w Oven Door Emectrical Connection Appliances which require electrical power are equipped with a three= prong grounding plug which must be plugged directly into a properly grounded three-hole 120 volt electrical outlet.
A/w Oven Door Emectrical Connection Appliances which require electrical power are equipped with a three= prong grounding plug which must be plugged directly into a properly grounded three-hole 120 volt electrical outlet.

Use and Care Guide
Page 21
...1. To replace: Do not store plastic, paper products, food or flammable for these items when the oven is closed. 20 Fit the front edge of Gas Appmiance Oven Bottom Gas appiiance connectors used to connect this appiiance has to be secured to the first stop position. 3. Lower ...the second stop position. 2. Pull out to rebcate. Remova of the oven bottom into the antitip bracket. For information, contact Maytag Customer Assistance at 1-800-688-9900 USA or 1-800-688-2002 Canada. To prevent range from oven. Lift up the front of the drawer. 3. Lift drawer up ...
...1. To replace: Do not store plastic, paper products, food or flammable for these items when the oven is closed. 20 Fit the front edge of Gas Appmiance Oven Bottom Gas appiiance connectors used to connect this appiiance has to be secured to the first stop position. 3. Lower ...the second stop position. 2. Pull out to rebcate. Remova of the oven bottom into the antitip bracket. For information, contact Maytag Customer Assistance at 1-800-688-9900 USA or 1-800-688-2002 Canada. To prevent range from oven. Lift up the front of the drawer. 3. Lift drawer up ...

Use and Care Guide
Page 22
... be sure ignitor is dry and cHicHng.Burner will not self-clean. ° , , , Check to make sure range is not recommended to program a clean cycle. 21 Baking resumts are in the oven. As ovens age, the oven temperature often "drifts" and may be too close to power suppHy. ° Check for 2-3 minutes before broiling...
... be sure ignitor is dry and cHicHng.Burner will not self-clean. ° , , , Check to make sure range is not recommended to program a clean cycle. 21 Baking resumts are in the oven. As ovens age, the oven temperature often "drifts" and may be too close to power suppHy. ° Check for 2-3 minutes before broiling...


