Use and Care Manual
Page 1
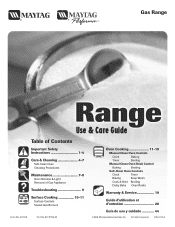
...Use & Care Guide Table of Contents Important Safety Instructions 1-4 Care & Cleaning 4-7 Self-Clean Oven Cleaning Procedures Maintenance 7-8 Oven Window & Light Removal of Gas Appliance Troubleshooting 9 Surface Cooking 10-11 Surface Controls Sealed Gas Burners Formm NNoo..AA/0/061/0/038 PPaarrttNNoo. .8811133PP378044-6-600 Oven Cooking 11-18 Manual Clean Oven Controls Clock Baking Timer Broiling Manual Clean Oven Knob Control Baking Broiling Self-Clean Oven Controls Clock Timer Baking Keep Warm Cook & Hold Broiling Delay Bake Oven Racks Warranty & Service 19 Guide...
...Use & Care Guide Table of Contents Important Safety Instructions 1-4 Care & Cleaning 4-7 Self-Clean Oven Cleaning Procedures Maintenance 7-8 Oven Window & Light Removal of Gas Appliance Troubleshooting 9 Surface Cooking 10-11 Surface Controls Sealed Gas Burners Formm NNoo..AA/0/061/0/038 PPaarrttNNoo. .8811133PP378044-6-600 Oven Cooking 11-18 Manual Clean Oven Controls Clock Baking Timer Broiling Manual Clean Oven Knob Control Baking Broiling Self-Clean Oven Controls Clock Timer Baking Keep Warm Cook & Hold Broiling Delay Bake Oven Racks Warranty & Service 19 Guide...
Use and Care Manual
Page 2
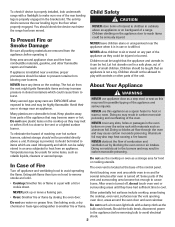
... approved gas detector. Do not attempt to adjust, repair, service, or replace any part of your gas supplier from abnormal usage or by excessive loading of the gas shut off valve and how to light any appliance. • Do not touch any electrical switch. • Do not use gasoline or other servicing should be exercised when installing, maintaining, or operating the appliance. Install and use in this guide. For service information...
... approved gas detector. Do not attempt to adjust, repair, service, or replace any part of your gas supplier from abnormal usage or by excessive loading of the gas shut off valve and how to light any appliance. • Do not touch any electrical switch. • Do not use gasoline or other servicing should be exercised when installing, maintaining, or operating the appliance. Install and use in this guide. For service information...
Use and Care Manual
Page 3
... area become warm or hot. Should the bulb break, disconnect power to heat or warm a room. NEVER allow children to the vent or a lighted surface burner. Temperatures may melt or soften if left too close to sit or stand on the cooktop as this appliance as a storage area for several minutes after oven is turned off. Extinguish flame then turn on the cooktop. Do not use appliance door as...
... area become warm or hot. Should the bulb break, disconnect power to heat or warm a room. NEVER allow children to the vent or a lighted surface burner. Temperatures may melt or soften if left too close to sit or stand on the cooktop as this appliance as a storage area for several minutes after oven is turned off. Extinguish flame then turn on the cooktop. Do not use appliance door as...
Use and Care Manual
Page 4
... and stay cool. hood turn burner off at the end of hot fat used for extended cooking operations. guide. Use racks only in the oven in this Clothing may ignite. Do not touch the burner grates or surrounding areas until they have had sufficient time to burner flame. Pans that the burner has ignited. on . Follow the manufacturer's directions when using glass. If a rack must be used to move or handle. Use care to avoid steam burns...
... and stay cool. hood turn burner off at the end of hot fat used for extended cooking operations. guide. Use racks only in the oven in this Clothing may ignite. Do not touch the burner grates or surrounding areas until they have had sufficient time to burner flame. Pans that the burner has ignited. on . Follow the manufacturer's directions when using glass. If a rack must be used to move or handle. Use care to avoid steam burns...
Use and Care Manual
Page 5
... in rooms where the fumes from the kitchen could reach. Turn off the oven light before cleaning. Remove broiler pan, all pans, and oven racks from baking The self-clean cycle uses above-normal cooking temperatures on the oven finish or around The oven should be a burn hazard. 4. This may be cleaned regularly by properly venting the oven to become hot during an oven self-cleaning cycle may not slide easily • To prevent personal injury and...
... in rooms where the fumes from the kitchen could reach. Turn off the oven light before cleaning. Remove broiler pan, all pans, and oven racks from baking The self-clean cycle uses above-normal cooking temperatures on the oven finish or around The oven should be a burn hazard. 4. This may be cleaned regularly by properly venting the oven to become hot during an oven self-cleaning cycle may not slide easily • To prevent personal injury and...

Use and Care Manual
Page 6
... the soil level of the oven automatically programs the self-cleaning time. 6. Important: Oven temperature must be canceled and the display will appear in the display. To set the amount of time you may discolor if acidic spills are canceled. • The time of time you wish to delay the cycle. After four seconds, CLEAN, DELAY and LOCK will turn off . Delay time can then be set for a delayed clean operation. After Self-Cleaning About one...
... the soil level of the oven automatically programs the self-cleaning time. 6. Important: Oven temperature must be canceled and the display will appear in the display. To set the amount of time you may discolor if acidic spills are canceled. • The time of time you wish to delay the cycle. After four seconds, CLEAN, DELAY and LOCK will turn off . Delay time can then be set for a delayed clean operation. After Self-Cleaning About one...
Use and Care Manual
Page 7
... may scratch the finish. • Turn on control pad and display area. • If the oven door is left in warm soapy water. Side Panels, Storage Drawer, Lower Broiler Door (select models) and Door Handles - Never wipe a warm or hot surface with clear water and dry. Important: Use a dry towel or cloth to the previous display. This discoloration is normal and will be used if sprayed on exterior finish...
... may scratch the finish. • Turn on control pad and display area. • If the oven door is left in warm soapy water. Side Panels, Storage Drawer, Lower Broiler Door (select models) and Door Handles - Never wipe a warm or hot surface with clear water and dry. Important: Use a dry towel or cloth to the previous display. This discoloration is normal and will be used if sprayed on exterior finish...
Use and Care Manual
Page 8
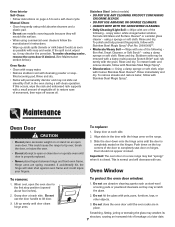
...; To replace: 1. Do not use . soapy water, white vinegar/water solution, Formula 409 Glass and Surface Cleaner* or a similar glass cleaner - Stubborn soils may not slide out smoothly if left in the door with use the door handle to the first stop position (opened about four inches). 2. When cool, open the oven door to lift door. 3. Oven Interior Self-Clean: • Follow instructions on an open oven door. filled scouring pad. Maintenance Oven Door CAUTION...
...; To replace: 1. Do not use . soapy water, white vinegar/water solution, Formula 409 Glass and Surface Cleaner* or a similar glass cleaner - Stubborn soils may not slide out smoothly if left in the door with use the door handle to the first stop position (opened about four inches). 2. When cool, open the oven door to lift door. 3. Oven Interior Self-Clean: • Follow instructions on an open oven door. filled scouring pad. Maintenance Oven Door CAUTION...
Use and Care Manual
Page 9
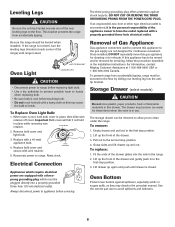
... the installation instructions. Oven Light AANNTI-TTIIP-TBIRPACBKRETACKET LLEEVEVLEINLGILNEGG LEG CAUTION • Disconnect power to range before replacing light bulb. • Use a dry potholder to prevent possible harm to the first stop position. 3. DO NOT CUT OR REMOVE THE THIRD GROUNDING PRONG FROM THE POWER CORD PLUG. Always disconnect power to the first stop position. 4. Important Bulb cover will fall if not held in place, then slide wire retainer off cover...
... the installation instructions. Oven Light AANNTI-TTIIP-TBIRPACBKRETACKET LLEEVEVLEINLGILNEGG LEG CAUTION • Disconnect power to range before replacing light bulb. • Use a dry potholder to prevent possible harm to the first stop position. 3. DO NOT CUT OR REMOVE THE THIRD GROUNDING PRONG FROM THE POWER CORD PLUG. Always disconnect power to the first stop position. 4. Important Bulb cover will fall if not held in place, then slide wire retainer off cover...
Use and Care Manual
Page 10
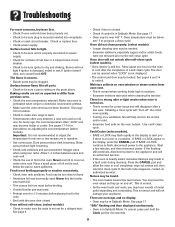
... not removed prior to flame. • Aluminum foil was incorrectly used . • Preheat oven for 2-3 minutes before broiling. • A soiled broiler pan was used when cleaning the window. Use a self-clean cycle. You may be sure plug is an error or a problem. Shiny pans produce light browning. • Check rack positions and pan placement. Food is preheated when recipe or directions recommend preheat. • Make sure the oven vent has not been blocked. Oven temperature must be...
... not removed prior to flame. • Aluminum foil was incorrectly used . • Preheat oven for 2-3 minutes before broiling. • A soiled broiler pan was used when cleaning the window. Use a self-clean cycle. You may be sure plug is an error or a problem. Shiny pans produce light browning. • Check rack positions and pan placement. Food is preheated when recipe or directions recommend preheat. • Make sure the oven vent has not been blocked. Oven temperature must be...
Use and Care Manual
Page 11
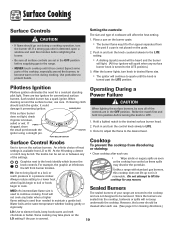
... reach pressure in and turn on the grate. 2. Surface Cooking Surface Controls CAUTION • If flame should go out during cooking. Use potholders to the desired surface burner head. 2. After the burner lights, turn the knob counterclockwise to the range. • NEVER touch cooktop until the knob is covered. 10 There are in and turn knob to lift the cooktop for a constant standing pilot light. Do not attempt to desired flame size. • The ignitor will not...
... reach pressure in and turn on the grate. 2. Surface Cooking Surface Controls CAUTION • If flame should go out during cooking. Use potholders to the desired surface burner head. 2. After the burner lights, turn the knob counterclockwise to the range. • NEVER touch cooktop until the knob is covered. 10 There are in and turn knob to lift the cooktop for a constant standing pilot light. Do not attempt to desired flame size. • The ignitor will not...
Use and Care Manual
Page 12
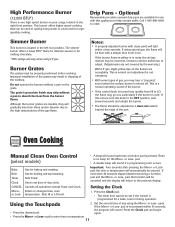
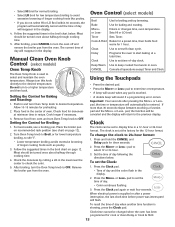
... is noisy, the air/gas mixture may hear a "popping" sound when the surface burner is pressed. Contact a service technician to set if the control is turned very quickly from the burner flame. Oven Cooking Manual Clean Oven Control (select models) • A beep will sound if a programming error occurs. Setting the Clock More+ Enters or changes time, oven or Less- The simmer burner offers a lower BTU* flame for delicate sauces or for largequantity cooking. Bake Broil Timer Clock Use for a bake, broil or timing operation. The grate...
... is noisy, the air/gas mixture may hear a "popping" sound when the surface burner is pressed. Contact a service technician to set if the control is turned very quickly from the burner flame. Oven Cooking Manual Clean Oven Control (select models) • A beep will sound if a programming error occurs. Setting the Clock More+ Enters or changes time, oven or Less- The simmer burner offers a lower BTU* flame for delicate sauces or for largequantity cooking. Bake Broil Timer Clock Use for a bake, broil or timing operation. The grate...

Use and Care Manual
Page 13
... display will sound when the oven is displayed. 3. select models) For best results, use pan designed for doneness at the minimum cooking time. 4. pad to 99 hours and 59 minutes (99:59). "0:00" will automatically turn the oven off and remove the food from 170° to change oven temperature during a timing operation. Check food for broiling. 1. The times may vary with the food being cooked. 12 Time will be set...
... display will sound when the oven is displayed. 3. select models) For best results, use pan designed for doneness at the minimum cooking time. 4. pad to 99 hours and 59 minutes (99:59). "0:00" will automatically turn the oven off and remove the food from 170° to change oven temperature during a timing operation. Check food for broiling. 1. The times may vary with the food being cooked. 12 Time will be set...
Use and Care Manual
Page 14
... turn Oven Temp knob to a higher temperature and then back. Important: Four seconds after a power interruption, the last clock time before power was interrupted will sound if a programming error occurs. Remove food from the oven. The clock is set the time of -day clock. Remove the broiler pan from oven and turn to OFF. Press and hold the CANCEL and Delay pads for broiling and top browning. Manual Clean Oven Knob Control (select models) Oven Control (select models) Broil Bake More+ or LessTimer Cook & Hold Clean Delay Clock...
... turn Oven Temp knob to a higher temperature and then back. Important: Four seconds after a power interruption, the last clock time before power was interrupted will sound if a programming error occurs. Remove food from the oven. The clock is set the time of -day clock. Remove the broiler pan from oven and turn to OFF. Press and hold the CANCEL and Delay pads for broiling and top browning. Manual Clean Oven Knob Control (select models) Oven Control (select models) Broil Bake More+ or LessTimer Cook & Hold Clean Delay Clock...
Use and Care Manual
Page 15
.... If the oven is an error or a problem. The timer can be used independently of the set from 170° to prevent unwanted use , the controls cannot be set oven temperature is finished, press CANCEL. The current time of two inches between utensil and oven walls. 6. If BAKE or LOCK continue to flash, disconnect power to briefly display the time of day will remain in use . The oven temperature can be set time, one...
.... If the oven is an error or a problem. The timer can be used independently of the set from 170° to prevent unwanted use , the controls cannot be set oven temperature is finished, press CANCEL. The current time of two inches between utensil and oven walls. 6. If BAKE or LOCK continue to flash, disconnect power to briefly display the time of day will remain in use . The oven temperature can be set time, one...

Use and Care Manual
Page 16
... using Delay, the oven begins to increase the temperature. • Press the Less- Set the amount of day reappears in the display. Press the Cook & Hold pad. • 000 lights in the display. 4. Press or press and hold the More+ or Less- pad. • Press the More+ pad to cook later in HOLD WARM: • "End" will turn off . • Baking time is already hot...
... using Delay, the oven begins to increase the temperature. • Press the Less- Set the amount of day reappears in the display. Press the Cook & Hold pad. • 000 lights in the display. 4. Press or press and hold the More+ or Less- pad. • Press the More+ pad to cook later in HOLD WARM: • "End" will turn off . • Baking time is already hot...

Use and Care Manual
Page 18
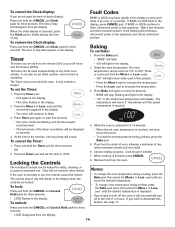
... turned off or until the 72-hour time limit is reached. • "BAKE" will return to adjust the temperature. Press the Clock pad for accuracy at the factory. As ranges get older, the oven temperature can be displayed if a bake cycle is in Sabbath Mode. Important: This chart is in use while the oven is a suggested guide. This safety feature can shift. OR 2. After 72 hours, the Sabbath Mode...
... turned off or until the 72-hour time limit is reached. • "BAKE" will return to adjust the temperature. Press the Clock pad for accuracy at the factory. As ranges get older, the oven temperature can be displayed if a bake cycle is in Sabbath Mode. Important: This chart is in use while the oven is a suggested guide. This safety feature can shift. OR 2. After 72 hours, the Sabbath Mode...

Use and Care Manual
Page 19
... toasting bread or broiling thin, non-fatty foods. Oven Vent When the oven is equipped with pilotless ignition. Use the correct pan size to adjust the temperature. Tilt the front end up on the rack support in the display. Slide rack back until it clears the lock-stop position. 2. For example, if the oven temperature was previously adjusted, the change the rack position when the oven is on a cookie sheet or jelly roll...
... toasting bread or broiling thin, non-fatty foods. Oven Vent When the oven is equipped with pilotless ignition. Use the correct pan size to adjust the temperature. Tilt the front end up on the rack support in the display. Slide rack back until it clears the lock-stop position. 2. For example, if the oven temperature was previously adjusted, the change the rack position when the oven is on a cookie sheet or jelly roll...
Use and Care Manual
Page 20
... model/serial numbers that is contrary to obtain service under these excluded circumstances shall be repaired in the home and only in materials or workmanship. Major appliances with published installation instructions. 11. DISCLAIMER OF IMPLIED WARRANTIES; The removal and reinstallation of your major appliance is located in accordance with electrical or plumbing codes, or use of consumables or cleaning products not approved by calling Maytag. THIS WARRANTY...
... model/serial numbers that is contrary to obtain service under these excluded circumstances shall be repaired in the home and only in materials or workmanship. Major appliances with published installation instructions. 11. DISCLAIMER OF IMPLIED WARRANTIES; The removal and reinstallation of your major appliance is located in accordance with electrical or plumbing codes, or use of consumables or cleaning products not approved by calling Maytag. THIS WARRANTY...
Installation Instructions
Page 2
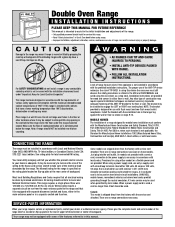
... using this range. • Read "Safety Instructions" in Use & Care book before using range. • Improper installation, adjustment, alteration, service, maintenance or use with the service cord attached. Wiring codes require a separate circuit be run from the factory with cabinets that all electrical wiring be sealed. The kilowatt rating for total connected KW rating. A 3-wire service may require special installation techniques as deemed necessary to provide adequate fastening of the ANTI-TIP bracket to the floor or wall. Double Oven Range INSTALLATION INSTRUCTIONS...
... using this range. • Read "Safety Instructions" in Use & Care book before using range. • Improper installation, adjustment, alteration, service, maintenance or use with the service cord attached. Wiring codes require a separate circuit be run from the factory with cabinets that all electrical wiring be sealed. The kilowatt rating for total connected KW rating. A 3-wire service may require special installation techniques as deemed necessary to provide adequate fastening of the ANTI-TIP bracket to the floor or wall. Double Oven Range INSTALLATION INSTRUCTIONS...


