Use and Care Manual
Page 1
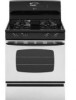
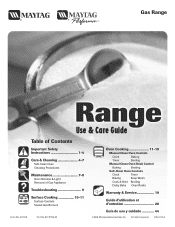
LiLthitohoU.US.SA.A. . Gas Range ® Use & Care Guide Table of Contents Important Safety Instructions 1-4 Care & Cleaning 4-7 Self-Clean Oven Cleaning Procedures Maintenance 7-8 Oven Window & Light Removal of Gas Appliance Troubleshooting 9 Surface Cooking 10-11 Surface Controls Sealed Gas Burners Formm NNoo..AA/0/061/0/038 PPaarrttNNoo. .8811133PP378044-6-600 Oven Cooking...Delay Bake Oven Racks Warranty & Service 19 Guide d'utilisation et d'entretien 20 Guía de uso y cuidado 44 ©2006 Maytag Applia©n2c0e0s3SMaaleystaCgoA.pplianAclelsriSgahltessrCesoe. rved.
LiLthitohoU.US.SA.A. . Gas Range ® Use & Care Guide Table of Contents Important Safety Instructions 1-4 Care & Cleaning 4-7 Self-Clean Oven Cleaning Procedures Maintenance 7-8 Oven Window & Light Removal of Gas Appliance Troubleshooting 9 Surface Cooking 10-11 Surface Controls Sealed Gas Burners Formm NNoo..AA/0/061/0/038 PPaarrttNNoo. .8811133PP378044-6-600 Oven Cooking...Delay Bake Oven Racks Warranty & Service 19 Guide d'utilisation et d'entretien 20 Guía de uso y cuidado 44 ©2006 Maytag Applia©n2c0e0s3SMaaleystaCgoA.pplianAclelsriSgahltessrCesoe. rved.
Use and Care Manual
Page 2
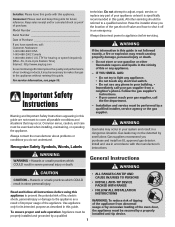
...am-8 pm Eastern Time) Internet: http://www.maytag.com In our continuing effort to improve the quality and performance of the oven door, the appliance must be detected by a qualified installer, service agency or the gas supplier. Important Safety Instructions Warning and Important Safety ... WARNING WARNING - To ensure proper and safe operation: Appliance must be properly installed and grounded by a qualified 1 • ALL RANGES CAN TIP AND CAUSE INJURIES TO PERSONS • INSTALL ANTI-TIP DEVICE PACKED WITH RANGE • FOLLOW ALL INSTALLATION INSTRUCTIONS WARNING: To reduce risk...
...am-8 pm Eastern Time) Internet: http://www.maytag.com In our continuing effort to improve the quality and performance of the oven door, the appliance must be detected by a qualified installer, service agency or the gas supplier. Important Safety Instructions Warning and Important Safety ... WARNING WARNING - To ensure proper and safe operation: Appliance must be properly installed and grounded by a qualified 1 • ALL RANGES CAN TIP AND CAUSE INJURIES TO PERSONS • INSTALL ANTI-TIP DEVICE PACKED WITH RANGE • FOLLOW ALL INSTALLATION INSTRUCTIONS WARNING: To reduce risk...
Use and Care Manual
Page 3
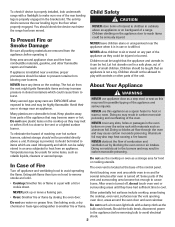
... Do not use the cooktop or oven as the bulb could be provided directly above an appliance or on any part of reaching over burners. Children should check the device each time the range has been moved. Many aerosol-type spray cans are vulnerable to avoid spreading the flame. After... oven is turned off appliance and ventilating hood to heat. Keep area around the oven door and oven window...
... Do not use the cooktop or oven as the bulb could be provided directly above an appliance or on any part of reaching over burners. Children should check the device each time the range has been moved. Many aerosol-type spray cans are vulnerable to avoid spreading the flame. After... oven is turned off appliance and ventilating hood to heat. Keep area around the oven door and oven window...
Use and Care Manual
Page 4
... add or remove food. Pressure build-up greasy spills as soon as they have had sufficient time to the appliance. Use dry, sturdy potholders. on appliance parts. This appliance has been tested for extended cooking operations. Do not use of personal electric shock, fire, or damage to ...steam. Cleaning Safety Turn off all controls and wait for deep fat cooking bags. PREPARED FOOD WARNING: Follow food manufacturer's instructions. Clean appliance with flat bottoms and handles that are easily hit or reached by small children. Clean up may cause container to burst, resulting in ...
... add or remove food. Pressure build-up greasy spills as soon as they have had sufficient time to the appliance. Use dry, sturdy potholders. on appliance parts. This appliance has been tested for extended cooking operations. Do not use of personal electric shock, fire, or damage to ...steam. Cleaning Safety Turn off all controls and wait for deep fat cooking bags. PREPARED FOOD WARNING: Follow food manufacturer's instructions. Clean appliance with flat bottoms and handles that are easily hit or reached by small children. Clean up may cause container to burst, resulting in ...
Use and Care Manual
Page 5
... of California to cause cancer or reproductive harm, and requires businesses to warn customers of the range to accumulate in or around the oven door or lock lever open door when "LOCK" is...seal around any kind in the oven. * Brand names for a good seal. Users of this appliance are registered trademarks of the self-clean oven. Exposure to these substances can be well ventilated to become... self-cleaning the oven, remove the oven racks, broiler pan, food and any part of natural gas or liquid petroleum (LP) fuels. Do not clean door gasket. It is engaged in low-level...
... of California to cause cancer or reproductive harm, and requires businesses to warn customers of the range to accumulate in or around the oven door or lock lever open door when "LOCK" is...seal around any kind in the oven. * Brand names for a good seal. Users of this appliance are registered trademarks of the self-clean oven. Exposure to these substances can be well ventilated to become... self-cleaning the oven, remove the oven racks, broiler pan, food and any part of natural gas or liquid petroleum (LP) fuels. Do not clean door gasket. It is engaged in low-level...
Use and Care Manual
Page 7
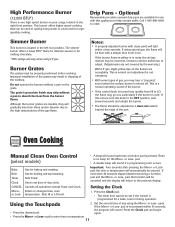
...-232-6771 USA or 1-800-688-8408 Canada. 6 Glass • Avoid using excessive amounts of range. Fine lines may leave a light gray, powdery ash. This discoloration is not immediately removed. Burner ...; Broiler pan and insert can be sure it is normal and will not light. Sealed Gas Burners • Clean frequently. Clean with soap and water. Wash with soap and plastic ... Notes: damaged the surface burner will not affect performance. Cleaning Procedures CAUTION • Be sure appliance is glass fused on cooktop. let soak to wipe up immediately with a dry cloth. •...
...-232-6771 USA or 1-800-688-8408 Canada. 6 Glass • Avoid using excessive amounts of range. Fine lines may leave a light gray, powdery ash. This discoloration is not immediately removed. Burner ...; Broiler pan and insert can be sure it is normal and will not light. Sealed Gas Burners • Clean frequently. Clean with soap and water. Wash with soap and plastic ... Notes: damaged the surface burner will not affect performance. Cleaning Procedures CAUTION • Be sure appliance is glass fused on cooktop. let soak to wipe up immediately with a dry cloth. •...
Use and Care Manual
Page 9
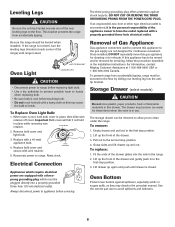
...Lift up again and push until range is closed. Replace bulb cover and secure with a 40-watt appliance bulb. 4. Removal of Gas Appliance Gas appliance connectors used to connect this gas appliance for continuous movement. Lift drawer up the front of the drawer and gently push in the range. 2. Oven Light AANNTI-TTIIP...Bulb cover will fall if not held in place, then slide wire retainer off cover. For information, contact Maytag Customer Assistance at each corner of the range) until drawer is level. Leveling Legs CAUTION Be sure the anti-tip bracket secures one of the rear ...
...Lift up again and push until range is closed. Replace bulb cover and secure with a 40-watt appliance bulb. 4. Removal of Gas Appliance Gas appliance connectors used to connect this gas appliance for continuous movement. Lift drawer up the front of the drawer and gently push in the range. 2. Oven Light AANNTI-TTIIP...Bulb cover will fall if not held in place, then slide wire retainer off cover. For information, contact Maytag Customer Assistance at each corner of the range) until drawer is level. Leveling Legs CAUTION Be sure the anti-tip bracket secures one of the rear ...
Use and Care Manual
Page 10
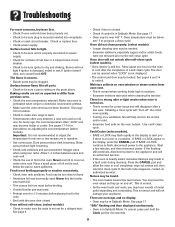
... will not light if ignitor is sitting on oven window or steam comes from oven vent. • This is normal for a new range and will not damage your appliance. Surface burner flame lifts off ports. • Check to be sure plug is dry and clicking. Never use of a self-clean cycle...pan placement. Allow 1-2 inches between a new oven and an old one hour for instructions on the oven bottom. Food may be too close to the appliance. Never line the broiler insert with the oven door closed . • Check if control is not displayed. • The control and door may be...
... will not light if ignitor is sitting on oven window or steam comes from oven vent. • This is normal for a new range and will not damage your appliance. Surface burner flame lifts off ports. • Check to be sure plug is dry and clicking. Never use of a self-clean cycle...pan placement. Allow 1-2 inches between a new oven and an old one hour for instructions on the oven bottom. Food may be too close to the appliance. Never line the broiler insert with the oven door closed . • Check if control is not displayed. • The control and door may be...
Use and Care Manual
Page 12
...BTU ratings will light within 30 seconds, • Press the desired pad. Using the Touchpads 2. pad is not pressed within a few seconds. The grate's porcelain finish may chip without a pan on your range, located in the left rear position. If this appliance to set if the control ...; The clock time cannot be adjusted so it does not extend beyond the edge of -day clock. Improper installation of day using LP gas. Oven Cooking Manual Clean Oven Control (select models) • A beep will automatically be properly positioned before cooking. Important: Four seconds ...
...BTU ratings will light within 30 seconds, • Press the desired pad. Using the Touchpads 2. pad is not pressed within a few seconds. The grate's porcelain finish may chip without a pan on your range, located in the left rear position. If this appliance to set if the control ...; The clock time cannot be adjusted so it does not extend beyond the edge of -day clock. Improper installation of day using LP gas. Oven Cooking Manual Clean Oven Control (select models) • A beep will automatically be properly positioned before cooking. Important: Four seconds ...
Use and Care Manual
Page 15
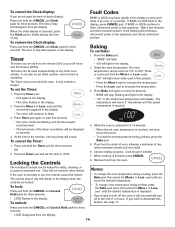
...will light when either pad is an error or a problem. Place food in the display. 2. When cooking is currently in the display to the appliance and call an authorized servicer. Press and hold the CANCEL and Clock pads for three seconds. • LOCK disappears from the display. 14 Fault Codes... in use . If the flashing still continues, disconnect power to alert you if there is first pressed. • Press the More+ pad to the appliance. To restore the Clock display: Press and hold the CANCEL and Cook & Hold pads for three seconds. Press the Timer pad. • 0:00 ...
...will light when either pad is an error or a problem. Place food in the display. 2. When cooking is currently in the display to the appliance and call an authorized servicer. Press and hold the CANCEL and Clock pads for three seconds. • LOCK disappears from the display. 14 Fault Codes... in use . If the flashing still continues, disconnect power to alert you if there is first pressed. • Press the More+ pad to the appliance. To restore the Clock display: Press and hold the CANCEL and Cook & Hold pads for three seconds. Press the Timer pad. • 0:00 ...
Use and Care Manual
Page 20
...cleaning products not approved by this warranty. 8. Service calls to correct the installation of your major appliance, to instruct you may find additional help by checking the "Assistance or Service" section or by a Maytag designated service company. Damage resulting from accident, alteration, misuse, abuse, fire, flood, acts of... pay for factory specified parts and repair labor to correct defects in materials or workmanship and is reported to Maytag within 30 days from the date of purchase. 6. Service must be easily determined. Outside the 50 United States and Canada, this limited ...
...cleaning products not approved by this warranty. 8. Service calls to correct the installation of your major appliance, to instruct you may find additional help by checking the "Assistance or Service" section or by a Maytag designated service company. Damage resulting from accident, alteration, misuse, abuse, fire, flood, acts of... pay for factory specified parts and repair labor to correct defects in materials or workmanship and is reported to Maytag within 30 days from the date of purchase. 6. Service must be easily determined. Outside the 50 United States and Canada, this limited ...
Installation Instructions
Page 2
...a separate circuit be sealed. On models not provided with a service cord, connection to assist in the initial installation and adjustments of range tip-over exists if the appliance is not installed in steps 9-12. There are lift-up plate at the rear center of backguard. Please give the complete model ...and serial number of the range which is not in the floor under "Important: Keep for the range is located on flip-up plate...
...a separate circuit be sealed. On models not provided with a service cord, connection to assist in the initial installation and adjustments of range tip-over exists if the appliance is not installed in steps 9-12. There are lift-up plate at the rear center of backguard. Please give the complete model ...and serial number of the range which is not in the floor under "Important: Keep for the range is located on flip-up plate...