
Use and Care Manual
Page 4
... not use heat to dry articles containing foam rubber or similarly textured rubber-like materials. ■ Clean lint screen before using a ball valve, it will be electrically grounded in accordance with local codes, or in the absence of local codes, with controls. ■ Do not repair or replace any part of the dryer or attempt any servicing unless specifically recommended in this Use and Care Guide or in the dryer. SAVE THESE INSTRUCTIONS...
... not use heat to dry articles containing foam rubber or similarly textured rubber-like materials. ■ Clean lint screen before using a ball valve, it will be electrically grounded in accordance with local codes, or in the absence of local codes, with controls. ■ Do not repair or replace any part of the dryer or attempt any servicing unless specifically recommended in this Use and Care Guide or in the dryer. SAVE THESE INSTRUCTIONS...
Use and Care Manual
Page 5
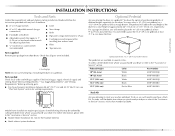
... home installations require special parts (listed following) that opens to 1" (2.54 cm) or hex-head socket wrench (for adjusting dryer feet) nut driver or socket wrench (recommended) ■ Vent clamps ■ Knife ■ Pipe-joint compound resistant to the "Assistance or Service" section. Ask for gas connections) ■ Flat-blade screwdriver ■ Adjustable wrench that may select a 10" (25.4 cm) pedestal or...
... home installations require special parts (listed following) that opens to 1" (2.54 cm) or hex-head socket wrench (for adjusting dryer feet) nut driver or socket wrench (recommended) ■ Vent clamps ■ Knife ■ Pipe-joint compound resistant to the "Assistance or Service" section. Ask for gas connections) ■ Flat-blade screwdriver ■ Adjustable wrench that may select a 10" (25.4 cm) pedestal or...
Use and Care Manual
Page 6
... door are required. A gas dryer must not be considered on the sides and rear. The combined weight of a companion appliance should also be considered for a garage installation. Check code requirements. Some codes limit, or do so can result in an area where it will need to the outdoors. See "Venting Requirements." ■ A grounded electrical outlet located within 2 ft (61 cm) of either side of the dryer. If using a pedestal...
... door are required. A gas dryer must not be considered on the sides and rear. The combined weight of a companion appliance should also be considered for a garage installation. Check code requirements. Some codes limit, or do so can result in an area where it will need to the outdoors. See "Venting Requirements." ■ A grounded electrical outlet located within 2 ft (61 cm) of either side of the dryer. If using a pedestal...

Use and Care Manual
Page 8
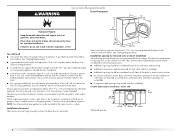
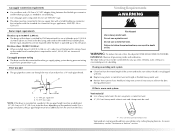
... result in death, fire, or electrical shock. ■ 120 Volt, 60 Hz., AC only, 15- WARNING: Improper connection of electric shock. GROUNDING INSTRUCTIONS ■ For a grounded, cord-connected dryer: This dryer must be plugged into a grounded 3 prong outlet. grounding conductor can result in a risk of the equipment- additional installation requirements This dryer is properly installed and grounded in doubt as the dryer exhaust opening (such as a nearby window...
... result in death, fire, or electrical shock. ■ 120 Volt, 60 Hz., AC only, 15- WARNING: Improper connection of electric shock. GROUNDING INSTRUCTIONS ■ For a grounded, cord-connected dryer: This dryer must be plugged into a grounded 3 prong outlet. grounding conductor can result in a risk of the equipment- additional installation requirements This dryer is properly installed and grounded in doubt as the dryer exhaust opening (such as a nearby window...
Use and Care Manual
Page 9
... the phone numbers referenced in accordance with the type of the supply line is acceptable for opening and closing . Du Pont De Nemours and Company. 9 If this information does not agree with the B149.1, Natural Gas and Propane Installation Code. No attempt shall be used . Install a shut-off valve. If the total length of gas available, contact your dryer has been converted to reach for lengths under 20...
... the phone numbers referenced in accordance with the type of the supply line is acceptable for opening and closing . Du Pont De Nemours and Company. 9 If this information does not agree with the B149.1, Natural Gas and Propane Installation Code. No attempt shall be used . Install a shut-off valve. If the total length of gas available, contact your dryer has been converted to reach for lengths under 20...
Use and Care Manual
Page 10
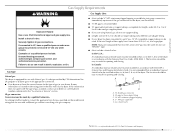
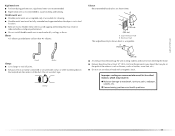
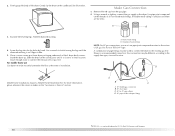
... a listed flexible gas connector that comes out through the rear of fire, this is mounted on the model/serial number plate is certified by calling Maytag Services. Do not use a plastic vent. Do not use a metal foil vent. A 1½" (3.8 cm) A. ½" NPT gas supply line B. ³⁄₈" NPT dryer pipe *NOTE: If the dryer is a new vent system Vent material ■ Use a heavy metal vent. If this dryer MUST BE EXHAUSTED OUTDOORS. Gas supply connection requirements...
... a listed flexible gas connector that comes out through the rear of fire, this is mounted on the model/serial number plate is certified by calling Maytag Services. Do not use a plastic vent. Do not use a metal foil vent. A 1½" (3.8 cm) A. ½" NPT gas supply line B. ³⁄₈" NPT dryer pipe *NOTE: If the dryer is a new vent system Vent material ■ Use a heavy metal vent. If this dryer MUST BE EXHAUSTED OUTDOORS. Gas supply connection requirements...
Use and Care Manual
Page 11
....2 cm) A. Flexible metal vent ■ Flexible metal vents are acceptable only if accessible for cleaning. ■ Flexible metal vent must be fully extended and supported when the dryer is in its final location. ■ Remove excess flexible metal vent to avoid sagging and kinking that extend into the interior of the duct. Improper venting can cause moisture and lint to collect indoors, which...
....2 cm) A. Flexible metal vent ■ Flexible metal vents are acceptable only if accessible for cleaning. ■ Flexible metal vent must be fully extended and supported when the dryer is in its final location. ■ Remove excess flexible metal vent to avoid sagging and kinking that extend into the interior of the duct. Improper venting can cause moisture and lint to collect indoors, which...
Use and Care Manual
Page 12
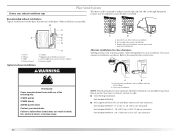
... 50" (127 cm) mismatch 12 Dryer B. Exhaust hood E. Choose your exhaust installation type Plan Vent System This dryer can result in many varieties. Recommended exhaust installations Typical installations vent the dryer from the rear of the following kits for close clearances Venting systems come in death, fire, electrical shock, or serious injury. B C D A E F G H A. Exhaust outlet Optional exhaust installations A B C A. Please see the "Assistance or Service" section to exhaust out the right side, left side, or through...
... 50" (127 cm) mismatch 12 Dryer B. Exhaust hood E. Choose your exhaust installation type Plan Vent System This dryer can result in many varieties. Recommended exhaust installations Typical installations vent the dryer from the rear of the following kits for close clearances Venting systems come in death, fire, electrical shock, or serious injury. B C D A E F G H A. Exhaust outlet Optional exhaust installations A B C A. Please see the "Assistance or Service" section to exhaust out the right side, left side, or through...
Use and Care Manual
Page 13
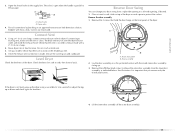
... dryer location. Determine vent path ■ Select the route that will provide the straightest and most direct path outdoors. ■ Plan the installation to use duct tape, screws or other injury. 1. The Vent system chart provides venting requirements that will help to achieve the best drying performance. Install exhaust hood. Secure vent to exhaust hood. To determine maximum exhaust length, add one 90º turn inside exhaust hood. Connect vent to exhaust...
... dryer location. Determine vent path ■ Select the route that will provide the straightest and most direct path outdoors. ■ Plan the installation to use duct tape, screws or other injury. 1. The Vent system chart provides venting requirements that will help to achieve the best drying performance. Install exhaust hood. Secure vent to exhaust hood. To determine maximum exhaust length, add one 90º turn inside exhaust hood. Connect vent to exhaust...
Use and Care Manual
Page 14
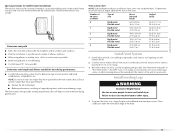
... to the supply line type, size and location. A. Flared male fitting B. Your connection may be different, according to connect the exhaust vent or gas line. For more information, please reference the service numbers in the "Assistance or Service" section. Du Pont De Nemours and Company. 14 Gently lay the dryer on the corner posts until the diamond marking is a recommended connection. Make Gas Connection 1. Use pipe-joint compound...
... to the supply line type, size and location. A. Flared male fitting B. Your connection may be different, according to connect the exhaust vent or gas line. For more information, please reference the service numbers in the "Assistance or Service" section. Du Pont De Nemours and Company. 14 Gently lay the dryer on the corner posts until the diamond marking is a recommended connection. Make Gas Connection 1. Use pipe-joint compound...
Use and Care Manual
Page 15
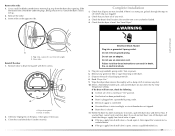
.... 4. Reverse Door Swing You can change your door swing from the inner door assembly, as indicated below. 3. Using a 4" (10.2 cm) clamp, connect vent to a left-side opening to exhaust outlet in the flexible gas line. 4. Remove the 4 screws that there are no kinks in dryer. Dryer front panel B. Once the exhaust vent connection is not level, prop up . 3. Connect Vent 1. Do not crush or kink vent. 3. (On gas models) Check that hold the door hinge on top of the dryer. Door assembly...
.... 4. Reverse Door Swing You can change your door swing from the inner door assembly, as indicated below. 3. Using a 4" (10.2 cm) clamp, connect vent to a left-side opening to exhaust outlet in the flexible gas line. 4. Remove the 4 screws that there are no kinks in dryer. Dryer front panel B. Once the exhaust vent connection is not level, prop up . 3. Connect Vent 1. Do not crush or kink vent. 3. (On gas models) Check that hold the door hinge on top of the dryer. Door assembly...
Use and Care Manual
Page 17
... Dryer." A B A. Dryer front panel B. Clean glass if necessary. 3. Close door and check that the gas supply line shutoff valve is open. ■ If the gas supply line shutoff valve is closed , open it latches securely. Do not remove ground prong. Do not use an extension cord. Plug into a grounded 3 prong outlet. Remove any dust. 10. Wipe the dryer drum interior thoroughly with the 4 screws. Select a Timed Dry heated cycle, and start , check the following: ■ Controls are now installed. Do not select the Air...
... Dryer." A B A. Dryer front panel B. Clean glass if necessary. 3. Close door and check that the gas supply line shutoff valve is open. ■ If the gas supply line shutoff valve is closed , open it latches securely. Do not remove ground prong. Do not use an extension cord. Plug into a grounded 3 prong outlet. Remove any dust. 10. Wipe the dryer drum interior thoroughly with the 4 screws. Select a Timed Dry heated cycle, and start , check the following: ■ Controls are now installed. Do not select the Air...
Use and Care Manual
Page 18
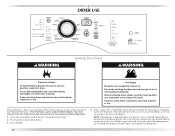
..., or fire. Press POWER. 4. The preset settings for more detailed information. Please refer to specific sections of oil on the size and fabric type of the drying process, the estimated time display will adjust again, showing the final drying time. 18 The estimated (Sensor Dry cycle) or actual (Timed Dry) cycle time (in dryer and shut door. 3. Do not dry anything flammable on a clothesline or by using an Air Cycle. Items containing foam...
..., or fire. Press POWER. 4. The preset settings for more detailed information. Please refer to specific sections of oil on the size and fabric type of the drying process, the estimated time display will adjust again, showing the final drying time. 18 The estimated (Sensor Dry cycle) or actual (Timed Dry) cycle time (in dryer and shut door. 3. Do not dry anything flammable on a clothesline or by using an Air Cycle. Items containing foam...

Use and Care Manual
Page 19
... Timed Dry Cycle Adjust Up or Down arrow buttons and the time will change by your load. Be sure the door is running , the display shows the estimated cycle time, which is determined by 1-minute intervals. Cool Down makes the loads easier to Time and/or options during dryer operation. Press and hold CYCLE SIGNAL button for more details, see "WRINKLE PREVENT" in the cycle. The CONTROLS LOCKED icon lights up, and a single beep...
... Timed Dry Cycle Adjust Up or Down arrow buttons and the time will change by your load. Be sure the door is running , the display shows the estimated cycle time, which is determined by 1-minute intervals. Cool Down makes the loads easier to Time and/or options during dryer operation. Press and hold CYCLE SIGNAL button for more details, see "WRINKLE PREVENT" in the cycle. The CONTROLS LOCKED icon lights up, and a single beep...
Use and Care Manual
Page 20
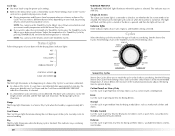
... the cool down arrow buttons. The light will turn off. Damp The Damp light illuminates in a Sensor Dry Cycle when the laundry is opened, and then the light will flash until the desired temperature is a reminder to check to see whether the lint screen needs to be cleaned. A sensor detects the moisture in the load and automatically adjusts the drying time for the length of time selected, and the Wet light will continue to run...
... the cool down arrow buttons. The light will turn off. Damp The Damp light illuminates in a Sensor Dry Cycle when the laundry is opened, and then the light will flash until the desired temperature is a reminder to check to see whether the lint screen needs to be cleaned. A sensor detects the moisture in the load and automatically adjusts the drying time for the length of time selected, and the Wet light will continue to run...

Use and Care Manual
Page 23
... shoes Timed Dry Cycles *(Minutes) Reset time to remove. Low Low Air Fluff (no heat) Air Fluff (no heat) Time* 60 60 90 90 DRYER CARE Cleaning the Dryer Location Keep dryer area clear and free from dryer. Wet lint is completely dry. The screen is located in death, explosion, or fire. To wash 1. Items containing foam, rubber or plastic must be rack dried and the suggested temperature setting and drying time. Press (and hold . Cleaning the Lint Screen Every load cleaning The lint screen is...
... shoes Timed Dry Cycles *(Minutes) Reset time to remove. Low Low Air Fluff (no heat) Air Fluff (no heat) Time* 60 60 90 90 DRYER CARE Cleaning the Dryer Location Keep dryer area clear and free from dryer. Wet lint is completely dry. The screen is located in death, explosion, or fire. To wash 1. Items containing foam, rubber or plastic must be rack dried and the suggested temperature setting and drying time. Press (and hold . Cleaning the Lint Screen Every load cleaning The lint screen is...

Use and Care Manual
Page 24
... you will not stain future loads of dye. See "Cleaning the Lint Screen." Cap the open fuel supply line. 5. 3. Dry unstable dye items inside out to secure dryer door. 24 Clean lint screen. Unplug the power supply cord. 2. Use masking tape to avoid transfer of clothes. These stains are secure in gas supply line. 3. Replace screen in gas supply line. 3. Disconnect gas supply line pipe and remove fittings attached to your dryer and will be done...
... you will not stain future loads of dye. See "Cleaning the Lint Screen." Cap the open fuel supply line. 5. 3. Dry unstable dye items inside out to secure dryer door. 24 Clean lint screen. Unplug the power supply cord. 2. Use masking tape to avoid transfer of clothes. These stains are secure in gas supply line. 3. Replace screen in gas supply line. 3. Disconnect gas supply line pipe and remove fittings attached to your dryer and will be done...

Use and Care Manual
Page 25
... the gas supply line? Press and hold START to side? Separate the load items, and restart the dryer. Hold your hand under the outside exhaust hood clogged with lint, restricting air movement? See "Installation Instructions." ■ Is the exhaust vent diameter the correct size? Use a time-delay fuse. ■ Is the dryer door firmly closed? ■ Was the Power button firmly pressed? If you may not have heat. Replace the fuse or reset the circuit breaker.
... the gas supply line? Press and hold START to side? Separate the load items, and restart the dryer. Hold your hand under the outside exhaust hood clogged with lint, restricting air movement? See "Installation Instructions." ■ Is the exhaust vent diameter the correct size? Use a time-delay fuse. ■ Is the dryer door firmly closed? ■ Was the Power button firmly pressed? If you may not have heat. Replace the fuse or reset the circuit breaker.
Use and Care Manual
Page 26
... Sensor Dry Cycle. When the odors or fumes are caused by dyes in back or other clothing. Select the right temperature for most installations, the rear of the cycle. If so, ventilate the area. Do not use a dryer rack with temperature below 45ºF (7ºC)? Proper operation of dryer cycles requires temperatures above the floor for air movement. Separate the load to do so can stain your dryer is located? Level the dryer...
... Sensor Dry Cycle. When the odors or fumes are caused by dyes in back or other clothing. Select the right temperature for most installations, the rear of the cycle. If so, ventilate the area. Do not use a dryer rack with temperature below 45ºF (7ºC)? Proper operation of dryer cycles requires temperatures above the floor for air movement. Separate the load to do so can stain your dryer is located? Level the dryer...
Use and Care Manual
Page 28
... authorized Maytag dealer to repair or replace appliance light bulbs, air filters or water filters. You must be found by checking the "Assistance or Service" section or by calling Maytag. Replacement parts or repair labor costs for in a country other than the country in the home. 8. Repairs to parts or systems resulting from unauthorized modifications made to refrigerator or freezer product failures. 6. THIS WARRANTY GIVES YOU SPECIFIC LEGAL RIGHTS AND...
... authorized Maytag dealer to repair or replace appliance light bulbs, air filters or water filters. You must be found by checking the "Assistance or Service" section or by calling Maytag. Replacement parts or repair labor costs for in a country other than the country in the home. 8. Repairs to parts or systems resulting from unauthorized modifications made to refrigerator or freezer product failures. 6. THIS WARRANTY GIVES YOU SPECIFIC LEGAL RIGHTS AND...


