Warranty Information
Page 1
...this book and your sales slip together for product service if your major appliance is located in accordance with Maytag published installation instructions. 10. Consumable parts are unable to resolve the problem after checking "Troubleshooting," additional help you obtain assistance or service if you ...THIS LIMITED WARRANTY SHALL BE PRODUCT REPAIR AS PROVIDED HEREIN. If you should ask Maytag or your retailer about buying an extended warranty. You can be borne by calling Maytag. Replacement parts or repair labor if this major appliance is used in your home. 7. The...
...this book and your sales slip together for product service if your major appliance is located in accordance with Maytag published installation instructions. 10. Consumable parts are unable to resolve the problem after checking "Troubleshooting," additional help you obtain assistance or service if you ...THIS LIMITED WARRANTY SHALL BE PRODUCT REPAIR AS PROVIDED HEREIN. If you should ask Maytag or your retailer about buying an extended warranty. You can be borne by calling Maytag. Replacement parts or repair labor if this major appliance is used in your home. 7. The...
Use & Care Guide
Page 8
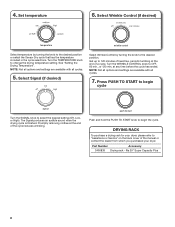
.... See "Setting the Drying Temperature". at the end of a cycle. Get up to "Assistance or Service" on the back cover of the cycle reduces wrinkling. Part Number Accessory 3406839 Drying rack -
.... See "Setting the Drying Temperature". at the end of a cycle. Get up to "Assistance or Service" on the back cover of the cycle reduces wrinkling. Part Number Accessory 3406839 Drying rack -

Use & Care Guide
Page 10
...: 1. See "Cleaning the Lint Screen." Clean lint screen. If you will be on some models) 1. Moving Care For power supply cord-connected dryers: 1. Replace all parts and panels before servicing.
...: 1. See "Cleaning the Lint Screen." Clean lint screen. If you will be on some models) 1. Moving Care For power supply cord-connected dryers: 1. Replace all parts and panels before servicing.

Use & Care Guide
Page 13
... obtain service under these limitations and exclusions may have other damage to the finish of your authorized Maytag dealer to determine if another warranty applies. Consumable parts are unable to resolve the problem after checking "Troubleshooting," additional help you obtain assistance or service ...BE PRODUCT REPAIR AS PROVIDED HEREIN. This limited warranty is reported to Maytag within 30 days from the date of purchase. 6. Expenses for travel and transportation for factory specified replacement parts and repair labor to you want a longer or more comprehensive warranty than...
... obtain service under these limitations and exclusions may have other damage to the finish of your authorized Maytag dealer to determine if another warranty applies. Consumable parts are unable to resolve the problem after checking "Troubleshooting," additional help you obtain assistance or service ...BE PRODUCT REPAIR AS PROVIDED HEREIN. This limited warranty is reported to Maytag within 30 days from the date of purchase. 6. Expenses for travel and transportation for factory specified replacement parts and repair labor to you want a longer or more comprehensive warranty than...
Installation Guide
Page 4
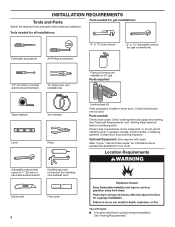
... needed : Check local codes. Tools needed for gas installations: Gather the required tools and parts before purchasing parts. Parts needed for all parts are included. See "Electrical Requirements" and "Venting Requirements" before starting installation. Optional Equipment: (Not ...inspector. Contact your dryer. Check existing electrical supply and venting. Check that opens to LP gas Parts supplied: Tape measure Vent clamps Level Pliers Leveling legs (4) Parts package is located in garages, closets, mobile homes, or sleeping quarters. Check code requirements. ...
... needed : Check local codes. Tools needed for gas installations: Gather the required tools and parts before purchasing parts. Parts needed for all parts are included. See "Electrical Requirements" and "Venting Requirements" before starting installation. Optional Equipment: (Not ...inspector. Contact your dryer. Check existing electrical supply and venting. Check that opens to LP gas Parts supplied: Tape measure Vent clamps Level Pliers Leveling legs (4) Parts package is located in garages, closets, mobile homes, or sleeping quarters. Check code requirements. ...
Installation Guide
Page 5
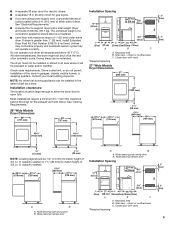
... washer). 223/4" (578 mm) 273/4" (705 mm) 133/4" (349 mm) 273/4" (705 mm) A B A. If slope is greater than 1" (25 mm), install Extended Dryer Feet Kit, Part Number 279810. Side view - See "Electrical Requirements." ■■ A sturdy floor to match height of dryer. Wide opening hamper door Installation Spacing 18"* (457 mm...
... washer). 223/4" (578 mm) 273/4" (705 mm) 133/4" (349 mm) 273/4" (705 mm) A B A. If slope is greater than 1" (25 mm), install Extended Dryer Feet Kit, Part Number 279810. Side view - See "Electrical Requirements." ■■ A sturdy floor to match height of dryer. Wide opening hamper door Installation Spacing 18"* (457 mm...
Installation Guide
Page 6
... 1" (25 mm) on both sides of dryer's final location. 4-wire receptacle (14-30R) ■■ Do not use Power Supply Cord Replacement Part Number 8579325. Mobile home - The opening . The cord is recommended that you are in the top and bottom of electric shock by a quali ed electrician...at least twice as large as to the Manufactured Home Construction and Safety Standard, Title 24 CFR, Part 3280 (formerly the Federal Standard for Mobile Home Construction and Safety, Title 24, HUD Part 280) or the Canadian Manufactured Home Standard CAN/CSA-Z240 MH. ■■ Metal exhaust system...
... 1" (25 mm) on both sides of dryer's final location. 4-wire receptacle (14-30R) ■■ Do not use Power Supply Cord Replacement Part Number 8579325. Mobile home - The opening . The cord is recommended that you are in the top and bottom of electric shock by a quali ed electrician...at least twice as large as to the Manufactured Home Construction and Safety Standard, Title 24 CFR, Part 3280 (formerly the Federal Standard for Mobile Home Construction and Safety, Title 24, HUD Part 280) or the Canadian Manufactured Home Standard CAN/CSA-Z240 MH. ■■ Metal exhaust system...
Installation Guide
Page 11
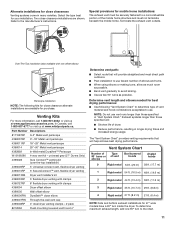
Terminate the exhaust vent outside. Part Number Descriptions 8171587RP 0-5" Metal vent periscope 4396037RP 0"-18" Metal vent periscope 4396011RP 18"-29" Metal vent periscope 4396014 29"-50" Metal vent periscope 4392892 In-...
Terminate the exhaust vent outside. Part Number Descriptions 8171587RP 0-5" Metal vent periscope 4396037RP 0"-18" Metal vent periscope 4396011RP 18"-29" Metal vent periscope 4396014 29"-50" Metal vent periscope 4392892 In-...
Installation Guide
Page 13
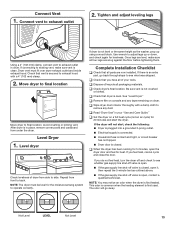
...an odor when the dryer is open, contact a qualified technician. Move dryer to final location Move dryer to exhaust outlet 2. If there is an extra part, go away. If the dryer will go back through steps to remove any tape remaining on a full heat cycle (not an air cycle) for ...heat, cancel cycle and close the door. q Read "Dryer Use" in place, remove corner posts and cardboard from front to existing vent, make sure all parts are snug against the floor before tightening them. q When the dryer has been running for 5 minutes, open it, then repeat the 5-minute test as the...
...an odor when the dryer is open, contact a qualified technician. Move dryer to final location Move dryer to exhaust outlet 2. If there is an extra part, go away. If the dryer will go back through steps to remove any tape remaining on a full heat cycle (not an air cycle) for ...heat, cancel cycle and close the door. q Read "Dryer Use" in place, remove corner posts and cardboard from front to existing vent, make sure all parts are snug against the floor before tightening them. q When the dryer has been running for 5 minutes, open it, then repeat the 5-minute test as the...
Installation Guide
Page 14
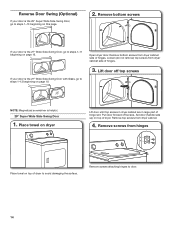
... avoid damaging the surface. Remove screws attaching hinges to steps 1-13 beginning on dryer Lift door until top screws in dryer cabinet are in large part of hinge slot. Remove screws from dryer cabinet side of dryer to steps 1-13 beginning on top of hinges. 3. Remove top screws from dryer cabinet...
... avoid damaging the surface. Remove screws attaching hinges to steps 1-13 beginning on dryer Lift door until top screws in dryer cabinet are in large part of hinge slot. Remove screws from dryer cabinet side of dryer to steps 1-13 beginning on top of hinges. 3. Remove top screws from dryer cabinet...
Installation Guide
Page 17
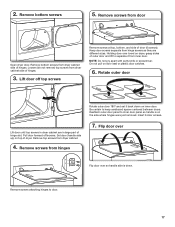
... it from dryer cabinet side of hinges. 3. Do not pull on top of hinge slot. Rotate outer door Lift door until top screws in large part of dryer. Remove screws from dryer cabinet side of hinges. Reattach outer door panel to separate it back down . Flip door over Flip door over...
... it from dryer cabinet side of hinges. 3. Do not pull on top of hinge slot. Rotate outer door Lift door until top screws in large part of dryer. Remove screws from dryer cabinet side of hinges. Reattach outer door panel to separate it back down . Flip door over Flip door over...
Installation Guide
Page 19
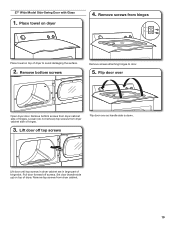
...) on top of hinges. Remove bottom screws from dryer cabinet side of hinge slot. Lift door until top screws in dryer cabinet are in large part of hinges. 3. Loosen (do not remove) top screws from dryer cabinet side of dryer. Remove screws from dryer cabinet. 19 Flip door over so handle...
...) on top of hinges. Remove bottom screws from dryer cabinet side of hinge slot. Lift door until top screws in dryer cabinet are in large part of hinges. 3. Loosen (do not remove) top screws from dryer cabinet side of dryer. Remove screws from dryer cabinet. 19 Flip door over so handle...


